In this tutorial, I’ll show you how to easily export SEO data from your WordPress site, so you’ve got all the details you need right at your fingertips.
This tutorial is a great fit if you’re looking to organize content, track SEO progress, or even clean up some outdated meta descriptions. Let’s dive in and get that data exported!
Exporting SEO Data Using WP CLI
For those comfortable working with the command line, WP CLI (WordPress Command Line Interface) offers an efficient way to export SEO data from your WordPress site. If you have access to WP CLI, you can easily extract key SEO data such as post titles, slugs (URLs), and descriptions.
To start, open your terminal and use the following command to generate a CSV file containing your post titles, slugs, and meta descriptions:
This command will create a CSV that includes:
- Post Title (Title of the post),
- Post Slug (URL of the post),
- Post Excerpt (Meta description, if available).
If you need to export SEO data from pages or other post types, simply replace post with page in the command.
Exporting SEO Data Using an SEO Plugin
If you’re using an SEO plugin like Yoast SEO or RankMath, these tools make it easy to export SEO data with just a few clicks. Both plugins offer built-in export features that allow you to download titles, meta descriptions, and other SEO-related data.
- Yoast SEO:
- Go to the WordPress dashboard.
- Navigate to SEO → Tools → Export SEO Data.
- Choose your preferred format (CSV or Excel) and export your SEO data.
- RankMath:
- Go to RankMath → Status & Tools → Export.
- Download the SEO data as a CSV file.
This method is a simple and effective way to export SEO data, especially if you’re already using one of these popular SEO plugins.
Exporting SEO Data Using a Database Query (Advanced Method)
For those who prefer working directly with the database, you can run a custom SQL query to export SEO data from your WordPress site. This method offers greater flexibility and control over the data you retrieve.
Here’s a basic SQL query to extract post titles, slugs, and SEO descriptions from Yoast SEO:
This query will return:
- Post Title,
- Post Slug,
- SEO Description (from Yoast’s meta description field).
Ensure to replace wp_ with your table prefix if it’s different from the default.
Exporting SEO Data Using Site Crawling Tools (No-Code Solution)
If you’re looking for a no-code solution to export SEO data from your WordPress site, consider using a site crawling tool like Screaming Frog SEO Spider or Sitebulb. These tools provide an easy way to gather SEO data such as page titles, descriptions, and URLs without needing any technical expertise.
Here’s how to use Screaming Frog:
- Download and install Screaming Frog SEO Spider.
- Enter your website URL into the tool and let it crawl your site.
- After the crawl is complete, go to the “Page Titles” and “Meta Description” tabs to view your SEO data.
- Export the data into a CSV file for further analysis.
These tools make it easy to export SEO data from your WordPress site and analyze it with minimal effort.
Conclusion
Now that you know how to export SEO data from your WordPress site, you’ve got the tools to keep things organized and make your SEO efforts more effective. Whether you use WP CLI, an SEO plugin, a database query, or a site crawler, getting access to titles, URLs, and descriptions is a game-changer for staying on top of your content.
And if you want to keep your WordPress site running smoothly and securely, it’s worth checking out our Managed WordPress Hosting service. With automatic updates, top-notch security, and expert support, it’s a great way to make sure your site stays in good shape.
Thanks for reading!
]]>
Link cloaking is important to any website and affiliate marketing strategy. It involves hiding the true destination URL behind a shorter, more attractive link that can be easily shared with others without revealing its underlying source URL.
Link cloaking provides many benefits to affiliate marketers, including improved link click-through rates and enhanced privacy protection for visitors who may not want to reveal where they are clicking through from.
This article discusses link cloaking, its significance, and how to employ WordPress plugins for the purpose of masking links expediently.
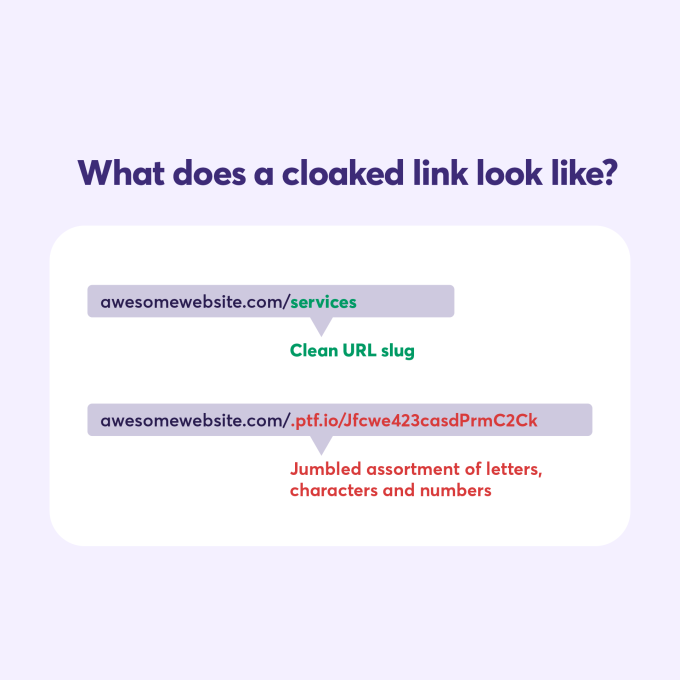
What is Link Cloaking?
Link cloaking is a technique used to mask the original destination of a link. It involves replacing the original URL with an alternative, usually a shorter and more memorable one.
Link cloaking is a strategy utilized to disguise the genuine goal of a connection, making it simpler for individuals to recall and share connections while shielding them from malevolent locales or tricks.
Link cloaking can be done manually or using WordPress plugins.
The main purpose of link cloaking is to protect users from potential risks associated with clicking on unknown links. By obscuring the true destination of a link, you make it harder for hackers or scammers to access your site by exploiting vulnerabilities in your codebase or URLs. Link cloaking also makes URLs shorter and simpler to share, which is helpful for platforms such as email or social media.
Link cloaking is an important technique for webmasters to help protect their affiliate links from being stolen or misused. By using link cloaking, you can also gain valuable insights into the performance of your campaigns and ensure that your customers have a better user experience. Now let’s explore the benefits of link cloaking in more detail.
Benefits of Link Cloaking for Affiliates
The biggest benefit of link cloaking is that it helps affiliate marketers to keep their links short and easy to remember while also protecting the integrity of their affiliate program. Link cloaking allows you to mask a long, ugly URL with a shorter one that looks more professional and won’t get blocked by spam filters or email clients. Link cloaking can help boost the trustworthiness of your website, potentially leading to higher click-through rates on advertisements.
Another benefit of link cloaking is that it gives you control over how people access your content. Creating custom URLs for each campaign allows you to track clicks from different sources and see which performs best. You can even set up redirects so visitors who click on old links still end up at the right page on your site.
Link cloaking provides a security benefit for both parties involved, as malicious users cannot easily guess the destination of their clicks when using cloaked links. Affiliates are safeguarded from potential commission theft via direct access to the merchant’s product page. In contrast, merchants can rest assured that no one links directly to their store’s pages without permission or attribution. All in all, link cloaking is a win-win situation.
Using link cloaking makes it easier for search engines like Google and Bing to index your web pages correctly, as they are not confused by multiple versions of URLs pointing back to the same page. This is because they can recognize only one version at any given time, making sure all traffic goes through it instead of being split between two different URLs leading back to the same place, which could confuse search engine bots resulting in lower rankings or penalties altogether.
Link cloaking is a great way to improve the user experience and protect your affiliate links from being stolen. This next section will discuss how to cloak your links in WordPress for maximum security and convenience.
Cloaking links in WordPress is a great way to protect your affiliate link and ensure you get the credit for any sales. With that said, it’s important to choose the right plugin for cloaking your links; let’s explore some of the best plugins available.
 Earn Extra Money With Little Effort – Join ChemiCloud’s web hosting affiliate program and earn up to $125 for every referral!
Best Link Cloaking Plugins for WordPress
Link cloaking is vital for website administrators, developers, and entrepreneurs, who must guarantee their connections are safe and appropriately advanced. Link cloaking helps you hide your link’s original URL so visitors can’t see or copy it. It also allows you to track clicks on your links, create shorter URLs, and keep your website SEO friendly.
WordPress has a variety of plugins available that allow users to easily cloak their links without coding knowledge. Here we review some of the best link cloaking plugins for WordPress:
1) ThirstyAffiliates
Price: Free, with premium plans available
ThirstyAffiliates is a popular plugin many affiliate marketers and bloggers use to cloak affiliate links in WordPress websites. The plugin has advanced features such as automatic keyword linking, a category-based link management system, detailed click reports, etc., making it ideal for managing multiple affiliate programs within one dashboard.
This plugin provides additional security measures in addition to link cloaking, such as concealing critical files like the wp-config file from external access or obscuring specific parts of code when viewed in the source view. It also boasts a feature called “Cloak Affiliate Links” which masks all outside URLs on posts and pages with one click from its settings page.
2) Pretty Links
Price: Free, with premium plans available
Pretty Links is another popular link cloaking plugins for WordPress with over two million active installations. It offers features such as auto-cloaking, redirection types (301/302/307), tracking clicks on cloaked links, setting up nofollow attributes for cloaked links, creating custom slugs for shortened URLs, and more.
3) Simple URLs
Price: Free
Using the free plugin “Simple URLs” can be a great way to manage and monitor the outgoing links from your website. This plugin allows you to craft cloaked links and shorten longer existing ones to make them more shareable with clients.
It is worth testing a variety of link cloakers WordPress plugins to determine which one best suits your requirements, as performance can vary between different options. Additionally, if you are looking for more advanced features like split testing or A/B testing,, consider investing in a premium plan that offers these additional benefits, comprehensive reporting tools, and analytics capabilities.
In conclusion, these four plugins offer great options for securely hiding outgoing URLs while providing additional benefits such as tracking user activity on those links and generating shortlinks. Select the plugin that best meets your needs based on its capabilities.
How to Cloak Links in WordPress
WordPress has several ways to cloak links – some require coding knowledge while others don’t.
The easiest way to cloak links in WordPress is by using plugins. Many free and premium plugins for WordPress make it easy to cloak URLs with just a few clicks; however, if more advanced features like split testing or AB testing are desired, then an enterprise-level plugin such as Pretty Links Pro should be considered.
Beyond the basic link cloaking functionality, ThirstyAffiliates can also:
- Make managing affiliate links easier by grouping them into categories.
- Automatically nofollow your affiliate links to comply with search engine guidelines.
- Monitor clicks on each link to measure its success.
- Target visitors based on their geographical area (paid feature) and direct them appropriately.
Here’s how to use the plugin to start cloaking affiliate links on your WordPress site.
1) We assume you are already logged into your WordPress admin panel (wp-admin).
2) In the left sidebar, hover on Plugins, then click Add New
4) Type ThirstyAffiliates in the Search Plugins text box and press Enter.
5) Look after the ThirstyAffiliates plugin, and then click Install Now:

6) After the plugin is installed, click on the Activate button
After you have successfully activated the ThirstyAffiliates plugin, one of the first things you will need to set up is your link prefix. This part of a cloaked link appears after the domain name but before the affiliate link slug. To give an example, it would look something like this:
- yourwebsite.com/recommends/wordpress-hosting
- yourwebsite.com/go/chemicloud
7) Head over to the ThirstyAffiliates → Settings and click on the Link Appearance tab. This is where you can decide your link prefix: choose from one of the suggestions or make your own!
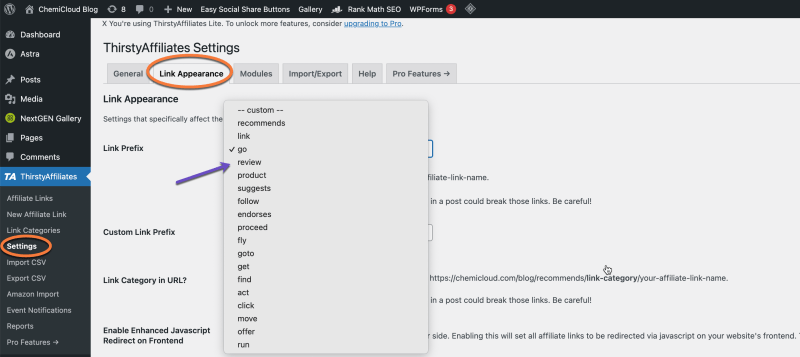
Lower on the page, you can determine whether to insert a nofollow attribute for affiliate links and/or open them in a new browser tab. The choice is yours to make!
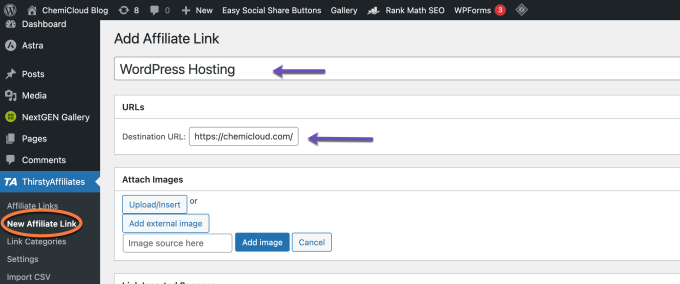
8) Once you’ve chosen your link prefix, go to ThirstyAffiliates → New Affiliate Link to add your first cloaked affiliate link.
I recommend you include a Title for your link: To ensure that you keep track of the link and use it in your content, choose a relevant title to add. From there, paste the affiliate destination URL into the Destination URL box:
9) A great way of managing all your links is by using the Link Categories option. Through this, you can set up brand new categories or select existing categories that would be applicable – much like you would when creating a post!
10) Once you’re done configuring your link, click the Save Link button.
When you complete saving your link, one of the choices offered is Cloaked URL. Generally, ThirstyAffiliates will use the title of your link for the slug. However, you can adjust this manually by selecting the Edit Slug button.
11) Rather than manually creating and inserting affiliate links, you can use the Quick Add Affiliate Link button found in the WordPress TinyMCE editor to add a new link easily:
That’s it! ThirstyAffiliates will automatically use the link title as the anchor text, but you can edit that if desired.
Conclusion
Link cloaking is an essential tool for any affiliate marketer. It helps protect your brand and reputation while giving you greater control over how users access the products or services you promote. With the right link cloaking plugin, WordPress can be a powerful platform to ensure maximum security and efficiency when it comes to managing your affiliate links. Take advantage of this valuable resource today and ensure all your links are cloaked properly.
If you enjoyed this tutorial, then you’ll love our support! All ChemiCloud’s hosting plans include 24/7 support from our amazing support team.
]]>
In recent years, WordPress has been making advances in its development capabilities. The platform is becoming increasingly user-friendly, from automated unit testing to CSS preprocessing and command line tools. One of these features that stands out among the crowd is WP-CLI, an incredibly beneficial asset to any developer. In this article, we’ll take a closer look at what makes WP-CLI so valuable.
For experienced and enthusiastic web developers, this comprehensive guide will help you make your workflows more efficient using WP-CLI.
What is WP-CLI?
WP-CLI, short for WordPress Command Line Interface, is a powerful tool that can be used to manage and maintain your WordPress website from the command line. It offers users a plethora of commands for various functions, like plugin installation, backup generation, core file updating, and many more.
Daniel Bachhuber has been the primary maintainer of the open source project known as ‘WordPress Command Line Interface (or, for short: ‘WP-CLI’) since 2003.
On August 8th, 2018, the new version of the WordPress Command Line Interface (known as “WPC-CLI v2”) became available.
For ChemiCloud customers, WP-CLI version 2.7.1 is readily available on all our Managed WordPress hosting plans; all you need to do is access your account via SSH, and you are good to go!
Installing WP-CLI
The instructions below will be helpful if you don’t have WP-CLI installed on your server. It is essential to ensure your system meets the necessary requirements before installing it. Specifically, users must have a UNIX-like environment (including OS X, Linux, FreeBSD, or Cygwin) and partial support in Windows environments. Moreover, they should have PHP 5.6+ and WordPress 3.7+; however, note that older versions of WordPress may provide lesser functionality.
Once you’ve verified the requirements, download the wp-cli.phar file using wget or curl:
curl -O https://raw.githubusercontent.com/wp-cli/builds/gh-pages/phar/wp-cli.phar
Next, check the Phar file to verify that it’s working:
php wp-cli.phar --info
To use WP-CLI from the command line by typing wp, make the file executable and move it somewhere in your PATH. For example:
chmod +x wp-cli.phar
sudo mv wp-cli.phar /usr/local/bin/wp
If it was installed successfully, you should see something like this when you run wp --info:
[root@rs9-nyc ~]# wp --info
OS: Linux 4.18.0-425.10.1.lve.el7h.x86_64 #1 SMP Wed Jan 25 09:29:40 EST 2023 x86_64
Shell: /bin/bash
PHP binary: /opt/cpanel/ea-php72/root/usr/bin/php
PHP version: 7.2.34
php.ini used: /opt/cpanel/ea-php72/root/etc/php.ini
MySQL binary: /usr/bin/mysql
MySQL version: mysql Ver 15.1 Distrib 10.5.19-MariaDB, for Linux (x86_64) using readline 5.1
SQL modes:
WP-CLI root dir: phar://wp-cli.phar/vendor/wp-cli/wp-cli
WP-CLI vendor dir: phar://wp-cli.phar/vendor
WP_CLI phar path: /root
WP-CLI packages dir:
WP-CLI cache dir: /root/.wp-cli/cache
WP-CLI global config:
WP-CLI project config:
WP-CLI version: 2.7.1
For those using ChemiCloud Managed WordPress hosting, WP-CLI is available right away. Don’t know what version you’re working with? Utilize the wp cli version command to get an answer.
[root@rs9-nyc ~]# wp cli version --allow-root
WP-CLI 2.7.1
Updating WP-CLI
You can update WP-CLI by using wp cli update or repeating the installation steps.
If WP-CLI is owned by root or another system user, you’ll need to run sudo wp cli update.
Managing WordPress
Beginning a command requires wp followed by the desired command, subcommand, and essential and nonessential parameters.
Keep in mind that whatever WordPress directory you are in the terminal is what WP-CLI will work with. If you are using cPanel as the control panel, here’s a great guide on how to find the document root of your WordPress website in cPanel. So, for instance, changing directories to enter a different one may cause you to use another installation of WordPress.
Now let’s explore some practical WP-CLI commands as well as associated examples.
Installing WordPress
To easily install WordPress using WP-CLI, here’s a list of commands that you should use:
# Download WordPress
$ wp core download
Downloading WordPress 6.2 (en_US)...
md5 hash verified: 34f279efe623025641bc11a69e3c02fa
Success: WordPress downloaded.
$ wp core download --locale=nl_NL
Downloading WordPress 4.5.2 (nl_NL)...
md5 hash verified: c5366d05b521831dd0b29dfc386e56a5
Success: WordPress downloaded.
By default, WordPress will be installed using the en_US locale code. In case you wish to install WordPress in a different language, you can use the --locale flag:
$ wp core download --locale=nl_NL
Downloading WordPress 6.2 (nl_NL)...
md5 hash verified: 34f279efe623025641bc11a69e3c02fb
Success: WordPress downloaded.
Here’s a great guide containing a list of all the WordPress Locale codes. (Hint – You can CRTL / CMD + F to find your language).
The second command will set up the wp-config.php configuration file with the database connection details. If you are using cPanel, make sure to create a database first.
$ wp core config --dbname=database_name --dbuser=database_username --dbpass=database_password --dbhost=localhost --dbprefix=mywp_
Success: Generated 'wp-config.php' file.
The third command will install WordPress using a couple of parameters:
# Install WordPress
$ wp core install --url=yourdomain.com --title="My WebSite Title" --admin_user=john.smith --admin_password=strongpassword [email protected]
Success: WordPress installed successfully.
Reinstalling WordPress
You can reinstall WordPress core files using WP-CLI. The following command would download WordPress core without the default themes and plugins.
wp core download --skip-content --force
Running WordPress Core Updates
wp core version
# Display the WordPress version
$ wp core version
6.2
wp core check-update
# Check for WordPress updates
$ wp core check-update
Success: WordPress is at the latest version.
wp core update
# Update WordPress to a newer version
$ wp core update
Updating to version 6.2 (en_US)...
Downloading update from https://downloads.wordpress.org/release/wordpress-6.2-new-bundled.zip...
Unpacking the update...
Cleaning up files...
No files found that need cleaning up.
Success: WordPress updated successfully.
Rollback WordPress to a Previous Version
First, you’ll need to check on the previous WordPress version. You can find all the available versions here.
Suppose you want to roll back WordPress to the 6.0.3 version. The wp-cli command line that you should use is:
wp core update --version=6.0.3 --force
Checking for Missing or Modified WordPress Core Files
wp core verify-checksums – this command verifies WordPress files against WordPress.org’s checksums. It is handy if you suspect your WordPress might be infected with malware or if there are missing WordPress core files.
$ wp core verify-checksums
Warning: File should not exist: wp-admin/error_log
Success: WordPress installation verifies against checksums.
Managing Plugins
Using wp plugin you can easily manage plugins, including installs, activations, and updates.
wp plugin list – get a list of installed WordPress plugins:
$ wp plugin list
+---------+----------+--------+---------+
| name | status | update | version |
+---------+----------+--------+---------+
| akismet | inactive | none | 5.1 |
| hello | inactive | none | 1.7.2 |
+---------+----------+--------+---------+
If you want to see only a list of all active plugins which have updates available, you can use the following:
wp plugin list --field=name --status=active --update=available
wp plugin install – installs one or multiple WordPress plugins
To find the plugin names, you can visit the WordPress Repository and check out the URL. This is an easy way to get the name of a plugin from its repository.
Alternatively, you can use wp plugin search searchterm which will give you a list of the slugs in the terminal.

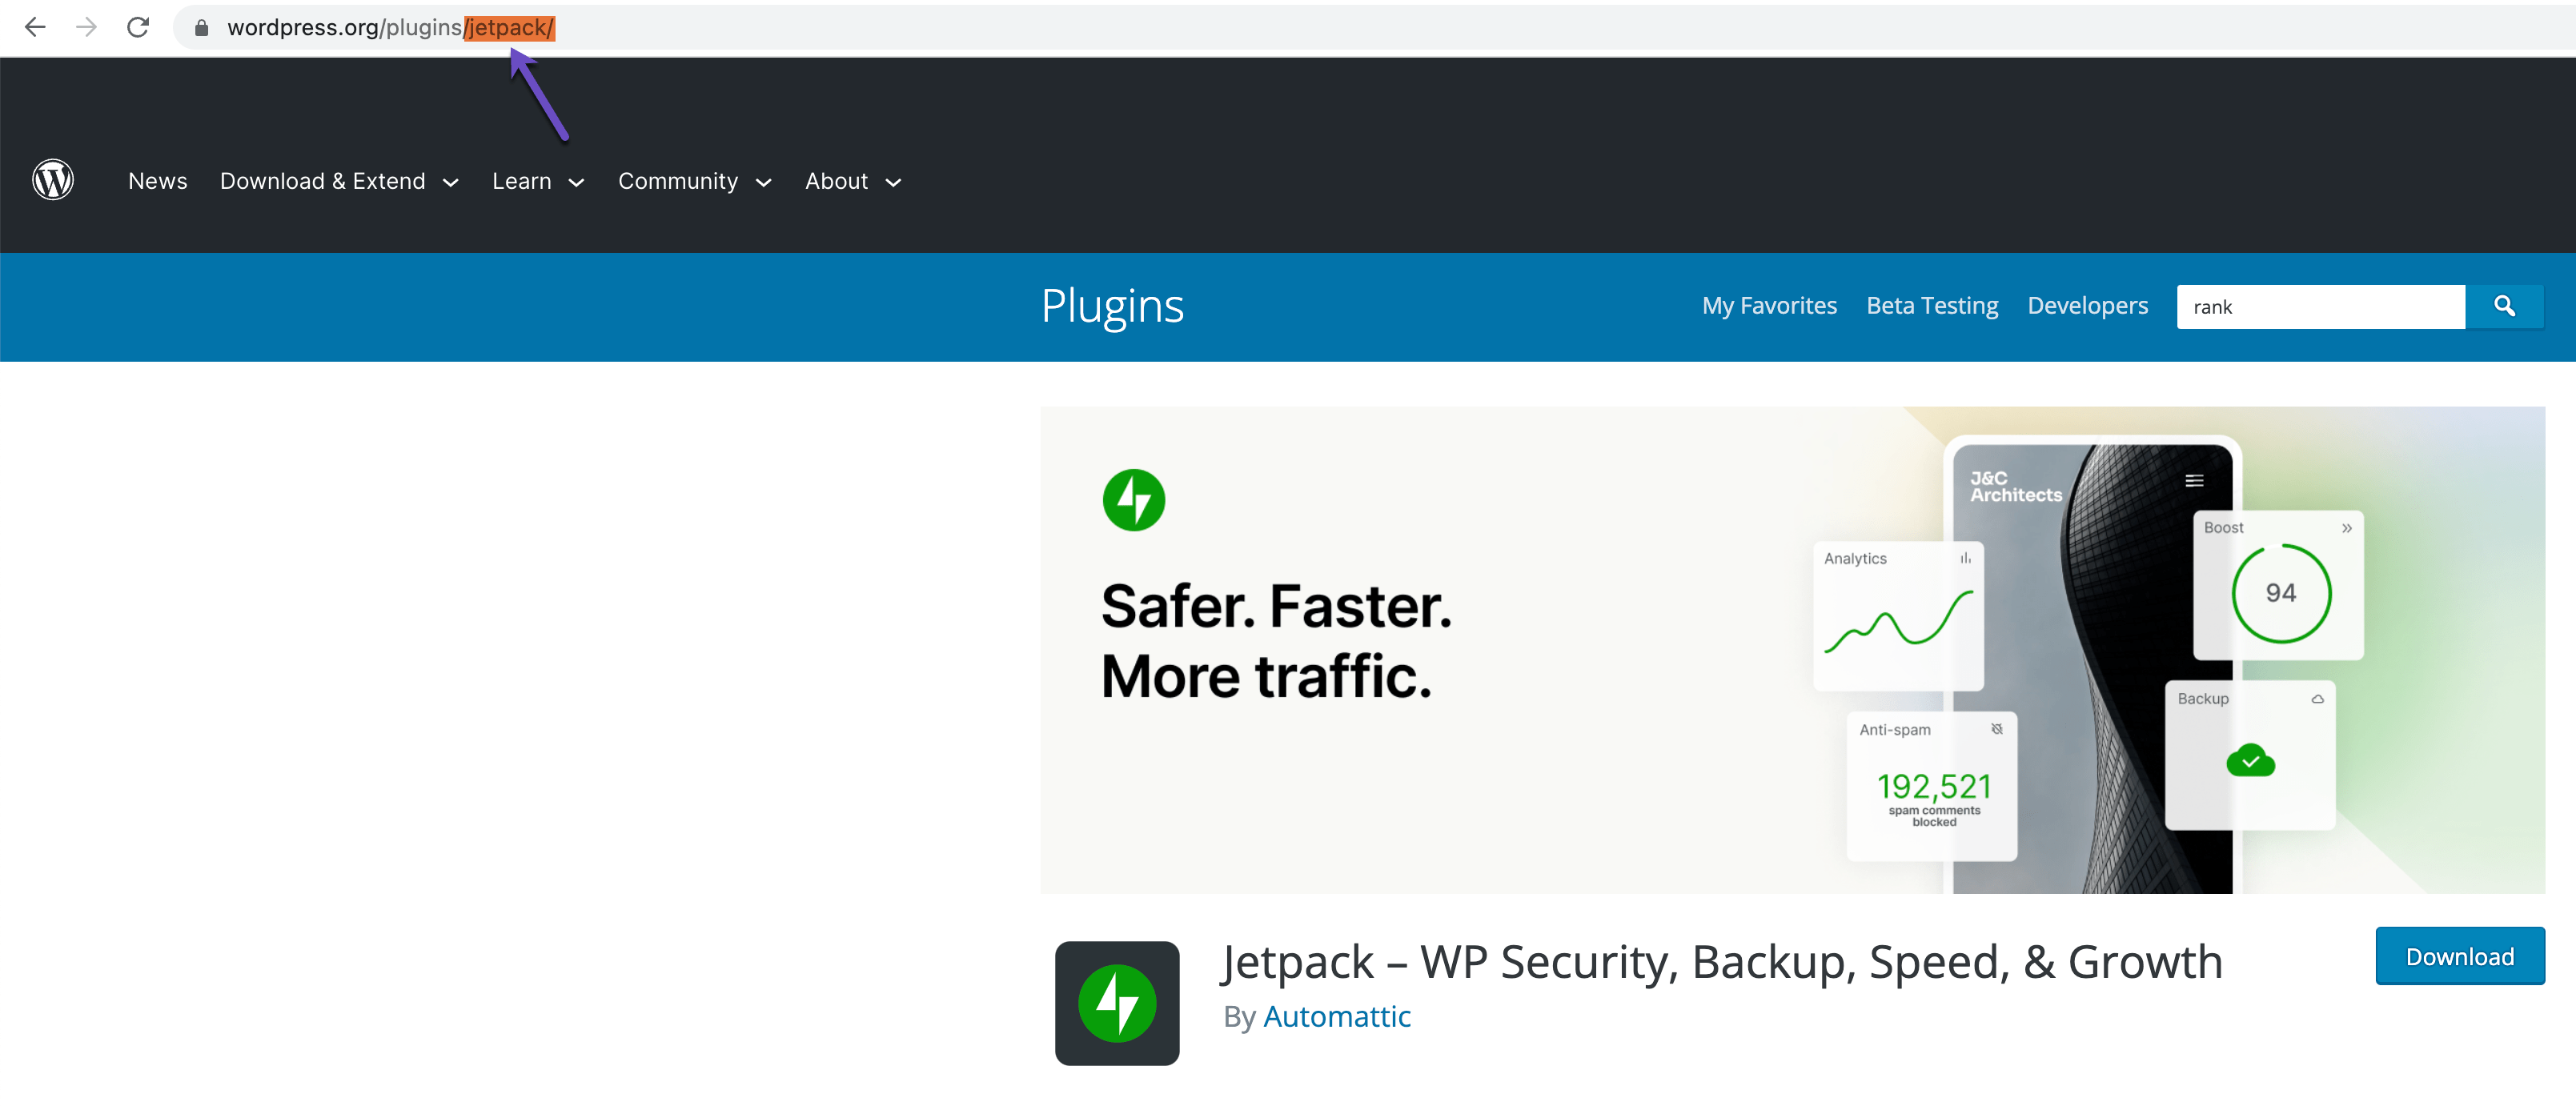
# Install the latest version of the plugin and activate it:
$ wp plugin install jetpack --activate
Installing Jetpack – WP Security, Backup, Speed, & Growth (12.0)
Downloading installation package from https://downloads.wordpress.org/plugin/jetpack.12.0.zip...
Unpacking the package...
Installing the plugin...
Plugin installed successfully.
Activating 'jetpack'...
Plugin 'jetpack' activated.
Success: Installed 1 of 1 plugins.
Another remarkable feature of WP-CLI is that it allows you to install WordPress plugins from remote files, not just the repository. This is incredibly useful when you’re working on a plugin or using a premium plugin.
$ wp plugin install http://s3.amazonaws.com/bucketname/my-plugin.zip?AWSAccessKeyId=123&Expires=456&Signature=abcdef --activate
Downloading install package from http://s3.amazonaws.com/bucketname/my-plugin.zip?AWSAccessKeyId=123&Expires=456&Signature=abcdef
Unpacking the package...
Installing the plugin...
Plugin installed successfully.
Success: Installed 1 of 1 plugins.
To install multiple WordPress plugins, you can pile on parameters. Here’s an example that downloads and activates 3 plugins:
# Install multiple plugins:
wp plugin install really-simple-ssl seo-by-rank-math litespeed-cache --activate
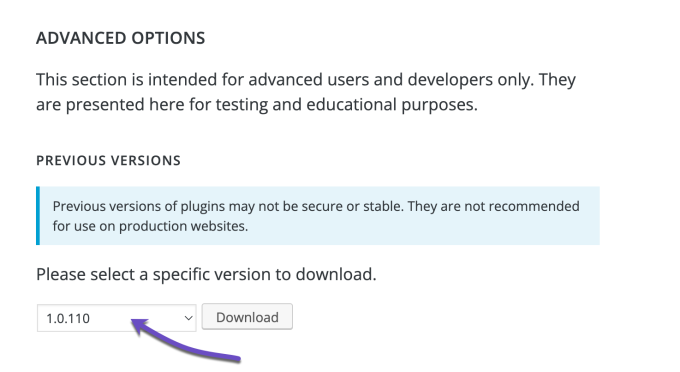
In some cases, installing a previous version of WordPress plugins may be necessary. To do so, use the --version= flag
wp plugin install seo-by-rank-math --version=1.0.110 --activate
To get a previous version of a plugin, the first thing to do is search for the plugin in the WordPress repository. Scroll down on the plugin’s page and click on the “Advanced View.”
Scroll to the bottom of the page, and you will see an option to download previous versions of the plugin:
To deactivate a single plugin, you can run the following command:
$ wp plugin deactivate jetpack
Plugin 'jetpack' deactivated.
Success: Deactivated 1 of 1 plugins.
In the event of compatibility issues, it can be helpful to deactivate all plugins at once. Utilizing the command below makes it possible to do so quickly and easily. Afterward, you can reactivate them individually while testing for any conflicts.
To deactivate all your plugins at once, run the following command:
$ wp plugin deactivate --all
Plugin 'hello' deactivated.
Success: Deactivated 1 of 3 plugins.
You can also manually update WordPress plugins. Example below:
$ wp plugin update jetpack
Success: Plugin already updated.
Additionally, you can update all your WordPress plugins. Example below:
$ wp plugin update --all
Success: Plugin already updated.
Finally, you can also manually remove a WordPress plugin using the following command:
$ wp plugin delete jetpack
Deleted 'jetpack' plugin.
Success: Deleted 1 of 1 plugins.
Managing a WordPress Database
wp db performs basic database operations using credentials stored in wp-config.php.
wp db export exports the database to a file.
$ wp db export
Success: Exported to 'cchostingdemos_wp342-2023-04-24-50121f9.sql'.
wp db import imports a database from a file.
$ wp db import cchostingdemos_wp342-2023-04-24-50121f9.sql
Success: Imported from 'cchostingdemos_wp342-2023-04-24-50121f9.sql'.
wp db optimize optimizes the database.
$ wp db optimize
Success: Database optimized.
wp db repair repairs the database.
$ wp db repair
Success: Database repaired.
wp db reset removes all tables from the database.
$ wp db reset
Are you sure you want to reset the 'cchostingdemos_wp342' database? [y/n] y
Success: Database reset.
wp db search finds a string in the database.
$ wp db search "[email protected]"
mywp_options:option_value
6:[email protected]
mywp_users:user_email
1:[email protected]
wp db size displays the database name and size.
$ wp db size
+----------------------+----------+
| Name | Size |
+----------------------+----------+
| cchostingdemos_wp342 | 704512 B |
+----------------------+----------+
wp db size --tables displays the database tables and size for each.
$ wp db size --tables
+-------------------------+---------+
| Name | Size |
+-------------------------+---------+
| mywp_usermeta | 49152 B |
| mywp_users | 65536 B |
+-------------------------+---------+
wp db tables lists the database tables.
$ wp db tables
mywp_commentmeta
mywp_comments
mywp_links
mywp_options
mywp_postmeta
mywp_posts
mywp_term_relationships
mywp_term_taxonomy
mywp_termmeta
mywp_terms
mywp_usermeta
mywp_users
Managing WordPress Users
wp user manages users and their roles, capabilities, and meta.
The following command will list all the users on your WordPress install:
# List users
wp user list
# List users with administrator role
wp user list --role=administrator
The following command will create a new user on your WordPress install. The available roles are administrator, editor, author, contributor, and subscriber.
# Create a new administrator user.
wp user create john [email protected] --role=administrator
Success: Created user 5.
Password: C2p0MS4zCa
The following command will delete the user and re-assign all posts to another user:
# Delete user john and reassign posts to user paul
$ wp user delete john --reassign=paul
By following the below steps, you will manage to reset the password for a specific WordPress user
Step 1: List all the users and find the ID of the user you'd like to change password:
$ wp user list

Step 2: Change password for specified user ID:
$ wp user update 1 --user_pass=2DeBa10XjxD3Z8Ma
replace "1" with the id of the user you want to change password.
The following command will help you change the email address for a specific WordPress user:
Step 1: $ wp user list
# to see all users. Find the ID of the user you'd like to update email address

Step 2: update the email address:
$ wp user update 1 --user_email=<email> replacing "1" with the id of the user you want to update and <email> with the new email address.
The following command will help you set or modify a WordPress user role:
Step 1:
$ wp user list
# to see all users. Find the ID of the user you'd like to update.

Step 2:
$ wp user set-role 1 administrator
Success: Added johndoe (1) to http://example.com as author.

# Available roles:
administrator
editor
author
contributor
subscriber
Performing a WordPress Database Search and Replace
wp search-replace searches and replaces strings in the database. e.g.: replacing any match of an old domain name with a new domain name.
Before running this command, we strongly recommend you do a backup for your database using the following command line:
wp db export
Once you’ve ensured that you have a backup for the database, you can safely use the wp search-replace command:
wp search-replace 'https://old-domain.com/' 'http://new-domain.com/' --precise --recurse-objects --all-tables-with-prefix
| Parameter | Description |
|---|---|
| –precise | Force using PHP (instead of SQL), which is more thorough but slower. |
| –recurse-objects | Enable recursing into objects to replace strings. |
| –all-tables-with-prefix | Enable replacement on any tables that match the table prefix even if not registered on $wpdb. |
Using wp maintenance-mode You can control the maintenance mode on your WordPress site. Example:
wp cron event list
This command displays all scheduled cron events with their hook names, next run time, and recurrence.
To run a specific cron event immediately:
wp cron event run <hook>
Fortunately, there are a few steps you can take that will help protect your website from many vulnerabilities associated with WordPress security. In this comprehensive guide, we’ll cover why wordpress security is essential, common threats posed by hackers and other malicious actors, how to secure your site without technical knowledge as well as when updates should be made to keep things running smoothly. So if you want peace of mind knowing that your website is safe and sound, read on.
When discussing WordPress security, many things can be done to secure your website and prevent hackers and vulnerabilities from affecting your online presence.
WordPress is one of the most popular platforms for self-hosted blogs and websites and powers over 43.2% of all websites. Even WhiteHouse.gov is using the WordPress platform! So because of its popularity, it may fall victim to attacks by hackers.
With the various themes and plugins out there, it is unsurprising that vulnerabilities exist and continually affect websites.
The last thing you want to happen is to find out one day that your website got hacked. To help you prevent this from happening, we will be sharing multiple tips and techniques you can use to secure your WordPress website and stay protected.
Why is WordPress security important?
WordPress security is an essential consideration for any website owner. Protecting your site from hackers, malicious code, and other security threats that could compromise your data or gain access to confidential information is essential. Brute force attacks, malware insertions, and phishing schemes are all potential dangers to WordPress websites. As such, it’s essential to take the necessary steps to ensure your WordPress site is secure.
To ensure optimal security, it’s essential to keep up with the latest security measures for WordPress websites to avoid potential risks posed by hackers or malicious actors online. Updating plugins regularly can help reduce the risk of exploited vulnerabilities while ensuring all users have unique usernames and strong passwords, adding another layer of defense against unauthorized access attempts into accounts or admin areas on a website. Installing additional security plugins like Wordfence Security Plugin can further enhance these measures while providing real-time monitoring capabilities so you know what’s happening at all times on your website too.
WordPress security is essential for protecting your website from malicious attacks and data breaches. Considering the potential risks that can threaten WordPress sites is imperative, so let’s examine some of them.
What are some common security risks for WordPress sites?
Weak passwords are one of the most common security risks for WordPress sites. Using a simple or easily guessed password can make it easy for malicious actors to gain access to your site and potentially cause irreparable damage. Create complex passwords that combine uppercase and lowercase letters, numbers, and special characters for maximum security. For added security, consider utilizing a reliable password manager such as 1Password or Dashlane to store passwords with greater complexity and randomness.
Another security risk is outdated software, such as WordPress core files or plugins/themes installed on your site. Updating all components to the most recent versions is necessary to prevent hackers from taking advantage of any existing vulnerabilities that may exist in older versions. It’s also important to regularly back up your website to quickly restore any lost data if something goes wrong during an update process.
Common security risks for WordPress sites include malicious code injections, brute force attacks, and unsecured hosting environments.
To guarantee the safety of your website, it is essential to comprehend how to safeguard your WordPress site appropriately.
How can I secure my WordPress site?
It’s super important to remember that WordPress is open-source software. This means that anyone can examine the code that makes WordPress works. Sure, yes, hackers are constantly analyzing this code to find potential exploits. Still, so are the security teams at WordPress, volunteer developers, ethical white hats, and the millions of people who contribute to WordPress for the opposite reason of hackers – to keep it secure and be on the lookout for the community at large.
Additionally, most security breaches aren’t caused by a WordPress code vulnerability. They happen because people often don’t keep their WordPress site and the plugins installed up-to-date.
If you follow good security practices, your site will be just fine.
Invest in Rock-solid WordPress Hosting
Every web host out there should take security very seriously. The reason why you must choose a web host you can rely on for your business. The research you do before choosing a web host should include inquiries into how they handle security events.
You should look for a host with the following essential services:
- Up-to-date server software stacks. Whether they use LiteSpeed, NGINX, Apache, or IIS, they should run the latest, patched versions.
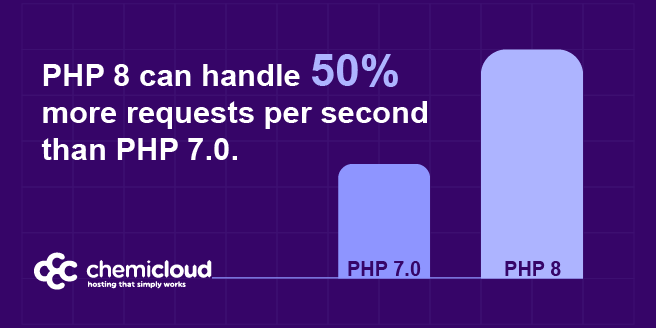
- If they’re still offering PHP 5, you should probably look elsewhere. The earliest version of PHP they should be offering is PHP 8.
The same goes for other software, like MySQL, MariaDB, cPanel, Plesk, and the server operating system.
- Firewalls and other security defenses. There are hundreds of ways your hosting provider can keep their servers secure. If they own their servers and are co-locating them, for example, putting strict controls on the ways someone can physically access that server, for example, is something they should be doing. They should also use firewalls and other defense mechanisms, like intrusion detection, to keep unauthorized users out.
- Malware monitoring and/or removal apps – You should select a host that tries to detect and prevent malware infections and possibly offers full-service malware scanning and removal. When doing your research, you should inquire what the policy is when the host spots an account infected with malware, whether they offer such services, and if so, what their costs are.
ChemiCloud uses cloud infrastructure for all of our managed WordPress Hosting customers to keep their data safe. By distributing data across redundant servers, the information hosted in the cloud is always protected against hardware failure.
In addition to this, our servers run on CloudLinux OS, which allows us to use a virtualized file system for each account and completely isolate it. A significant advantage is that if one user account becomes compromised, the malware infection does not spread to the other accounts hosted on the same server. Moreover, we’ve partnered with Imunify360 to provide a secure and reliable WordPress Hosting service. Its multi-layered defense architecture ensures precision targeting and eradication of malware and viruses.
Through these services, we add additional layers of protection to your website.
Install & Use a (Good) SSL Certificate
An SSL or Secured Socket Layer Certificate encrypts the data transmitted between the user and your website. This is CRUCIAL to websites where your users are customers, and they are submitting payment information to acquire items from your store.
Sure, if you’re running a blog and not selling anything, you can get away with a Let’s Encrypt SSL Certificate, which is free. But if you’re taking payments, you need an SSL. Using an SSL means you use https:// in front of your site instead of seeing a red “Not secured” notification in the address bar.
SSL Certificates have engrained trust in the populous because of their security, and even more so with the famed Green Bar SSL, aka an EV SSL Certificate, because they know those companies are verified and authenticated by a trusted security provider.
If you are on a WordPress host that uses cPanel, you can easily install a Let’s Encrypt SSL Certificate.
Always Keep Your WordPress Version + Plugins Up To Date
See this? This is scary. That’s a user who doesn’t care about their site right there. 10 updates, including a WordPress version update.

An outdated WordPress site, plugin, or theme is a potential wide-open gateway to your website. Let’s review some recent WordPress stats.
- 62% of websites had an SEO spam infection during our cleanups. Database spam was the most dominant form of infection. Our remediation team often found database infections without backdoors, which may be related to SQL injections and reflective of our user base.
- 47% of all infected websites contained one or more backdoors, allowing attackers to maintain access to compromised environments after the initial infection.
- In 2022, over 30% of all WordPress applications were out of date at the point of infection.
Fortunately, a recent update in a major release of WordPress enabled us to use the GUI to automate things like automatic updates for themes & plugins and WordPress itself. Previously you needed to be somewhat savvy and edit your wp-config.php file by hand to add some lines of code for these things.
How to Enable Auto-Updates for Plugins
Enabling automatic updates for plugins couldn’t be easier!
Step 1: Log in to your wp-admin. By default, wp-admin can be accessed by entering https://www.yourdomain.tld/wp-admin into your browser, where “yourdomain.tld” would replace your domain name.
Step 2: Locate the Plugins option on the left.
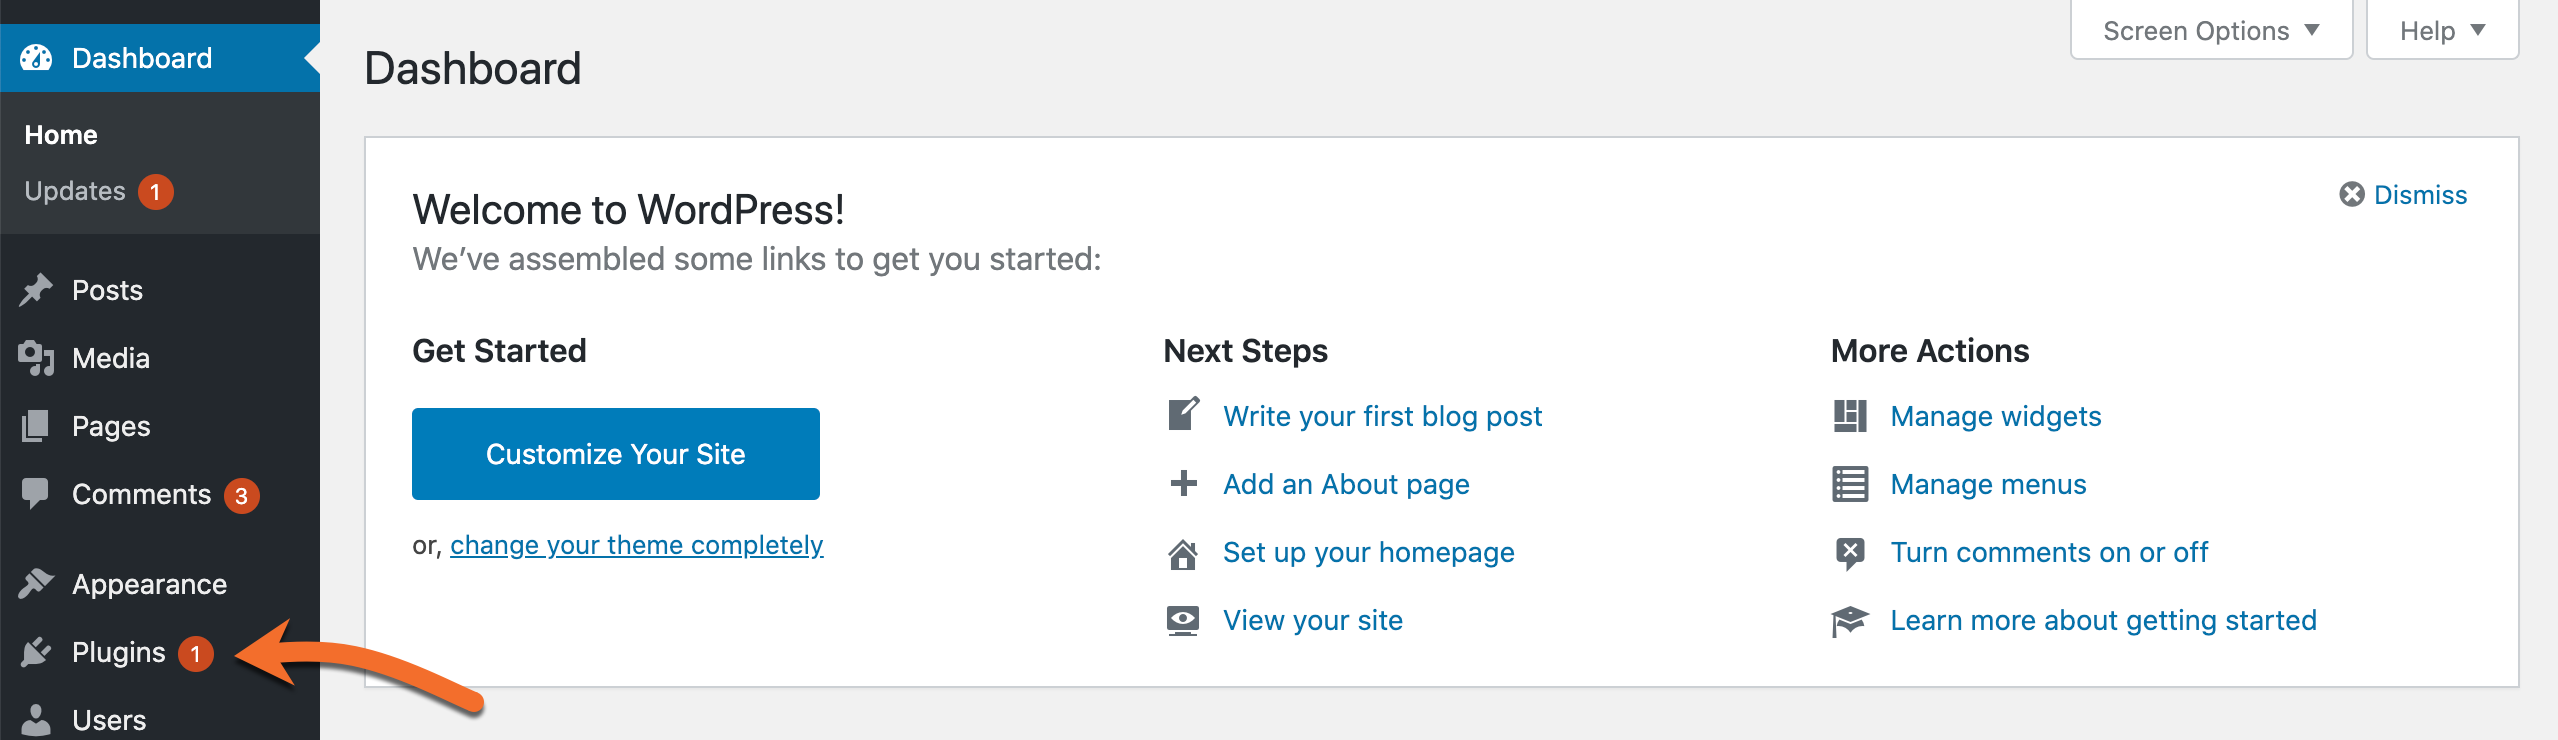
Step 3: In the far right column, click “Enable Automatic Updates” for each plugin you want to be able to update itself automatically.
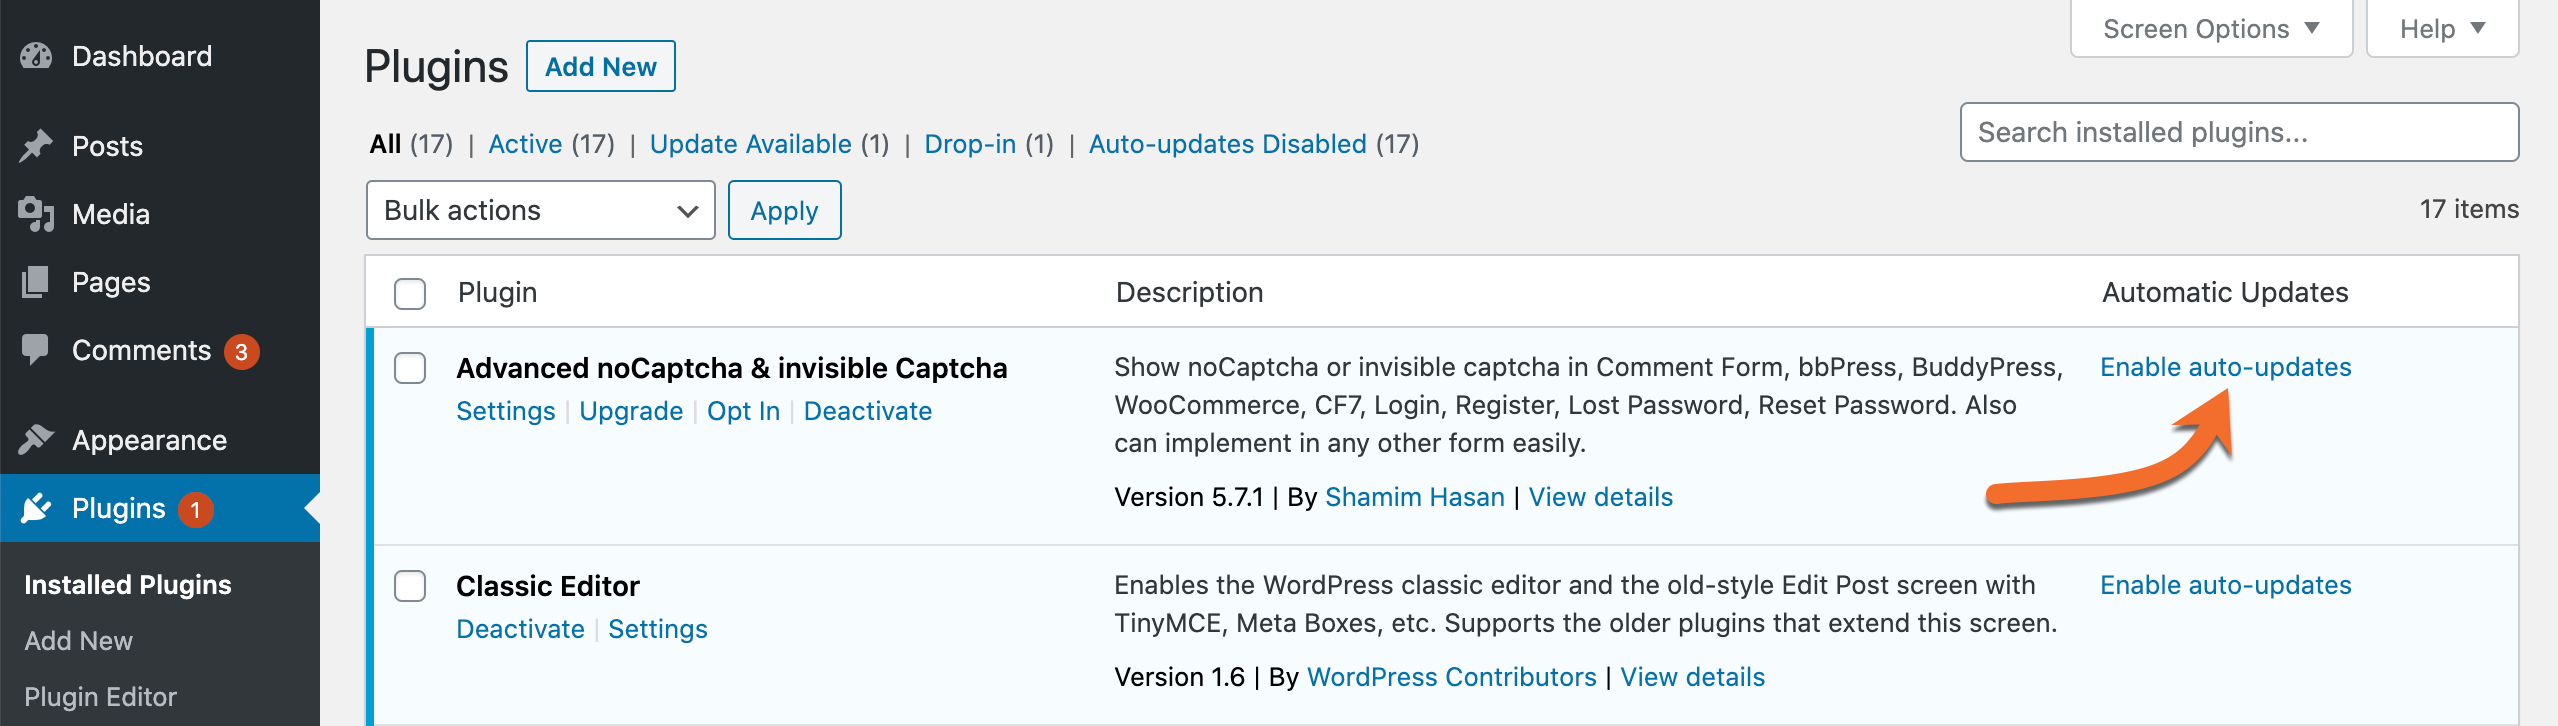
That’s all you have to do! Now, your plugins will update themselves automatically when the developer publishes a new version.
How to Enable Auto-Updates Updates for Themes
Step 1: Click Appearance in the menu on the left side of your WordPress Admin Dashboard.
Step 2: Select Enable auto-updates for your theme.
Note: You will need to do this for each of your themes. Also, as of this writing, not all WordPress themes have been updated to support this feature, and as such, you may not see the option to enable auto-updates for your theme until the developer provides an update.
If you’re more hands-on and don’t trust automation, no worries; this release hasn’t forgotten about you! Feel free to turn off those automatic updates, and when you’re ready to update a theme or plugin, upload it as a ZIP file, and voila! It’s updated! 
Use Smart Usernames and Smarter Passwords
Regarding user security, using reasonable security practices is key to keeping your login credentials secure. Avoid using a username as “admin,” and always choose a complex password.
Instead of using Admin for the WordPress admin, use your name, or a variation of it, or a random username altogether. Actually, here’s a list of usernames you should definitely avoid.
- Admin – This used to be the default username for WordPress and is, therefore, one that will definitely be tried in a brute force attack.
- Your real name or nickname – This is both public information and as easy to guess as “admin”. In addition, it can make sense to create a separate profile without administrator’s right to publish content. That way, the username of the main login does not appear on the website. Don’t use variations of your name either. If your name is John Jacob Jingleheimer Schmidt, don’t use jjjschmidt as the username.
- Any personal information – Including birthdays, etc. Only use a personal detail if it’s something no one could ever know.
- The title of your site, or something obviously related to it – “Kittens” for a cat adoption agency, etc…
Make sure to choose a complex password. Google has some great tips on how you can choose a secure password. You should be using a password manager, like 1Password or Bitwarden.
If you are managing multiple WordPress sites, it is prudent to use different passwords. One way to generate random passwords.
If you want to store your passwords locally, on your computer, then you can use a free tool such as KeePass.
Use Two-Factor Authentication
Take advantage of Two-Factor Authentication to completely secure your WordPress login. Two-Factor Authentication involves a second step in the login process. It is a text (SMS), or time-based one-time password (TOTP) required to log in. Two-factor authentication is a 100% effective way to prevent brute-force attacks on your WordPress admin panel.
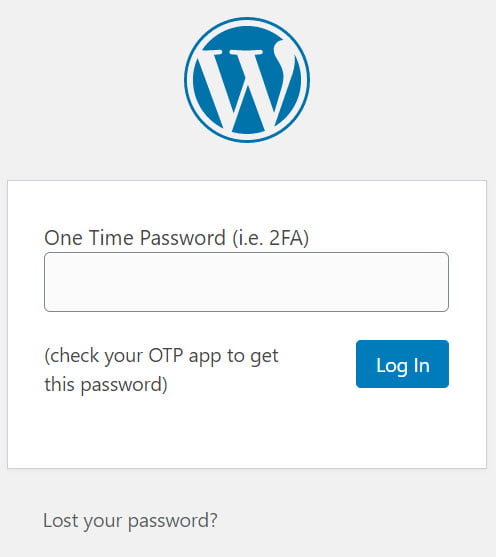
We prefer using the free Google Authenticator plugin, as you can use it for unlimited users. Just install the plugin and click on a user account. You can then set up two-factor authentication by creating a new secret key or by only scanning the QR code. Then make sure to mark it “Active.”
With 2-Step Verification enabled, you will be asked to enter a six-digit code on your login page after you provide your username and password. If you do not provide this six-digit number, you cannot log in, even if you have the correct username and password.
Disable The Plugin Editor
WordPress comes with a set of the very easy-to-reach plugin and theme editors. These editors, while super handy if you want to edit your theme/plugins in the same wp-admin you do everything else in, allow direct access to your site’s code. If someone compromises a user account of sufficient privileges, they would have easy access to make some malfeasant changes on your site.
Most WordPress users will never need to touch the plugin and theme editors. If you are the user who likes to tinker and do some custom coding, re-enabling the plugin and theme editors is just as easy as disabling them.
It’s one line of code in your wp-config.php:
define('DISALLOW_FILE_EDIT', true);
Doing this won’t be the end of stopping a hacker, but it will confuse less experienced hackers and stop them in their tracks. And at the very least, it will make doing something on your site that much more challenging and give you time to sort out what’s gone wrong.
Lock Down Your WordPress Login URL
If you want to make it even harder for hackers to find certain backdoors, you are less likely to be the target of an attack. Locking down your WordPress admin URL and login is the right way to increase your login security.
The default WordPress site’s login URL is domain.com/wp-admin. One of the problems with this is that all of the bad bots, hackers, and scripts out there also know this. By changing the URL for your WordPress admin panel, you can make yourself less of a target and better protect your site against brute-force attacks.
Out of the box, anyone can access your wp-admin page simply by visiting https://yoursite.com/wp-admin. You can (and should) use a plugin to stop them in their tracks, such as the free WPS Hide Login plugin. This plugin allows you to rename the /wp-admin to anything you want, like /login, or even something like /mywordpressadminloginpageishere if you wanted to.
Sarcasm aside, you should use a path that isn’t obvious. I use this plugin on my own site, and while I won’t tell you what the path is, it’s something you wouldn’t guess but is still easy to remember.
You should also install a plugin that limits the number of attempts a user has to log in before they’re blocked. The aptly named, Limit Login Attempts plugin (also FREE) gives users several attempts to login before they are locked out. The plugin can also cleverly detect and redirect bots away from your login page.
If you want to go the extra mile, you can enable Cloudflare Rate Limiting to further control access to your site. Using the Cloudflare network, this tool automatically detects brute force attacks and DDoS attacks and blocks those offending IP addresses.
How to Change Your WordPress Login URL
We recommend using a free plugin called WPS Hide Login to change your WordPress login URL.
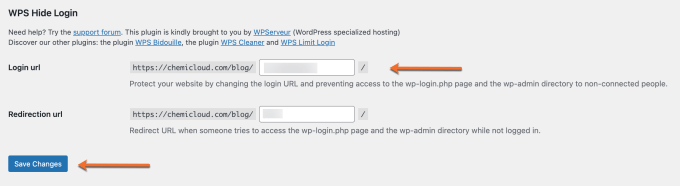
This plugin lets you quickly and safely change the URL of the login form page to anything you want. It renames or changes files in the core, nor does it add rewrite rules. It merely intercepts page requests and works on any WordPress website. This way, the wp-admin directory and wp-login.php page become inaccessible.
Once installed, go to General Settings of your WordPress dashboard and set your admin panel URL.
Deactivating this plugin brings your site back precisely to the state it was before.
Harden Your wp-config.php File
The wp-config.php file stores all the necessary details for an intruder to access your site’s database. It is one of the most critical files in your entire WordPress install.
Deny Access to the wp-config.php File
You can prevent the file from being accessed by adding the following code to your .htaccess file.
<Files wp-config.php>
order allow,deny
deny from all
</Files>
Anyone that tries to access your site’s wp-config.php will receive a 403 Forbidden error. Neat trick, eh?
Disable directory listing
By default, when your web server does not find an index file (index.php or index.html), it automatically displays an index page showing the files and folders in that web directory.
This could make your site vulnerable to attacks by revealing the critical information hackers need to take advantage of a vulnerability in a WordPress plugin, theme, or your server in general.
How to disable directory browsing in WordPress
Just add the following line in the site’s .htaccess file located in the root directory of your website.
Options -Indexes
If you are a ChemiCloud customer, we have you covered. By default, the directory listing is disabled on our servers.
Disable PHP Execution in WordPress Directories
Most of the time, hacked WordPress sites usually have backdoor files. These backdoor files are often disguised as core WordPress files and are placed in /wp-includes/ or /wp-content/uploads/ folders.
An easier way to improve your WordPress security is by disabling PHP execution for some WordPress directories.
Create a blank .htaccess file and paste this code inside it:
<Files *.php>
deny from all
</Files>
Then upload this file to /wp-content/uploads/ and /wp-includes/ directories.
Prevent Hotlinking
Hotlink Protection will prevent other websites from directly linking to files on your website. An example of hotlinking would be using a <img> tag to display an image from your site on some other site on the internet. This will result in the other site stealing your bandwidth.
How to Prevent Hotlinking
To prevent hotlinking insert the following code into your .htaccess file:
RewriteEngine on
RewriteCond %{HTTP_REFERER} !^$
RewriteCond %{HTTP_REFERER} !^http(s)?://(www\.)?domain.com [NC]
RewriteRule \.(jpg|jpeg|png|gif)$ - [NC,F,L]
Perform regular backups
Backing up your site is about creating a copy of all the site’s data and storing it somewhere safe. That way, you can restore the site from that backup copy in case anything wrong happens.
Most hosting providers now provide backups. ChemiCloud’s managed WordPress Hosting has free automated backups, that are stored offsite, allowing it to be quickly restored so that you can rest easy knowing your data is safe!
WordPress Backup Plugins
If your host doesn’t have backups, there are some popular WordPress backup services and plugins which you can use to automate the backup task.
- Duplicator
- WP Time Capsule
- BackupBuddy
- UpdraftPlus
- BackUpWordPress
- BackWPup
- WP BackItUp
Hide Your WordPress Version
Another good practice is to hide your WordPress install version. Anyone that checks the source code of your site can quickly reveal what version of WordPress you are running, and if you aren’t good at staying up with the latest updates, this can be a welcome sign for intruders.
Simply add the following code to your functions.php file:
function wpversion_remove_version() {
return '';
}
add_filter('the_generator', 'wpversion_remove_version');
Please note that editing the source code of the WordPress functions.php file could break your site if it is not done correctly. If you feel uncomfortable doing this, please check with your web developer first.
Can I secure my WordPress site without technical knowledge?
Securing your WordPress site without technical knowledge is possible. In today’s digital world, protecting yourself and your website from potential security risks is essential. Fortunately, various methods and services can help safeguard your WordPress website with minimal effort from you.
A common approach to safeguarding WordPress sites is using a security plugin. Security plugins offer features such as two-factor authentication, malware scanning, password strength enforcement, and more. They also provide an easy way for non-technical users to monitor their website’s security status and take action when necessary. Popular security plugins include Wordfence Security, iThemes Security Pro, Sucuri Security – Auditing & Malware Scanner, All in One WP Security & Firewall, and BulletProof Security.
Another way to secure a WordPress site without technical knowledge is through a managed WordPress hosting service that offers built-in security features like malware scans or automated backups. Many hosting services provide these security measures as part of their packages, eliminating the need to configure any extra software or plugins on your server independently.
In conclusion, protecting one’s WordPress website no longer requires technical expertise due to its growing popularity among online entrepreneurs, bloggers, and small business owners who may not possess such skills yet still wish to ensure their sites remain secure from cyber threats. With options ranging from utilizing specialized plugins and services provided by reliable third parties through managed hosting solutions offered directly by leading web host companies, there is now an abundance of opportunities for users to take advantage of.
WordPress Security FAQs
Does WordPress have security issues?
Yes, WordPress does have security issues. The open-source nature of WordPress makes it prone to malicious attacks, notwithstanding its standing as one of the most secure content management systems around. To ensure the utmost security, users should regularly update their WordPress installations, use strong passwords, and consider two-factor authentication or additional security measures. Additionally, plugins should be checked regularly for any vulnerabilities, and additional security measures such as two-factor authentication can also help reduce risks associated with using WordPress.
Does WordPress have good security?
Yes, WordPress has good security. It offers multiple layers of protection, including regular updates to ensure the latest bug fixes and security patches are applied. Its built-in user authentication system is robust and secure. At the same time, its extensive plugin library provides additional features like two-factor authentication for extra safety. Furthermore, it can be further secured by using a web application firewall or an SSL certificate for encryption. All in all, WordPress provides a secure platform for websites.
Conclusion
Learning about potential risks, implementing best practices for securing your WordPress site, and regularly updating plugins can help protect you from many vulnerabilities. With some knowledge and effort, you can ensure that your WordPress site remains secure against threats so it continues to serve as an effective platform for years.
Take the steps necessary to secure your WordPress website today and ensure it reaches its highest potential. With our comprehensive web hosting tutorials, helpful tips & resources, you can be confident in the security of your site.
If you know any other WordPress security tips that may help, please let us know in the comments area.
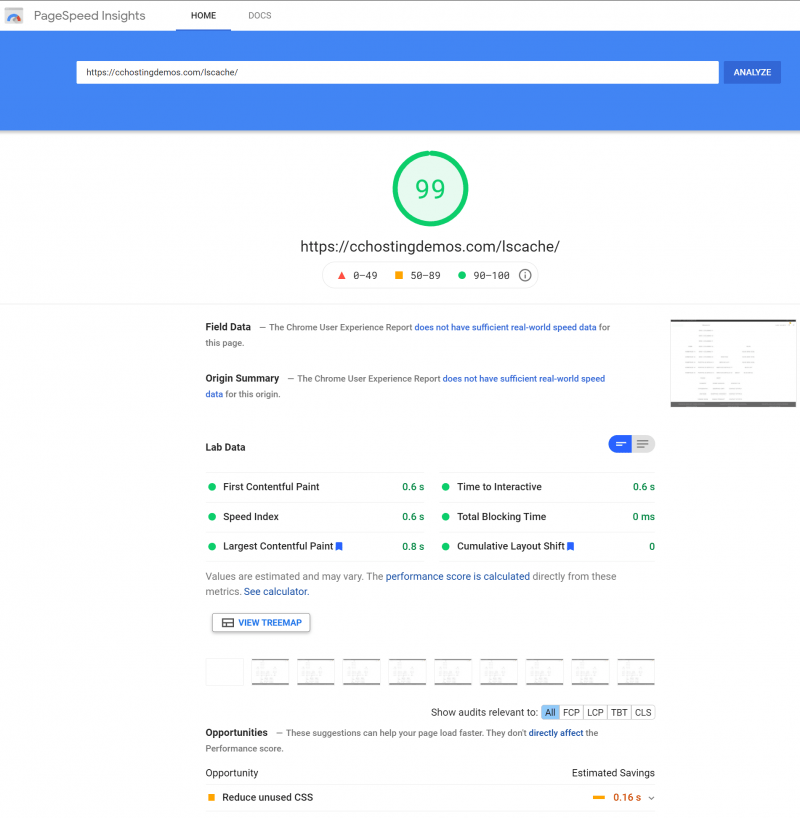
]]>First impressions are everything, especially online. While I am unable to help you improve the content quality on your site or the design and theme, I can help you with how fast your site loads. As a website owner, you have a lot of control over how fast your website loads. Keep in mind, your site is only ever going to be as fast as your web hosting company’s servers, but there are a lot of performance tweaks you can use to ensure those first impressions are lasting ones and your site is squeezing every bit of performance outta those servers.
One of these tweaks is using the new Guest Mode, a feature that was introduced in the LiteSpeed Cache for WordPress plugin beginning with version 4. This Guest Mode feature is designed to load your site as quickly as possible the first time a visitor loads it in their browser, even if that visitor is a search engine bot or page speed checker.
LiteSpeed is using cutting-edge caching technology that outperforms both NGINX and Apache web servers. But don’t take our word for it, check out our benchmarks. Turbo-Charge Your Website with LiteSpeed! Included for free with all our managed Managed WordPress hosting plans.
First Run? All systems go.
A lot happens the first time someone loads your site. Let’s say you run an eCommerce site. As part of the first-page load, the LiteSpeed server needs to figure out where the visitor is located, for example, and from there it can serve the visitor a page in their native language, if one is available, then switch the currency used on the site, and display international pricing from your pricing tables. Some time is required to make these changes and even more, time is required to generate pages from scratch, such as a custom page in a visitor’s native language.
Using the Guest Mode feature of the LiteSpeed Cache for WordPress plugin, you can defer any / all of the decision-making and immediately serve a default cached version of the page requested by the visitor.
Sounds fantastic, right? But I bet you’re wondering how this works.
How does Guest Mode work?
The first time someone visits your site with Guest Mode is very different than the first time someone visits your site without Guest Mode enabled. With the feature enabled, LiteSpeed Server makes no effort to learn anything about the visitor and instead serves them a default version of the page they requested from the cache.
So what’s missing?
For this first visit only, there is are no cache varies and no Edge Side Includes (ESI; if enabled). LiteSpeed Web Server doesn’t care where they’re from, who they are, or what they look like; each new visitor is going to be served the same default cached page.
And did I tell you it’s going to be fast? Lightning-fast. The server didn’t have to spend any CPU cycles figuring out where they were, trying to find cookies, looking for cache varies, and dealing with Edge Side Includes.
But here’s the magic! Once the HTML of the default cached page begins loading at the other end, an Ajax call is made, and then and only then, all the elements that were ignored, such as the user’s location, among other things, are dealt with and the ‘proper’ version of the page they requested is loaded, cache varies, ESI, and all.
If you’re familiar with how this works, you may be thinking, “well isn’t that going to cause a slight delay between the time the default cached page is served and the correct content loads post Ajax call?” And the answer to that is yes, which is why you want to test this, especially if your site is complicated because it can cause some FOUC display issues.
How to Enable Guest Mode in the LiteSpeed Cache for WordPress Plugin
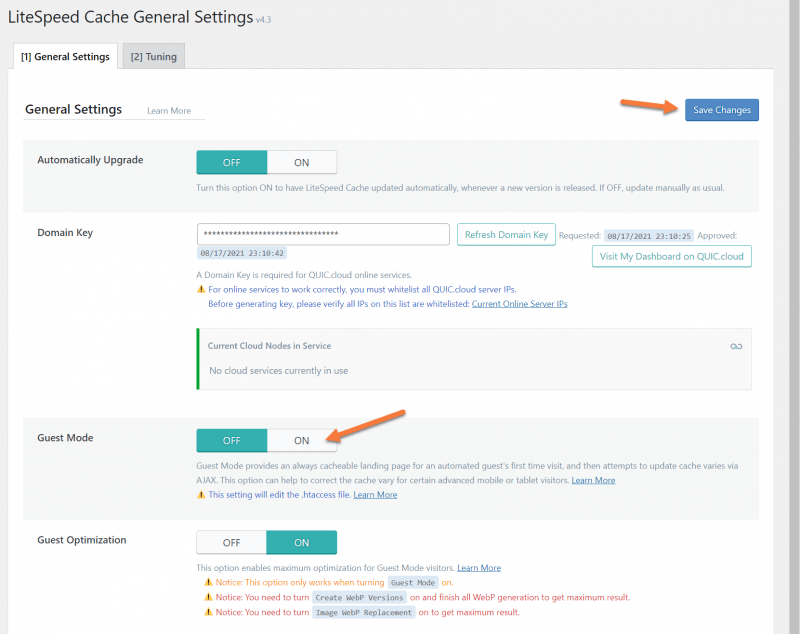
Step 1: Log in to your WordPress wp-admin. After logging in, look in the Admin menu on the left for LiteSpeed Cache. Hover over LiteSpeed Cache and in the little menu that pops out, click General.

Step 2: When the General Settings page opens, look for Guest Mode and click the On toggle. Then click Save Changes in the top right corner.
And that’s it, really, however…
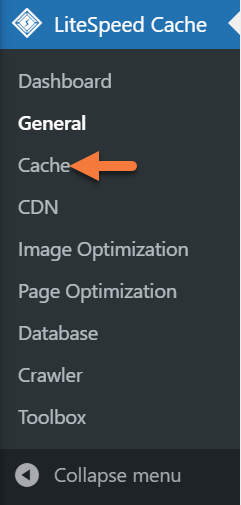
Step 3: In order for Guest Mode to be the most effective, you should also enable Cache Mobile. To do this, look for the Cache option in the LiteSpeed Cache menu from the left-hand side.
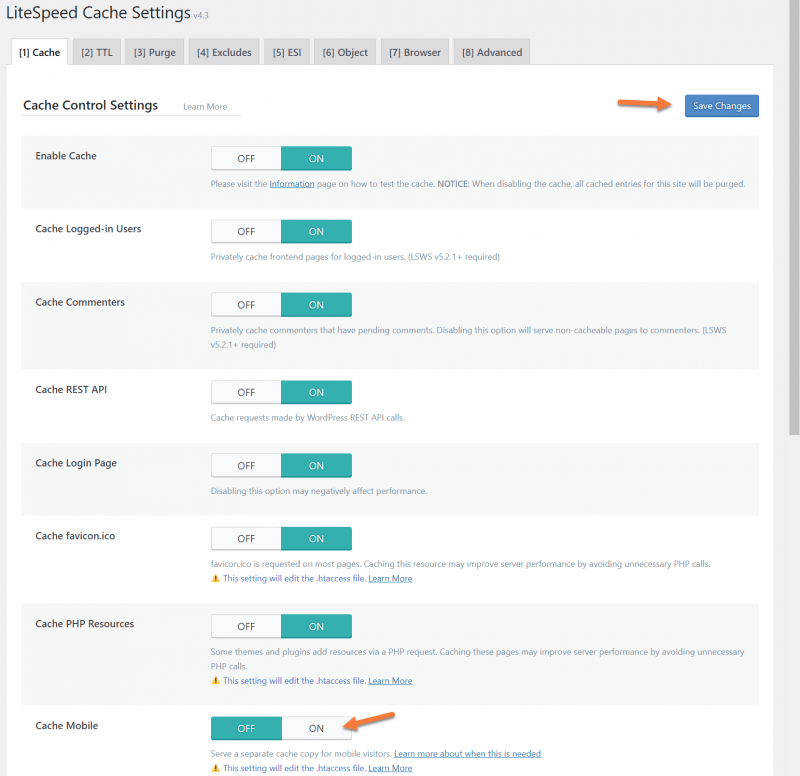
Step 4: Once the Cache page loads, look for the Cache Mobile setting, then click the On toggle to enable the feature. Next, click Save Changes in the top right.
And that’s truly it. Congrats!
Performance Differences – Guest Mode On vs Off
I was curious to see what the performance differences would be myself, so we used our favorite benchmarking tool, GTMetrix to test our demo WordPress site with the Guest Mode disabled and enabled.
Our Demo WordPress is configured as follows:
- Version: WordPress 5.8
- Installed Plugins:
- Architect Visual Composer
- Breadcrumb NavXT
- Contact Form 7
- LiteSpeed Cache
- Meta Box
- Newsletter
- OT One Click Import Demo
- OT Portfolios
- OT Services
- Redux
- Slider Revolution
- WooCommerce
- WPBakery Page Builder
- Installed Theme: Architect 1.4.2 from ThemeModern
- Server Location: Dallas
- Testing Location: Vancouver (free GTMetrix testing server)
Below are our results with the Guest Mode feature disabled:
GTMetrix Results (Guest Mode Off)
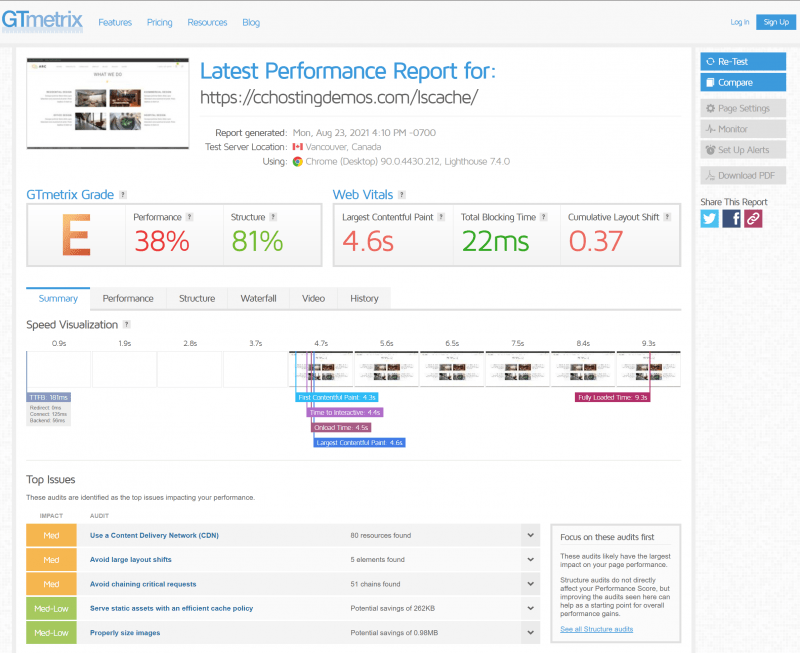
PageSpeed Results (Guest Mode Off)

As you can see, the performance is pretty bad with the Guest Mode optimizations disabled. Let’s take a look at it with the feature enabled below:
GTMetrix Results (Guest Mode On)

PageSpeed Results (Guest Mode On)
As you can see, enabling the Guest Mode boosts performance!
Taking it one step further
If you wish, you can extend the functionality of the Guest Mode even further by enabling Guest Optimization.

After enabling this setting from the LiteSpeed Cache menu > General, not only will the default version of the page requested be served from cache, but also the maximum level of page optimizations and image optimizations will be used.
This setting will likely improve page scores quite a bit like a highly optimized cached version of the page requested will be delivered. When services like GTMetrix and Google PageSpeed Insights request these URLs, they should receive content almost instantaneously, satisfying even their most stringent benchmarking requirements.
Using Guest Mode + Guest Optimization can make your site lightning fast! 
Sounds good, but is there a catch?
Great question and the answer is yes. There’s a trade-off to using these features. There are some areas where you will be impacted by using Guest Mode / Guest Optimization, such as:
- Disk Space / File Usage – keep in mind when using Guest Mode and Guest Optimization, that Unique CSS will also be used and this means every stylistic variant for every page will be given its own CSS file. If you have a huge site, this can mean thousands of files can suddenly appear in your hosting account. Not do these files consume disk space, each of these files represents 1 INODE from your available INODEs.
- Server Resources – After enabling Mobile Cache and WebP Replacement, server resources such as Disk I/O and CPU Cycles can be rapidly consumed if your site is crawled, as the number of crawlers that will spawn can expand and they will eat up resources that would otherwise be used to serve your website, causing it to be slow.
- Quic.cloud Quota – As Critical CSS generation and Unique CSS generation are Quic.cloud services, using these features will deduct from your available quota in Quic.cloud. Depending on the size of your site, using Guest Optimization can quickly eat up the free quota of your Quic.cloud account.
Do keep in mind, if you are already using the features below from the LSCache Plugin, you won’t notice any additional impact on your resources because they are the same features that get enabled. when Guest Optimization is enabled.
Conclusion
Somewhere, someone is coming up with new ways to optimize their website and make it faster. The Guest Optimization feature in the LiteSpeed Cache for WordPress plugin is one of the latest features available to supercharge your website. First impressions are everything, so why not consider enabling the feature for users and Pagespeed bots alike?
What better place to enable Guest Mode for your WordPress site than if you hosted here at ChemiCloud with our already lightning-fast servers with LiteSpeed Enterprise, which gives you extra credits in the Quic.cloud system?
If you aren’t already hosting here, why not? And if you are hosting here and have enabled Guest Mode, tell us, what do you think? Have you seen improvements in your Pagespeed results? We want to hear from you!
Don’t forget that ChemiCloud’s infrastructure supports LiteSpeed out of the box. If you’d like to experience top speed and reliability and have access to great tools like Guest Mode, try our Managed WordPress hosting and have your website migrated today!
]]>
Ever scrolled to the bottom of a website with an older style design and see a link called Sitemap and wondered, what is that? Wonder no more! A WordPress sitemap is just like it sounds like, a map of the website with a list of all the pages and categories for that particular website. Think of it as an instruction manual for a search engine on what pages you have on your site, where they are, and what they’re called.
Sitemaps were really happenin’ in the late 90s/early 2000s and while they’re still around today, they tend to serve more of an SEO purpose, than someone clicking it to find a particular page. A sitemap certainly won’t boost your SEO rankings like magic, but it will allow engines to crawl your website. When you think about search engine optimization, you have to keep in mind one key thing – there’s more to search engines than Google.
Take Bing, for example, it may only have an estimated 8 percent market share, but there’s less competition on Bing for the number one spot, compared to Google, so don’t discount advertising on Bing or optimizing your site with their SEO tools.
Do I need a Sitemap?
Yes! They are extremely important from a search engine optimization perspective.
Just having one doesn’t immediately boost your search rankings, but if there’s a page on your site that isn’t indexed, having a site map helps the crawler sort that out and complete the indexing of your site.
Sitemaps are really useful when you first create your site because most new websites don’t have any backlinks. This makes it harder for search engines to discover and index all of a page’s content. For this reason, major search engines like Bing, Google, and Baidu, allow owners of websites to submit their sitemaps using their own webmaster tools. This instructs that search engine crawler bots to check your site and add your content to its search results database.
I already have a website, is a site map right for me?
Again, YES! Absolutely. Without a sitemap, there’s no guarantee all of your content has been indexed. A sitemap helps you highlight the portions of your website that are more important or updated more frequently than others, so search engines can index your content accordingly.
How do I create a Sitemap?
Well, it depends on how your website is built. If you’re using a CMS like WordPress, there are some great plugins, and if you used regular ole’ CSS and HTML to build your site, there are some tools you can use to generate a sitemap. We’ll cover a few ways to do this below so you can make an informed decision when you make your first sitemap.
Creating a Site Map using a Site Map Generator
If you manually built your website using regular HTML and CSS, you will certainly benefit from using a Site Map Generator. My favorite tool is xml-sitemaps.com.
The website is free and simple. It’s perfect for quickly creating a sitemap for a small website, up to 500 pages.
Their site doesn’t require any registration and you can download the XML file results immediately after using the tool.
Of course, if you have more than 500 pages, they do have a Pro Sitemap service which can index up to 1.5 million pages, automatically update sitemaps, and create an image, video, and news specific sitemaps, plus RSS feeds, as well as to detect and list broken links on your site.
How do I create a WordPress Sitemap?
It would be remiss of me not to mention how to create a sitemap on WordPress, the Internet’s most popular CMS.
There are a few plugins you can use to create a WordPress Sitemap site, including these:
However, with WordPress, you always want to keep in mind the number of plugins you have installed. If you already have a lot of plugins, do you really want to add another plugin that effectively does only one thing (creates sitemaps)? Probably not.
For this reason, we suggest using Yoast SEO for your sitemaps. For starters, you’re probably already using Yoast SEO for its awesome SEO features AND your sitemaps. In case you didn’t know, some of the best features of Yoast SEO include:
- Automated technical SEO improvements, like canonical URLs and meta tags.
- Advanced XML sitemaps; making it easy for Google to understand your site structure.
- Title and meta description templating, for better branding and consistent snippets in the search results.
- An in-depth Schema.org integration will increase your chance of getting rich results, by helping search engines to understand your content.
- Full control over site breadcrumbs, so that users and search engines always know where they are.
- Faster loading times for your whole website, due to an innovative way of managing data in WordPress.
Yoast also helps you create awesome content by giving you these features:
- SEO analysis: an invaluable tool while writing SEO-friendly content with the right (focus) keyphrases in mind.
- Readability analysis: ensures that humans and search engines can read and understand your content.
- Full language support for English, German, French, Dutch, Spanish, Italian, Russian, Indonesian, Polish, Portuguese, Arabic, Swedish, Hebrew, Hungarian and Turkish.
- A Google preview, which shows what your listings will look like in the search results. Even on mobile devices!
- Innovative Schema blocks for the WordPress block editor, so that your FAQ and HowTo content can be shown directly in the search results. Plus a breadcrumbs block to guide your users.
And, whether you’re an experienced blogger or totally new to the scene, Yoast helps you keep your site in perfect shape by:
- Tuning the engine of your website, so you can work on creating great content!
- Giving you cornerstone content and internal linking features to help you optimize your site structure in a breeze.
- Translating your content to structured data where possible, to help search engines understand your website.
- Helping you manage your team: with our SEO roles, you can give colleagues access to specific sections of the Yoast SEO plugin.
Exciting News: Introducing Our fastest WordPress Hosting stack Ready for speed? Try it for just $1!
If you aren’t using Yoast SEO already, you can download Yoast SEO here or install it from the Plugins area of your /wp-admin.
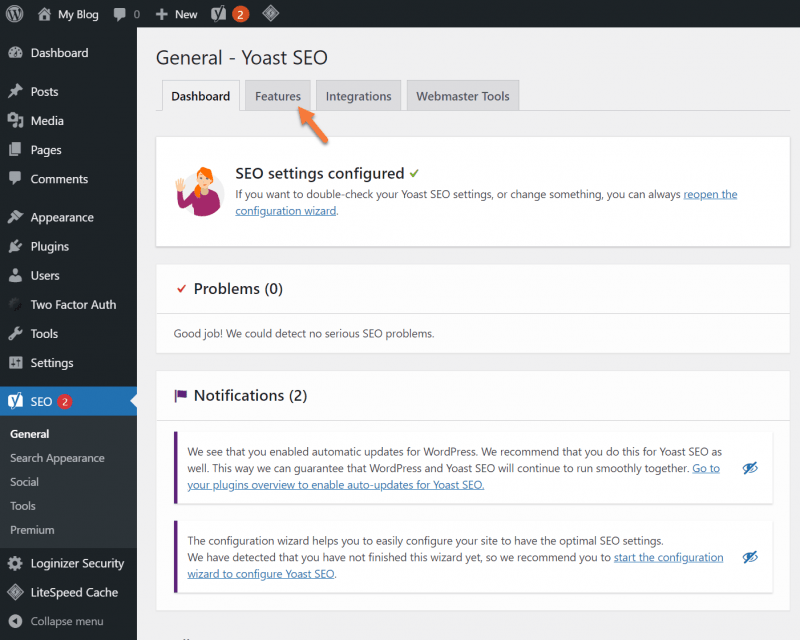
Let’s take a look at how to create a sitemap in Yoast SEO. By the way, the tutorial below assumes you’ve already installed Yoast SEO.
Step 1: Log in to your /wp-admin and click SEO from the toolbar on the left.
Step 2: From the Yoast SEO Dashboard, click the Features tab.
Step 3: Look in the list of features and ensure XML Sitemaps is set to on.
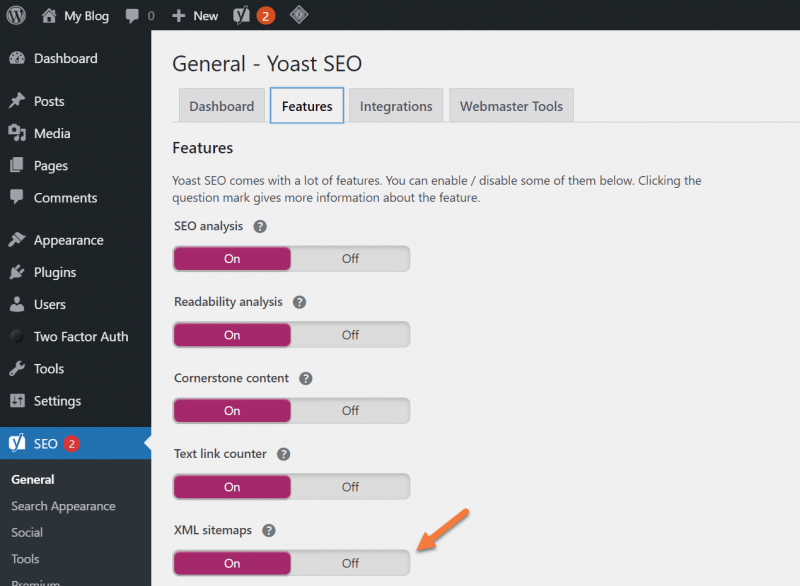
It’s important to keep in mind, XML sitemaps are enabled by default with Yoast SEO. Beyond the initial configuration you do with the plugin, you don’t need to manually turn sitemaps on.
Is this all I need to do to get on Google, Yahoo, Bing, and others?
Yes and no. You can hope and wish Google and Bing/Yahoo’s crawlers notice a new website appeared on the internet and they index it, but truth be told, that could take a while. New websites often don’t have the benefit of a lot of backlinks, if any, so getting noticed can be difficult.
But, there’s a simple solution!
You can submit your website to major search engines and your site will be queued for indexing by their crawler bots. Pretty cool, eh?
How to Submit Your Sitemap to Google
Once you’ve created your sitemap, you’ll want to submit it to major search engines, like Google. This ensures that Google knows your site exists, for one, and also where to find your sitemap. This also gives you helpful information, such as how many pages of your site Google has indexed and if it’s encountered any errors.
Step 1: You need to add your site to the Google Search Console. To do that, open the Search Console by clicking here, then click Start now.
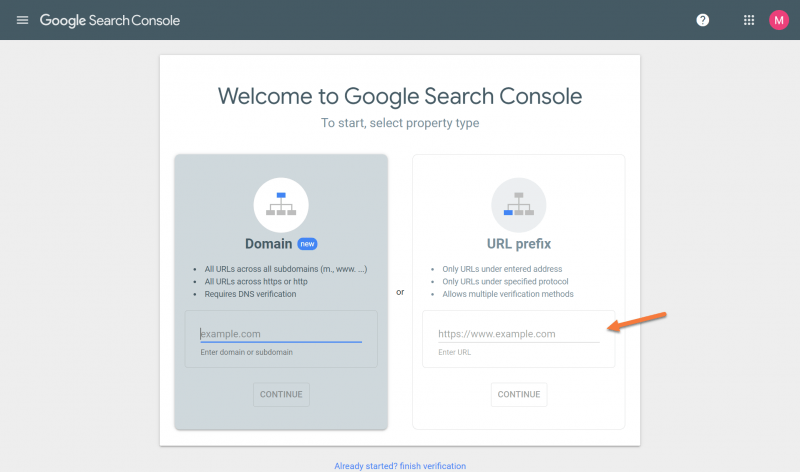
Step 2: You’ll have the option to either add your Domain, which includes all subdomains but requires DNS verification, or you can add by URL Prefix, which includes only URLS entered in the Search Console. This second method supports multiple verification methods and is the version we’ll be using for this tutorial.
Step 3: You’ll be given several options to verify you own the domain you’re attempting to add. For this tutorial, we’ll be using the HTML file method because it’s super easy.
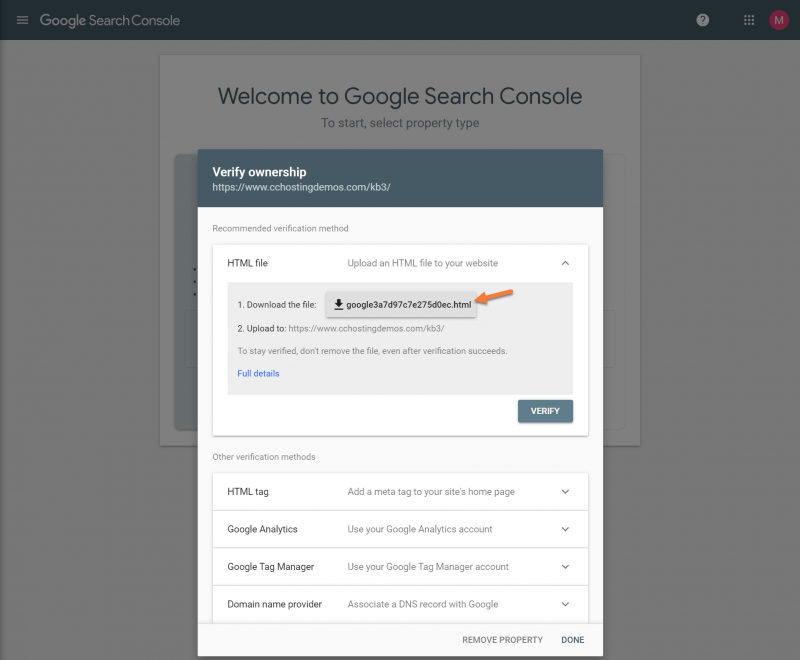
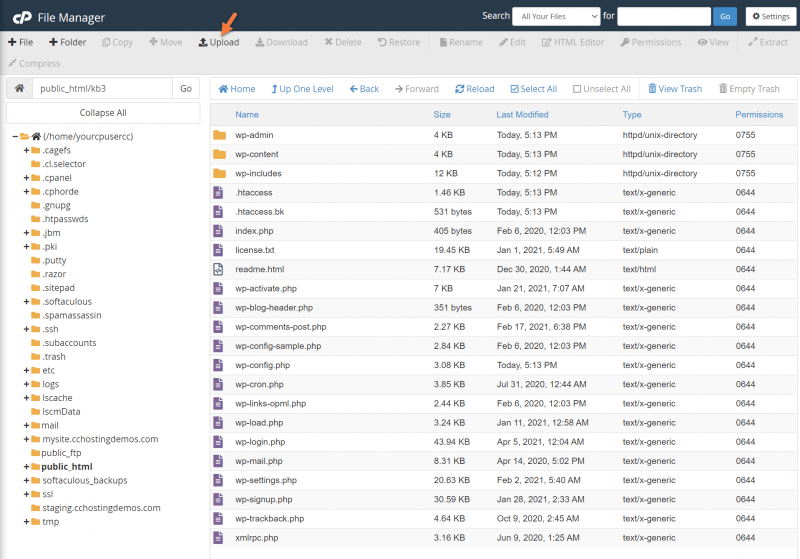
Download the html file and save it to your computer. Next, open your cPanel and open your File Manager.

Navigate to the directory where your website is installed. In my case, I’m using WordPress so I’m going to navigate to the directory where WordPress is installed.
Use the Upload function at the top of File Manager to upload the html file that you downloaded from Google Search Console.
Step 4: Once the file is uploaded, return to the Google Search Console and click Verify.

Google will check that it can access the HTML file you uploaded. Once it’s able to do this, you’ll see this message:

Click Go to property.
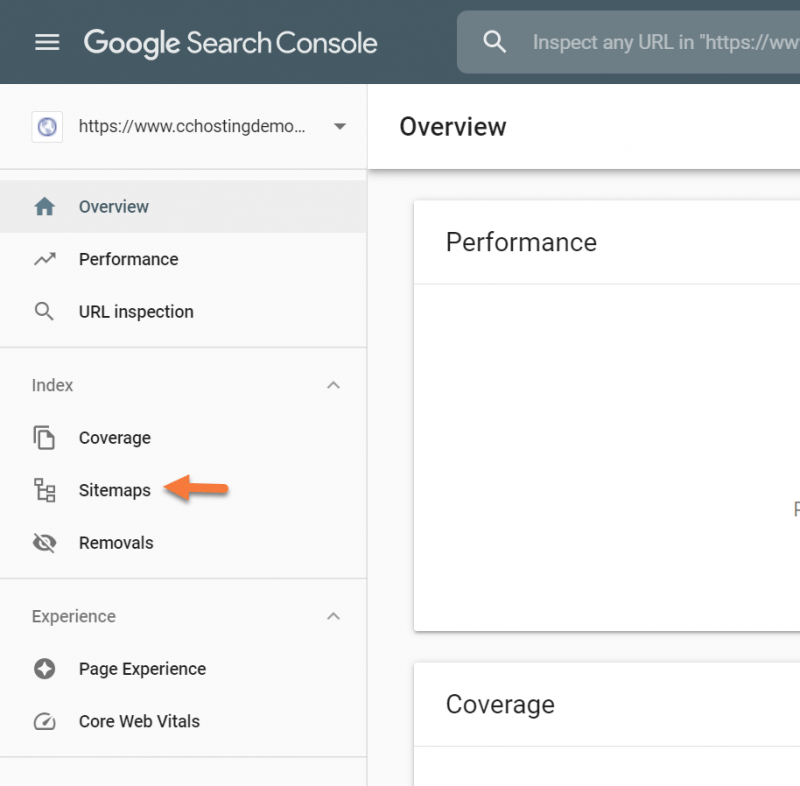
Step 5: Next, click “Sitemaps” from the left menu bar.
 Step 6: Next, you just need to enter the URL of your sitemap. If you’re using the Yoast SEO plugin, this is always going to be yourdomain.tld/sitemap_index.xml.
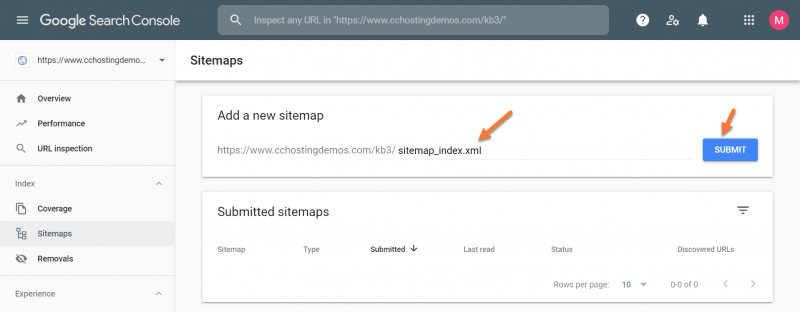
Finally, click Submit.
This will submit the link to your XML sitemap to Google and they will queue your site for indexing by their crawler bots!
Once Google indexes your sitemap, you’ll be able to use the Google Search Console to view statistics such as errors, like 403 and 404, which might be occurring on your site.
What about Bing?
Bing offers users a free set of Webmaster Tools just like Google does. You can use their app to submit your sitemap almost exactly like Google.

Just sign up for the free Bing webmaster tools and you can submit your site.
Conclusion
A WordPress sitemap is one of those little things that every website needs, no matter the size. It’s not going to shoot your site to the top of search engine results pages, but it’s a great way to get your site crawled faster than if you didn’t have a sitemap.
Once you create your WordPress sitemap, you should begin to see valuable search engine optimization information about your website which will allow you to improve your search presence, therefore improving the search performance of your website to maximize the number of visitors possible.
These tools are FREE to use, so why not take advantage of them?
What tips do you have for Sitemaps? Let us know in the questions and comments!
]]>