What is SPF, and how do you enable it on cPanel?
SPF (Sender Policy Framework) is an email authentication protocol that allows an email recipient to verify that the email was sent from an authorized server for a given domain.
To enable SPF on cPanel, follow these steps:
- Log in to your cPanel account
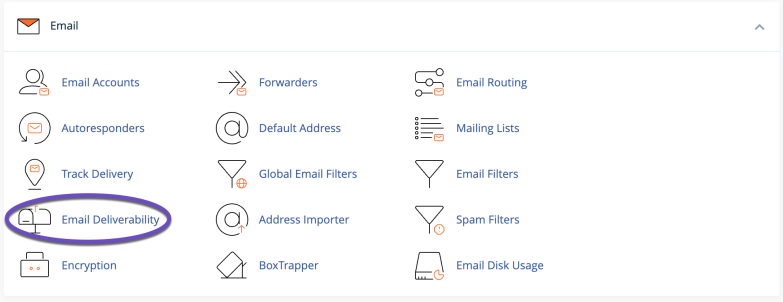
- Click on the “Email Deliverability” icon under the “Mail” section
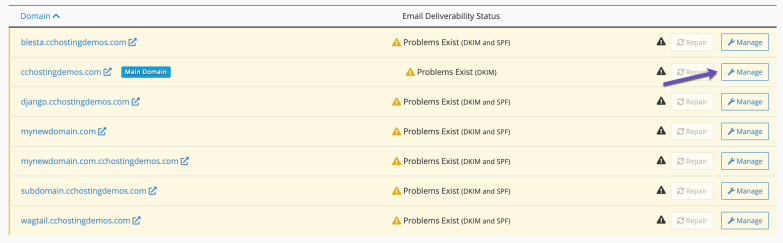
- Click on the “Manage” button next to the email domain for which you want to enable SPF
- Scroll down to the “Sender Policy Framework (SPF)” section
- Enter the desired SPF record in the “Record” field. A typical SPF record might look like “v=spf1 a mx ~all”.
- If there’s an SPF in place already, click on the Customize link. If there’s no SPF in place, click on the Install The Suggested Record button.
- Wait for the DNS changes to propagate, which may take up to 24 hours
Once SPF is enabled, email recipients can use the SPF information to verify that an email was sent from an authorized server for your domain.
What is DKIM, and how do you enable it on cPanel?
DKIM (DomainKeys Identified Mail) is an email authentication method that allows an email recipient to verify that the domain actually sent it it claims to be sent from and that it has not been modified in transit.
To enable DKIM on cPanel, follow these steps:
- Log in to your cPanel account
- Click on the “Email Deliverability” icon under the “Mail” section
- Click on the “Manage” button next to the email domain for which you want to enable SPF
- Scroll down to the “DomainKeys Identified Mail (DKIM)” section
- Click on the “Install The Suggested Record” button to generate a new DKIM key
- Wait for the DNS changes to propagate, which may take up to 24 hours
Once DKIM is enabled, outgoing emails from your domain will include a DKIM signature that the recipient’s email server can use to verify the email’s authenticity.
What is DMARC, and how do you enable it on cPanel?
DMARC (Domain-based Message Authentication, Reporting & Conformance) is an email authentication protocol that allows the sender of an email to specify the email authentication policies for their domain and provides a mechanism for receiving feedback on the authentication of messages sent from their domain.
To enable DMARC on cPanel, follow these steps:
- Log in to your cPanel account
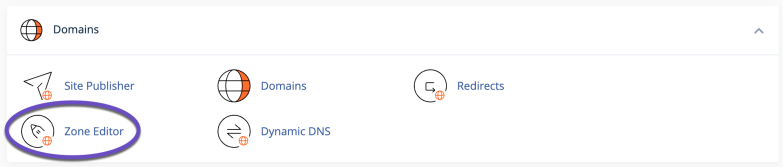
- Click on the “Zone Editor” icon under the “Domains” section
- Click on the “Manage” button next to the email domain for which you want to enable DMARC
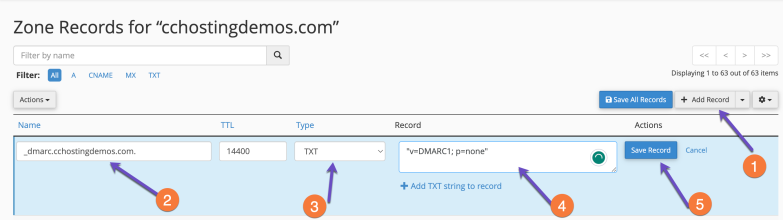
- Click on the +Add Record button and choose Add “TXT” Record from the list
- For the Name field, enter: _dmarc
- The type should be set to: TXT
- The record should be set to “v=DMARC1; p=none”
- Click on the Save Record button
- Wait for the DNS changes to propagate, which may take up to 24 hours
Once DMARC is enabled, email recipients can use the DMARC information to determine the authenticity of emails sent from your domain and take appropriate action based on your DMARC policy.
An advanced DMARC record looks like the following:
_dmarc.example.com IN TXT 14400 "v=DMARC1;p=none;sp=quarantine;pct=100;rua=mailto:[email protected]"
Make sure to change example and [email protected] to the proper ones according to your case.
In conclusion, enabling SPF, DKIM, or DMARC on cPanel is a simple process that can help improve your email’s security and deliverability.
By following these steps, you can ensure that your emails are properly authenticated and protected from modification in transit.
]]>What are Private Nameservers?
Private nameservers allow you to set up nameservers for your own domain of choice. Let’s say you are operating a web hosting business and don’t want people to Google our nameservers and find out you really resell hosting thru us. Using private nameservers, you can avoid just this problem.
Having your own nameservers also gives you a more professional appearance than just plain nameservers, for example. ns1.bobshostingshack.com is pretty professional compared to our default nameservers. 
How to Setup Private Nameservers at Hostinger
Step 1: Click here to open the Hostinger page. You will be prompted to log in to your Hostinger Account:
Step 2: After signing into your Hostinger Account, click on Domains from the top menu.
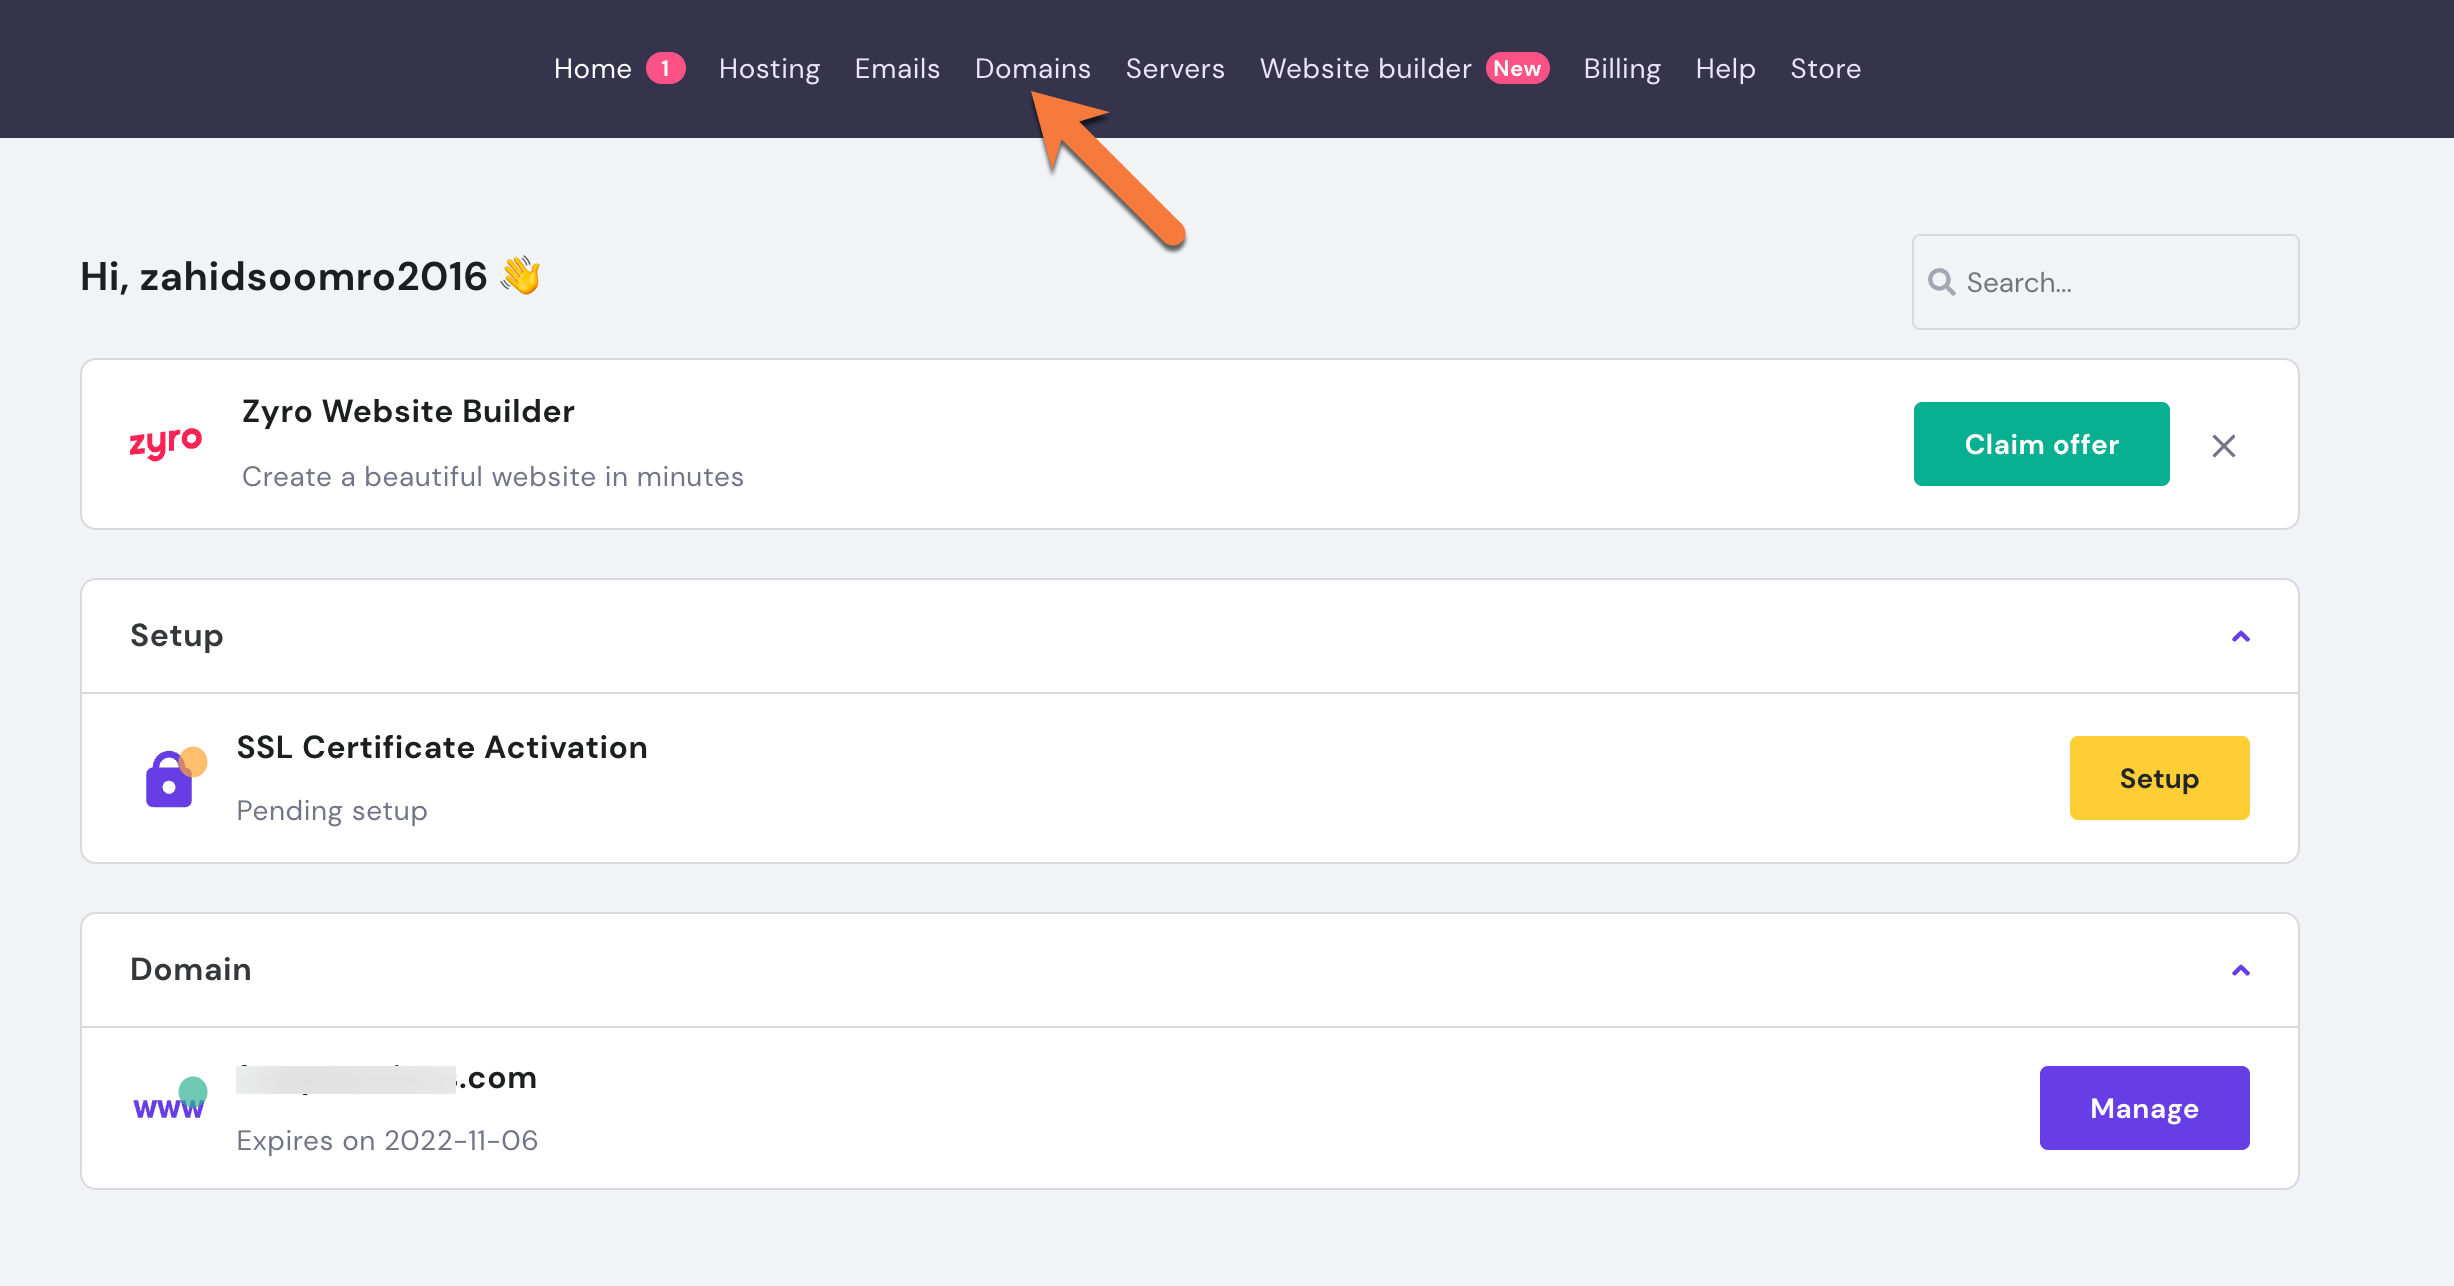
On the next page, you will see a list of all domains registered in your Hostinger account.
Find the domain for which you wish to manage the Nameservers and click on it.

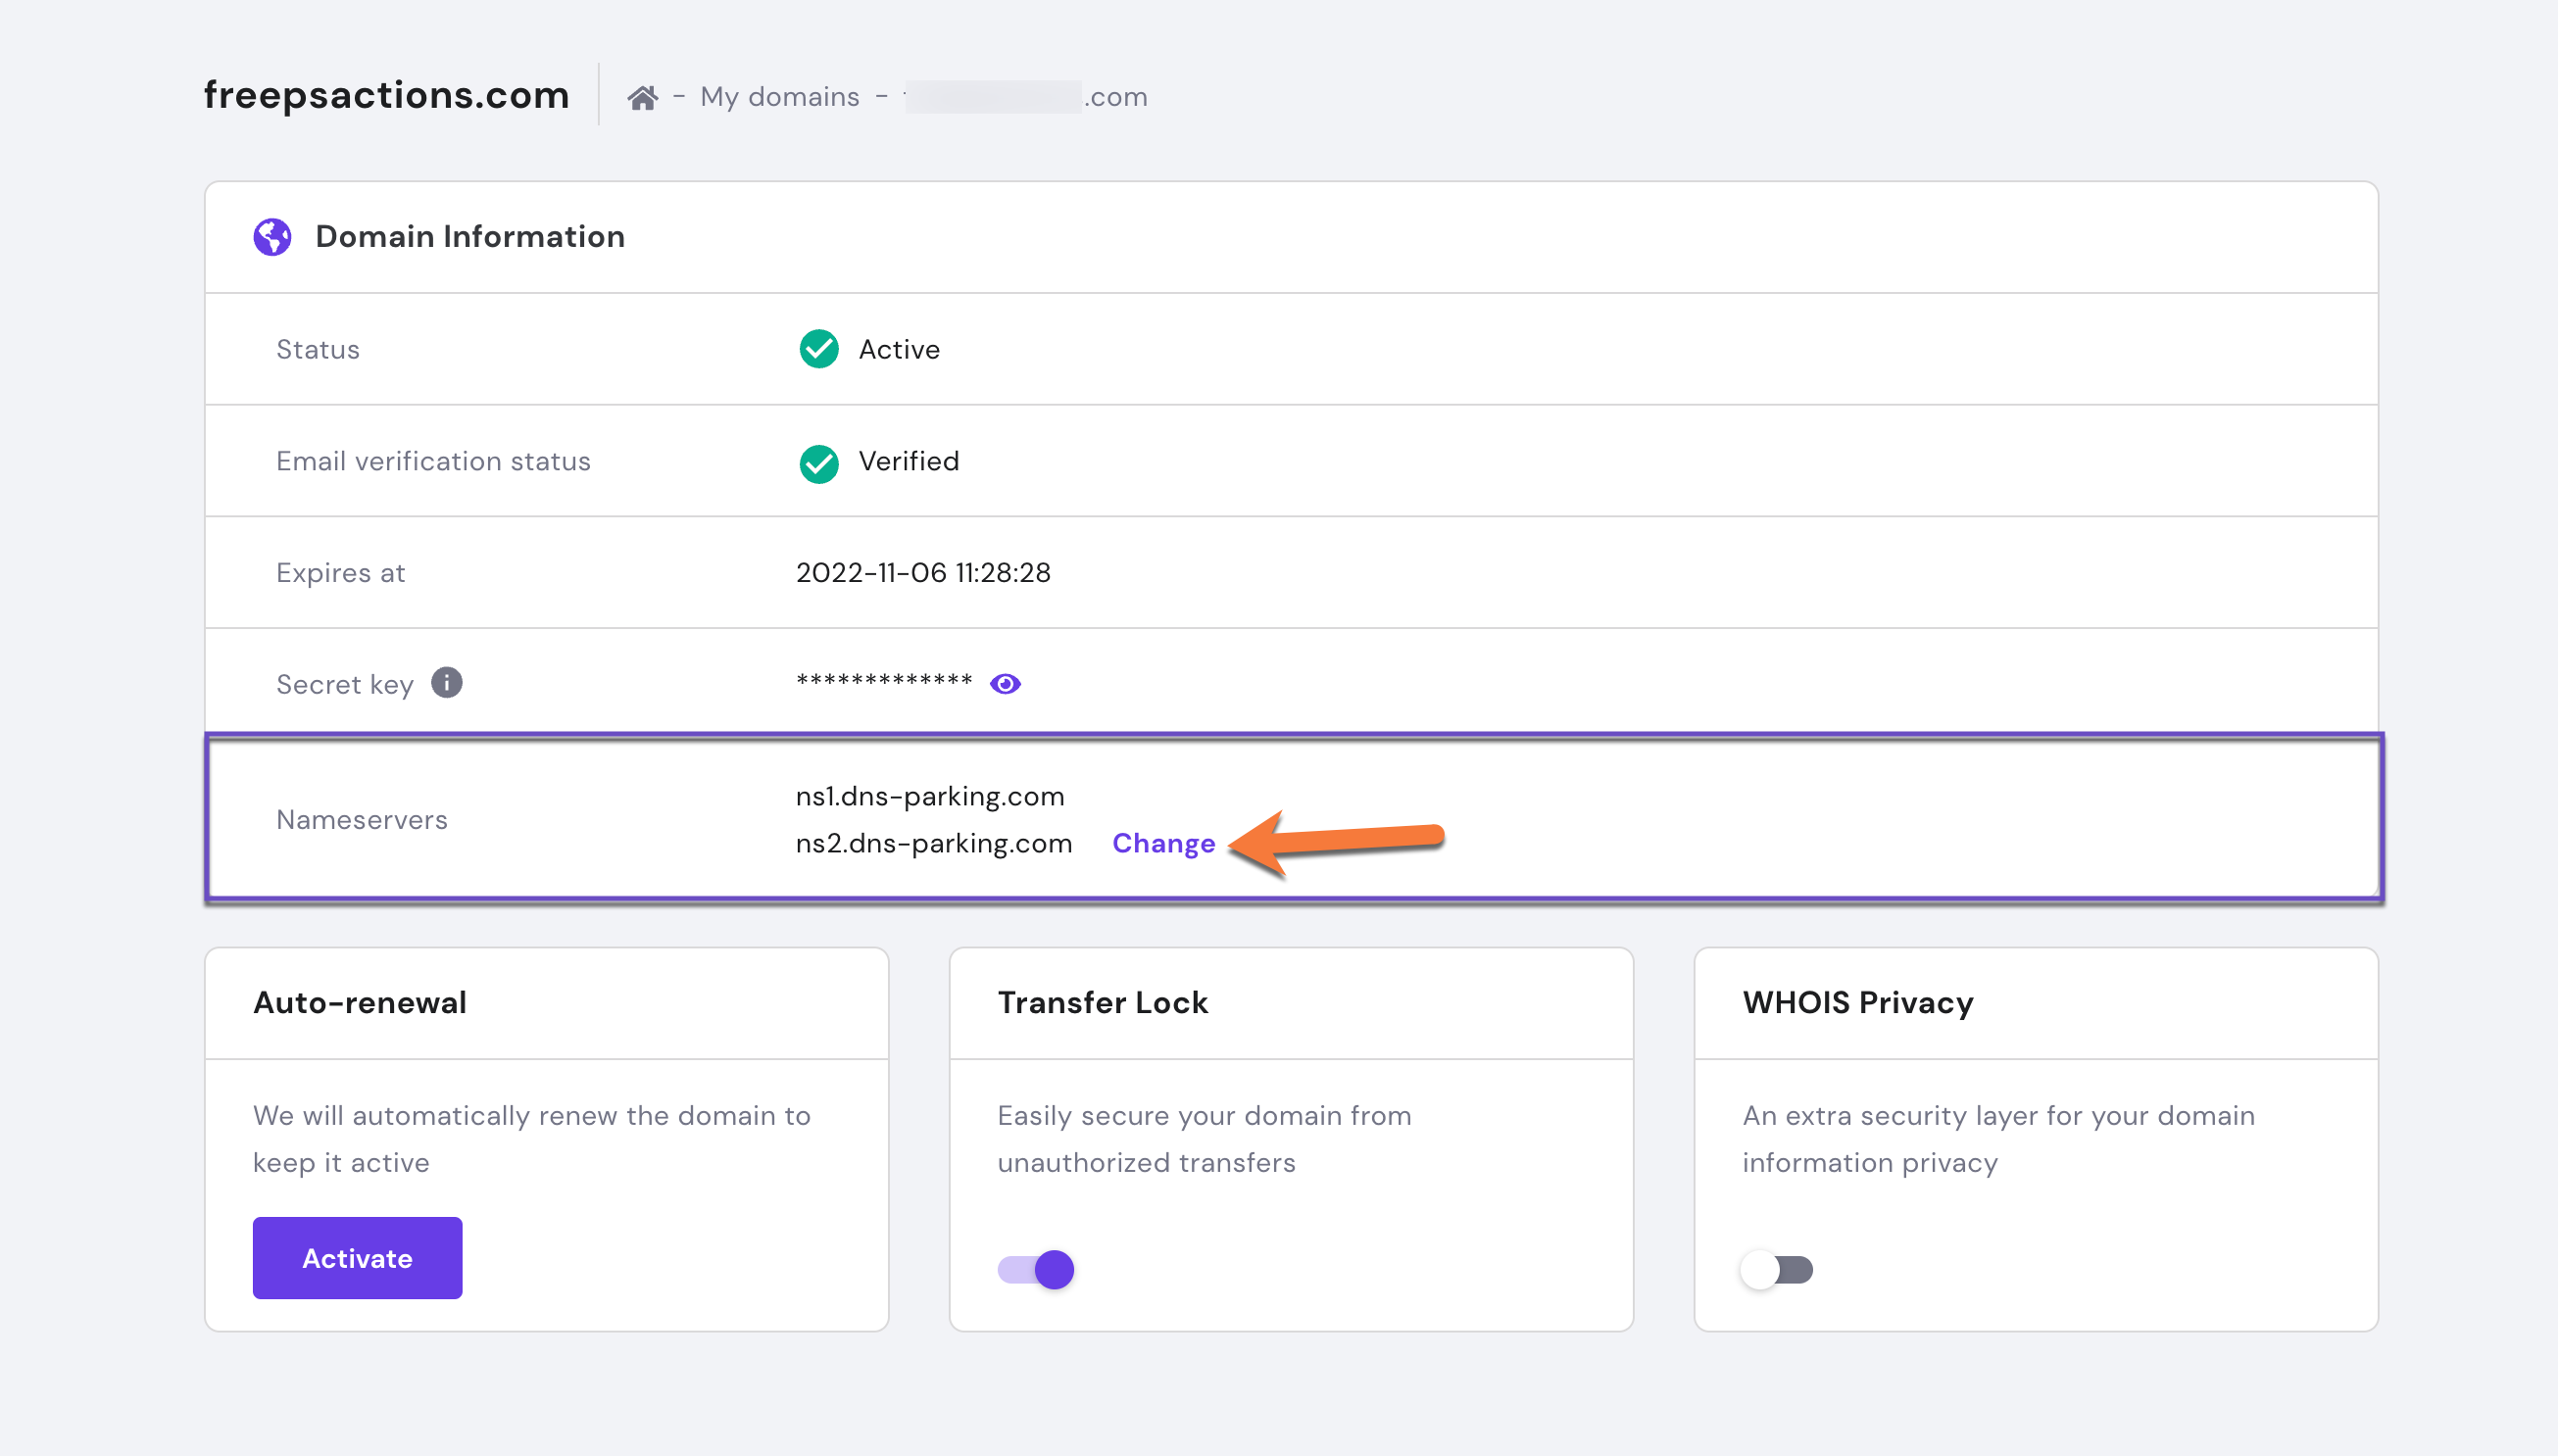
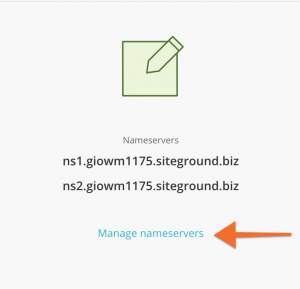
Step 3: While you are on the Domain Overview page, see the Nameservers option and click on the Change button.
Step 4: Once the Name servers page has loaded, scroll down the page and click on the Child Nameservers tab.
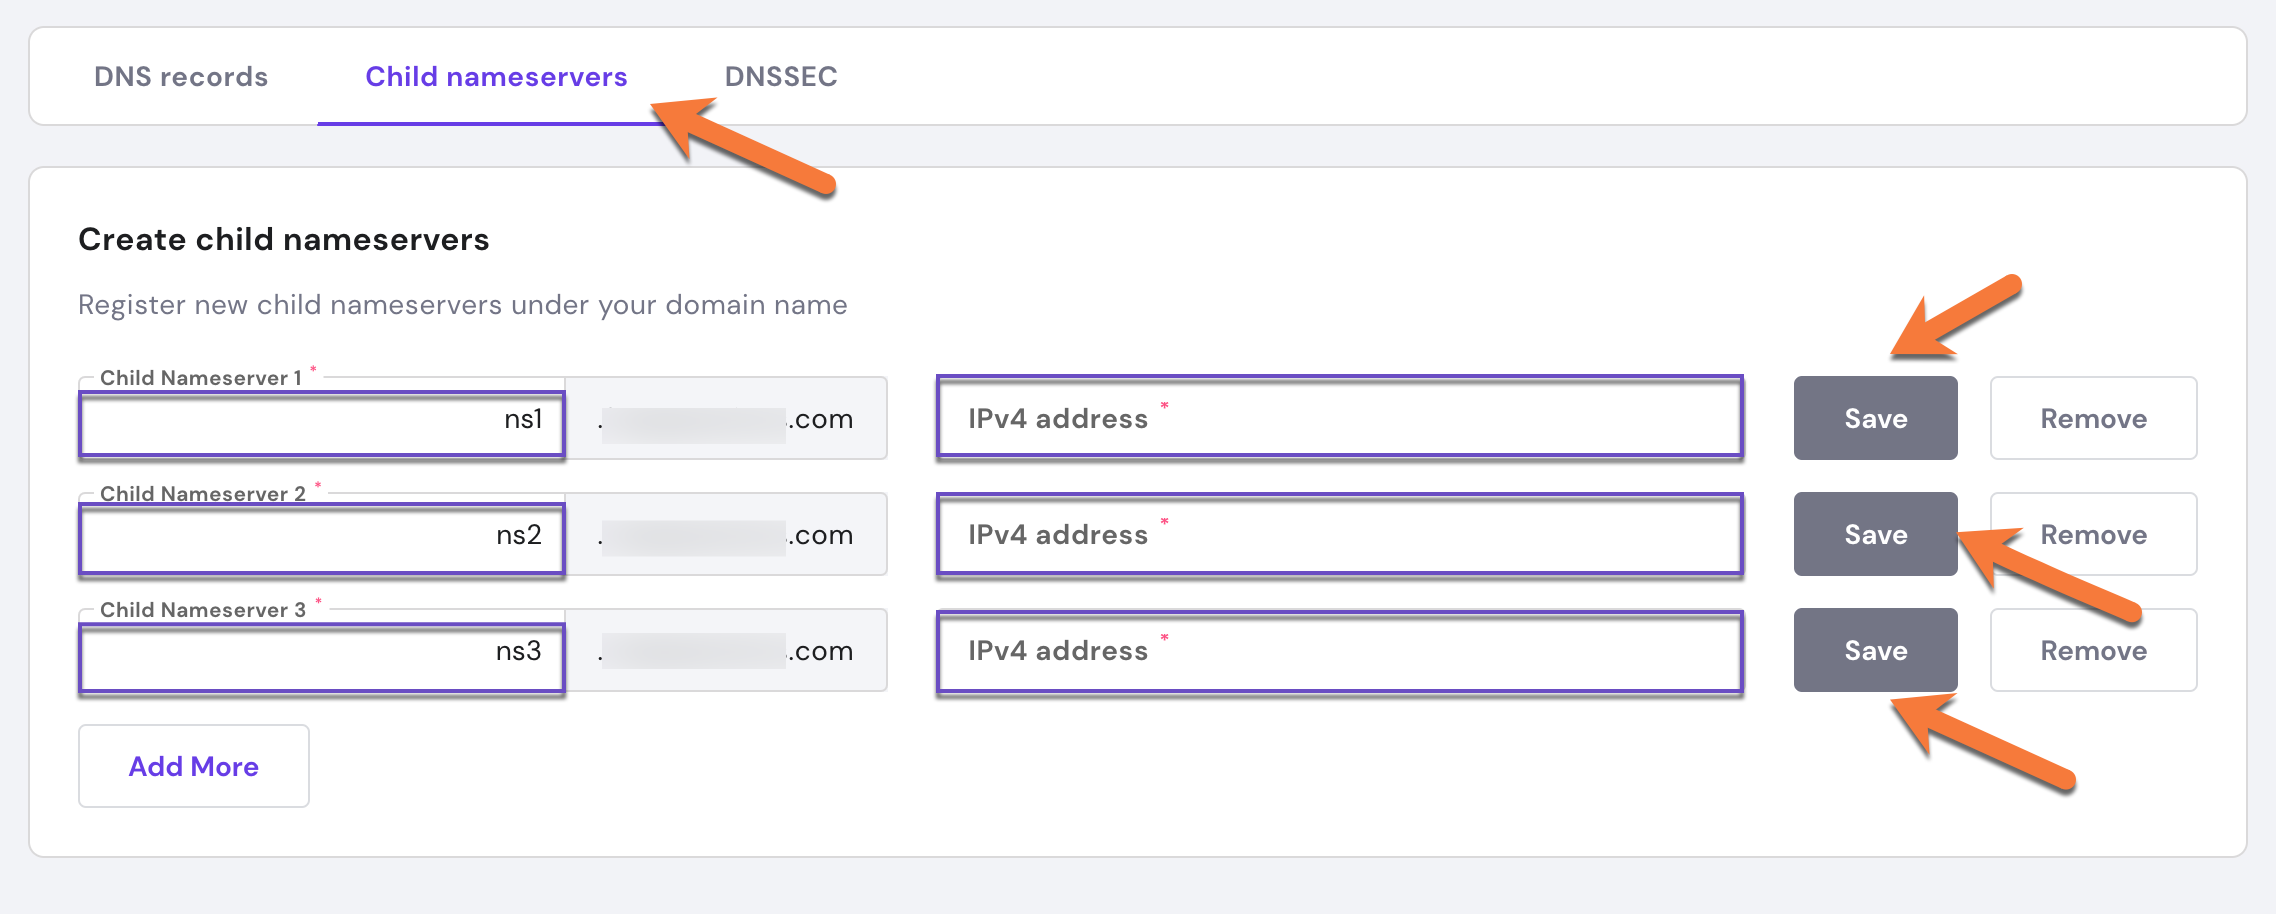
Step 5: Once the Child nameservers page opens, you will have the option to enter your custom name servers.
First, you’ll need to enter the record name for your custom name servers in the Child Nameserver Fields. For example, if your nameservers are going to be ns1.yourdomain.tld, ns2.yourdomain.tld, and so forth, your glue record hostnames will look like the image above.
Second, you need to give each name server an IPv4 address. In the IPv4 address field, enter the IP address for each name server and click the save button. Click Save to save the changes.
Now your Child nameservers are established. Congrats! Your changes will now propagate.
Transfer Your Domain To ChemiCloud
There is no need to juggle separate providers, contacts, and services when you can have everything you need, all in one place.
If you’d like to manage your nameservers and your hosting in the same place, here at ChemiCloud, you should consider transferring your domain(s) from Google Domains to ChemiCloud.
![]()
That’s a wrap!
]]>The basics of how Nameservers works
Think of name servers as specialized directory assistance operators in the big city of the internet. When you’re trying to find a website, these operators direct your computer to the right part of the city.
Here’s how it works with name servers, using a simple analogy:
- You Ask for Directions: You type a website name like “google.com” into your browser. It’s like calling directory assistance to ask for the address of a specific place in the city.
- Your Request Goes to a Name Server: Your request first reaches a name server assigned by your internet service. Think of this name server as a specialized operator who knows where all the website “addresses” are stored.
- Finding the Specific Operator: This name server might not have the specific address you need, so it refers your request to another name server that specifically manages addresses for the “.com” area of the internet. It’s like being transferred to an operator who specializes in a specific part of town.
- Getting the Exact Address: The “.com” name server looks up its records and finds the IP address for “google.com”. This name server is like a local expert who knows every street in the “.com” area.
- Directing You There: The name server sends back the IP address to your computer. Now, your computer knows how to reach “google.com”, much like how you’d start your journey after getting an address from directory assistance.
This system ensures that your internet journey to find a website is smooth and quick, just like how city directory assistance helps you navigate to your destination in a big city.
Things to Consider Before Changing the Name Servers for Your Domain
There are several important considerations to keep in mind before changing the nameservers for your domain:
- Propagation Time: Changes to nameservers can take anywhere from a few minutes a few hours to fully propagate across the internet. During this period, your website might be temporarily inaccessible or behave unpredictably.
- Email Service Disruption: If your email is hosted at the same domain, changing nameservers could disrupt your email service. Make sure you know the correct MX records to update at the new nameserver to avoid any email downtime.
- DNS Record Migration: Ensure that all necessary DNS records (like MX for mail servers, TXT for verification purposes, A records for addresses, etc.) are correctly set up at the new nameserver. This helps prevent services linked to your domain from breaking.
- SSL/TLS Certificates: If your website uses SSL/TLS certificates for HTTPS, changing nameservers might require reconfiguring or reissuing your certificates, depending on how they’re managed.
- Backup: Always have a backup of your DNS records. If anything goes wrong, you’ll be able to restore the previous settings without much hassle.
- Timing: Consider the timing of the nameserver change. Avoid making changes during peak business hours or major updates to minimize the impact on your users.
Taking these steps helps ensure a smooth transition when changing nameservers and reduces the risk of downtime or service disruption.
What Are the Preps for Changing Hostinger Nameservers?
When preparing to change Hostinger nameservers, here are some steps to follow to ensure a smooth transition:
- Access Hostinger Account: Log in to your Hostinger account where your domain is registered.
- Backup DNS Records: Before making any changes, document or take screenshots of your current DNS settings, including A, MX, CNAME, TXT records, and any other configurations. This will be crucial if you need to revert or re-enter these settings in the new nameserver environment.
- Prepare New Nameserver Information: Have the details of the new nameservers ready. Typically, you will need at least two nameserver addresses from the new hosting provider.
- Check Email Settings: If your email is hosted using the same domain, ensure you have the MX records and any other necessary email configuration details at hand to set up on the new nameservers to avoid disruption.
- Plan the Timing: Schedule the nameserver change during a low-traffic period for your website to minimize the impact on visitors and services. Overnight or during the weekend can be ideal, depending on your audience.
- Registrar Login Details: Ensure you have login credentials handy for both your current registrar (Hostinger) and potentially for the new nameserver provider if it’s different from your domain registrar.
- Propagation Delay Awareness: Remember that DNS changes can take anywhere from a few hours to up to 48 hours to propagate fully. During this time, your website and email services may experience inconsistencies.
- Technical Support: Know how to contact technical support from both Hostinger and your new hosting provider in case you encounter any issues during or after the change.
By following these steps, you’ll be well-prepared to change your Hostinger nameservers with minimal disruption to your services.
Why You Should Change Hostinger Nameservers
The DNS service you use for your domain can have a significant impact on the TTFB performance of your website. Using a highly scalable and available DNS service ensures high performance all around the world. All ChemiCloud plans include a premium DNS service.
Typically, domain registrars do not provide customers with a premium DNS service like ChemiCloud DNS. For this reason, we recommend switching nameservers to ours if your domain is registered with Hostinger and you are hosting your website with us.
What are my ChemiCloud Nameservers?
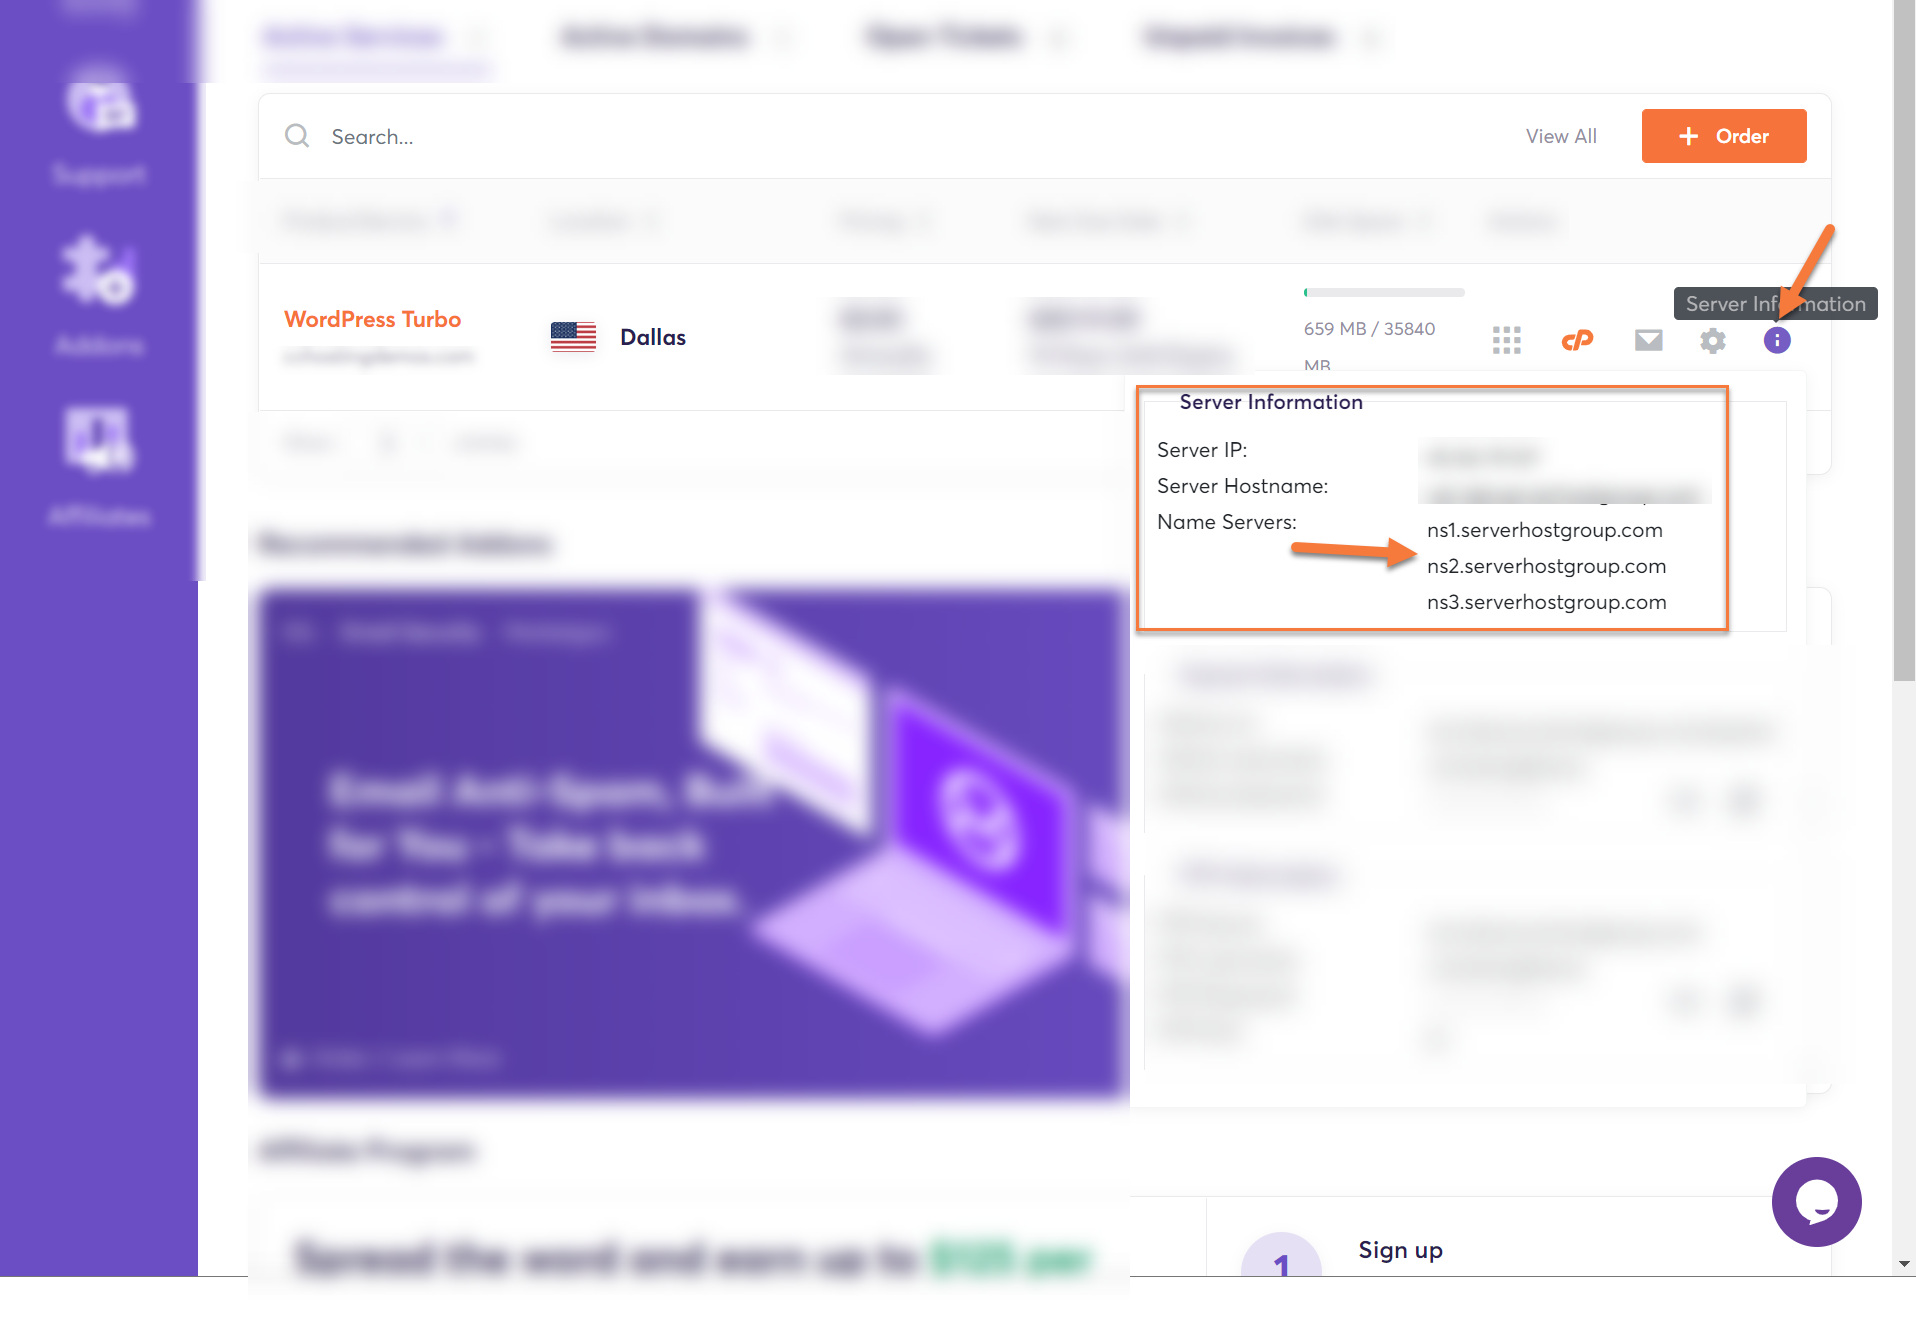
You can find your ChemiCloud nameservers by clicking on the Server Information icon inside the ChemiCloud dashboard.
To learn more, we published an easy guide explaining how to locate your Nameservers inside of the Client Area here.
How to Change Hostinger Nameservers
Step 1: Click here to open the Hostinger login page. You will be prompted to login into your Hostinger Account.
Step 2: After signing into your Hostinger Account, click on Domains from the top menu.
On the next page, you will see a list of all domains registered in your Hostinger account.
Find the domain for which you wish to manage the Nameservers and click on it.
Step 3: While you are on the Domain Overview page, see the Nameservers option and click on the Change button.

Step 4: The Custom name servers page will load. Here you will have the option to use the default Hostinger Name servers or to enter your own name server records. Enter your nameservers and click the Save button.
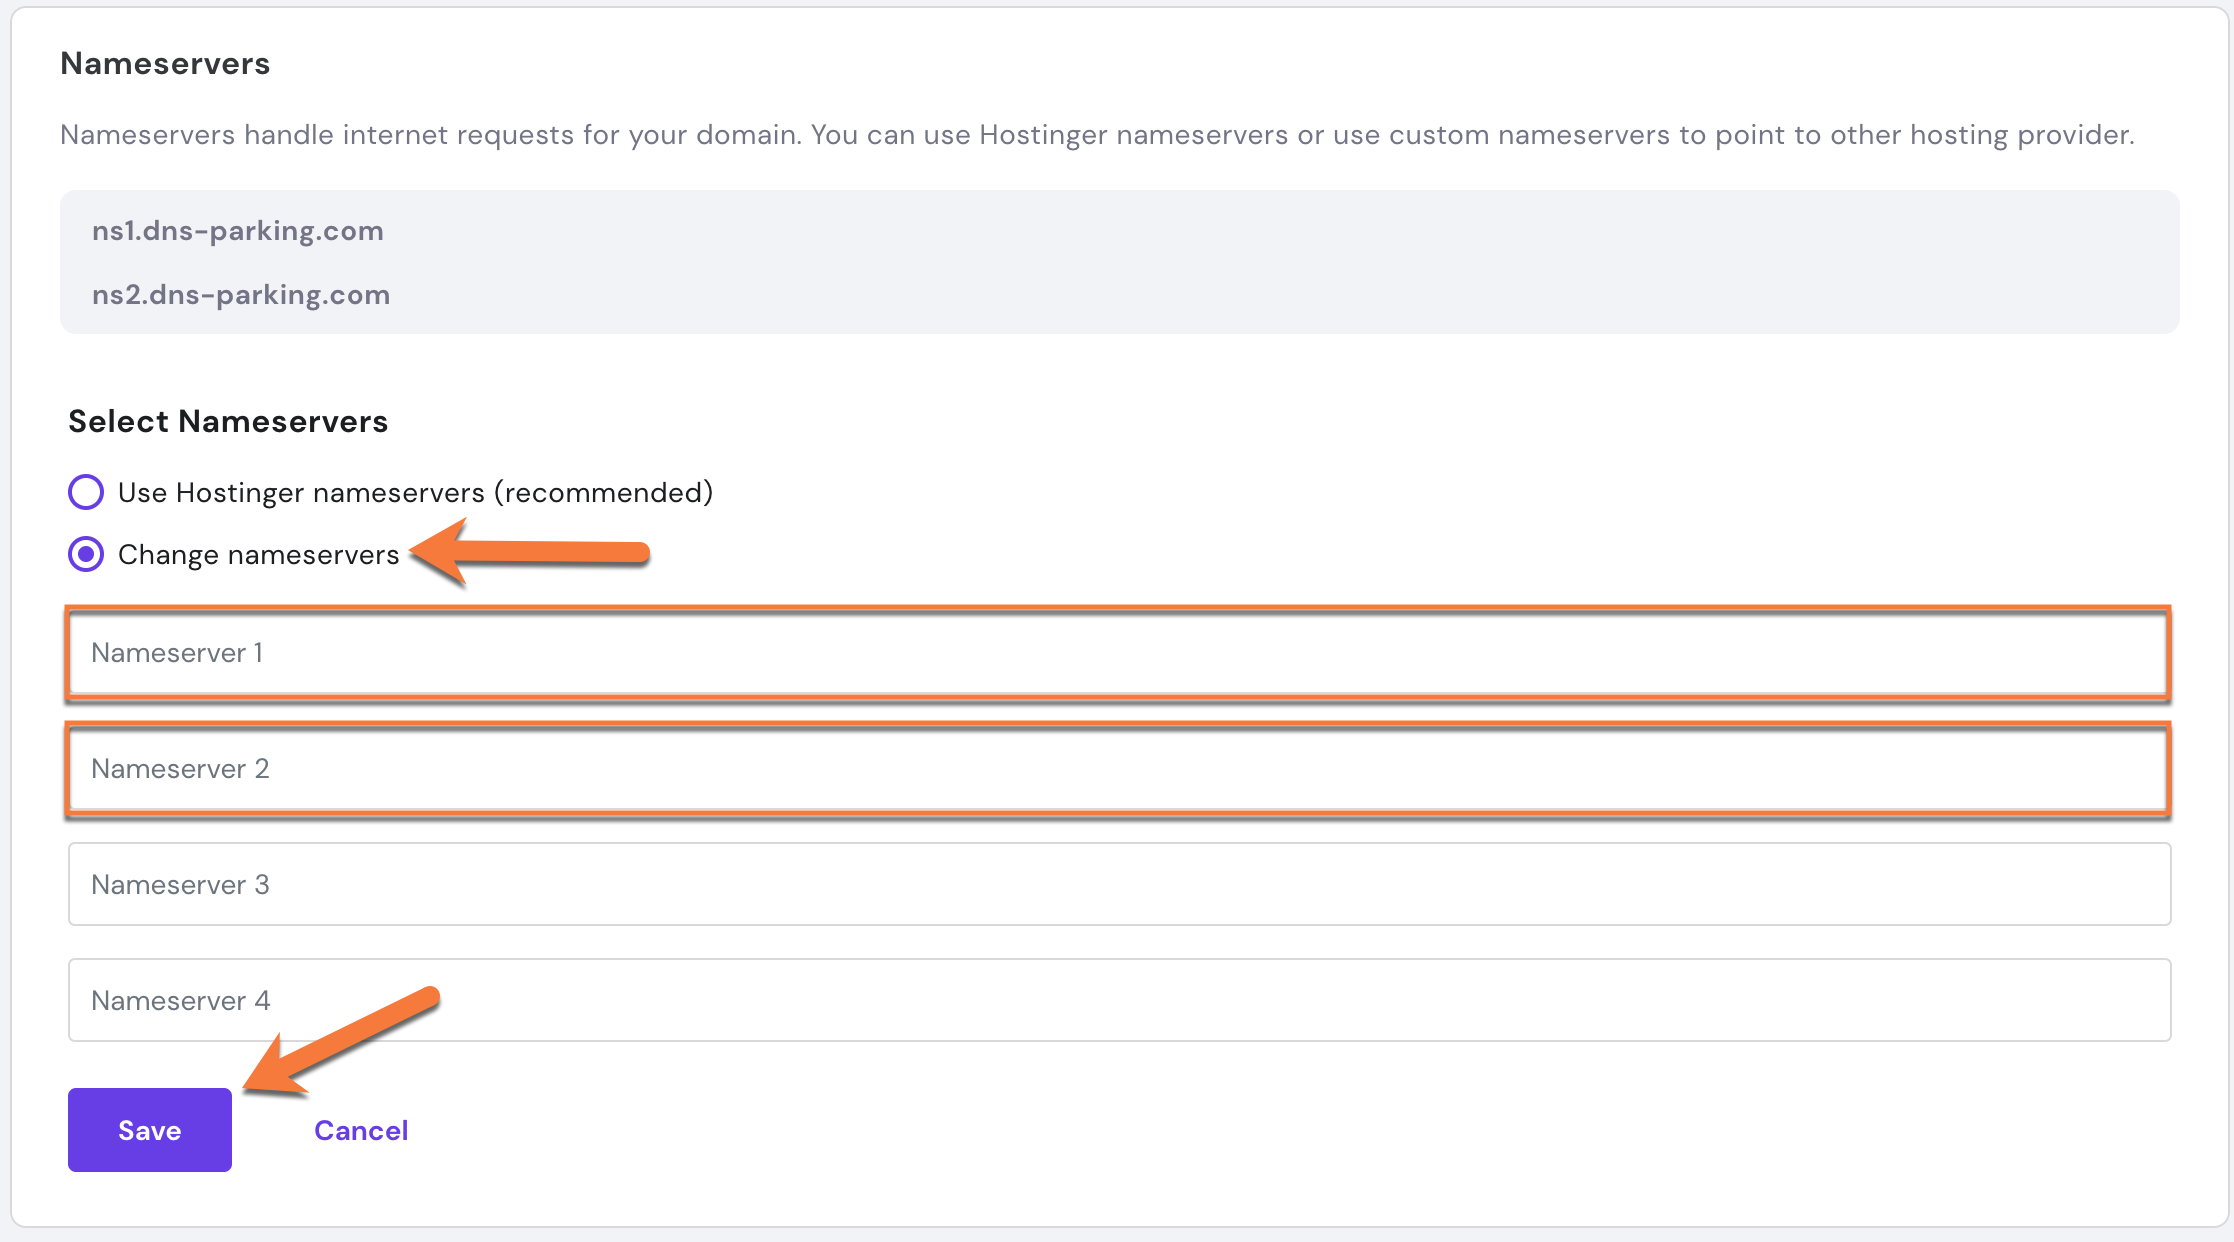
Your changes will now propagate.
How about transferring your domain for free?
Grab an annual hosting plan which you’ll need anyway, and get a free domain transfer. Moreover, we’ll migrate your website(s) free of charge and with zero downtime from Hostinger to us.
You’ll get more than a free domain transfer:
- Great renewal rates: When renewing your domain, you’ll never have to worry about breaking the bank.
- User-friendly domain management: Manage your domain with an easy-to-use control panel and dashboard.
- Industry-leading Customer Support – Day or night, our 24/7 happiness engineers are here to offer struggle-free support when you need it.
 Claim your free domain transfer now.
The basics of how Nameservers works
Think of name servers as specialized directory assistance operators in the big city of the internet. When you’re trying to find a website, these operators direct your computer to the right part of the city.
Here’s how it works with name servers, using a simple analogy:
- You Ask for Directions: You type a website name like “google.com” into your browser. It’s like calling directory assistance to ask for the address of a specific place in the city.
- Your Request Goes to a Name Server: Your request first reaches a name server assigned by your internet service. Think of this name server as a specialized operator who knows where all the website “addresses” are stored.
- Finding the Specific Operator: This name server might not have the specific address you need, so it refers your request to another name server that specifically manages addresses for the “.com” area of the internet. It’s like being transferred to an operator who specializes in a specific part of town.
- Getting the Exact Address: The “.com” name server looks up its records and finds the IP address for “google.com”. This name server is like a local expert who knows every street in the “.com” area.
- Directing You There: The name server sends back the IP address to your computer. Now, your computer knows how to reach “google.com”, much like how you’d start your journey after getting an address from directory assistance.
This system ensures that your internet journey to find a website is smooth and quick, just like how city directory assistance helps you navigate to your destination in a big city.
Things to Consider Before Changing the Name Servers for Your Domain
There are several important considerations to keep in mind before changing the nameservers for your domain:
- Propagation Time: Changes to nameservers can take anywhere from a few minutes a few hours to fully propagate across the internet. During this period, your website might be temporarily inaccessible or behave unpredictably.
- Email Service Disruption: If your email is hosted at the same domain, changing nameservers could disrupt your email service. Make sure you know the correct MX records to update at the new nameserver to avoid any email downtime.
- DNS Record Migration: Ensure that all necessary DNS records (like MX for mail servers, TXT for verification purposes, A records for addresses, etc.) are correctly set up at the new nameserver. This helps prevent services linked to your domain from breaking.
- SSL/TLS Certificates: If your website uses SSL/TLS certificates for HTTPS, changing nameservers might require reconfiguring or reissuing your certificates, depending on how they’re managed.
- Backup: Always have a backup of your DNS records. If anything goes wrong, you’ll be able to restore the previous settings without much hassle.
- Timing: Consider the timing of the nameserver change. Avoid making changes during peak business hours or major updates to minimize the impact on your users.
Taking these steps helps ensure a smooth transition when changing nameservers and reduces the risk of downtime or service disruption.
What Are the Preps for Changing IONOS Nameservers?
When preparing to change IONOS nameservers, here are some steps to follow to ensure a smooth transition:
- Access IONOS Account: Log in to your IONOS account where your domain is registered.
- Backup DNS Records: Before making any changes, document or take screenshots of your current DNS settings, including A, MX, CNAME, TXT records, and any other configurations. This will be crucial if you need to revert or re-enter these settings in the new nameserver environment.
- Prepare New Nameserver Information: Have the details of the new nameservers ready. Typically, you will need at least two nameserver addresses from the new hosting provider.
- Check Email Settings: If your email is hosted using the same domain, ensure you have the MX records and any other necessary email configuration details at hand to set up on the new nameservers to avoid disruption.
- Plan the Timing: Schedule the nameserver change during a low-traffic period for your website to minimize the impact on visitors and services. Overnight or during the weekend can be ideal, depending on your audience.
- Registrar Login Details: Ensure you have login credentials handy for both your current registrar (IONOS) and potentially for the new nameserver provider if it’s different from your domain registrar.
- Propagation Delay Awareness: Remember that DNS changes can take anywhere from a few hours to up to 48 hours to propagate fully. During this time, your website and email services may experience inconsistencies.
- Technical Support: Know how to contact technical support from both IONOS and your new hosting provider in case you encounter any issues during or after the change.
By following these steps, you’ll be well-prepared to change your Hostinger nameservers with minimal disruption to your services.
Why You Should Change Ionos Nameservers
The DNS service you use for your domain can have a significant impact on the TTFB performance of your website. Using a highly scalable and available DNS service ensures high performance all around the world. All ChemiCloud plans include a premium DNS service.
Typically, domain registrars do not provide customers with a premium DNS service like ChemiCloud DNS. For this reason, we recommend switching nameservers to ours if your domain is registered with Ionos and you are hosting your website with us.
What are my ChemiCloud Nameservers?
You can find your ChemiCloud nameservers by clicking on the Server Information icon inside the ChemiCloud dashboard.
To learn more, we published an easy guide explaining how to locate your Nameservers inside of Client Area here.
How to Change Ionos Nameservers
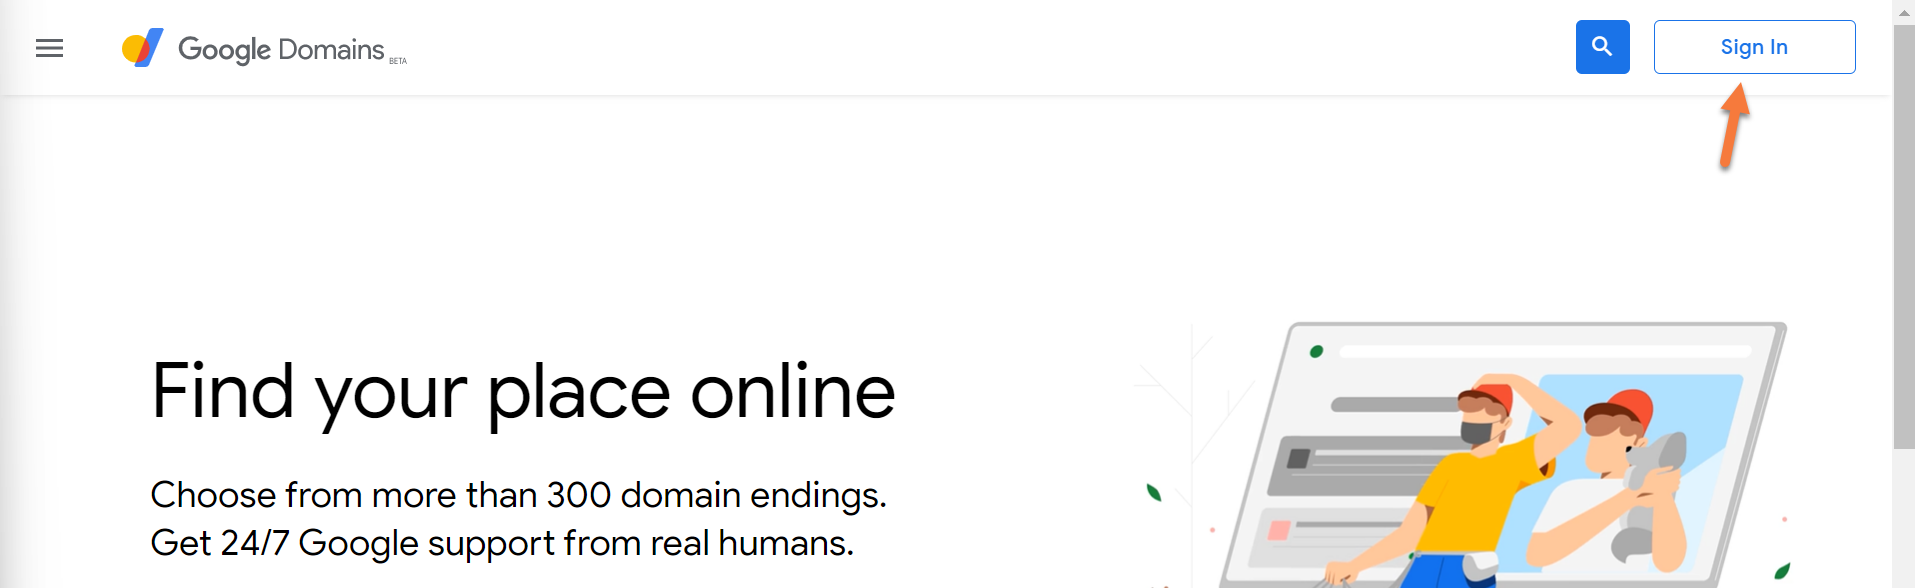
Step 1: Click here to open the Ionos page. In the top right corner of the webpage, click the Sign In button.
You will be prompted to log in to your Ionos Account.
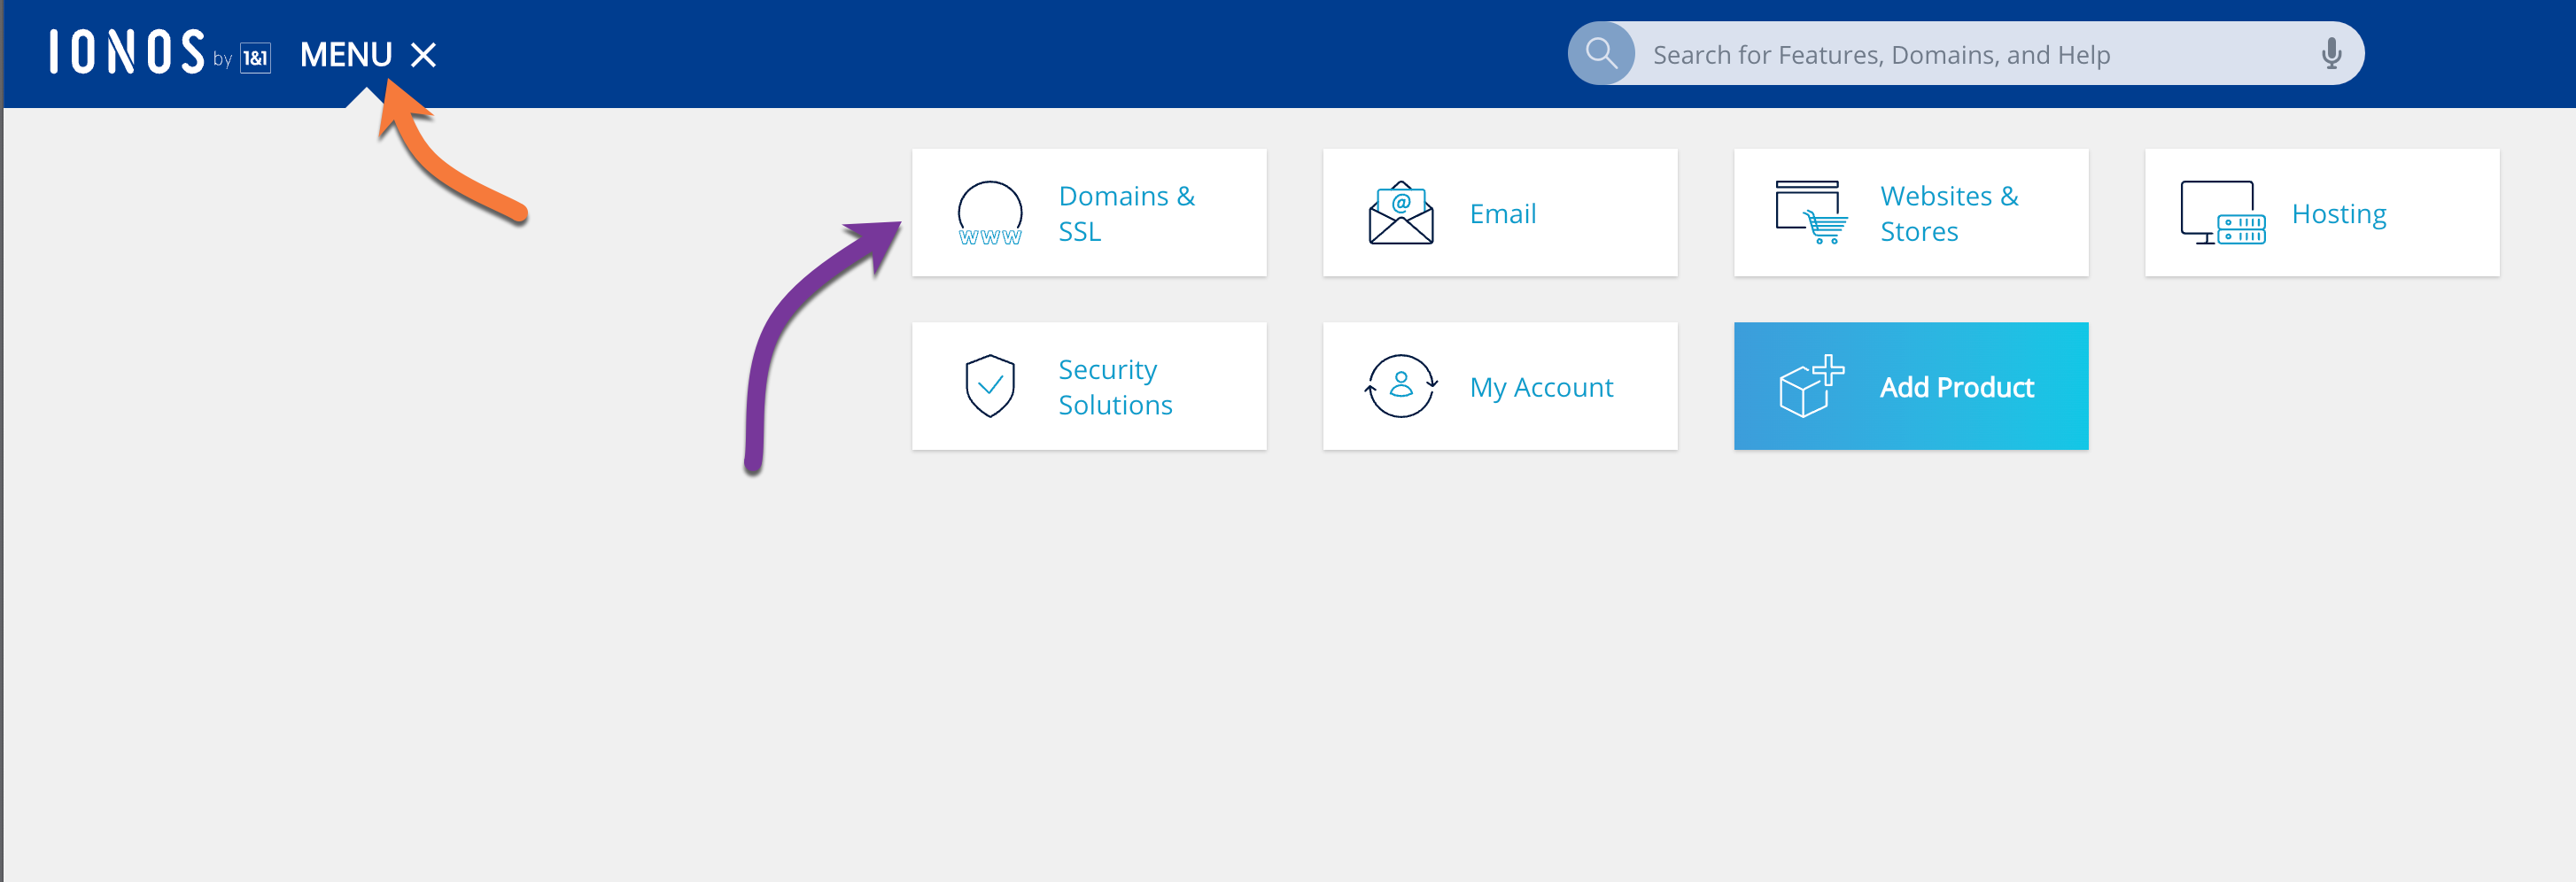
Step 2: After signing into your Ionos Account, click on MENU and navigate to Domains & SSL.
On the next page, you will see a list of all domains registered in your Ionos account.
Find the domain for which you wish to manage the Nameservers and click the wheel icon to the right of the domain listing.
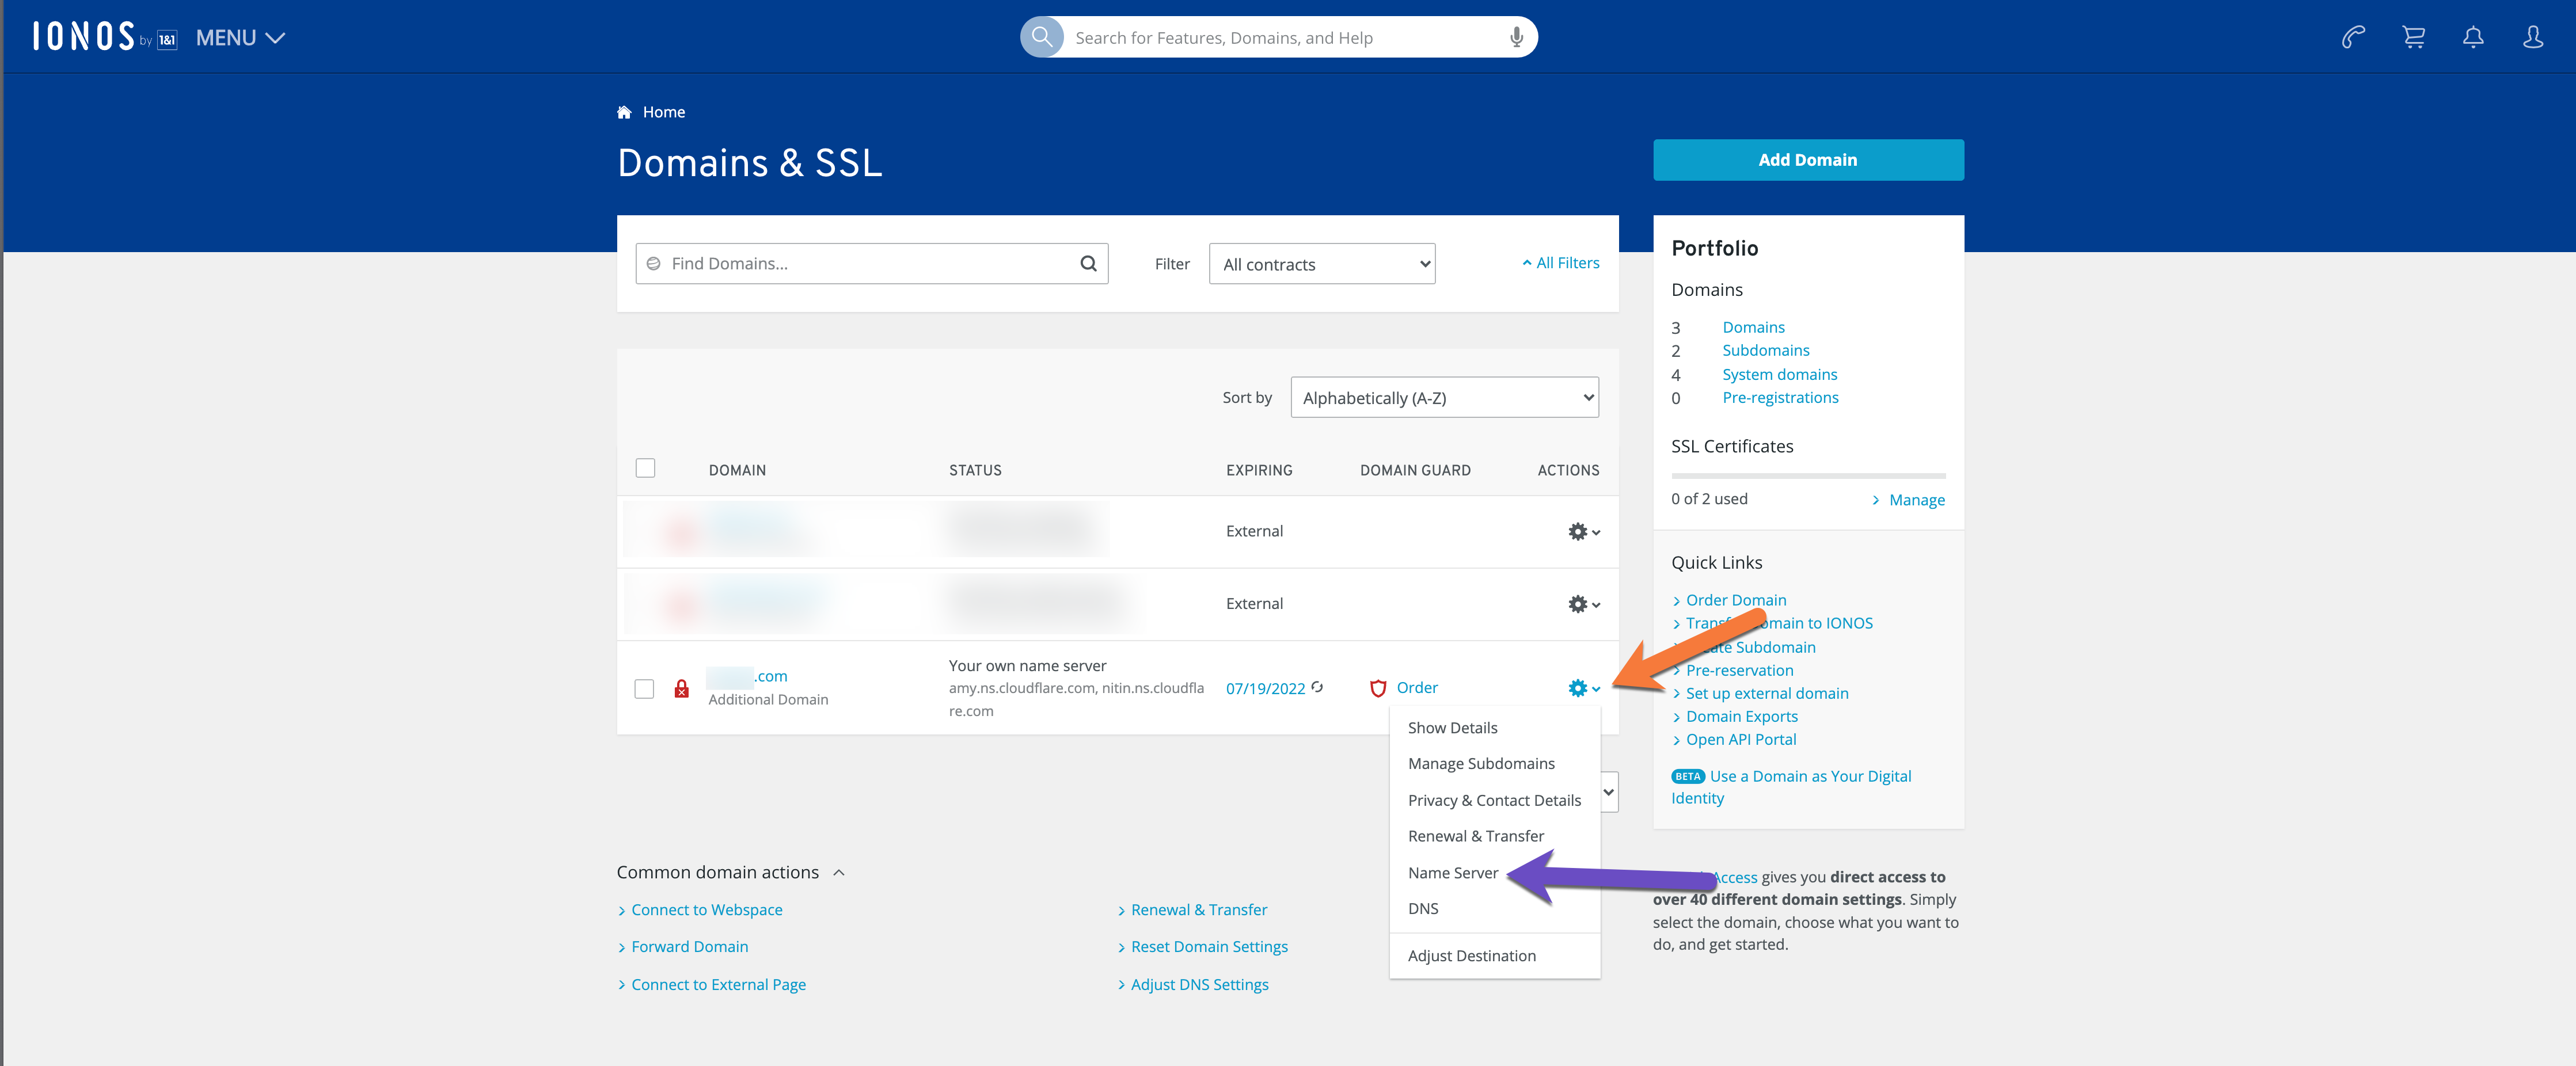
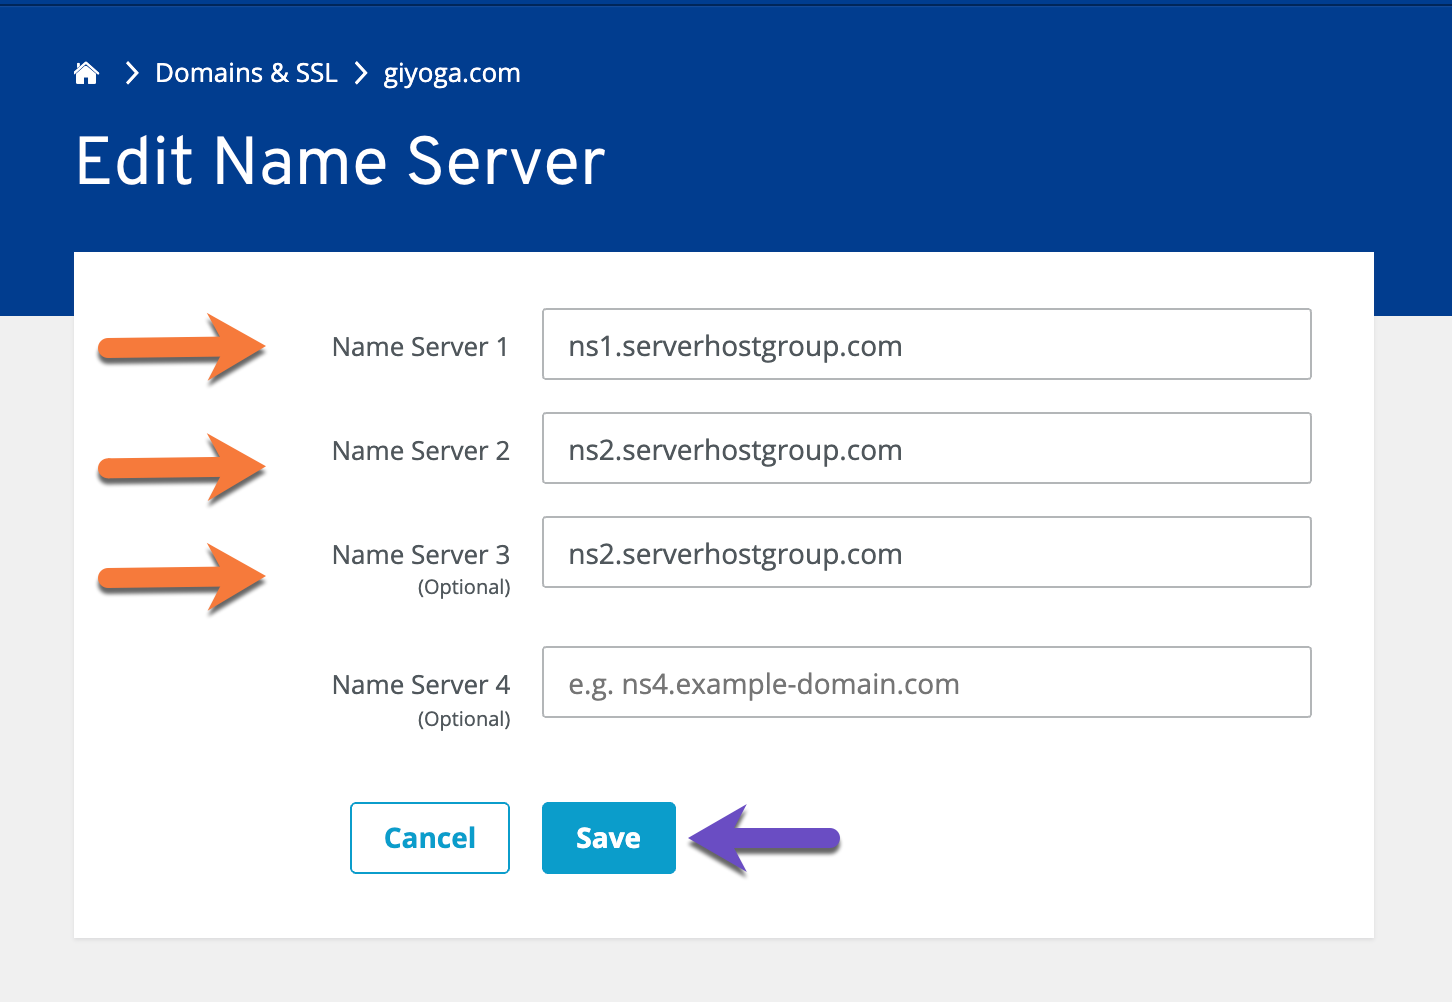
Step 3: The Name Servers Management page will load. Click on the “Edit Name Server” button.
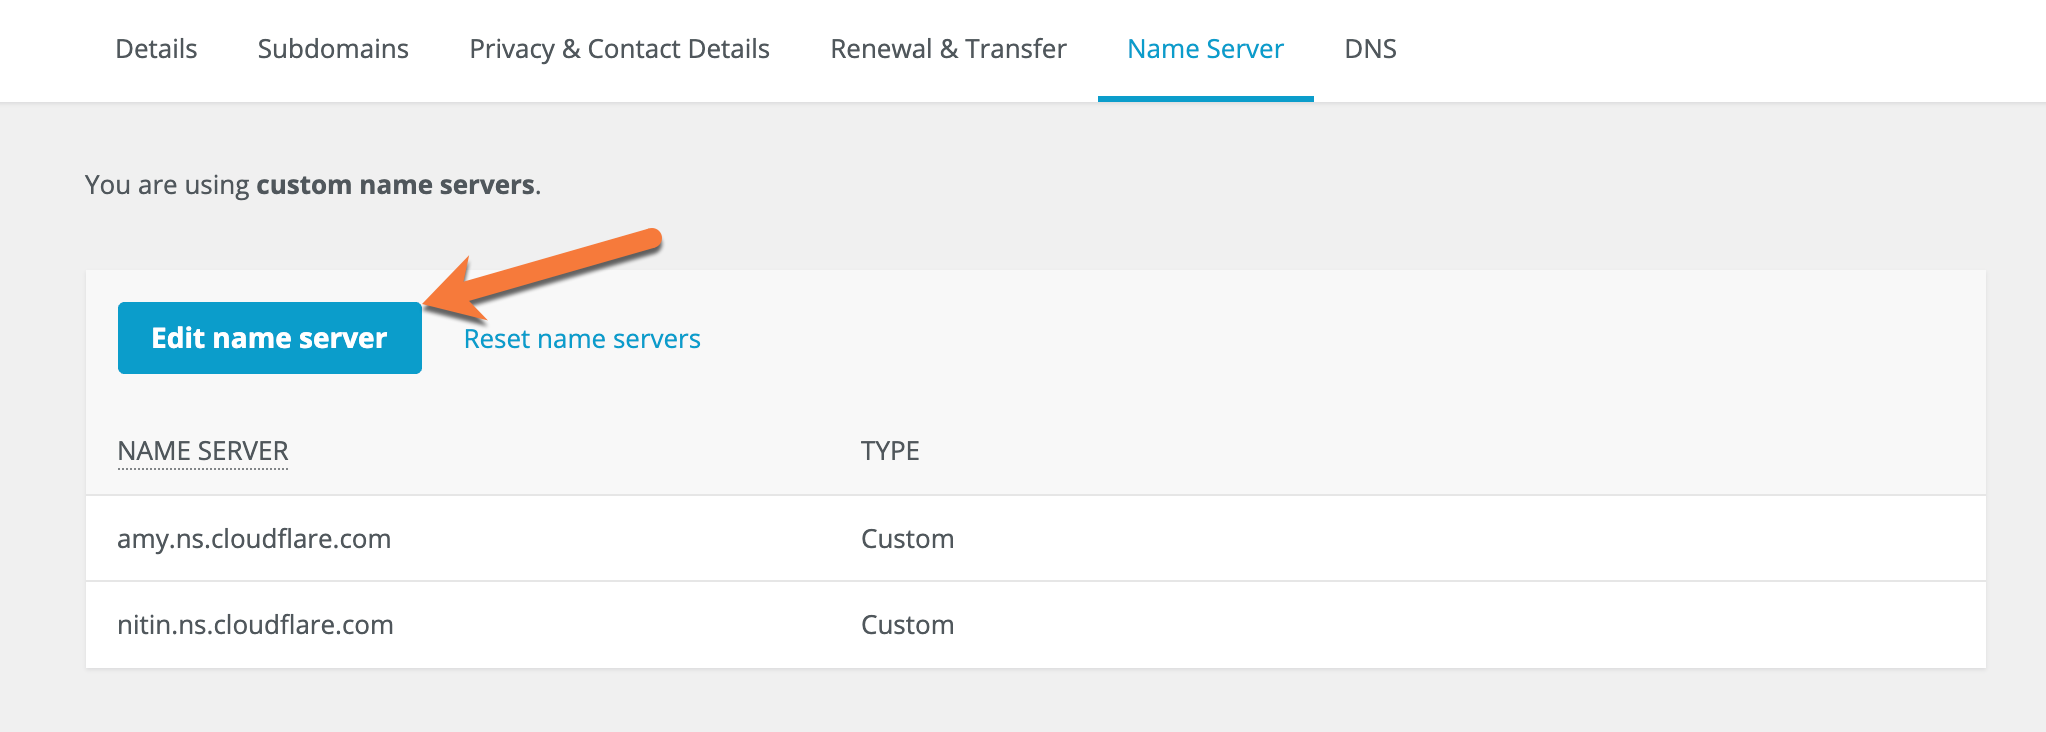
Step 4: The Custom name servers page will load. Here you will have the option to enter ChemiCloud name server records. Proceed to enter the three ChemiCloud nameservers and click the Save button.
Your changes will now propagate.
How about transferring your domain for free?
Grab an annual hosting plan which you’ll need anyway, and get a free domain transfer. Moreover, we’ll migrate your website(s) free of charge and with zero downtime from Hostinger to us.
You’ll get more than a free domain transfer:
- Great renewal rates: When renewing your domain, you’ll never have to worry about breaking the bank.
- User-friendly domain management: Manage your domain with an easy-to-use control panel and dashboard.
- Industry-leading Customer Support – Day or night, our 24/7 happiness engineers are here to offer struggle-free support when you need it.
Claim your free domain transfer now.
That’s it! You know how to change the name servers of your domain registered with Ionos.
]]>What are Private Nameservers?
Private nameservers allow you to set up nameservers for your own domain of choice. Let’s say you are operating a web hosting business and don’t want people to Google our nameservers and find out you really resell hosting thru us. Using private nameservers, you can avoid just this problem.
Having your own nameservers also gives you a more professional appearance than just plain nameservers, for example. ns1.bobshostingshack.com is pretty professional compared to our default nameservers.
How to Setup Private Nameservers at Google Domains
Step 1: Click here to open the Google Domains page. In the top right corner of the webpage, click the Sign In button.
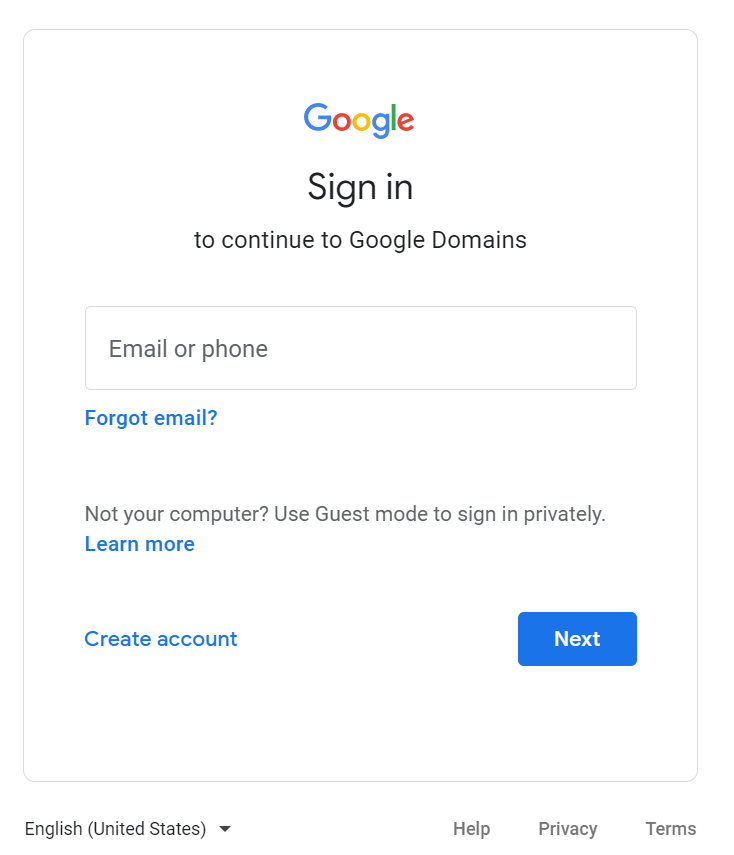
You will be prompted to login to your Google Account:
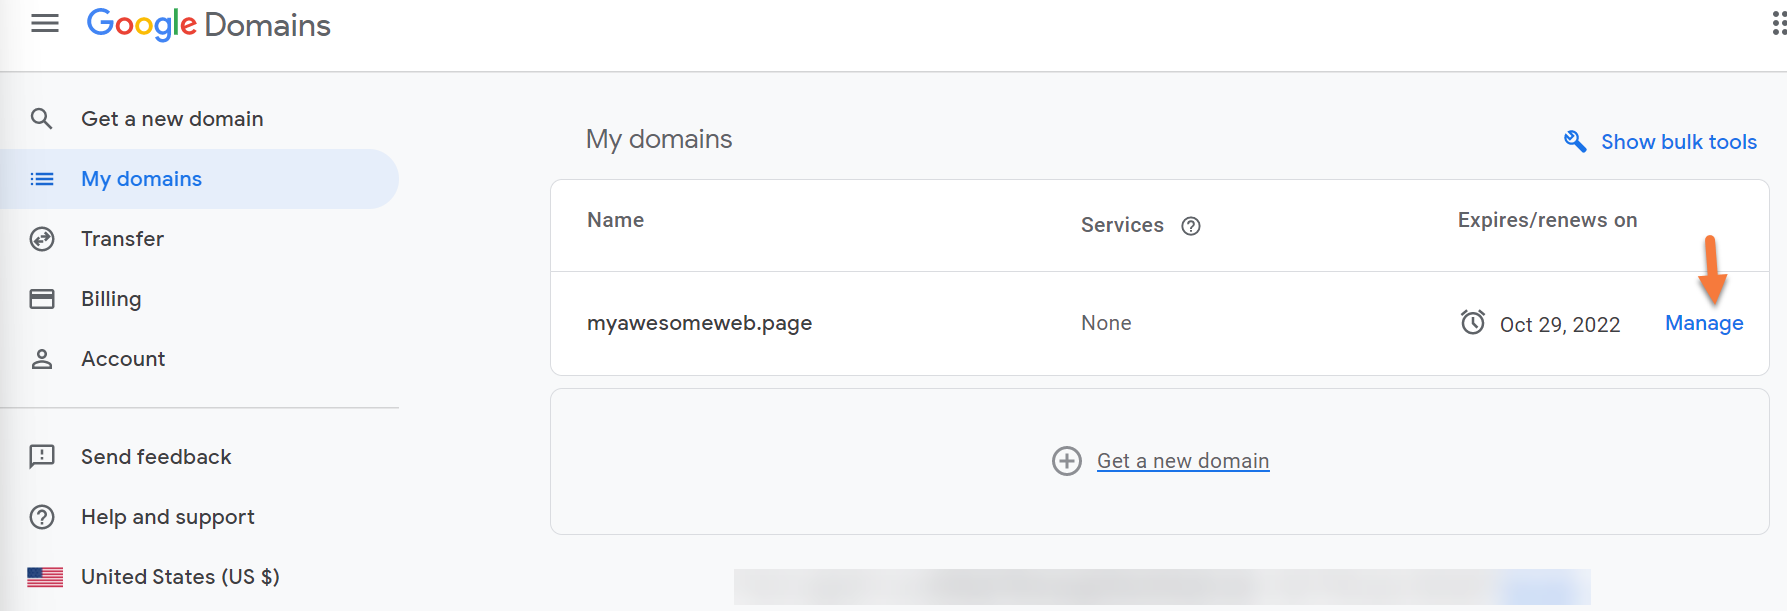
Step 2: After signing into your Google Account, your Google Domains page will load and you will see a list of all domains registered in your Google Domains account.
Find the domain for which you wish to manage the Nameservers and click Manage to the right of the domain listing.
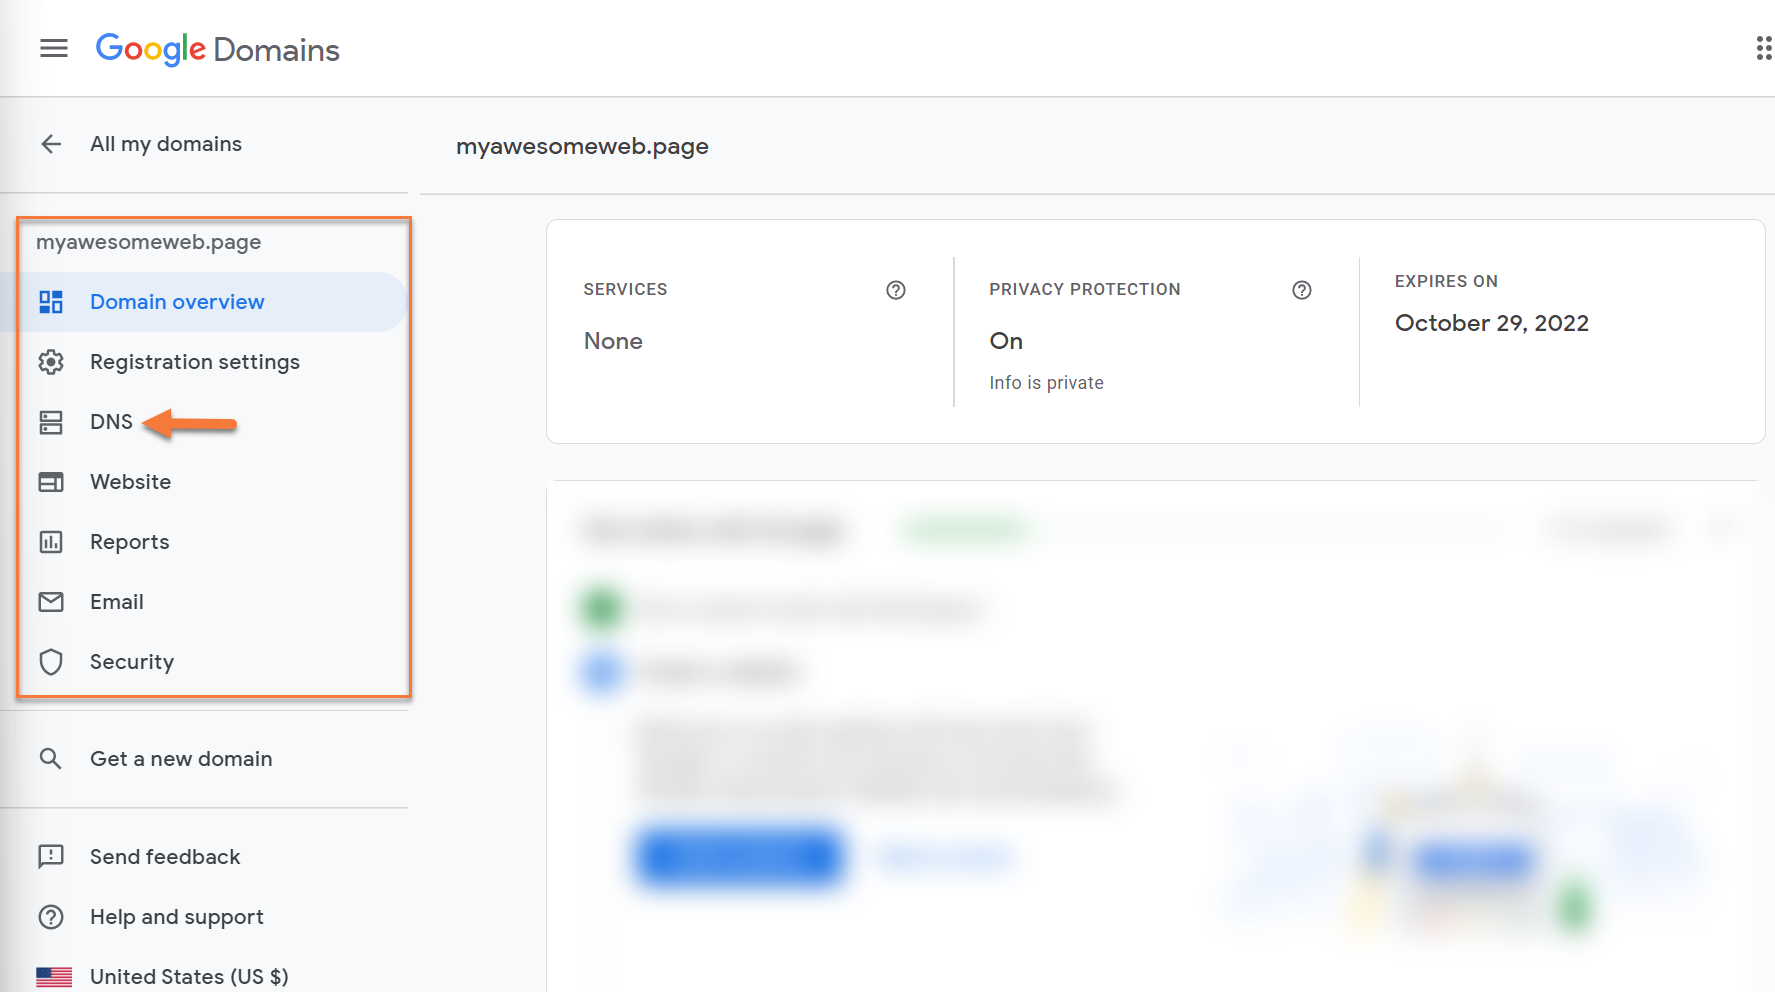
Step 3: The Domain Management page will load. Look on the left side of the page and you will see a list of options.
Click DNS.
Step 4: Once the DNS Management page has loaded, look in the top right corner for the Global DNS settings button. Click this to open the configuration area.

Step 5: In order to use custom name servers, you must first setup the Glue Records for the domain. Glue records are used to associate a name server with an IP address. To do this, click Manage Glue Records:

Step 6: Once the Glue records page opens, you will have the option to enter your custom name servers.

First, you need to create 3 blank records. To do this, click the create new record button 3 times. Your blank glue records area should look like the image below:

Second, you’ll need to enter the record name for your custom name servers in the Host Name Field. For example, if your nameservers are going to be ns1.yourdomain.tld, ns2.yourdomain.tld, and so forth, your glue record host names will look like the image below:

Third, you need to give each name server an IP address. The corresponding IP address for each name server can be found in your Welcome Email.
On the Glue records page, click the Add IPv4 address button for each name server. Your screen should look like the one below:

In the IPv4 Address field, enter the IP address for each name server and click the save button.
You will be returned to the Glue records page and the records for your domain should look like the image below:

Now your Glue Records are established. Congrats! We’re almost done.
Step 5: Next, you need to change the name servers for the domain. To do this, return to the Global DNS Settings by clicking the back button in the top left. .
Note, this is not the back button in your browser, but the back button in the settings.
See below:

Once the DNS settings page loads, click “Custom name servers” at the top of the page:

Step 6: The custom name servers area will open. Here you will enter the name servers you created in the earlier step.
Note: You will need to click the “Add another name server” button to add a field for the 3rd name server.
Your name server fields should look similar to the ones below after you’ve entered your name servers.
]]>Why You Should Change Google Domains Nameservers
The DNS service you use for your domain can have a significant impact on the TTFB performance of your website. Using a highly scalable and available DNS service ensures high performance all around the world. All ChemiCloud plans include a premium DNS service.
Typically, domain registrars do not provide customers with a premium DNS service like ChemiCloud DNS. For this reason, we recommend switching nameservers to ours if your domain is registered with Google Domains and you are hosting your website with us.
What are my ChemiCloud Nameservers?
You can find your ChemiCloud nameservers by clicking on the Server Information icon inside the ChemiCloud dashboard.
To learn more, we published an easy guide explaining how to locate your Nameservers inside of Client Area here.
How to Change Google Domains Nameservers
Step 1: Click here to open the Google Domains page. In the top right corner of the webpage, click the Sign In button.
You will be prompted to login to your Google Account:
Step 2: After signing into your Google Account, your Google Domains page will load and you will see a list of all domains registered in your Google Domains account.
Find the domain for which you wish to manage the Nameservers and click Manage to the right of the domain listing.
Step 3: The Domain Management page will load. Look on the left side of the page and you will see a list of options.
Click DNS.
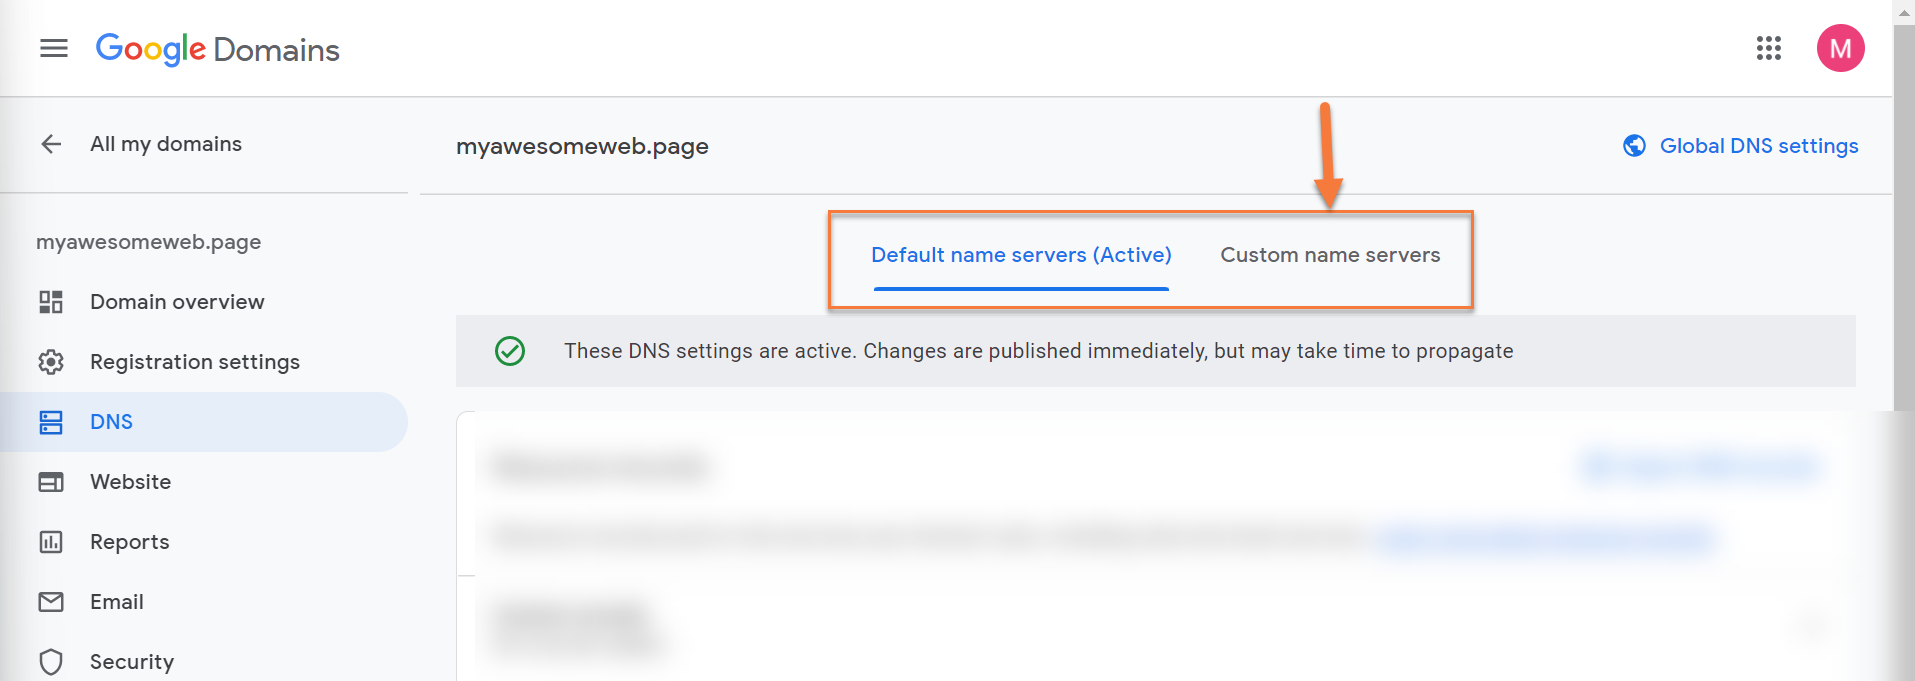
Step 4: Once the DNS Management page loads, look at the top of the page and you will see two options. Click “Custom Name Servers”.
Step 5: The Custom name servers page will load. Here you will have the option to enter ChemiCloud name server records.
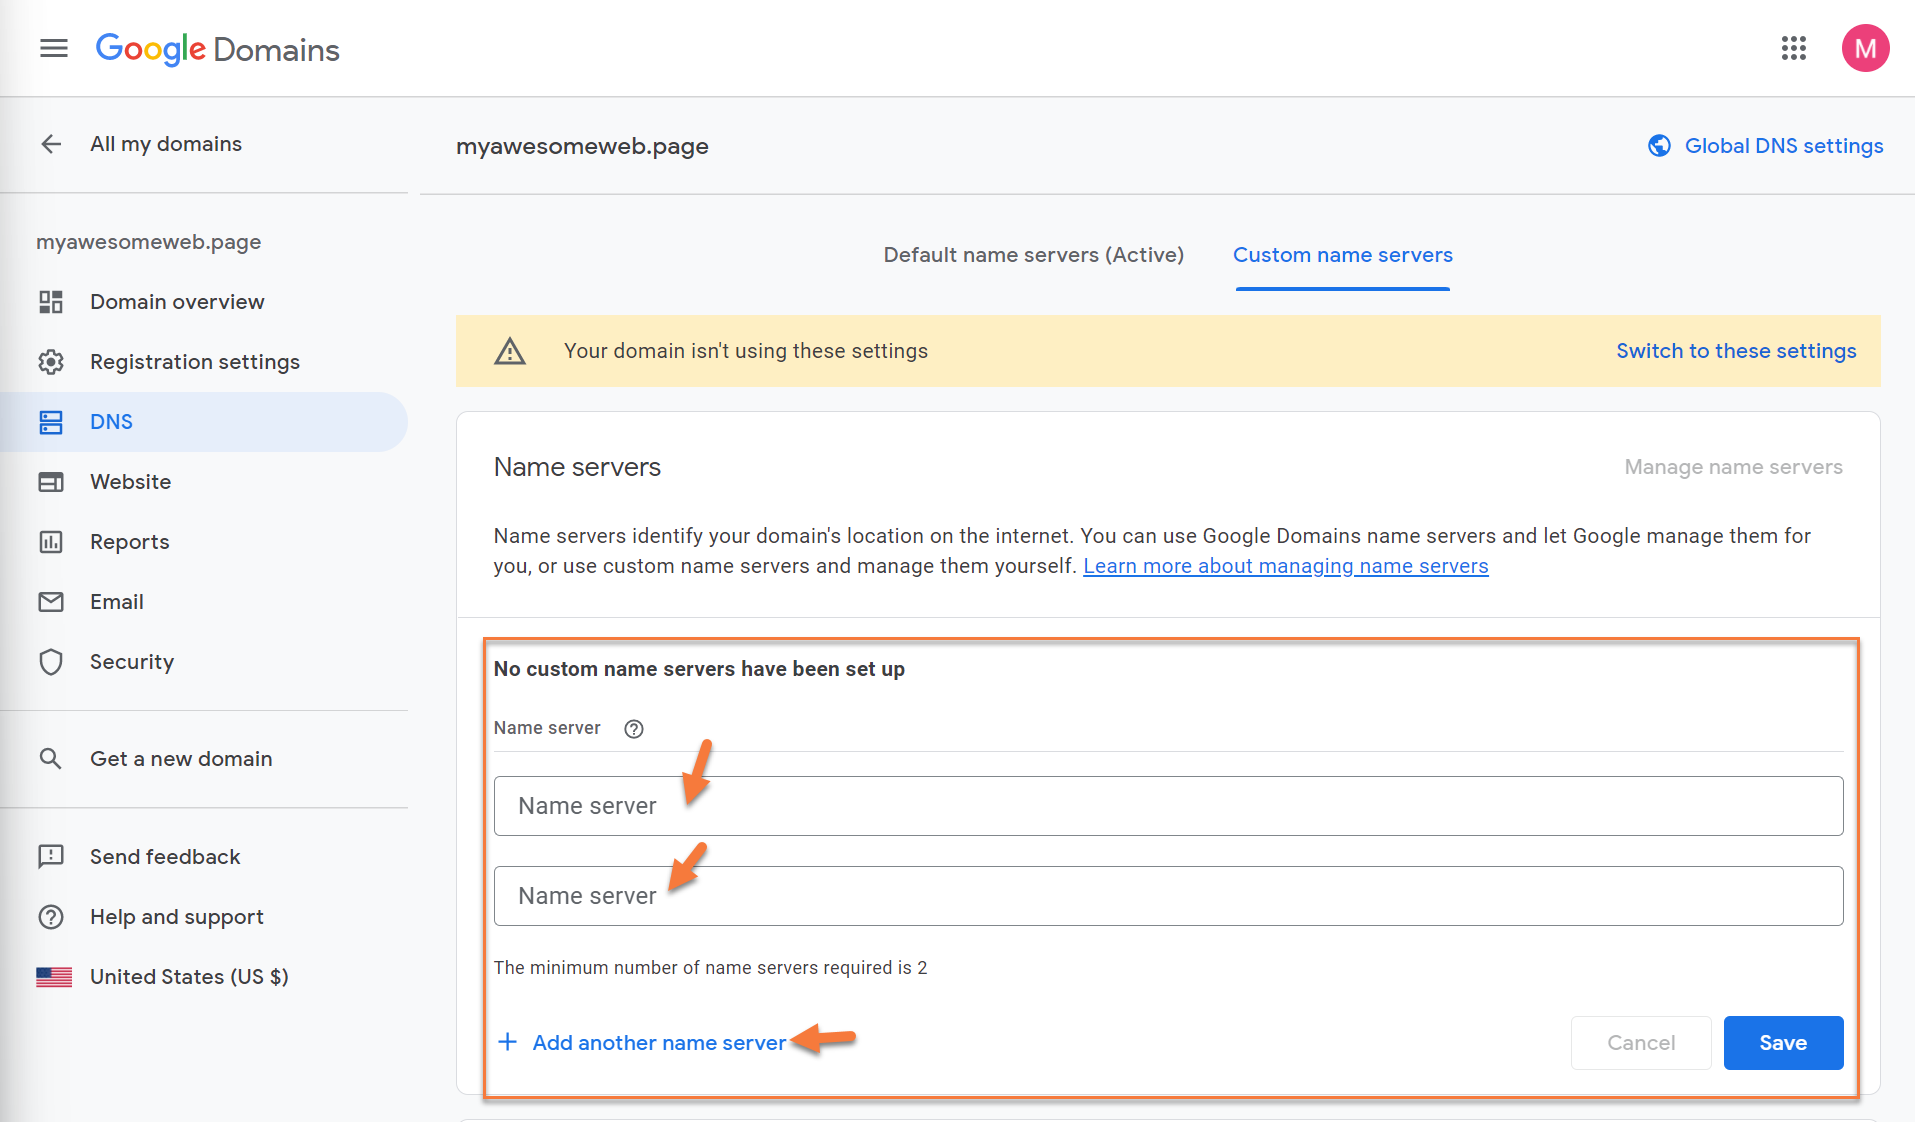
As ChemiCloud has three name servers, be sure to click the “add another name server” button beneath the 2 nameserver fields.
The three fields should look similar to the ones below:
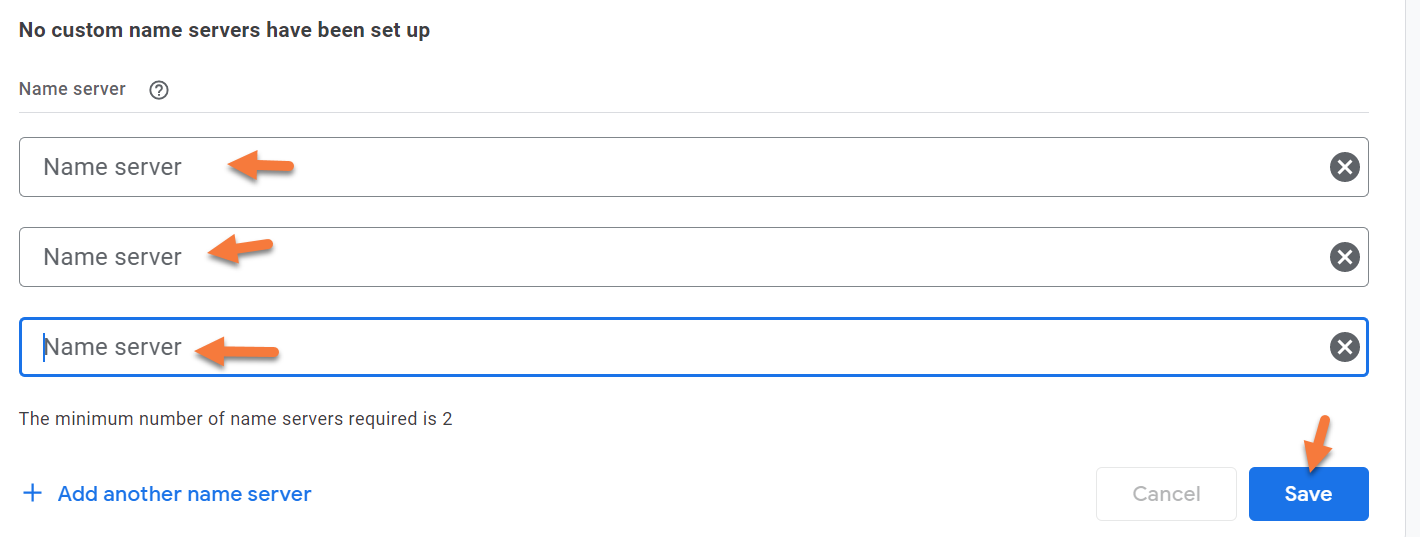
Once you have done this, proceed to enter the three ChemiCloud nameservers and click the Save button.
Your changes will now propagate.
Transfer Your Domain To ChemiCloud
There is no need to juggle separate providers, contacts, and services when you can have everything you need, all in one place.
If you’d like to manage your nameservers and your hosting in the same place, here at ChemiCloud, you should consider transferring your domain(s) from Google Domains to ChemiCloud.
Once you have your EPP code and have confirmed the domain is unlocked, and privacy is disabled, follow the steps to initiate the domain transfer.
![]()
We’ll assume that you have already unlocked the domain at its current registrar and that you also have the authorization code (sometimes called an EPP key) from Hostinger.
1) Head over to our Domain Transfer page and enter the domain name you wish to transfer to ChemiCloud and the domain Transfer Code (EPP) in the appropriate text field (your current domain registrar should provide this code).
2) Click the “Order Now“ button.
3) You will be asked if you require hosting as well. Click the “Continue“ button to finalize only the domain transfer without hosting.
Click the ‘Checkout‘ button to send your domain transfer request.
That’s it!
]]>This time is defined in seconds and the default settings can be found in the Zone File.
This Knowledgebase article will help you understand TTL.
Understanding TTL (Time-To-Live)
Generally, DNS propagation takes 24 to 48 hours to complete whenever any changes are made to your DNS Zone File. Lowering the TTL prior to making these changes will reduce the time required for propagation.
Let’s say you want to change the email on your domain from ChemiCloud to Google Workspace. If you make this change now with a default TTL of 43200 (12 hours), it will take up to 12 hours until all email is being delivered at Google’s Mail Servers instead of ChemiClouds. In the time between, mail will be delivered either to your ChemiCloud mailbox or your mailbox at Google, just depending on when the server sending that message last updated it’s DNS cache.
You can lower the TTL to make these changes take effect faster.
To do this, you’ll need to modify the TTL for each entry in your DNS Zone File.
Step 1: Login to your cPanel. There’s a lot of ways to do this, but the sure fire easiest way is to login to your Client Area, then open your cPanel.
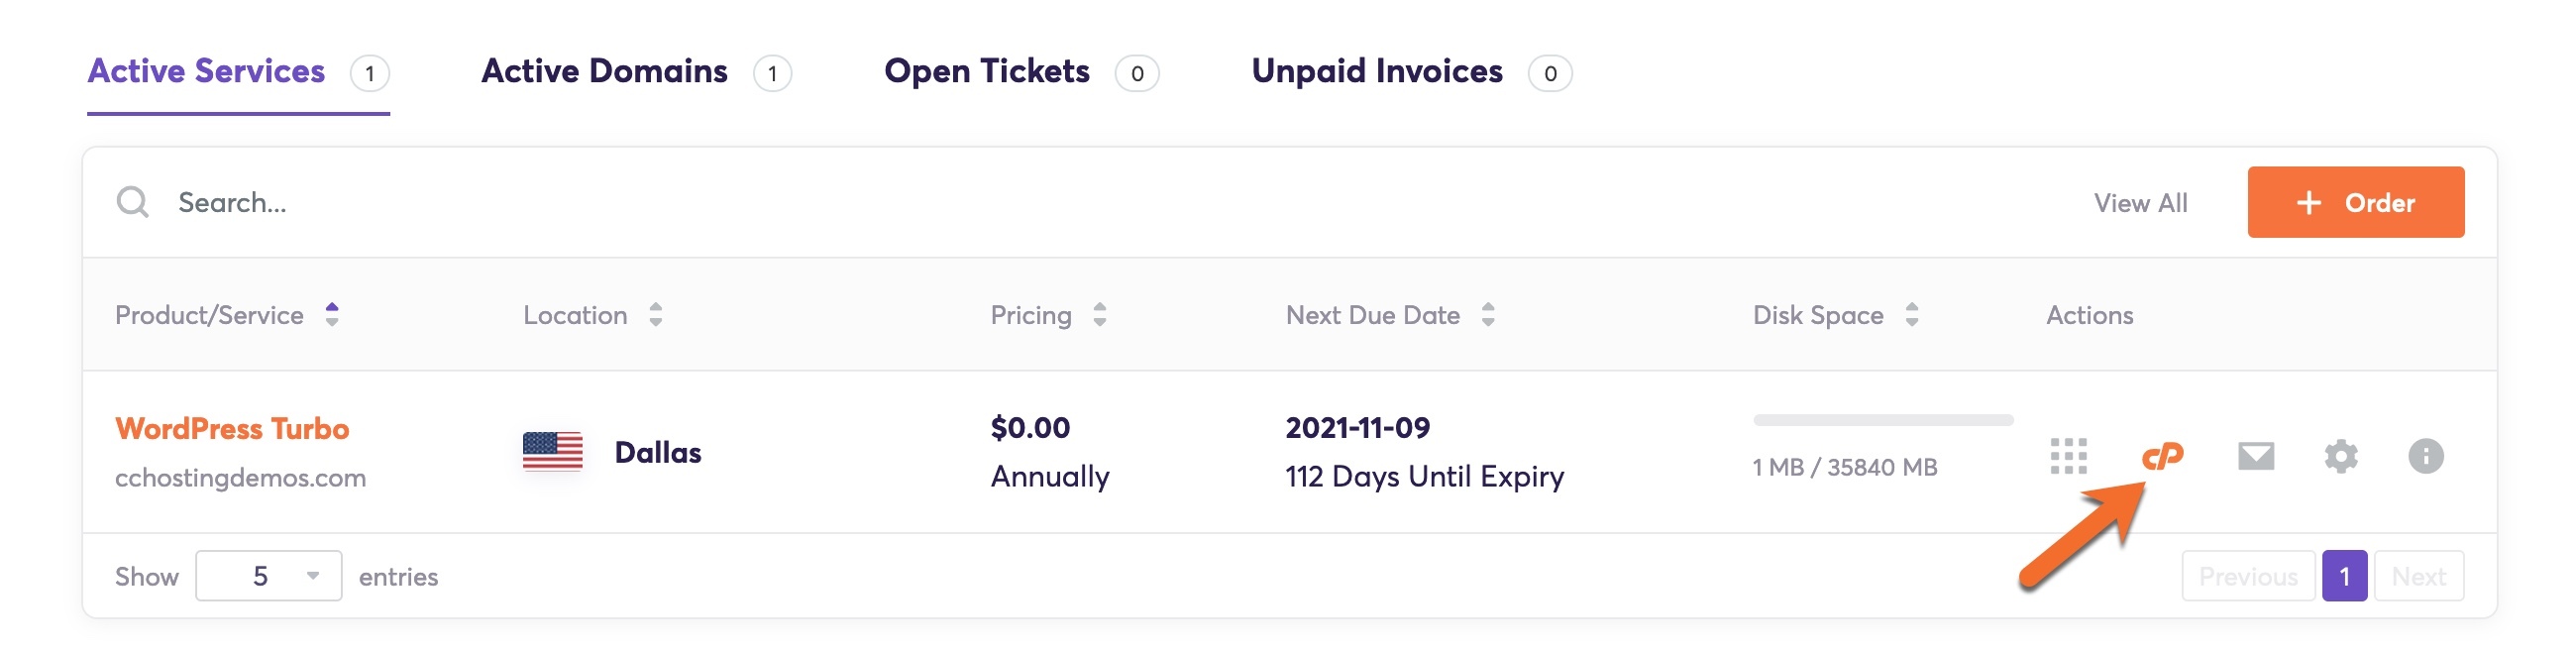
Step 2: In your cPanel look for the Domains section (4th from the top) and click Zone Editor.

Once the Zone Editor opens, you’ll see a list of your domains.
Click the Manage button on the right of the domain for which you want to change TTL.

Step 3: You will see a list of your DNS Records.
You’ll need to edit them each one at a time. To do this, click the Edit button which is located under the Actions column to the right of each record. This will allow you to change the TTL and other values for the record.

Step 4: After clicking Edit, change the TTL to your desired value.

When you’ve set your value, click Save Record to save the changes:

Complete this for each DNS record entry you want to modify. You will need to wait the amount of time the previous TTL was set before DNS servers globally will begin to cache the records at the new TTL. Once it has elapsed, any changes you make will occur within the TTL time you have specified.
And that’s how you change the TTL values in DNS entries for your Domain.
That’s a wrap!
]]>
The basics of how Nameservers works
Think of name servers as specialized directory assistance operators in the big city of the internet. When you’re trying to find a website, these operators direct your computer to the right part of the city.
Here’s how it works with name servers, using a simple analogy:
- You Ask for Directions: You type a website name like “google.com” into your browser. It’s like calling directory assistance to ask for the address of a specific place in the city.
- Your Request Goes to a Name Server: Your request first reaches a name server assigned by your internet service. Think of this name server as a specialized operator who knows where all the website “addresses” are stored.
- Finding the Specific Operator: This name server might not have the specific address you need, so it refers your request to another name server that specifically manages addresses for the “.com” area of the internet. It’s like being transferred to an operator who specializes in a specific part of town.
- Getting the Exact Address: The “.com” name server looks up its records and finds the IP address for “google.com”. This name server is like a local expert who knows every street in the “.com” area.
- Directing You There: The name server sends back the IP address to your computer. Now, your computer knows how to reach “google.com”, much like how you’d start your journey after getting an address from directory assistance.
This system ensures that your internet journey to find a website is smooth and quick, just like how city directory assistance helps you navigate to your destination in a big city.
Things to Consider Before Changing the SiteGround NameServers for Your Domain
There are several important considerations to keep in mind before changing the nameservers for your domain:
- Propagation Time: Changes to nameservers can take anywhere from a few minutes a few hours to fully propagate across the internet. During this period, your website might be temporarily inaccessible or behave unpredictably.
- Email Service Disruption: If your email is hosted at the same domain, changing nameservers could disrupt your email service. Make sure you know the correct MX records to update at the new nameserver to avoid any email downtime.
- DNS Record Migration: Ensure that all necessary DNS records (like MX for mail servers, TXT for verification purposes, A records for addresses, etc.) are correctly set up at the new nameserver. This helps prevent services linked to your domain from breaking.
- SSL/TLS Certificates: If your website uses SSL/TLS certificates for HTTPS, changing nameservers might require reconfiguring or reissuing your certificates, depending on how they’re managed.
- Backup: Always have a backup of your DNS records. If anything goes wrong, you’ll be able to restore the previous settings without much hassle.
- Timing: Consider the timing of the nameserver change. Avoid making changes during peak business hours or major updates to minimize the impact on your users.
Taking these steps helps ensure a smooth transition when changing nameservers and reduces the risk of downtime or service disruption.
What Are the Preps for Changing SiteGround Nameservers?
When preparing to change SiteGround nameservers, here are some steps to follow to ensure a smooth transition:
- Access SiteGround Account: Log in to your SiteGround account where your domain is registered.
- Backup DNS Records: Before making any changes, document or take screenshots of your current DNS settings, including A, MX, CNAME, TXT records, and any other configurations. This will be crucial if you need to revert or re-enter these settings in the new nameserver environment.
- Prepare New Nameserver Information: Have the details of the new nameservers ready. Typically, you will need at least two nameserver addresses from the new hosting provider.
- Check Email Settings: If your email is hosted using the same domain, ensure you have the MX records and any other necessary email configuration details at hand to set up on the new nameservers to avoid disruption.
- Plan the Timing: Schedule the nameserver change during a low-traffic period for your website to minimize the impact on visitors and services. Overnight or during the weekend can be ideal, depending on your audience.
- Registrar Login Details: Ensure you have login credentials handy for both your current registrar (SiteGround) and potentially for the new nameserver provider if it’s different from your domain registrar.
- Propagation Delay Awareness: Remember that DNS changes can take anywhere from a few hours to up to 48 hours to propagate fully. During this time, your website and email services may experience inconsistencies.
- Technical Support: Know how to contact technical support from both SiteGround and your new hosting provider in case you encounter any issues during or after the change.
By following these steps, you’ll be well-prepared to change your SiteGround nameservers with minimal disruption to your services.
Why You Should Change SiteGround Nameservers
The DNS service you use for your domain can have a significant impact on the TTFB performance of your website. Using a highly scalable and available DNS service ensures high performance all around the world. All ChemiCloud plans include a premium DNS service.
Typically, domain registrars do not provide customers with a premium DNS service like ChemiCloud DNS. For this reason, we recommend switching nameservers to ours if your domain is registered with SiteGround and you are hosting your website with us.
Looking for a SiteGround alternative?  Join the growing club of happy customers who made the switch to better, faster web hosting!
What are my ChemiCloud Nameservers?
You can find your ChemiCloud nameservers by clicking on the Server Information icon inside the ChemiCloud dashboard.
To learn more, we published an easy guide explaining how to locate your Nameservers inside of Client Area here.
How to Change SiteGround Nameservers
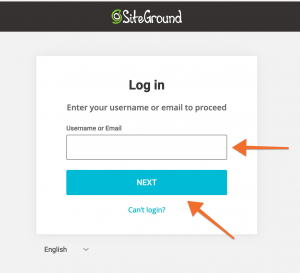
Step 1: Click here to open the Login page for your SiteGround Account. Then enter your username or email address and click the blue NEXT button. Then you will need to fill in your account’s password.
Step 2: After logging in, click on the Services tab at the top of the page then click on the Domains subtab.

Step 3: Beneath My Domains section, click the Manage button of the domain registered with SiteGround

Step 4: Under the Domain settings click Manage Nameservers
Step 5: Enter your nameservers in the 3 Nameservers fields, then click the Confirm button. Once completed, your nameserver fields should look similar to the image below:

That’s it! Your changes will now propagate.
How about transferring your domain for free?
Grab an annual hosting plan which you’ll need anyway, and get a free domain transfer. Moreover, we’ll migrate your website(s) free of charge and with zero downtime from SiteGround to us.
You’ll get more than a free domain transfer:
- Great renewal rates: When renewing your domain, you’ll never have to worry about breaking the bank.
- User-friendly domain management: Manage your domain with an easy-to-use control panel and dashboard.
- Industry-leading Customer Support – Day or night, our 24/7 happiness engineers are here to offer struggle-free support when you need it.
Claim your free domain transfer now.
DNS Explained
What is a domain name?
A domain name consists of two or more parts, technically they are called labels, separated by a dot. For example, chemicloud.com.
The right-most label (the part after the dot) specifies the top-level domain.
Each label to the left specifies a subdivision or subdomain of the domain above it. Note that “subdomain” expresses relative dependence, but it’s not absolute. For example, chemicloud.com comprises the subdomain of the net domain, and www.chemicloud.com comprises a subdomain of the domain chemicloud.com.
In theory, this subdivision can reach 127 levels deep and each label can contain up to 63 characters, as long as the whole domain doesn’t exceed a total length of 255 characters.
In the real world though, most registrars have shorter limits.
A hostname refers to a domain name that has one or more IP addresses associated with it. For example, lab.chemicloud.com is a hostname.
What is DNS?
The DNS, or Domain Name System, consists of a hierarchical set of DNS Servers. Each domain or subdomain has more authoritative DNS servers which publish information about that domain and the nameservers of any domains “beneath it”. The hierarchy of authoritative DNS servers matches the hierarchy of domains.
At the top of the hierarchy stands the root nameservers, the servers which are queried when looking up, or ‘resolving’, a top-level domain name (TLD).
A major component of DNS is iterative and recursive queries.
- An iterative query is one where the DNS server may provide a partial answer to the query (or give an error). DNS servers must support non-recursive queries.
- A recursive query is one where the DNS server will fully answer the query, or give an error. DNS servers are not required to support recursive queries and both the resolver, or another DNS server acting recursively on behalf of another resolver, negotiate the use of recursive services using bits in the query headers.
What is DNS Propagation?
DNS Propagation refers to the time for any change to DNS records to transmit across the Internet. Remember that DNS changes can take up to 24 hours to fully propagate. Here’s a great online tool to check on DNS propagation.
Struggling with DNS issues? ChemiCloud is the hosting solution designed to save you time!  Check out our web hosting plans!
All About DNS Records
Root Domain
The root domain, also sometimes referred to as the parent, naked, or apex domain is the primary entry point for the domain without any subdomains. The NAME field typically remains blank as this would define a subdomain.
This type of record should usually be an A record with the value set to the destination IP address. Using a CNAME for the root domain can cause other DNS functions, such as MX records, to route incorrectly.
It is standard practice to set the A record for the root domain to that of the www subdomain.
CNAME or “Canonical Name”
CNAME Records are used to define an alias hostname. A CNAME record takes this format:
alias.domain.name IN CNAME otherhost.domain.name.
This defines alias.domain.name as an alias for the host whose canonical (standard) name is otherhost.domain.name.
A Records
An A record gives you the IP address of a domain. That way users who try to go to www.example.com will get to the right IP address. An A record or Address Record maps a host name to a 32-bit IPv4 Address. An A record takes this format:
Name             TTL     TYPE    DATA
ftp.domain.com   43200   A       IP Address
Some DNS zones include a wildcard entry, which looks like this:
*.domain.com IN A xxx.xxx.xxx.xxx
The X represents a particular IP address. The * takes anything that comes before the domain, like myawesomesoup.domain.com, or pullmyfinger.domain.com and points it to the server’s IP address. This way, if someone mistakenly types too many or too few www’s, they still get to your website.
Using a wildcard entry is also useful when setting up subdomains in your hosting account, relieving you of the duty of adding additional A records for each subdomain.
MX Records
These are also known as Mail Exchange Records. They map a domain name to a list of all mail exchange servers for that domain. A zone can have one or more Mail Exchange (MX) Records. These records point to hosts that accept mail messages on behalf o the host. A host can be a Mail Exchange for itself. MX Records don’t need to point to a host in the same zone, either.
An MX Record takes this format:
host.domain.name       IN     MX      10 otherhost.domain.name.
IN     MX      20 otherhost2.domain.name.
The MX preference numbers, which can be set from 0 to 65535, signify the order in which mailers select MX records when they attempt mail delivery to the host. The lower the M number, the higher the host is in priority.
PTR Record (AKA Pointer Records)
These map an IPv4 Address to the canonical name for that host. Setting up a PTR record for a hostname in the in.addr.arpa.domain that corresponds to an IP address implements reverse DNS lookup for that address.
NS Records (AKA Name Server Records)
These map a domain name to a list of DNS servers that are authoritative for that domain. For instance, some name servers that belong to Cloudflare:
becky.ns.cloudflare.com.
amir.ns.cloudflare.com
SOA Record (AKA Start of Authority Record)
This specifies the DNS server providing authoritative information about an Internet domain, the email of the domain administrator, the domain serial number, and several timers relating to refreshing the zone.
TXT Record
The TXT Record allows a domain or DNS administrator to insert arbitrary text into a DNS Record. For example, this can be used to implement the Sender Policy Framework (SPF) and DomainKeys DNS records.
That’s a wrap!
]]>In this KB article, we will explore how to add and remove DNS records from the Cloudflare DNS Management area, and we’ll talk about what the various records are.
How to manage DNS records in Cloudflare
Accessing the Cloudflare DNS Editor
The first time you add your domain to Cloudflare, a scan of common DNS records is performed in an attempt to automatically add all of the domain’s DNS records to Cloudflare. Sometimes you may need to add, remove, or update DNS records later on though. To do that, use the steps below.
Step 1: Open the Cloudflare Dashboard by clicking here then proceed to sign in.

Step 2: Once your Cloudflare Dashboard is open, click on the domain you wish to manage.

Step 3: Click DNS from the row of options in the menu at the top to open the DNS Management tool.

You will be presented with a list of your current DNS records and some options.
Breaking Down the DNS Editor

There’s a lot of information on this screen, so let’s examine it before we go further.
In the upper left of the DNS management tool is the + Add Record button. We’ll talk about this later.
Adjacent to the + Add Record button is the Search Field. This is really handy if you are managing a domain that has a lot of DNS entries, as it allows you to search through them to find what you’re looking for faster.
The first column is the DNS Record Type. This is to indicate to you which type of DNS record the line entry is, be it an MX, CNAME, or A Record.
The second column is the Name of the DNS record.
The third column is the Content of the record. Depending on the type of record, this can be a domain name, an IP address, or other mixed alphanumeric and symbol characters.
The TTL column represents the TTL of the Record. TTL is a numerical value that determines how long a DNS cache server can serve a DNS record before reaching out to the authoritative DNS server and getting a new copy of the record.
The Proxy Status column indicates whether Cloudflare is proxying this record, thereby obfuscating the origin IP address/network where the resource is hosted/located.
The last column is the Edit option to allow you to edit a record.
Are you tired of slow web hosting? We use LiteSpeed caching to deliver content to your visitors almost instantly.  Check out our web hosting plans!
How to add DNS Records in Cloudflare
Adding a DNS Record is very straightforward.
Step 1: Click the blue + Add Record button in the top left of the DNS tool.

Step 2: You will be given the option to choose the record Type & Name, Value, and TTL.
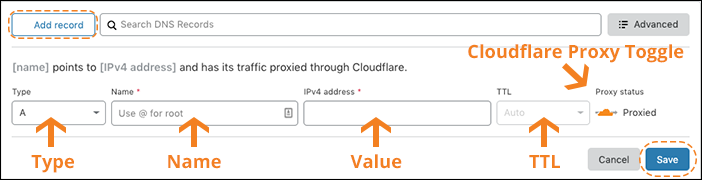
Some record types, such as A, AAAA, and CNAME, allow you to toggle the Cloudflare proxy on or off.
- An orange cloud icon proxies traffic through Cloudflare for the DNS record Name.
- A grey cloud icon ensures traffic for the DNS record Name is not proxied to Cloudflare. Cloudflare still serves DNS for grey clouded DNS records, but no other Cloudflare features such as SSL, page rules, caching, WAF, etc.. are applied to these records.
You should know, when adding a new record in Cloudflare, the record Type will always default to n A record.
A Records
A Records are necessary to direct a visitor’s browser requests to an origin web server.
To add an A record:
Step 1: Replace Value with a real IP address (you cannot use a Cloudflare IP address).
Step 2: Click Add Record.
Multiple A records for the same subdomain can be added with different IP addresses.
Cloudflare’s DNS will alternate requests to the various IP addresses provided. However, Cloudflare’s DNS will continue to alternate traffic to all specified IP addresses even if an IP address is unreachable.
CNAME Records
CNAME Records are necessary to direct a visitor’s browser requests to an origin web server. Unlike an A record, the CNAME will point to a hostname like www.example.com instead of an IP address. www.example.com would then either have an A record that lists the IP address or uses another CNAME record that points to a different hostname. Eventually, a chain of CNAME records must point to a hostname that resolves to an IP address.
To add a CNAME record:
Step 1: Replace Value with the target (destination) domain. Example: mysite.myhost.com Example: s3-eu-west-1.amazonaws.com
Step 2: Click Add Record.’
TXT Records
TXT records are commonly used for mail authentication.
To add a TXT record:
Step 1: Replace Value with real data, the contents of the record.
TXT @ v=spf1 include:example.net -all
Step 2: Click Add Record. ‘
MX records are necessary for the delivery of email to a mail server. Any MX record Server name requires a corresponding A record that lists the IP address of the mail server.
To add an MX record:
Step 1: Click Add Record.
Step 2: Choose MX From the Type field to display the required MX record details.
The mail server is the NDS hostname of the mail server.
Priority is a relative number. The lowest Priority number in a group of MX records will have priority over the rest.
Step 3: Click Save.
DKIM Records
There is no DKIM record type. DKIM is instead configured as a DNS TXT record.
DKIM records can often exceed the 255-character limit for TXT records. Therefore, Cloudflare will automatically split these into multiple records at the same domain name, producing a record with a format similar to the following when queried:
default._domainkey.example.com. 299 IN TXT "v=DKIM1; k=rsa; p=<encoded public key>" "<rest of public key>;"
Remove quotation marks and spaces when adding DKIM records to your zone. Also, you do not need to prefix (escape) semicolons with a “\” character for DKIM records added to Cloudflare.
Some services require additional CNAME records for DKIM verification. Verification will fail for CNAME records used to verify DKIM unless there is a grey-cloud icon beside the CNAME record in the DNS app.’
SPF Records
Although DNS specifications have deprecated the SPF record type in favor of TXT records, some DNS clients may still look for a TXT Record. You can add both an SPF record and a TXT record to ensure backward compatibility.
SPF content as a TXT record will look similar to the following. If you host with ChemiCloud, be sure to use our SPF record:
TXT @ v=spf1 a mx include:relay.mailchannels.net ?all
Contact your mail provider about SPF record content if you observe SPF failures in your email headers or if your mail is undeliverable.
To add an SPF Record:
Step 1: Replace Value with real data.
Step 2: Click Save.
DMARC Records
Domain-based Message Authentication, Reporting & Conformance (DMARC) allows an email recipient to know if the email is protected by SPF and/or DKIM. DMARC describes how the email recipient should process the email if neither of those authentication methods passes.
To learn more about DMARC records, visit the DMARC project.
Deleting DNS Records in Cloudflare
Deleting records in the Cloudflare DNS editor is very straightforward.
Step 1: Click the Edit button on the far right of the row of the record you wish to remove.

Step 2: The editor tool will expand. You will have the option to edit the contents of the record or delete the record.
To delete the record, click the Delete button in the bottom left of the record editor.

You will be asked to confirm you are sure you wish to delete the record. Click the red Delete button to confirm the removal of the entry.

Summary
As you can see, adding and removing DNS records in your Cloudflare editor is fairly straightforward and easy, but if you get confused, we’re always here to help!
]]>