Let’s begin!
How to view an Email Header
If you aren’t familiar with how to view an email header, review our Knowledgebase Article on the topic here.
What’s an Email Header Look Like?
Let’s take a look at the headers on this message I recently received from Cloudflare:
Return-Path: <[email protected]>
Delivered-To: [email protected]
Received: from rs2-dal.serverhostgroup.com
	by rs2-dal.serverhostgroup.com with LMTP
	id ABlRGJN+kWCfFAAArSgKyQ
	(envelope-from <[email protected]>)
	for <[email protected]>; Tue, 04 May 2021 13:04:19 -0400
Return-path: <[email protected]>
Envelope-to: [email protected]
Delivery-date: Tue, 04 May 2021 13:04:19 -0400
Received: from bounce.cloudflare.com ([192.28.154.211]:54889)
	by rs2-dal.serverhostgroup.com with esmtps  (TLS1.2) tls TLS_ECDHE_RSA_WITH_AES_256_GCM_SHA384
	(Exim 4.94)
	(envelope-from <[email protected]>)
	id 1ldySt-0001O7-P9
	for [email protected]; Tue, 04 May 2021 13:04:19 -0400
X-MSFBL: 6L1whzPBe2O1M048olaxQrdKp6aBuU0YeoW35BFNjh0=|eyJnIjoiYmctYWJkLTg
	0NCIsInIiOiJhZG1pbkBjY2hvc3RpbmdkZW1vcy5jb20iLCJiIjoiZHZwLTE5Mi0
	yOC0xNTQtMjExIiwidSI6IjcxMy1YU0MtOTE4OjA6Mzg1NTU6MzA1MzQ0Ojc5MjY
	1Njo0NzgzNDo5OjUyMzY3OToyMjAxMDI1OTYifQ==
DKIM-Signature: v=1; a=rsa-sha256; q=dns/txt; c=relaxed/relaxed; t=1620147046;
	s=m1; d=cloudflare.com; [email protected];
	h=Content-Type:MIME-Version:Subject:To:From:Date;
	bh=9+V8RW6CdzfUNkIQW13NlUs0bkYglkEFbfyw+sOKgqU=;
	b=NPdi1tqYkPC4q9I4XA67LcScLhrJb374W6zqGfc6ppasZjGj5TD9hho/O2kfuztl
	r+57DIhzQ928o256pyMje7Y3MKHeMyNtCPYSDKGycs3OXre5fZbhdWihJo1NO6rE1aP
	zlhL47Q4WpmJq19LznC8gOu/6WWmYayhfmT632QI=
DKIM-Signature: v=1; a=rsa-sha256; q=dns/txt; c=relaxed/relaxed; t=1620147046;
	s=m1; d=mktdns.com; [email protected];
	h=Content-Type:MIME-Version:Subject:To:From:Date;
	bh=9+V8RW6CdzfUNkIQW13NlUs0bkYglkEFbfyw+sOKgqU=;
	b=XEryQBzICTRY/D+UQYyeMT4/Vy5p0QzHli0ldrUnEcFl3Loh03KBSkxHD+2pg9vu
	SGP+ZruN/4AF2IVN5KvhjBJiLV02KWTR/BQwhZmuSTSrN5hToMgWUL5sSrOSQ43BuzP
	KIRx9bBWgr7NNjHoUxABqLTQ/QE47bTtyfo0NN/A=
Date: Tue, 4 May 2021 11:50:46 -0500 (CDT)
From: Cloudflare <[email protected]>
Reply-To: [email protected]
To: [email protected]
Message-ID: <[email protected]>
Subject: 5.41 MB of data transferred in    April
MIME-Version: 1.0
Content-Type: multipart/alternative;
	boundary="----=_Part_12477951_36658994.1620147046127"
X-Binding: bg-abd-844
List-Unsubscribe: <mailto:NVBDA6K7IZ5GINLONM3G6VK2PBHGSTSINRDXQYSSJVBUUUTQGJWVQQKDORYFQT3UMZYXOPI=.523679.47834.9@unsub-ab.mktomail.com>
X-PVIQ: mkto-713XSC918-000001-000000-523679
X-MarketoID: 713-XSC-918:0:38555:305344:792656:47834:9:523679:220102596
X-Mailfrom: [email protected]
X-MktArchive: false
X-MSYS-API: {"options":{"open_tracking":false,"click_tracking":false}}
X-MktMailDKIM: true
X-Spam-Status: No, score=-0.2
X-Spam-Score: -1
X-Spam-Bar: /
X-Ham-Report: Spam detection software, running on the system "rs2-dal.serverhostgroup.com",
 has NOT identified this incoming email as spam.  The original
 message has been attached to this so you can view it or label
 similar future email.  If you have any questions, see
 root\@localhost for details.
 Content preview:  You can also view this email as a webpage <[[https://info.cloudflare.com/index.php/email/emailWebview?mkt_tok=NzEzLVhTQy05MTgAAAF810K22Dj-YRMGqmyLOV3MQgBYYP7lommWfZEn6cu5rDzE4cdkiXFsQrQGEsN6sk8rzdn7QI
    [...]
 Content analysis details:   (-0.2 points, 5.0 required)
  pts rule name              description
 ---- ---------------------- --------------------------------------------------
  0.0 URIBL_BLOCKED          ADMINISTRATOR NOTICE: The query to URIBL was
                             blocked.  See
                             http://wiki.apache.org/spamassassin/DnsBlocklists#dnsbl-block
                              for more information.
                             [URIs: cloudflare.com]
 -0.0 SPF_HELO_PASS          SPF: HELO matches SPF record
 -0.0 SPF_PASS               SPF: sender matches SPF record
  0.0 HTML_FONT_LOW_CONTRAST BODY: HTML font color similar or
                             identical to background
  0.0 HTML_MESSAGE           BODY: HTML included in message
 -0.1 DKIM_VALID_EF          Message has a valid DKIM or DK signature from
                             envelope-from domain
 -0.1 DKIM_VALID             Message has at least one valid DKIM or DK signature
  0.1 DKIM_SIGNED            Message has a DKIM or DK signature, not necessarily
                             valid
 -0.1 DKIM_VALID_AU          Message has a valid DKIM or DK signature from
                             author's domain
  0.0 T_KAM_HTML_FONT_INVALID Test for Invalidly Named or Formatted
                             Colors in HTML
X-Spam-Flag: NO

------=_Part_12477951_36658994.1620147046127
Content-Type: text/plain; charset=UTF-8
Content-Transfer-Encoding: quoted-printable
How To Analyze an Email Header
From
- This displays who sent the message, however, this can be easily forged and can be the least reliable.
Subject
- This is what the sender placed as a topic of the email message.
Date
- This shows the date and time the email message was composed.
To
- This shows to whom the message was addressed, but may not contain the recipient’s address.
Return-Path
- The email address for return mail. This is the same as “Reply-To:”.
Envelope-To
- This header shows that this email was delivered to the mailbox of a subscriber whose email address is admin @ chcostingdemos . com.
Delivery Date
- This shows the date and time at which the email was received by your mail server or client.
Received
- The received is the most important part of the email header and is usually the most reliable. They form a list of all the servers/computers through which the message traveled in order to reach you.
- The received lines are best read from bottom to top.
- That is, the first “Received:” line is your own system or mail server.
- The last “Received:” line is where the mail originated.
- Each mail system has their own style of “Received:” line.
- A “Received:” line typically identifies the server that received the mail and the server from which the mail was received.
Dkim-Signature & Domainkey-Signature
- This indicates if the domain key identifiers are validated to ensure that a server signed to this domain truly sent this message or not.
Message-id
- A unique string assigned by the mail system when the message is first created. These can easily be forged.
Mime-Version
- Multipurpose Internet Mail Extensions (MIME) is an Internet standard that extends the format of email. There are various MIME differentiators that could be attached, such as a S/MIME which uses PGP signing to encrypt a message.
Content-Type
- Generally, this will tell you the format of the message, such as html or plaintext.
X-Spam-Status
- Displays a spam score created by your service or mail client.
X-Spam-Level
- Displays a spam score usually created by your service or mail client.
Message Body
- This is the actual content of the email itself, written by the sender.
Finding The Original Sender
The easiest way for finding the original sender is by looking for the X-Originating-IP header.
This header is important since it tells you the IP address of the computer that had sent the email.
If you cannot find the X-Originating-IP header, then you will have to sift through the Received headers to find the sender’s IP address. In the headers above, that IP address is 192.28.154.211.
Once the email sender’s IP address is found, you can search for it at ARIN.
You should now be given results letting you know to which ISP (Internet Service Provider) or webhost the IP address belongs. Now, if you are tracking a spam email, you can send a complaint to the owner of the originating IP address. Be sure to include all the headers of the email when filing a complaint.
]]>Managing an Email Account in cPanel
First, let’s examine the overall UI of the Email Accounts area.
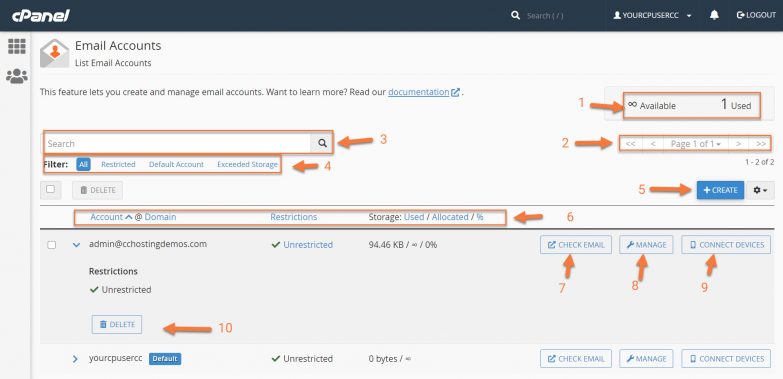
Legend:
- This indicates the number of email addresses our cPanel account can create and how many we have created. The default account is permanently excluded from this count.
- This is the pagination feature. If you have many email addresses, they may be listed on multiple pages.
- You can use the Search to find accounts quickly.
- With the Filter feature, you can show all accounts with restrictions, the default account, and accounts that have exceeded their storage limits.
- With the Create button, you can create new accounts. Adjacent to the Create button is the Cog, which allows you to set the number of entries listed per page.
- These are the column headers for the accounts list. Using traditional ascending or descending sort methods, you can sort by account name, accounts with restrictions, and order accounts by the amount of storage.
- You can log in to one of these email accounts using the Check Email feature.
- Manage allows you to manage aspects of the account, such as its password, storage, and restrictions.
- Connect Devices will help you set up that email account on things like mobile phones and tablets.
- This is the delete feature. Using this will delete the email account.
Struggling with email issues? ChemiCloud is the hosting solution designed to save you time!  Check out our web hosting plans!
Next, let’s take a look at the Manage Account Screen:
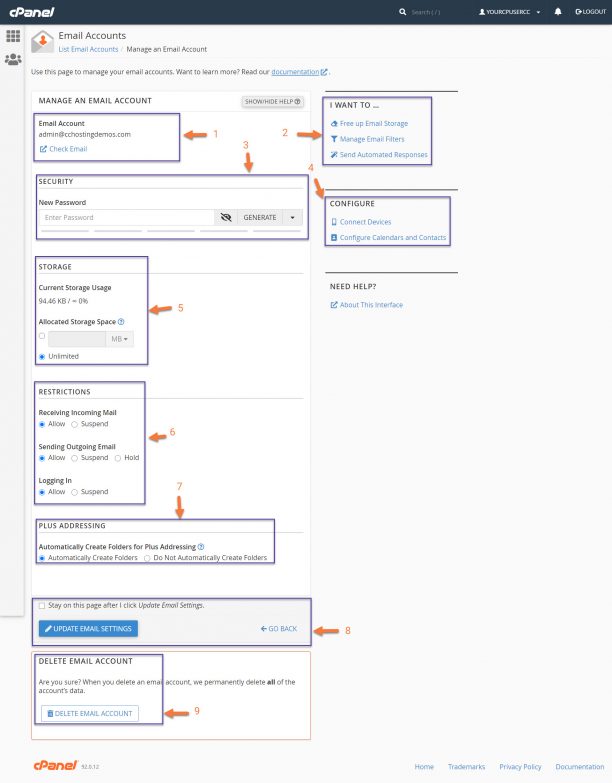
Legend:
- This indicates which email account you’re Managing, in case you need a reminder. You also have a link here to log right into that account.
- This section helps you perform quick tasks, such as freeing up email storage, managing filters for this account, and sending automated responses, which can be handy depending on how you use this account.
- This is the password change area. You can set a new password here, and there is also a password generator.
- The configure area helps you locate the proper information for adding your account email, calendar, and contacts to your mobile devices, like iOS, Android, and more.
- The storage area shows you how much storage the account is currently using and the current limit. You can set the account to have unlimited storage or a fixed limit, depending on your needs. Remember, though it may say unlimited storage, the storage pool email storage draws from is the storage assigned to your overall hosting account.
- The restrictions features allow you to change whether an account can receive email, send email, or even login.
- The plus addressing feature automatically creates a folder when this email address receives a message that uses plus addressing. For example, the system would place a message addressed to “[email protected]” in a new folder called “plusaddress”.
- The check box here lets you stay on the page after clicking update, and clicking the blue update box saves any changes you’ve made here.
- This option deletes the email account and all messages inside of it.
]]>
Using PHP mail has its own unique advantages in certain niche scenarios; however, at ChemiCloud, the application to deliver mail from your application, such as WordPress, is not recommended. There are several reasons for this.
Let’s take a look at some Pros and Cons of each option:
PHP mail Pros
- It’s integrated into a lot of applications out of the box.
- Because it’s been in use on Linux for so long, it’s also connected to the default MTA (if installed), making configuration relatively easy.
PHP mail Cons
- Sending mail via PHP mail means the messages dispatched will not benefit from the SPF and DKIM setup on your domain; therefore, the messages will likely be treated as spam by the receiving MTA (mail server).
- At ChemiCloud, if you are not on a VPS, there is a limit of 25 unauthenticated messages per hour, which means if you’re dispatching an email newsletter campaign, it will take a long time.
- Overall deliverability of email messages sent via PHP mail is not guaranteed.
- You won’t receive bounceback messages if there is a delivery failure.
While you’re comparing email delivery options, you should compare us to your current host. See why our platform is consistent, reliable, and one of the fastest in the industry. Check out our web hosting plans!
SMTP Pros
- SMTP is a secure and proven technology.
- Mail sent using SMTP over your ChemiCloud email will travel through our MailChannels servers and be appropriately delivered to the recipient’s inbox instead of being treated as spam.
- Messages sent via SMTP will carry your DKIM and SPF signatures to notify receiving mail servers you really did send this message, and it was allowed to be sent from your domain.
- At ChemiCloud, you can send up to 300 messages per hour unless you are on a VPS.
SMTP Cons
- Integration into applications like WordPress may require an additional plugin.
- You need to create an additional user to authenticate with the SMTP server, which means another password you need to keep secure.
SMTP vs PHP mail(): Which One Should I Use?
As you can see, sending mail from your PHP application using SMTP is the better choice.
We hope this answers some questions for you, but if you still need assistance, be sure to open a live chat with our Happiness Engineers 24×7 or a ticket from your Client Area, and we’ll get you sorted!
]]>If if you have signed up for Rackspace Email, in this tutorial will guide you to configure DNS for Rackspace email in cPanel.
Additionally, this Knowledge Base Article covers Rackspace Email and Email Plus, which use the same server settings at Rackspace, not Office365 or Hosted Exchange Services.[/ht_message]
How To Configure DNS for Rackspace in cPanel
Step 1: Login to your cPanel. There’s a lot of ways to do this, but the sure fire easiest way is to login to your Client Area, then open your cPanel.
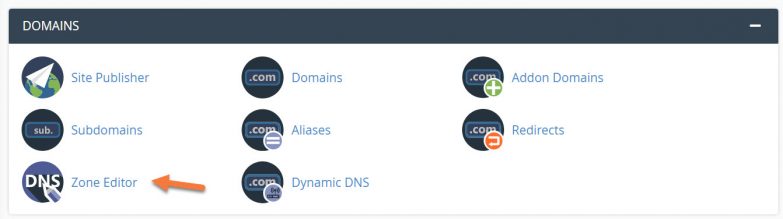
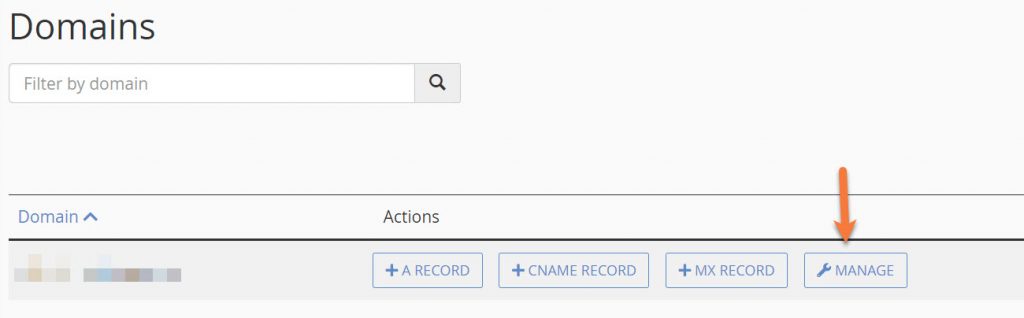
Step 2: In the Domains section of cPanel, click Zone Editor.
Step 3: When the Zone Editor has opened, choose the domain you want to modify from the Domains list, and click the Manage button on the right side.
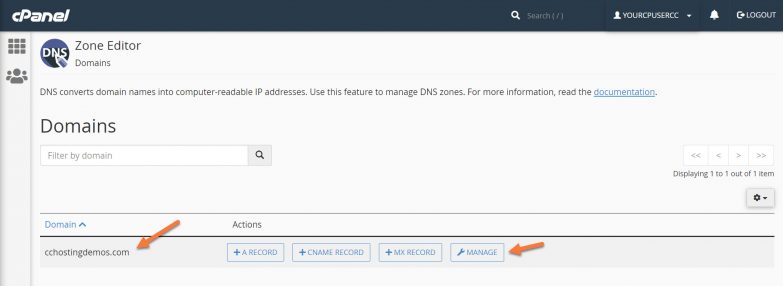
Step 4: Using the Filter at the top, click MX to hide the irrelevant records.

Step 5: Delete the current MX record by clicking the Delete button to the right of the record.
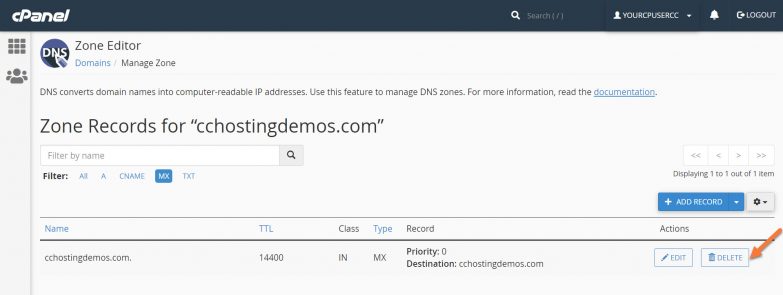
You will be asked to confirm – “Are you sure you wish to delete this record?” Click Continue.
You will be returned to a full view of all your DNS records.
Step 6: Next, we need to add a new MX record. To do this, click the downward facing triangle next to the blue + Add Record button on the right side and choose Add “MX” Record:
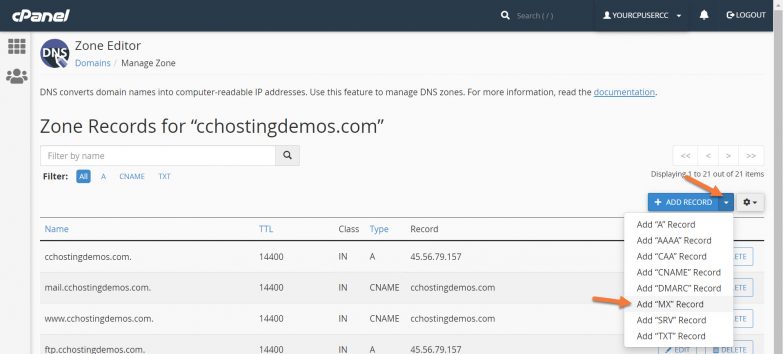
You will see the Zone Records screen has created an empty row for the new record:
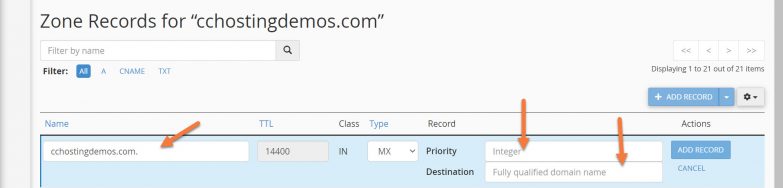
Three of the fields in the new row are editable. Let’s examine these:
Their MX Records are as follows:
| Host Name | MX Record Address | Priority |
|---|---|---|
| @ | mx1.emailsrvr.com | 10 |
Your completed record should look like the one below:

Once you’ve entered the record information, click the blue Add Record button.
You should see a green box appear in the top right corner with the text: Success: You successfully added the MX record for “cchostingdemos.com”.
Next, you need to repeat the process to add the second MX record.
To do this, click the downward facing triangle next to the blue + Add Record button on the right side and choose Add “MX” Record:
You will see the Zone Records screen has created an empty row for the new record:
Three of the fields in the new row are editable. Let’s examine these:
The first field is the name of the record. For this, you can leave it as-is.
The second field is the Priority of the Record. Enter 20 here.
The third field is the destination, which for Rackspace is: mx2.emailsrvr.com
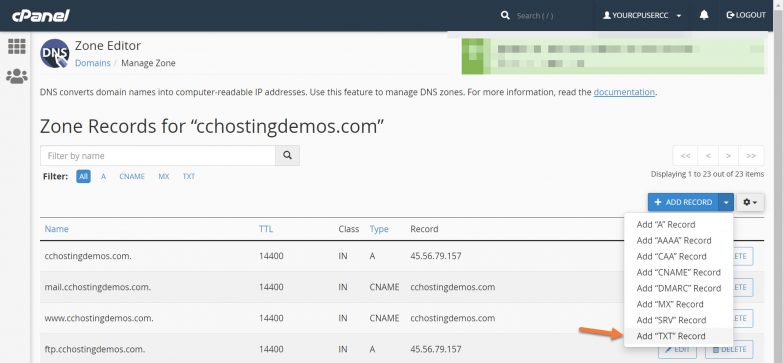
For Type, ensure it is set to TXT.
For Record, copy and paste this text: v=spf1 include:emailsrvr.com ~all
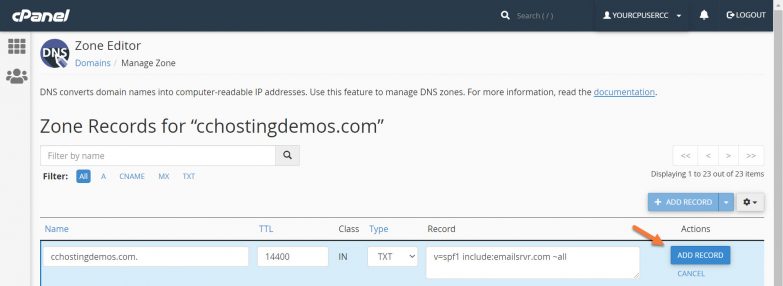
Add the record by clicking the blue Add Record button. You should see a green box appear in the top right corner with the text: Success: You successfully added the following TXT record for “yourdomain.tld”: yourdomain.tld.

And that’s it for DNS record settings. Just one other setting left, the very last one and it’s super easy!
This KB article will help you set up a free account at Zoho and configure your domain name to use Zoho Mail using cPanel.
How to setup Zoho Mail
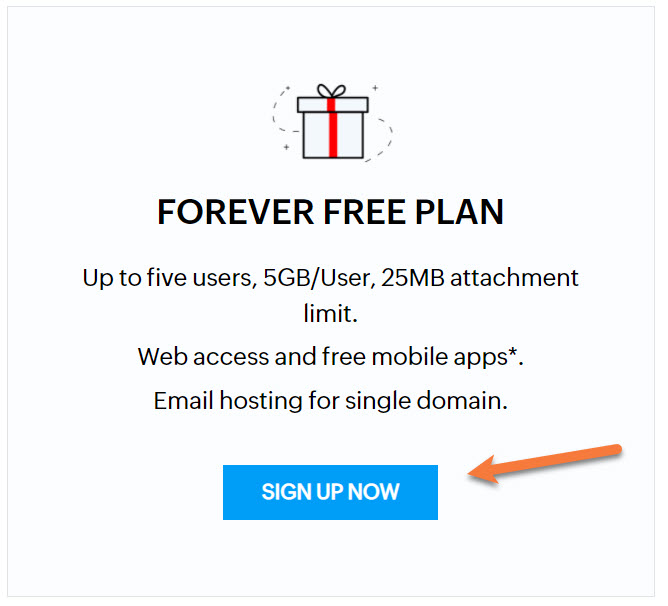
Step 1: You must create a Zoho Forever Free Email Plan. You can do that by visiting this page. To find the forever free plan, scroll down and look for it midway down the page.
During sign up, you will be asked for your domain name or given the option to purchase one from Zoho. They will also ask you to create an account and setup a username + password, and provide your phone number for SMS verification.
Step 2: After setting up your account, Zoho will ask you to verify you own the domain you’re trying to setup with their mail service.
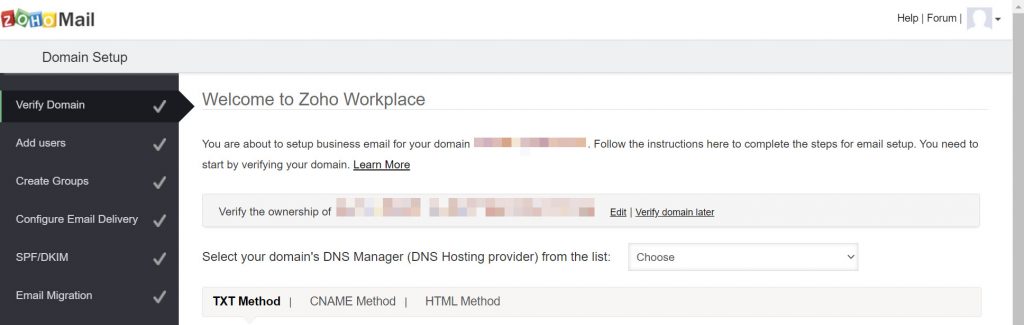
Zoho provides a few options for domain ownership verification. Since your domain’s DNS is pointed to ChemiCloud’s DNS servers, you’ll want to click the dropdown menu next to “Select your domain’s DNS Manager (DNS Hosting provider) from the list” and choose cPanel.
The verification area will expand and you will be given three options for verification:
- TXT Method
- CNAME Method
- HTML Method
They will also give you the values for each of the methods you need to enter.
For this KB article, we are going with the TXT method.
The values on this page which we need to pay attention to are the ones below:
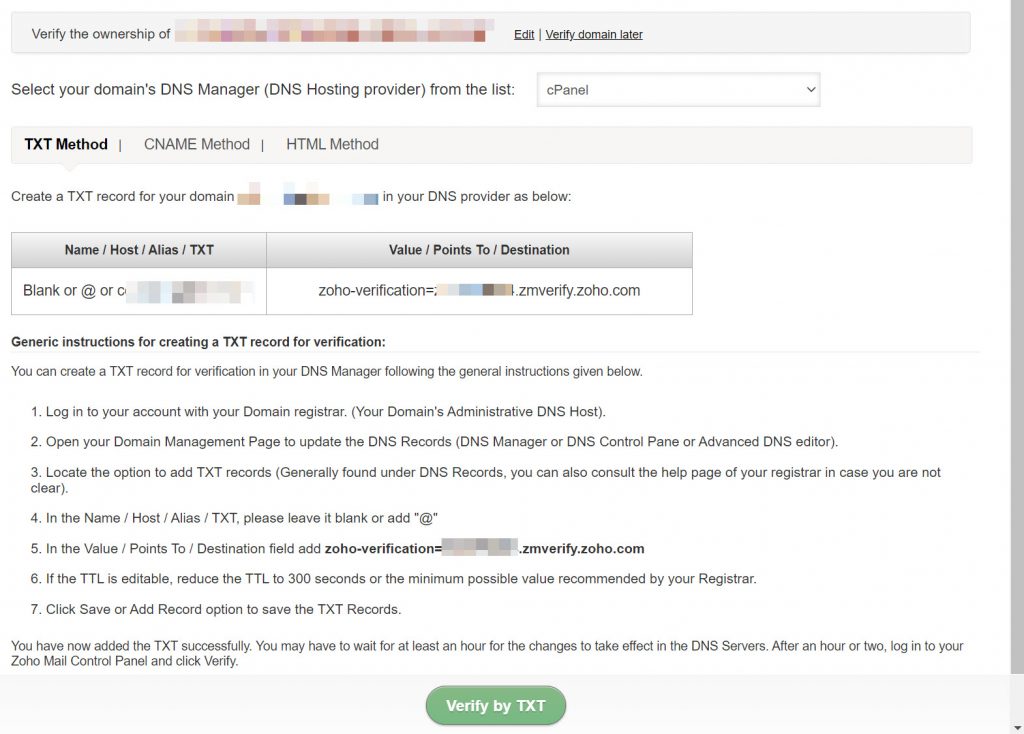
Step 3: To insert this TXT record into your DNS settings, you’ll need to open your Lab and then open your cPanel.
Once your cPanel is open, scroll down to the Domains section and click the Zone Editor.
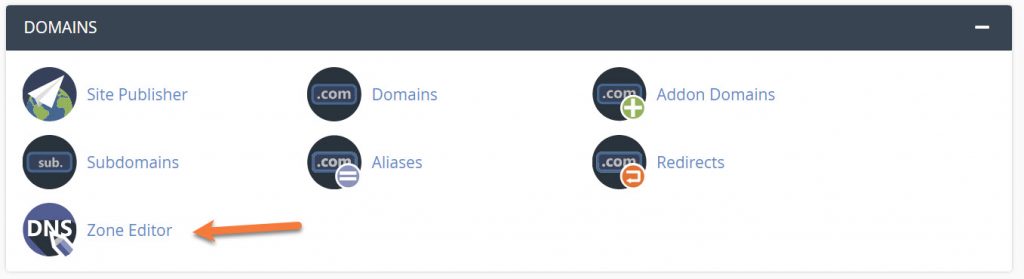
Next, choose the domain name you’re adding to Zoho from the list and click Manage.
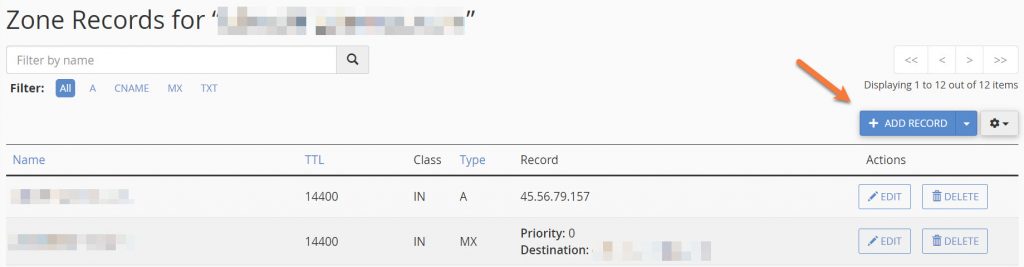
On the Zone Records screen, click the blue Add Record button located in the mid top right.
You will see the DNS records expand and a new row will be added.
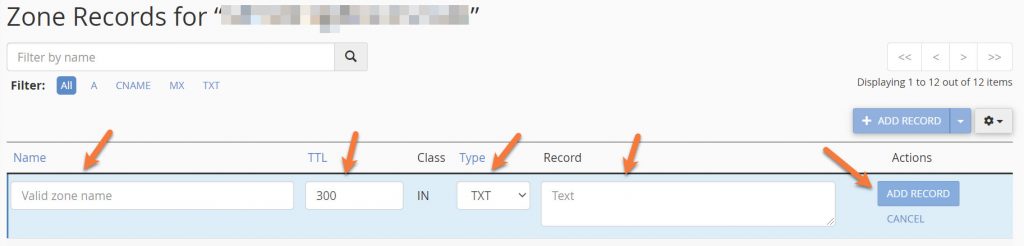
In the TTL box, enter 300.
In the Type drop down, choose TXT.
Under Name, enter yourdomain.
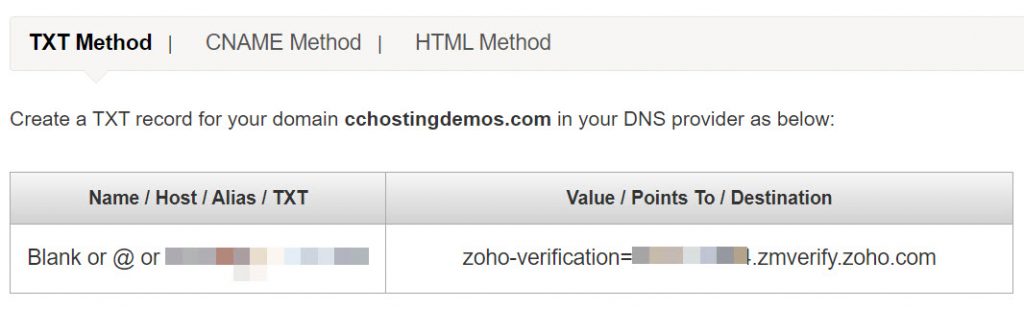
Under Record, enter zoho-verification=<yourcode>.zmverify.zoho.com where “yourcode” is the random code assigned to your record by Zoho.
Then click the blue Add Record button on the right-hand side.
Step 4: Return to the Zoho page in your browser and click the blue Verify TXT button at the bottom.
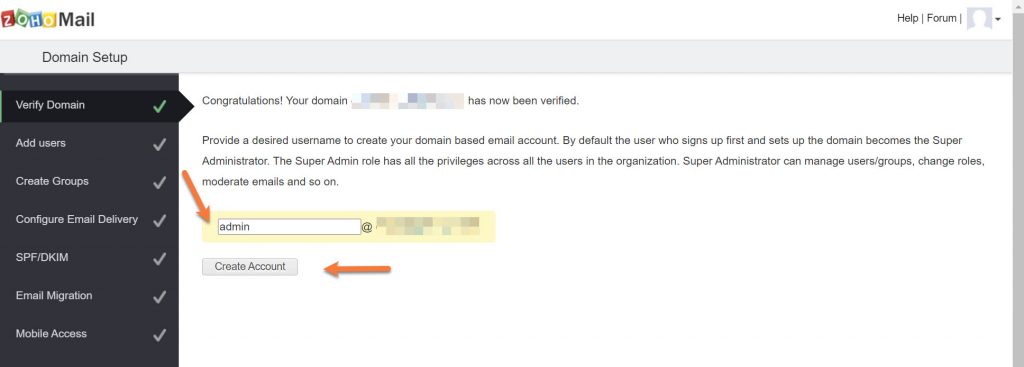
If you entered your records correctly, you will see a success screen and be given the option to create your first email account. The first user created is given the Super Administrator role. This role has all the privileges and is able to administer all users within the organization/account.
Enter your desired username and click Create Account.
Step 5: Next you will have the option to add additional users. You can add them one at a time, or by importing them from a CSV file.
Since we are using the Free Forever plan and setting up one user, I will skip this option.
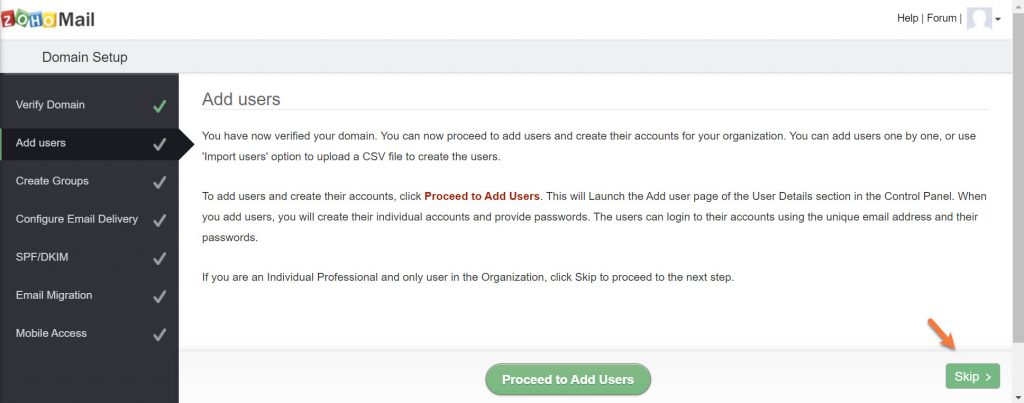
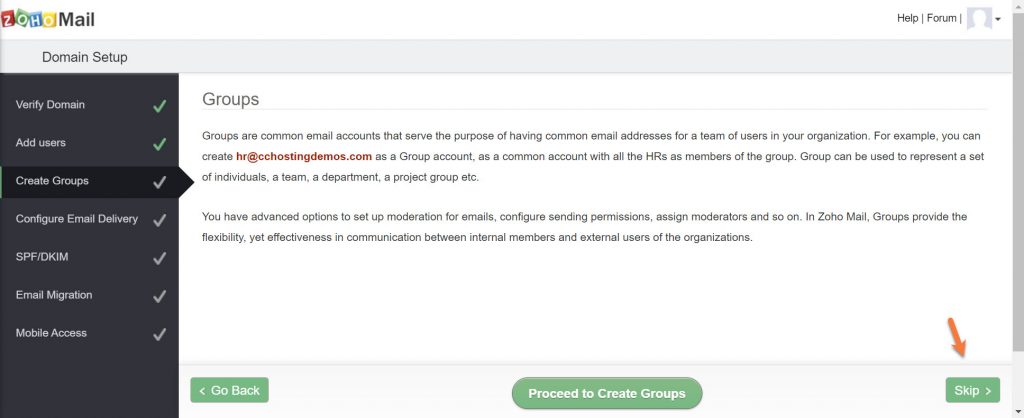
Step 6: Next, you will be given the option to create groups. This is handy if you have catch-all email addresses for common use by your team, such as sales@ or support@.
I don’t need to create any groups, so I’m going to skip this option.
Step 7: Next, you need to configure your MX Records. MX Records (Mail eXchange) are the special entries in DNS that designate the email-receiving server of your domain. Ensure that you have created the required user accounts and group accounts, before changing the MX.
Looking for a Zoho alternative?  Join the growing club of happy customers who made the switch to better, reliable email hosting.
Zoho’s MX Records are not specific to any one account, they are the same for all Zoho users. Their MX Records are as follows:
| Host Name | MX Record Address | Priority |
|---|---|---|
| @ | mx.zoho.com | 10 |
| @ | mx2.zoho.com | 20 |
| @ | mx3.zoho.com | 50 |
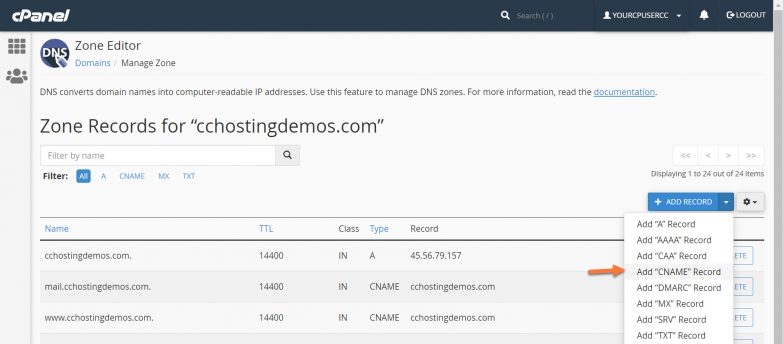
To add Zoho’s MX records to your DNS Configuration, navigate back to your cPanel > DNS > Zone Editor and click the blue + Add Record button in the mid-top right.
You will see the DNS records expand and a new row will be added.
Choose MX from the dropdown menu beneath type.
In the Priority field, enter the 10.
Enter mx.zoho.com and click the blue Add Record button in the Destination field.
Your first record will look like the one below:

Repeat this process for the remaining 2 Zoho MX Records.
After you have finished entering them, they should look like the one below.

Step 8: After you have entered your MX Records, return to the Zoho Mail setup screen and click MX Lookup at the bottom to confirm the MX Record Updates are correctly detected by Zoho.
Click Okay, then in the bottom right corner of the Zoho Setup screen, click Next.
Next, you need to set up your SPF and DKIM records. This is to help with email delivery and prevent email forging. Email spoofing is forging an email so that the email appears to be sent by someone, whereas the actual source might be someone else. To ensure that valid emails from your domain get delivered to your users, and spoofed emails from other spammers are identified by the other email services, we recommend you to add SPF records and DKIM records for your domain.
| TXT - Host/Name | TXT Value |
|---|---|
| Blank or @ or yourdomain.tld | v=spf1 include:zoho.com ~all |
Adding these records is very easy. To do this, return to the zone editor and click the blue Add record button.
In the Name field, enter yourdomain.tld.
From the record type dropdown, choose TXT.
In the Record field, copy the SPF record in the table above and paste it into the text box.
Click the blue Add Record button.
Your completed record entry should look like the one below:
![]()
Step 9: Kudos for hanging in there, we’re almost done! In this step, you’ll need to configure your DKIM records to ensure that valid emails sent from your domain using Zoho are not classified as spam at the receiver’s end. To configure this, click Proceed to Configure DKIM on the Zoho Setup Screen.
You will be transferred to the Zoho Mail DKIM – DomainKeys Identified Mail panel where you will see your domain listed, along with a circle icon and a pencil icon. Like below:
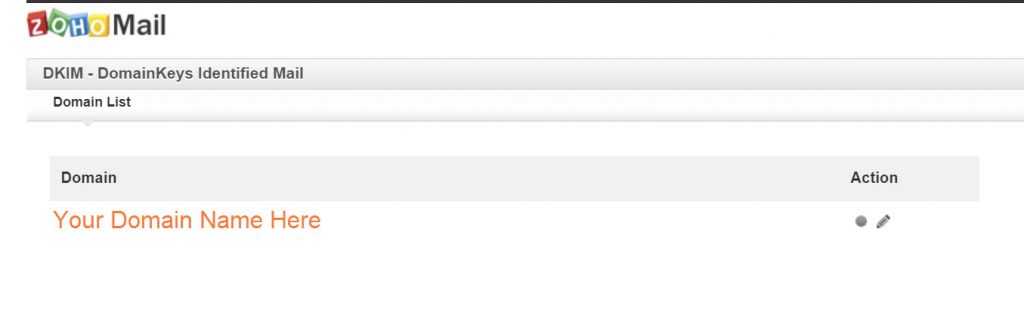
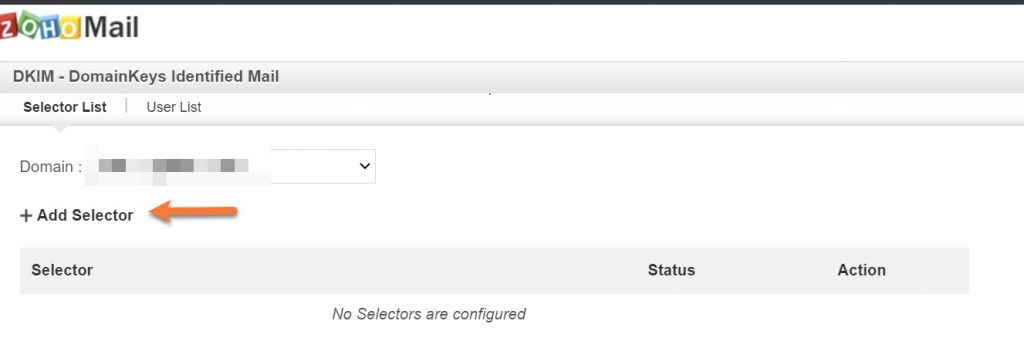
To use DKIM, you need to create a selector. To do this click the pencil icon.
You’ll be taken to the selector list. Click Add Selector.
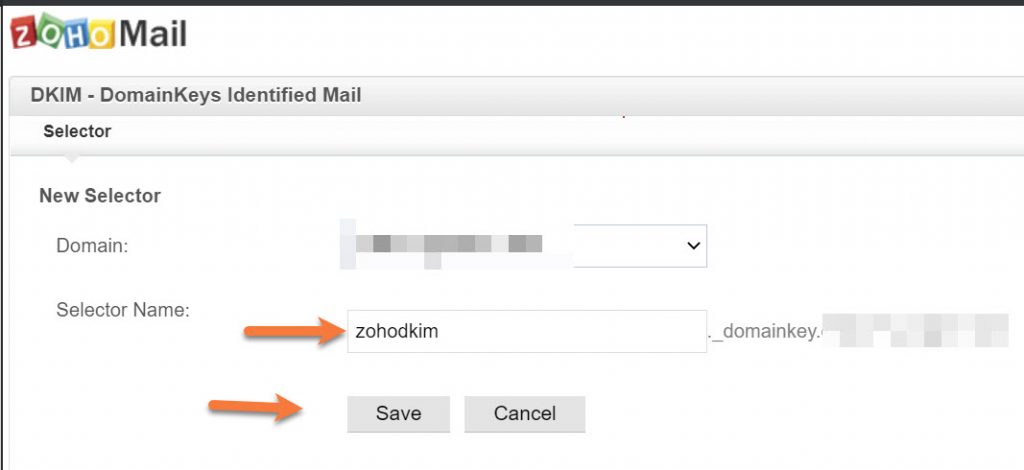
Next, you’ll be asked to give your selector a name. This name can be anything. For example, I’m going to use zohodkim. After you’ve named your selector, click save.
After you click save, you will be given your TXT record hostname and the TXT record value.
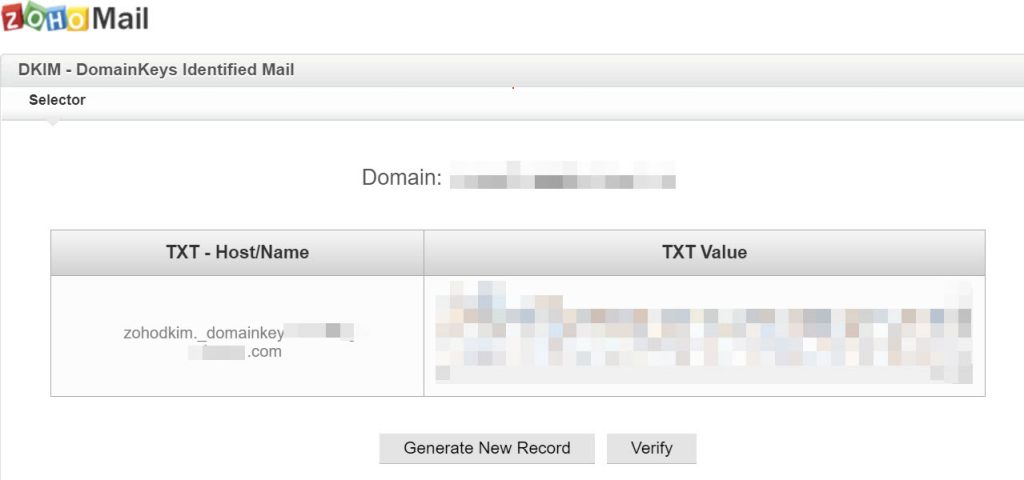
The TXT record hostname is mostly the same for each Zoho Mail customer, except your domain name is part of the record. In this case, the record is zohodkim._domainkey.yourdomain.tld
The TXT record value is randomly generated and will be unique to each DKIM selector you create.
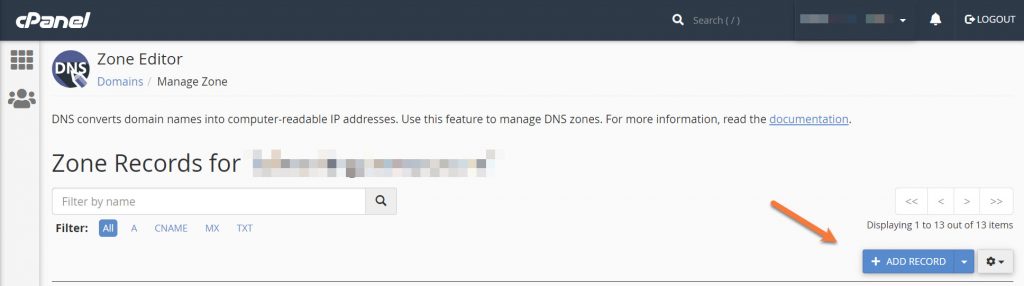
First, copy the TXT hostname record to your clipboard and return to the Zone Editor in cPanel. Click Add Record.
In the name field, enter zohodkim._domainkey.yourdomain.tld where ‘yourdomain.tld’ is your domain name.
In the Type dropdown, choose TXT.
For the Record Value, copy the TXT value from the Zoho Mail Setup DKIM Txt Value area and and paste it into the Record Value box in the Zone Editor.
Your completed TXT record should look similar to the one below:

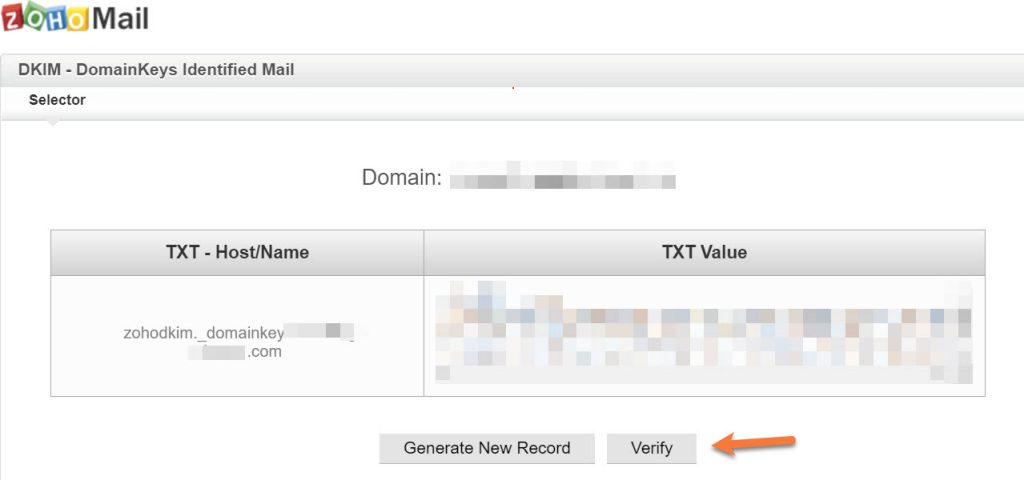
Click the blue Add Record button to add the DKIM record and return to the Zoho Mail Setup screen. Click Verify beneath the DKIM record to verify the DKIM record has been properly configured.
Once the record has been verified, click the Back to setup button at the bottom of the page.
Step 10: Zoho will prompt you for Email Migration, if you are migrating from ChemiCloud email servers, this is a convenient option to use as their service will automatically import your emails for you.
You can click Proceed to Migrate, if you wish. You will need the information below to do this:
Enter the IMAP server as mail.yourdomain.tld
Select SSL as the Security type
Enter 993 for Port
Your username should be formatted as ‘[email protected]’, not simply ‘yourusername’ in your email client to send and receive email.
For this article, we are going to click Skip.
Step 11: Next, Zoho Mail Setup will prompt you to download their apps. Zoho has three apps that you may find helpful.
First, the Zoho Mail Admin app is designed to help administrators manage their admin tasks from anywhere. You can manage users, reset user passwords, manage group membership and much more from this mobile app.
Second, the Inbox Insight app helps you to setup and get notified specific emails based on senders or folders, so that you do not miss out important emails, in the midst of the other notifications.
Third, the Zoho Mail App is designed to check your emails on the go, in the same way you check your email from your webmail. You can create or accept events, set up reminders, browse through your attachments with this app.
Step 12: After you’ve setup your apps, you can click the skip button. This is the final step in Zoho Setup. After skipping the mobile apps, your basic setup is complete.
Click the Green go to Zoho Workplace button to complete setup.
Next, there is one final change you must make in your cPanel for the e-mail at Zoho to properly work.
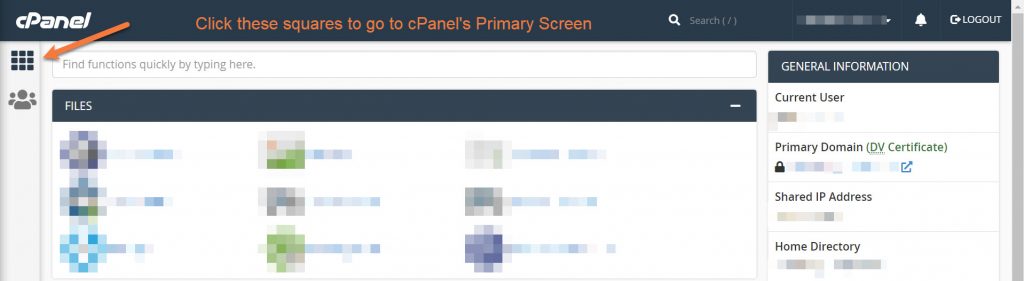
Navigate back to the main cPanel page by clicking the square box with 6 inner squares in the top left corner of cPanel.
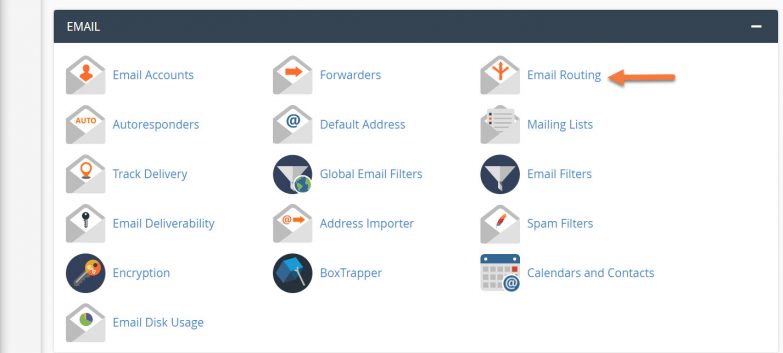
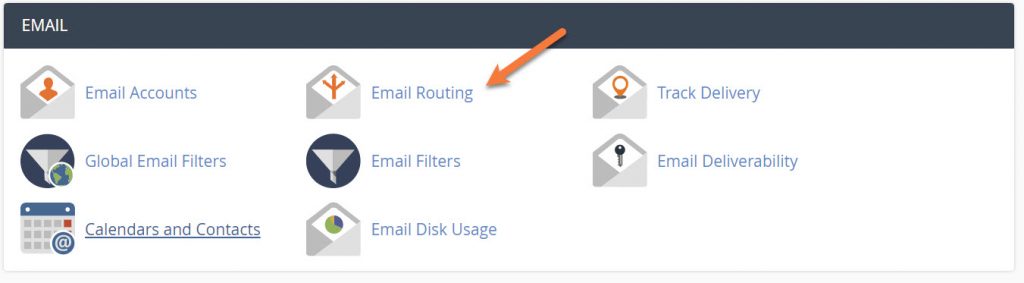
Scroll down and in Email section, look for Email Routing.
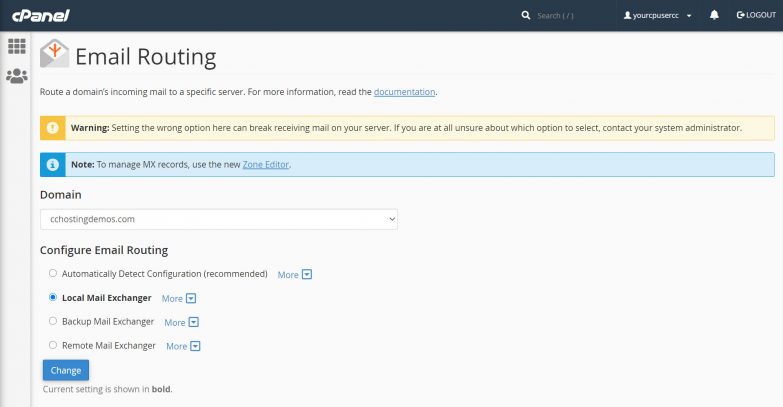
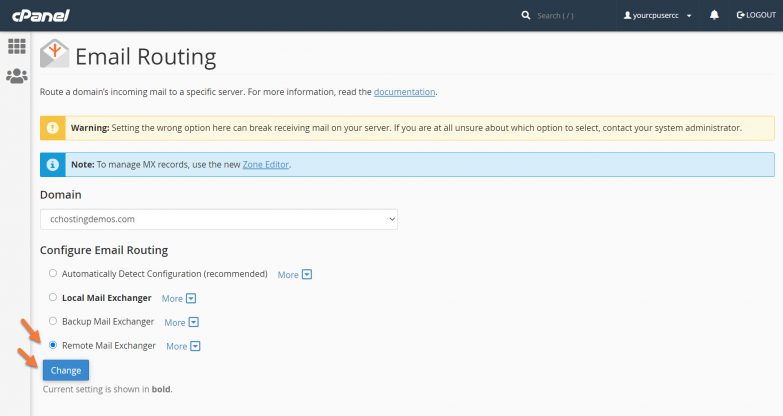
In the Email Routing Setup screen, you want to choose Remote Mail Exchanger. This instructs cPanel that you use an external mail service to send/receive email.
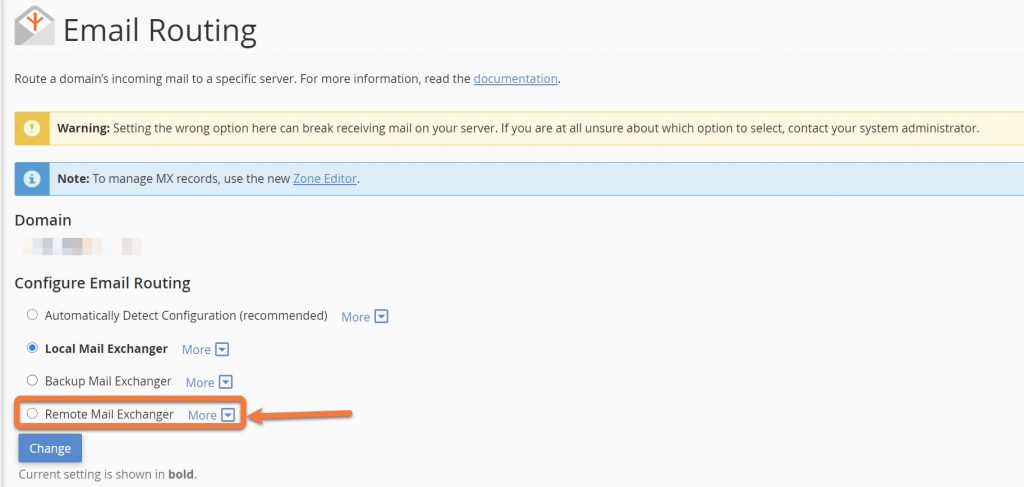
After you click Remote Mail Exchanger, click the blue Change button.
That’s it!
You have configured your Hosting account to use Zoho’s Free Forever Email plan!
We hope you enjoyed this knowledgebase article.
]]>How to Disable Mailman monthly membership reminder for an individual list
This tutorial assumes that you are already logged into cPanel.
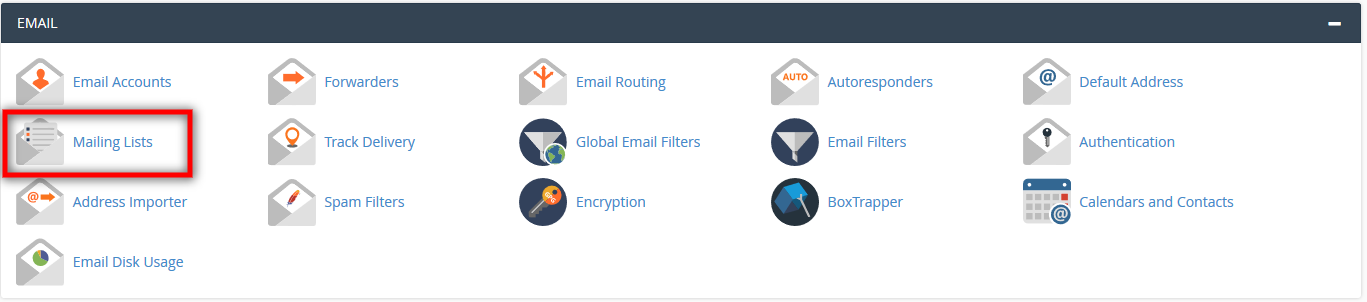
1. Go to Email > Mailing Lists
2. Under Current Lists you will need to locate your MailMan list then click Manage
3. While you are in the General Options section of your mailing list, scroll down to Notifications and set Send monthly password reminders? to No.

That’s all. Now you know how to Disable Mailman monthly membership reminder in cPanel.
Struggling with email issues? ChemiCloud is the hosting solution designed to save you money and time! Check out our email hosting plans!
How to Create an Email Account in cPanel
1) log in to your cPanel. There are many ways to do this, but the surefire easiest way is to log in to your Client Area, then open your cPanel.
2) Once your cPanel opens, look for the Email section, then click Email Accounts.

3) In the next window, you’ll need to click on the blue button called +CREATE

4) Next, you will need to type in the new email account you want to create and fill in the necessary information.

Here are the fields you need to fill in, to create your new email account:
- Domain – Choose the domain name you want to create your email address. Click on the Domain drop-down menu to see all the domains associated with your account.
- Username – enter the email address you want to create. E.g: john.smith
- Password – select a strong password for your new email account.
- Storage Space – choose the size of the mailbox.
- Automatically Create Folders for Plus Addressing – select Do Not Automatically Create Folders
5) When ready press the ‘Create’ button at the bottom.
That’s it! You now know how to create a new email account in cPanel.
]]>Another useful feature within cPanel is the Email Address Importer. This article will show you how to use the Email address importer and guide you through the process of setting up the CSV file (.csv) or Excel spreadsheet (.xls) needed to make it work.
But first thing is first. The Email address importer is a feature that allows you to create multiple Email accounts or Email forwarders simply by uploading a file containing all the addresses. This makes the process a lot easier, as opposed to adding each address by hand.
The only thing you need to look out for, is the way you format your Excel or CSV files beforehand. Depending on which option you choose, the Address Importer will read a set of fixed parameters.
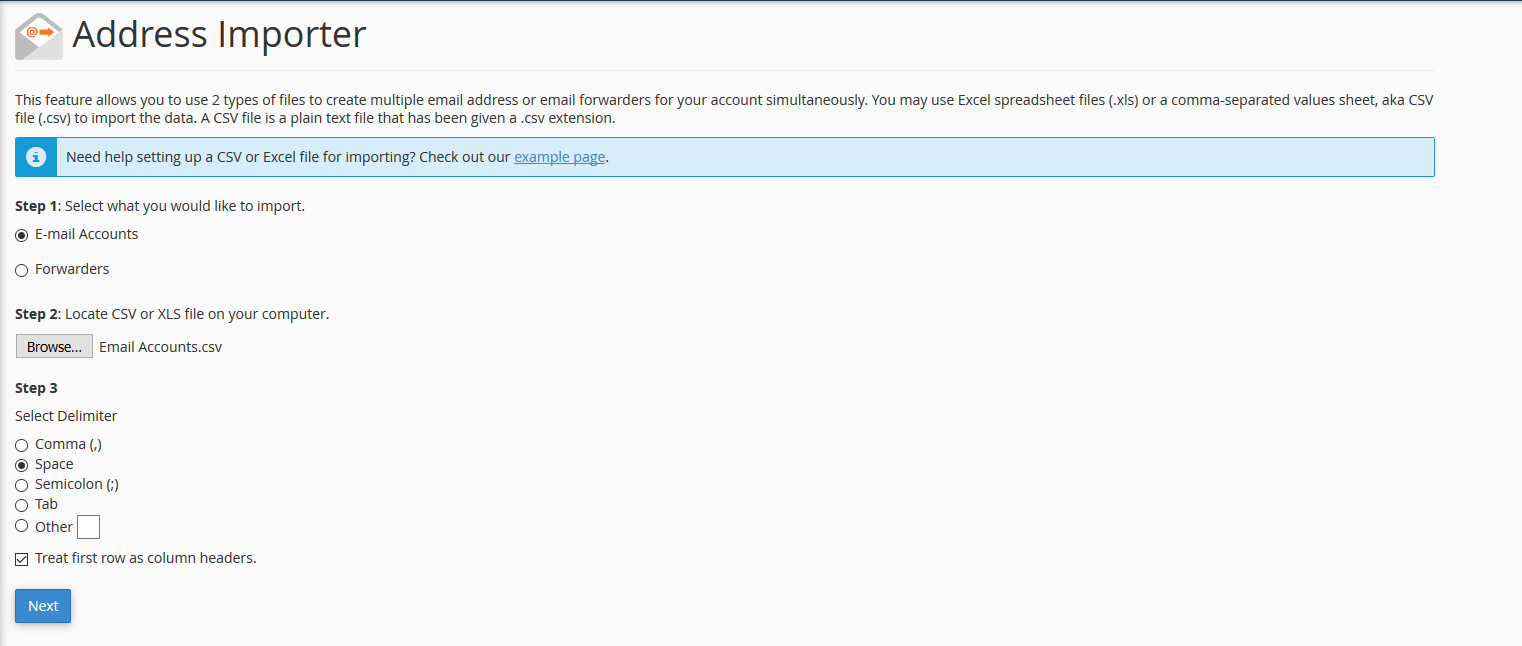
How to Use Email Address Importer in cPanel
1. Login to your cPanel account.
2. Navigate to the Email section and select Address Importer.

3. Select whether to import E-mail Accounts or Forwarders.
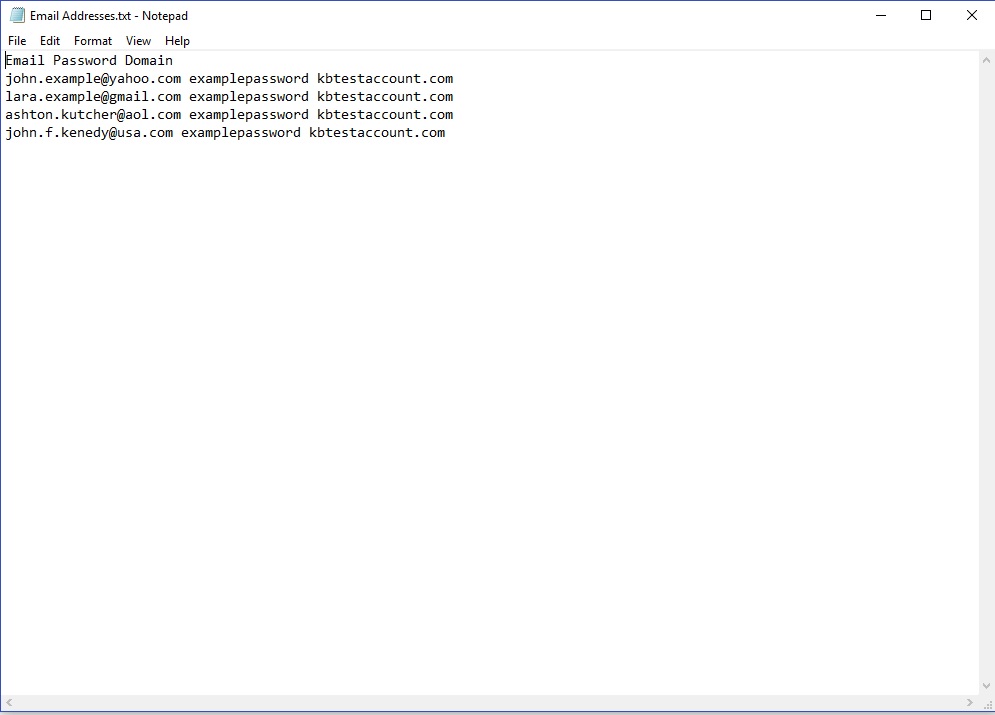
3.1 Email Addresses
For the purpose of this “how to” article, we have already formatted a simple .txt file with three column headers which correspond to the variables required by the Address Importer. It will require Email, Password, Domain and Quota (MB). Here is how the input file looks like:
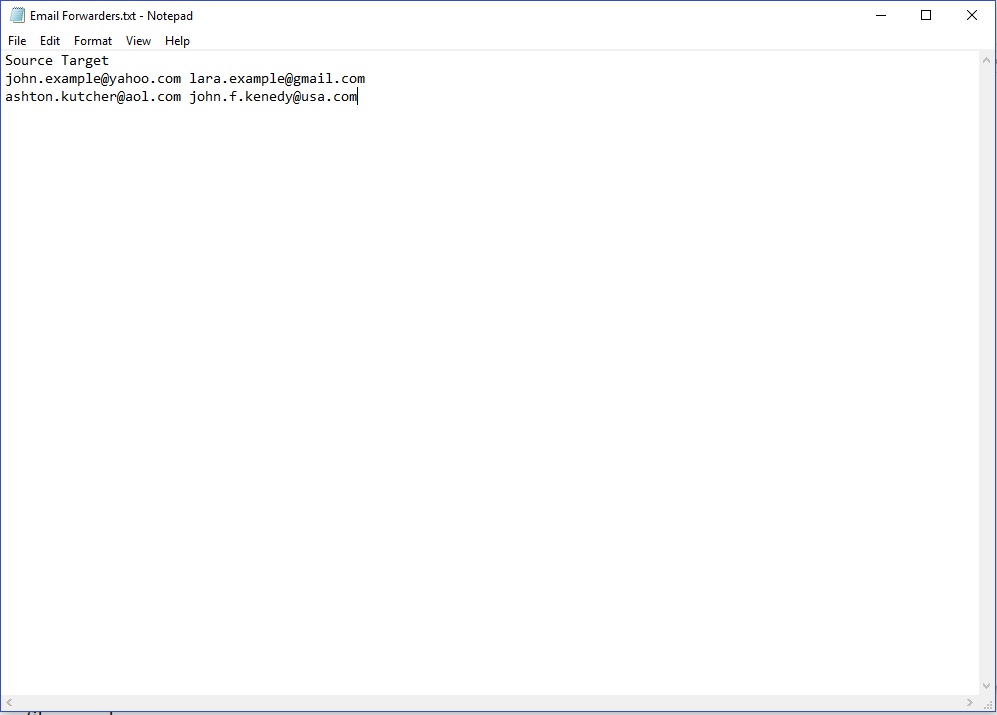
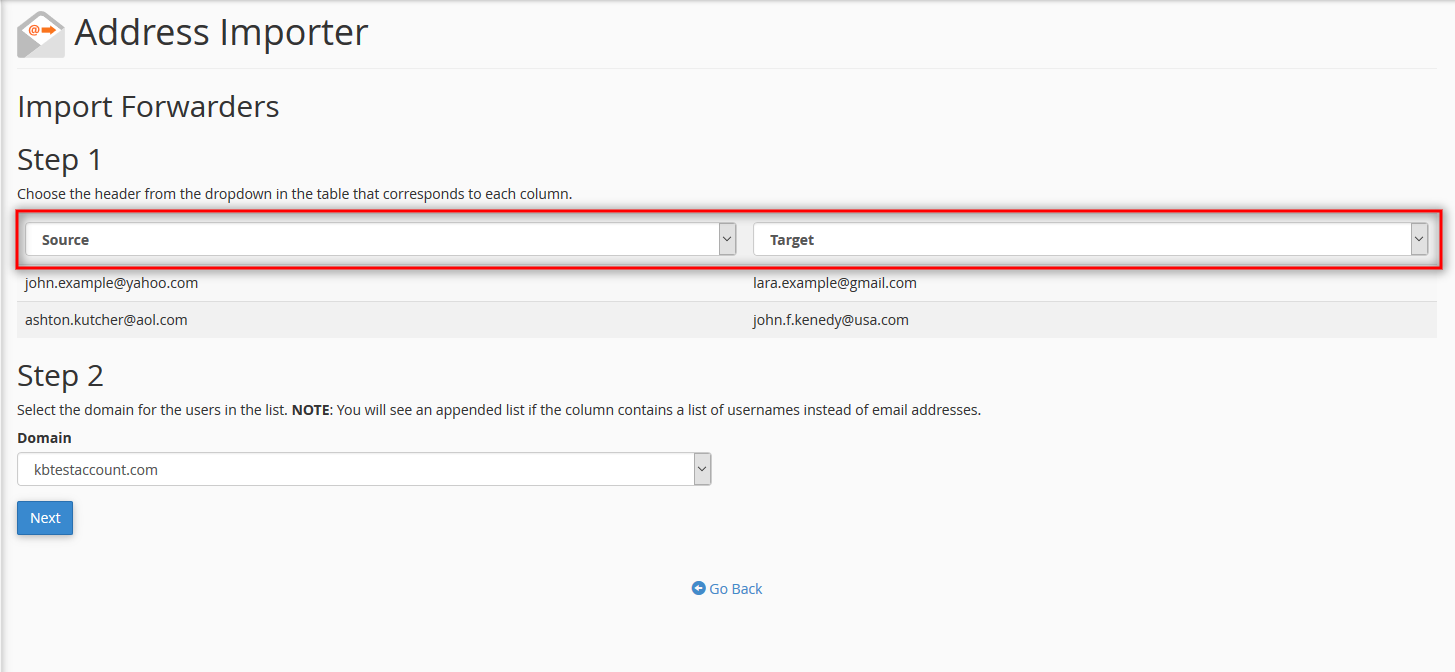
3.2 Forwarders
By selecting the Forwarders option, you will be required to upload a file with only two types of information columns: source and target. If you have already pre-formatted your .csv or .xls file beforehand, that’s great. Otherwise, you will be allowed to select the table headers on the next step.
Here is a file example:
4. Click on Browse and upload the file containing your addresses. You will be prompted by the following step where you need to select the type of separator you have used to separate the information in your file. You can also check the “Treat the first row as column headers” box if you already know which parameters the Address Importer expects. If you uncheck this box, you will be able to assign the table headers manually, so that the address importer knows what type of information it is reading.
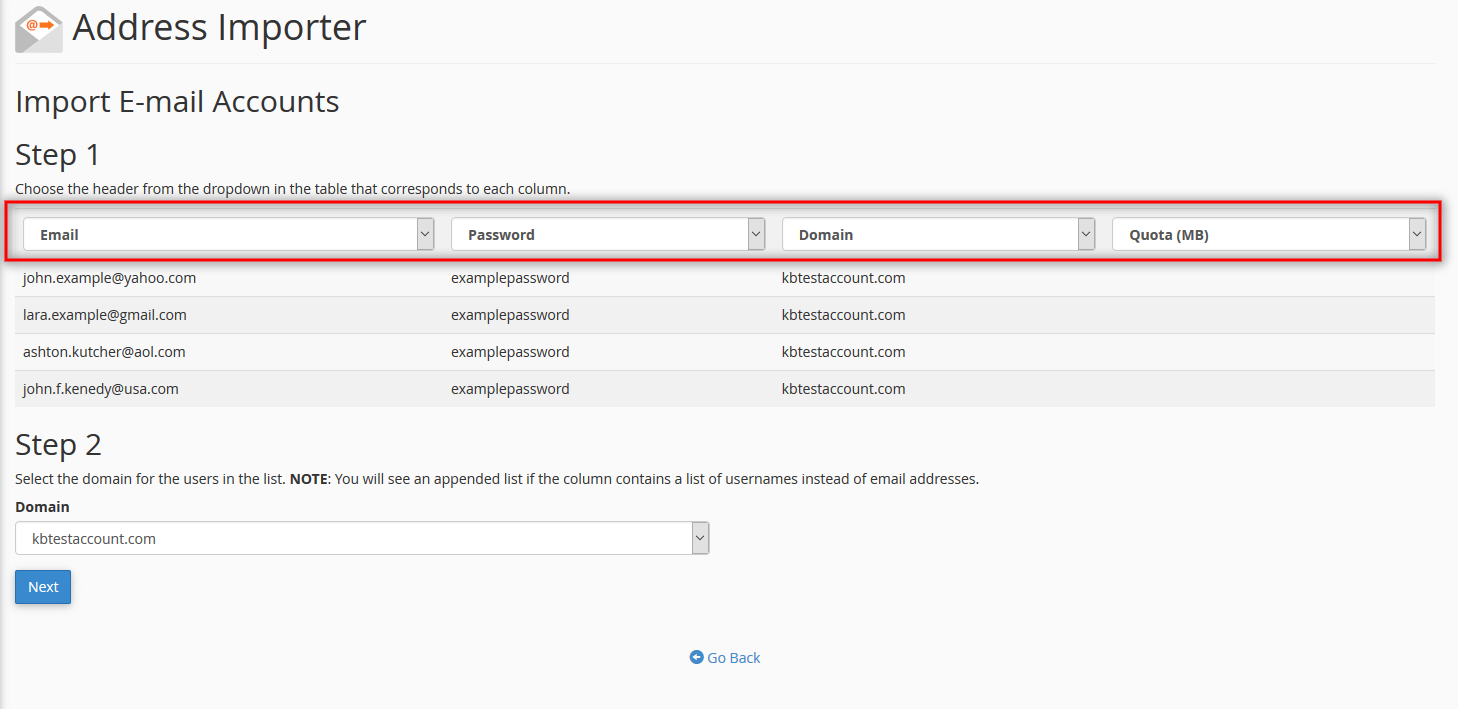
5. By clicking Next, you will be redirected to one of two pages, depending on your choice from Step 3.1 and Step 3.2. Click again on Next if everything looks good and then on Finish to add the Email addresses as domain accounts or forwarders.
In order to see the newly created Email accounts, navigate to the Email Accounts section from the cPanel home page. To view the newly created forwarders, simply navigate to the Forwarders section from your cPanel dashboard.
And that’s it. You’ve now learned how to use the Email Address Importer in cPanel. Make sure to always double check your settings and explore with different types of formatting your input files.
As always, thanks for choosing ChemiCloud solutions and feel free to contact us via our online chat if you have additional questions!
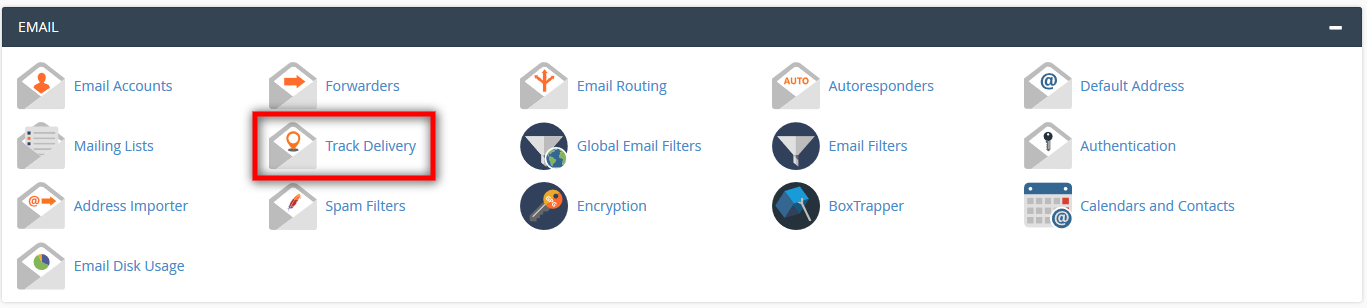
]]>In this article we will cover how to check Email message delivery in cPanel. You can find this feature under Track Delivery in the Email section. It is a very useful tool to use whenever you are experiencing issues with Email delivery from your account.
How to Check Email Message Delivery (Track Delivery) in cPanel
First, let’s see how to access Track Delivery and learn about the information at hand.
1. Login to your cPanel account.
2. Navigate to the Email section and click on Track Delivery.
3. Once on this page, you have two options:
- Type into the Recipient Email text box the specific Email address towards you wish to track delivery information and click Run Report.
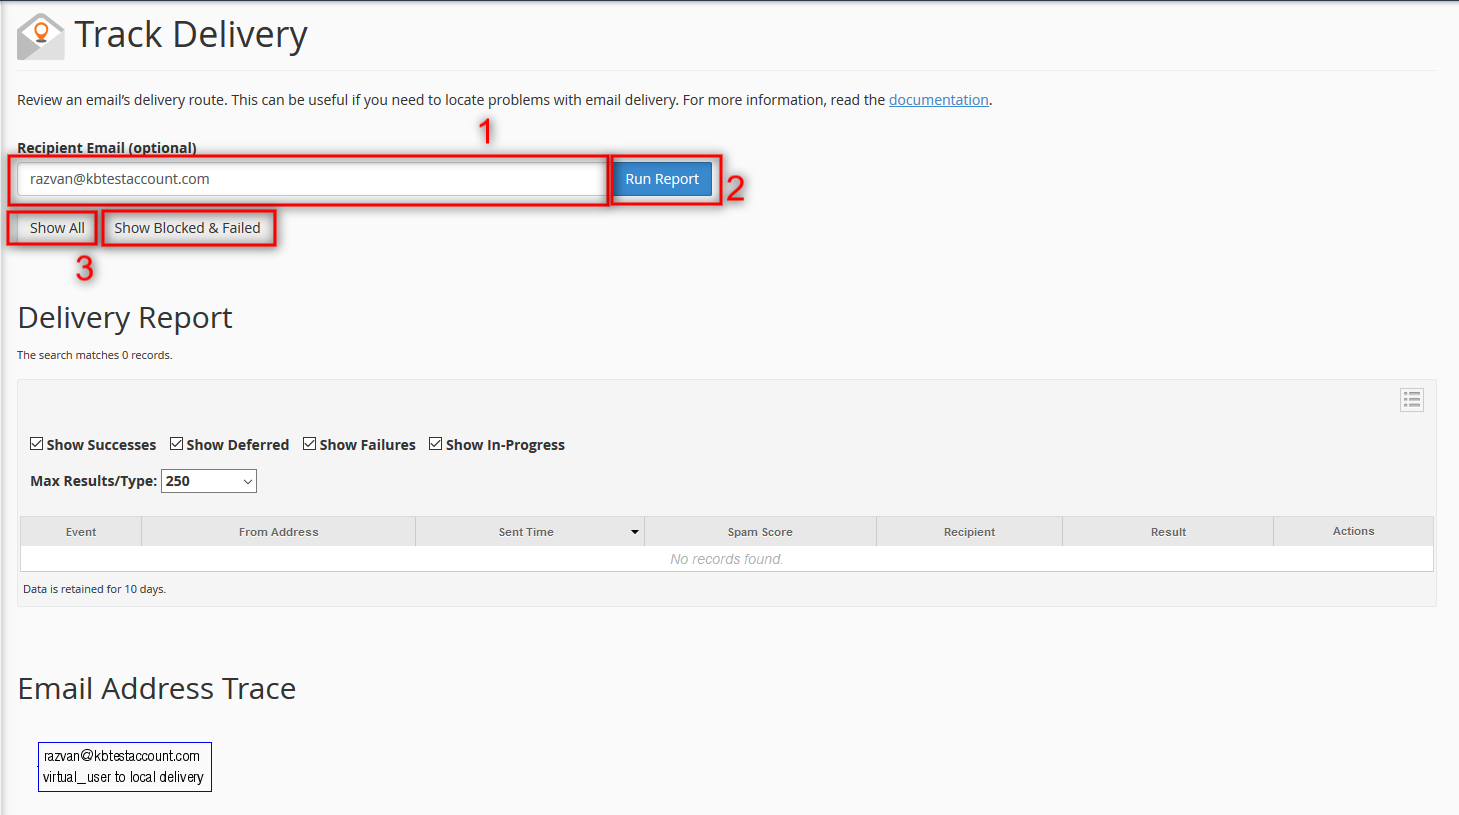
2. Or, leave the text box empty and show delivery details for all outgoing Email communication from your account by clicking on Show All. Additionally you can click on Show Blocked & Failed as well.
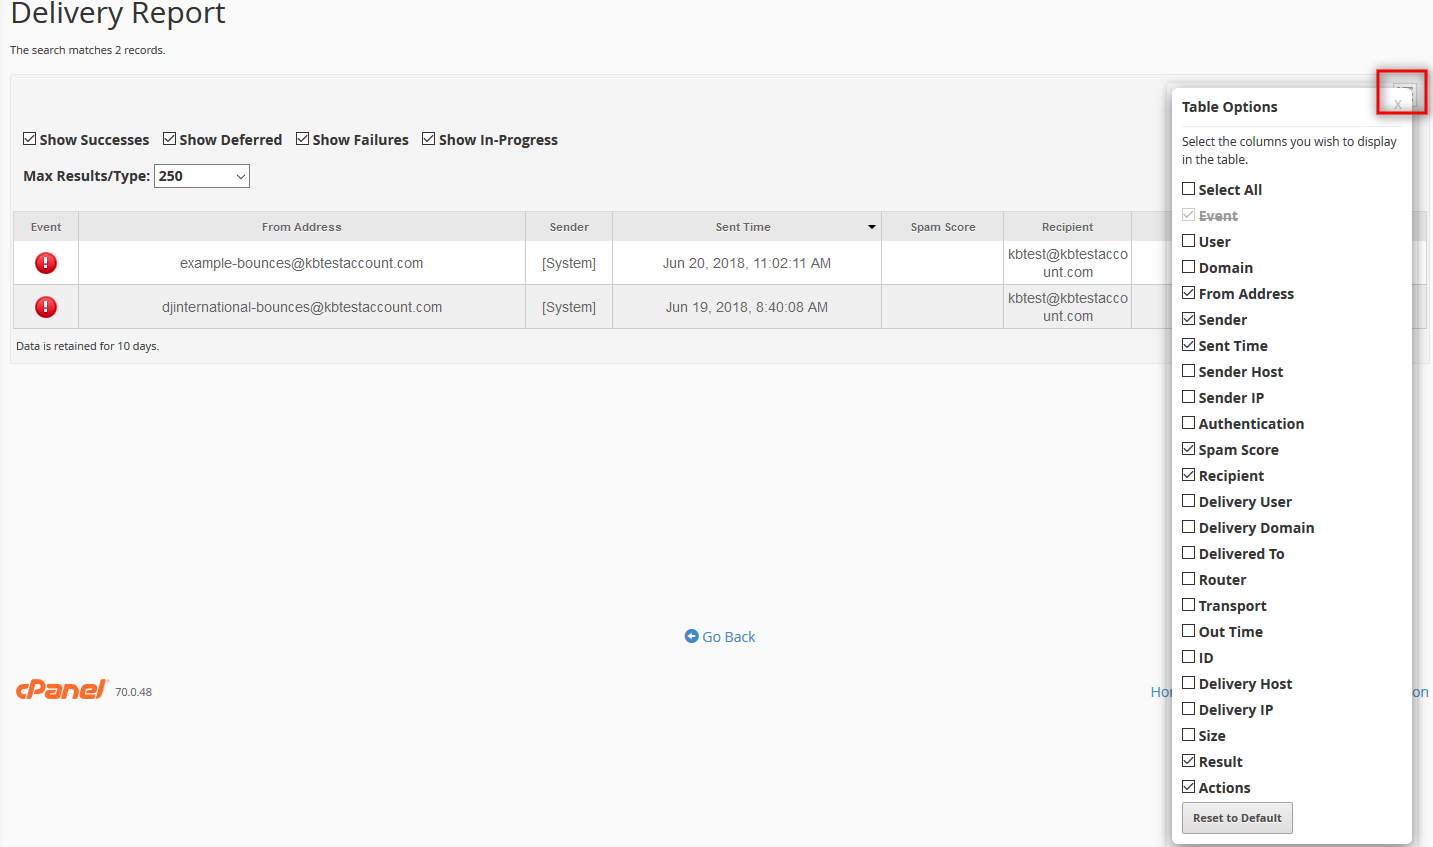
Next let’s take a closer look at the Delivery Report table.
Note: This feature is available only if your hosting provider has enabled the Eximstats in WHM. You may want to contact them if you do not see this information on the Track Delivery page.
The default information displayed by the Delivery Report table looks like the picture bellow. If you would like to learn more about each column shown, make sure to check out this documentation as well.
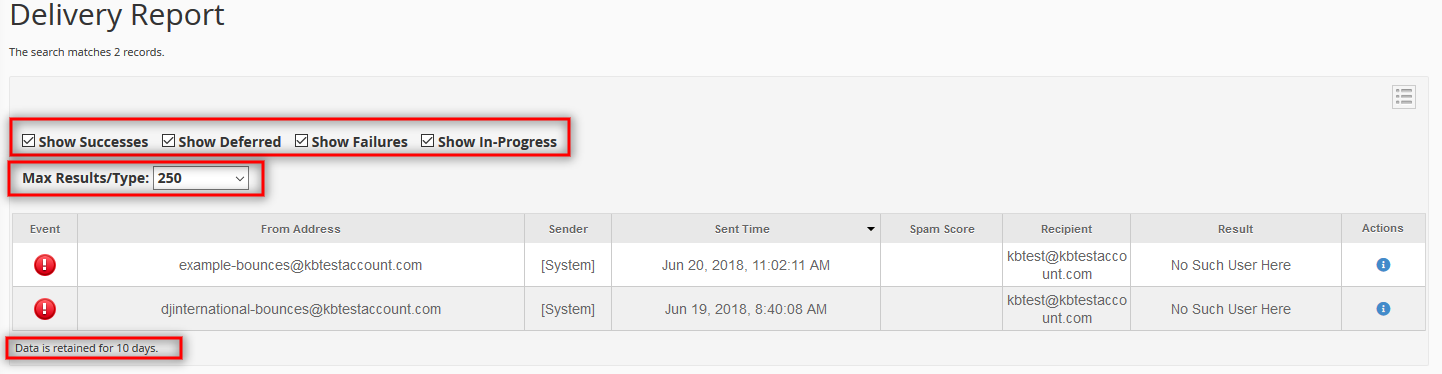
You can Choose how many results to show from the Max Results/Type drop down menu.
Also, you can show or hide information such as:
- Successes
- Deferred
- Failures
- In-Progress
If you need more information than displayed by default, you can click on the small menu icon ![]() on the right and choose one or more options from the drop-down list. A detailed description of each one can be found by accessing this link.
on the right and choose one or more options from the drop-down list. A detailed description of each one can be found by accessing this link.
If you have trouble deciphering the Events shown in the table, or you have other questions, feel free to get in touch via our Online Chat system.
]]>Today we are going to cover how to create and use mailing lists in cPanel. If you are not already familiar with the concept, mailing lists allow you to use a single email address to send mail to multiple recipients. Whether you’re working in a business environment, or simply using it for online marketing purposes, mailing lists play an important role in business to customer relationships. If managed properly and understood, they can be an effective strategy to boost sales and efficiently manage your customer/user base.
Keep in mind that adding addresses to your mailing lists without user approval may result in spam reports and unwanted email traffic. It is a commonly used best-practice that you offer users the option to unsubscribe.
Another important note is that, in order to manage mailing lists, cPanel uses a third-party web application called Mailman. You can read more instructions about this software by following this article.
How to Create Mailing Lists in cPanel
Now let’s see how you can actually set up a mailing list.
1. Login to your cPanel domain account.
2. Navigate to the Email section and click on Mailing Lists.
3. Select the domain you wish to add a mailing list to. If you are managing only one domain, this won’t be necessary.
4. Next, enter a List Name and Password in the appropriate boxes. Make sure to add a strong enough password for your list.
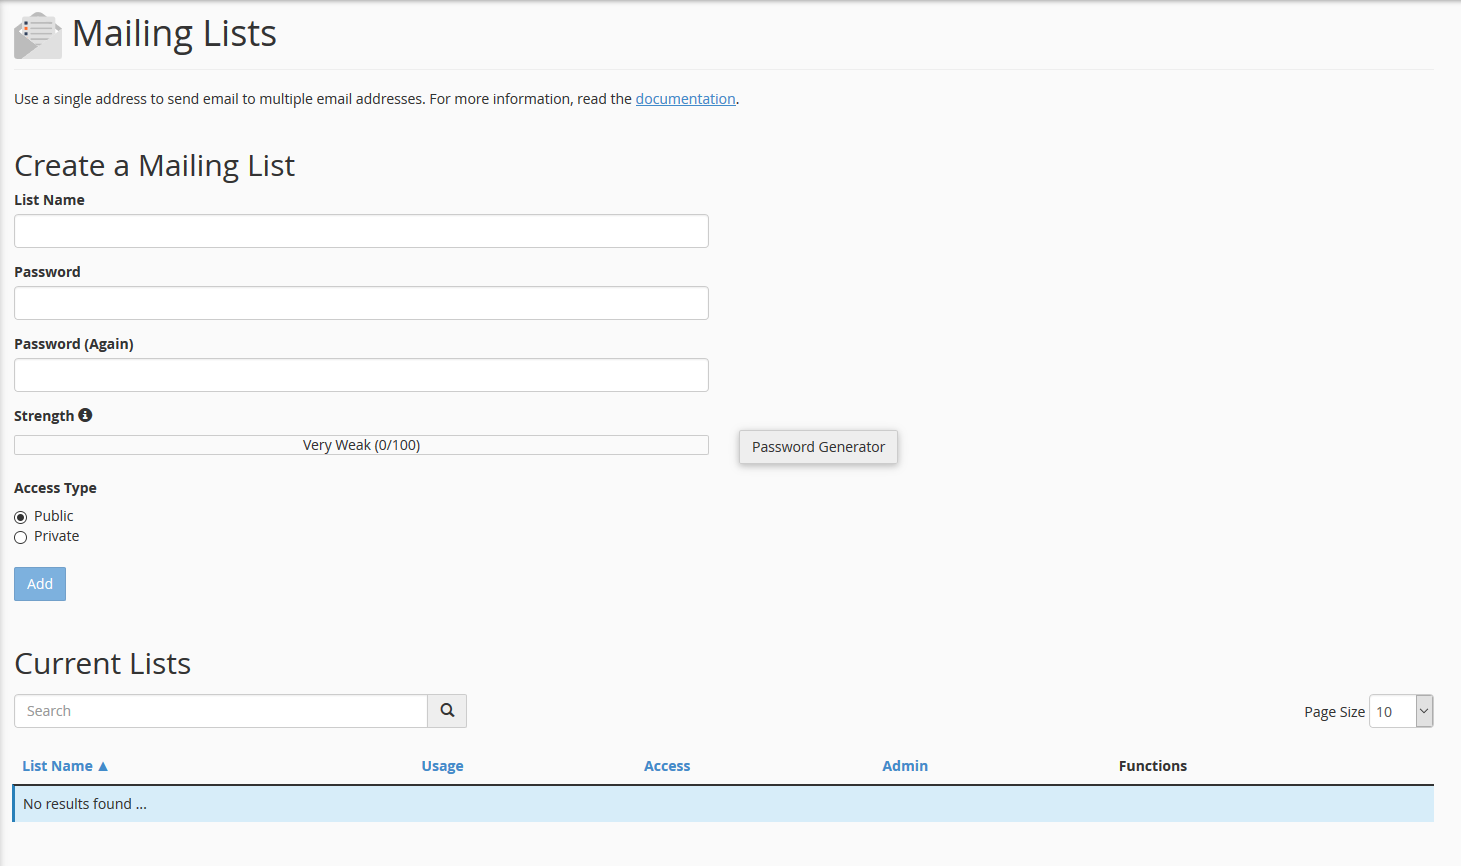
5. Choose whether to grant Public or Private access to your new mailing list.
- In the case of private access, the administrator will be required to approve subscriptions, while the Mailman application will not show the mailing list.
- For public access, subscriptions are not moderated, while Mailman displays the mailing list.
6. Click Add. You should now be able to see your newly created mailing list at the bottom of the page.

How to use Mailing Lists in cPanel
At the bottom of the Mailing lists page, you will see a table view with all created lists. Here you can access a series of important Functions:
- Delete – the delete function allows you to remove the mailing list, along with all its private and public information. This is the first function, which you can find along the same line as the List Name.

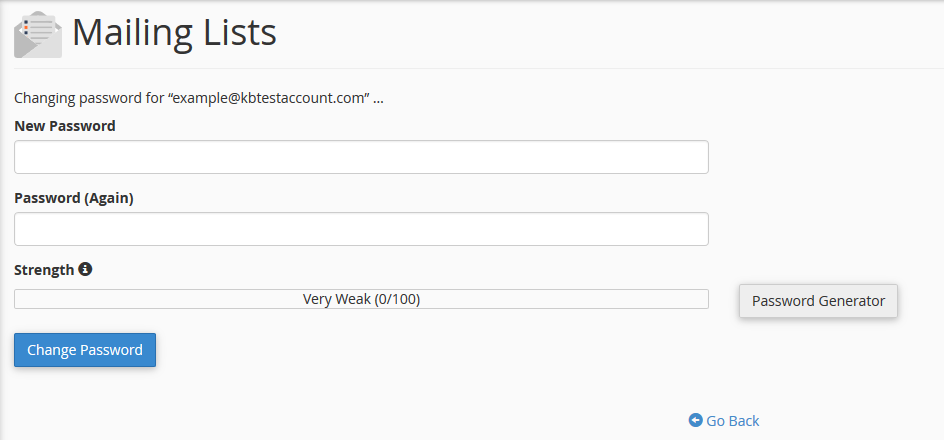
- Change Password – allows you to change the password of any given list, without any user approval.
- Manage – as we were stating above, mailing lists in cPanel are managed with the help of the Mailman web application. You can access Mailman by clicking on Manage. We highly recommend that you make yourself acquainted with this interface by reading its documentation first.

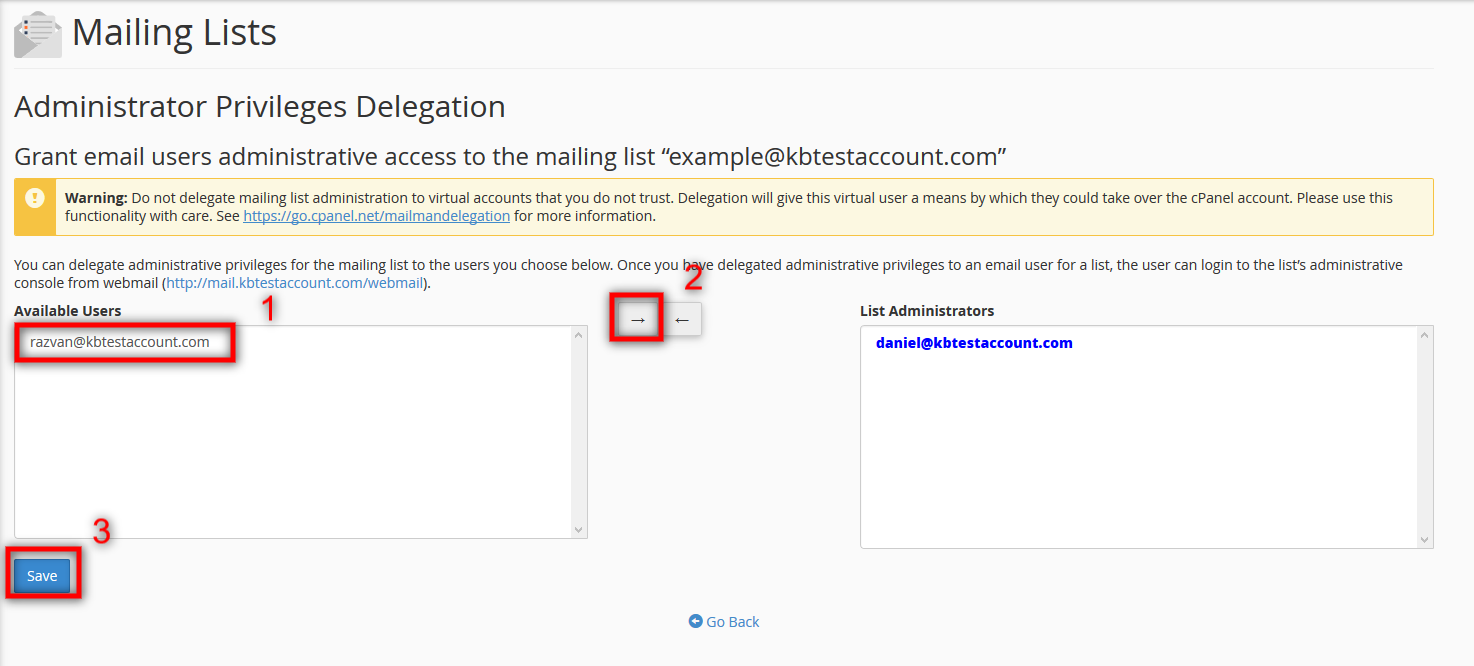
- Delegation – this function allows you to assign admin rights to specified list users. Be very careful to whom you delegate rights, as this feature may bring with it certain security risks. In order to access this function, simply click on Delegation and follow steps 1, 2 and 3 from the image below.
As always, if you still have questions, feel free to message us on our online chat. Thank you for using the ChemiCloud Services!
]]>