~/.ssh/id_rsa
Here’s a step-by-step guide to troubleshoot and resolve this:
Step 1) Check If SSH Agent Is Running and Add the Key
Run the following to check if your SSH key is loaded in the agent:
-
If you see something like:
Add the key manually:
-
If your key is encrypted, it will ask for the passphrase.
-
Once added, try connecting again:
Step 2) Check File Permissions
Incorrect file permissions can cause the Permission denied error. Run the following:
Step 3) Verify Key Usage in SSH Config (Optional)
If you are using a custom SSH key or different config, check the SSH config file:
Ensure the following is in place (replace with the correct IP if needed):
Step 4) Test Verbose Mode for Debugging
If it still doesn’t work, run SSH in verbose mode to get more details:
This will help identify any configuration issues.
Step 5) Regenerate SSH Key (if needed)
If the key is corrupted or invalid, regenerate a new key:
-
Save the new key as
id_rsain the~/.sshdirectory. -
Add the new public key to the server’s
~/.ssh/authorized_keysfile.
Step 6) Check if Public Key is added on the Server
If you suspect the key is missing on the server, ensure that your public key is added to the ~/.ssh/authorized_keys on the server.
If none of these steps work, send the output of verbose mode to your server administrator.
]]>This Knowledge Base article will guide you on connecting to your Web Hosting Account via SFTP using the CyberDuck FTP client on Windows 10.
How To Use CyberDuck with SFTP On Windows 10
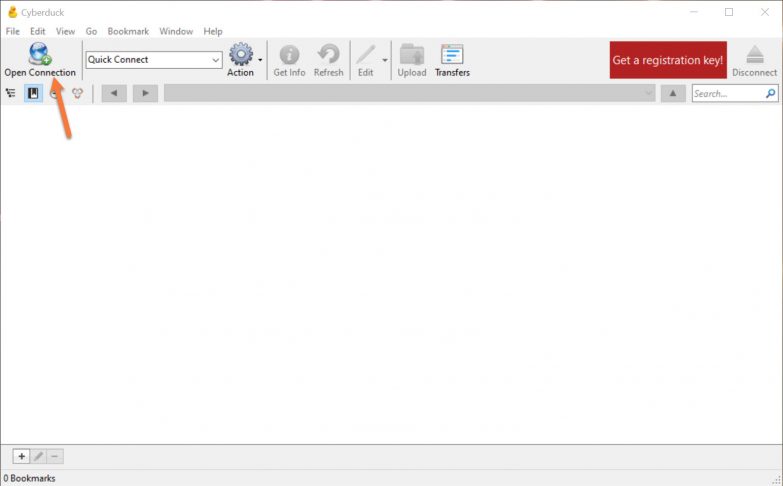
Step 1) Open Cyberduck and click Open Connection in the top left corner of the application.
Step 2) Click Open Connection in the top left corner. When the Open Connection Dialog appears, you will be prompted to enter some login information. Let’s review the options on this screen:
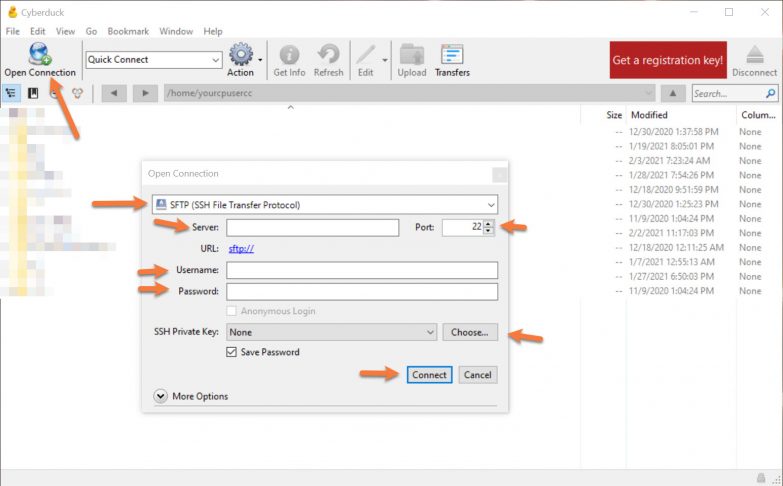
- Be sure you choose SFTP from the drop-down menu.
- In the server field, enter your domain name
- Be sure you are using Port 1988.
- In the username and password field, enter the username + password for the cPanel account, not for an FTP account that you manually created. This information is included in your Welcome Email.
- Under SSH Private Key, choose the private key that matches the one created in your cPanel > Security > SSH Keys.
- Click Connect to connect to the server.
Your completed dialog box should look similar to this:
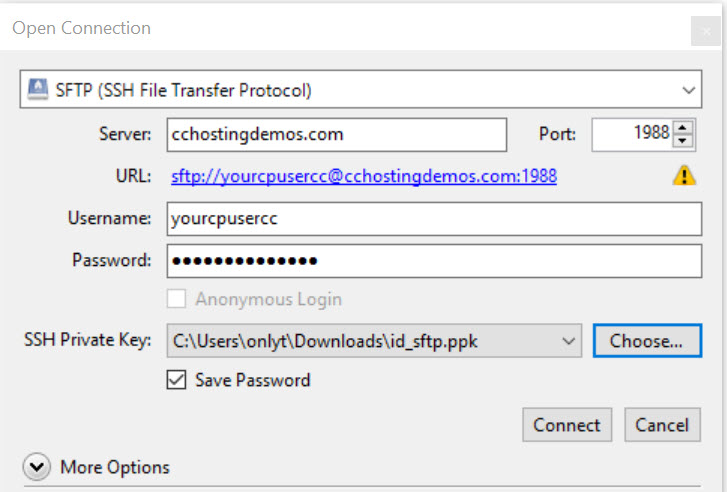
Except for your username and password + private key, it will be unique to your domain.
And that covers how to connect to SFTP using Cyberduck on Windows 10!
Are you struggling with SFTP connection errors? ChemiCloud is the hosting solution designed to save you time!  Check out our web hosting plans!
Despite it’s abilities, some users may find it a bit daunting to use. But not to worry! In this KB article, we’re going to cover how to connect to the server hosting of your website using FTP and upload a ZIP file using FileZilla.
How to Download & Install FileZilla
FileZilla is Free and Open Source Software. The programming code that makes the application work is available to the public for both examination and editing. One consequence of this is anyone can repackage the code into a clone of FileZilla and make it look like the real thing, but do nefarious things with it and when users install their version of the application, they end up with some spyware or malware installed.
To spare you that, you can click this link to the official FileZilla website where you can download the application knowing it’s the real deal. Next, click the grey “Download FileZilla Client” button.

Their website will automatically determine which Operating System you are running and you will see a green button to download FileZilla Client:
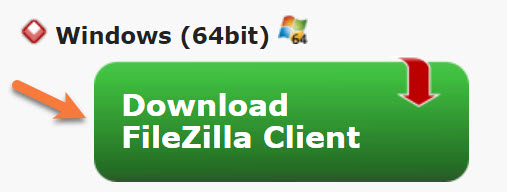
Click this button to download the application. Then open the file you’ve downloaded to install FileZilla.
How To Use FileZilla to Connect by FTP
1) Open FileZilla and enter the FTP login details in the fields located at the top of the application.
2) You will need the following details regarding the FTP account on your server:
3) Click the “Quickconnect” button.
Your computer connects to your web server. The directory of folders and files from your local computer appears on the left of the FileZilla FTP client window, and the directory of folders and files on your web server is displayed on the right.
How To Use FileZilla to Upload Files by FTP
The screenshot below is nearly identical to what you will see when you connect to the server hosting your website.
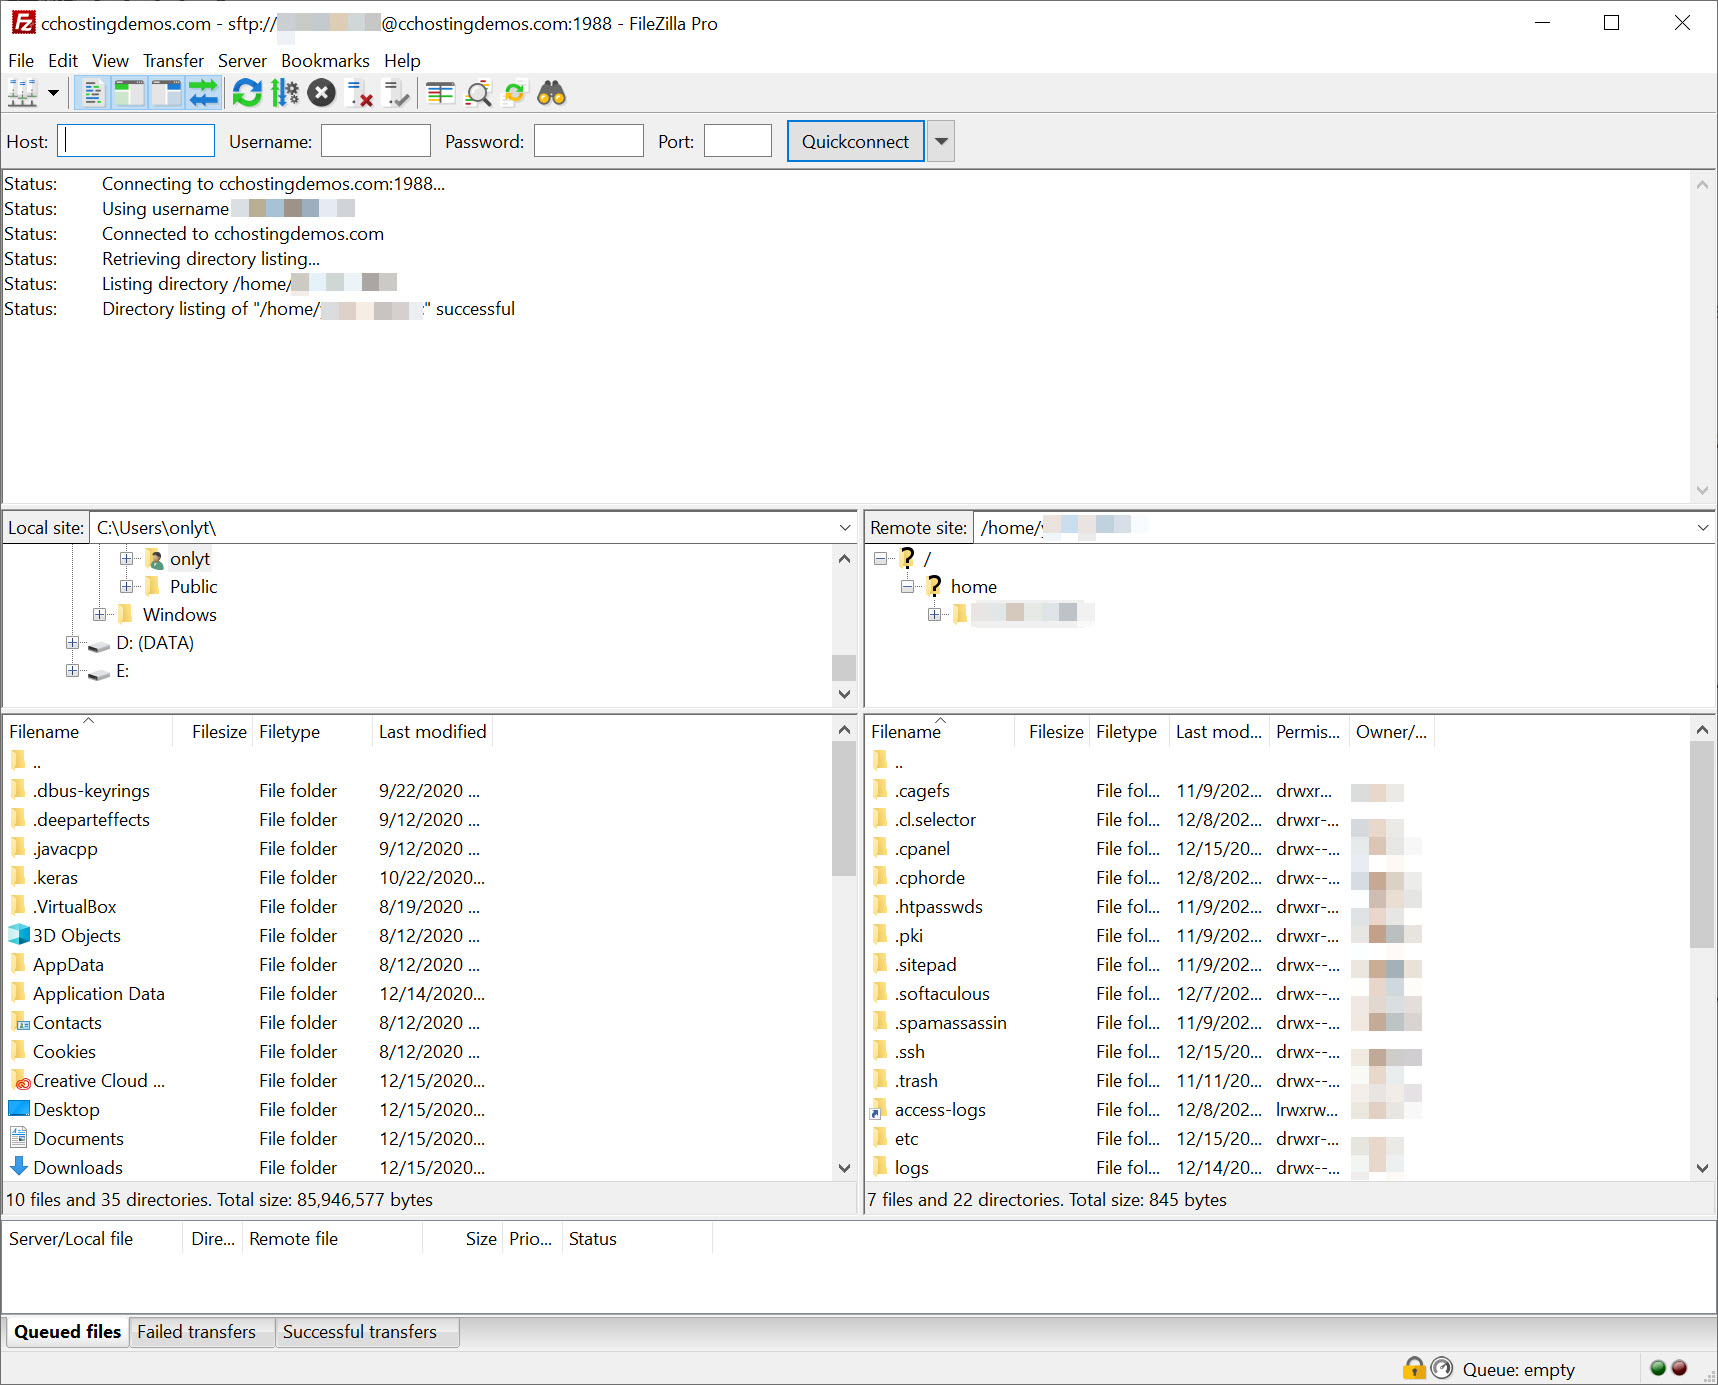
The interface is pretty easy to understand. The top half of the application is dedicated to showing logs of transfers.
The left middle section is your computer, while the middle right section is the server.
Struggling with FTP connection issues? ChemiCloud is the hosting solution designed to save you money and time! Check out our web hosting plans!
I have a ZIP file containing the latest release of WordPress in my Downloads folder, which I want to upload to my public_html folder. To do this, I will navigate to my Downloads folder on the left side of FileZilla. Then, on the right side of the app, I will find and open the public_html folder.
Now, to copy the WordPress ZIP file to the public_html folder, I need to click on it once, then drag and drop it into the public_html folder, like below:
Notice, that the small section at the bottom displays the transfer status of the ZIP file after I drop it into the public_html folder, and after the transfer completes, we can see the ZIP file in the public_html (right side), along with the other files/folders.
If you want to copy multiple files from your computer, you can absolutely do that by selecting them with your mouse or holding the CTRL or CMD Key and clicking on individual files, depending on your OS.
That’s it!
We hope you enjoyed this Knowledge Base Article. If you have any questions, please reach out to our Happiness Engineers available 24×7.
]]>If you are hosting additional domains, which are added as Addon domains or sub-domains in cPanel, they have their own document root folder and should be found in account’s home directory (above public_html).
You can easily locate the document root for an addon domain from cPanel > Domains > Addon Domains and look at Modify Addon Domain section.
As for any sub-domains, you can easily locate the document root from cPanel > Domains > Subdomains > Modify a Subdomain section.
]]>Tailing /var/log/secure on the target machine will be useful:
tail -f /var/log/secure
Dec 26 12:30:38 server sshd[3503454]: Authentication refused: bad ownership or modes for directory /home/user/.ssh
As you can see – bad ownership or modes for directory /home/user/.ssh.
SSH doesn’t like it if your home or ~/.ssh directories have group write permissions. Your home directory should be writable only by you, ~/.ssh should be 700, and authorized_keys should be 600 :
chmod go-w /home/user
chmod 700 /home/user/.ssh
chmod 600 /home/user/.ssh/authorized_keys
So fixing permissions is the way to go and have this error resolved.
Tired of hassling with troubleshooting? ChemiCloud is the managed hosting solution designed to save you time and money! Check out our web hosting plans!
The File Manager allows you to manage your site through HTTP rather than an FTP tool. While not as sophisticated as most FTP tools, File Manager gives you all the basic functionality necessary to manage your site.
You can easily edit, copy, move, delete, and change permissions on the files hosted on your account by using File Manager.
1) Log into cPanel.
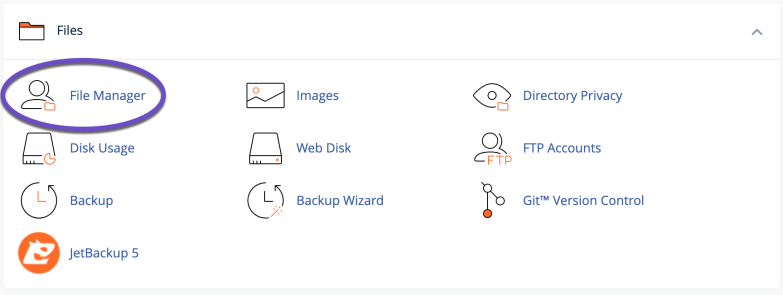
2) Look for the “FILES” section and click on “File Manager”.
3) You’ll automatically be logged into your account’s home directory of your account.
4) You can easily navigate between folders, click on the folder name and the sub-folders, and the folder’s content will be visible in the right window.
How to Create a New File or Folder in File Manager
To create a new file or folder, please follow these steps:
1) Click on the +File or +Folder icon in the top-left corner, depending on what you need to create a file or a folder.
2) A new window will open; here, you’ll have to enter the name of the new file/folder and the folder in which this file/folder should be created, by default, this will be added to the home directory of your account.

In the above example, we’ve created a file named robots.txt in the /public_html folder. Next, click on the Create New File button.
That’s it; the file robots.txt is created in the account’s public_html directory.
How to Edit a File using File Manager
To edit a file, please follow these steps:
1) Navigate to the folder where the file is located.
2) Select the file you wish to edit by clicking on it and hitting the Edit button:
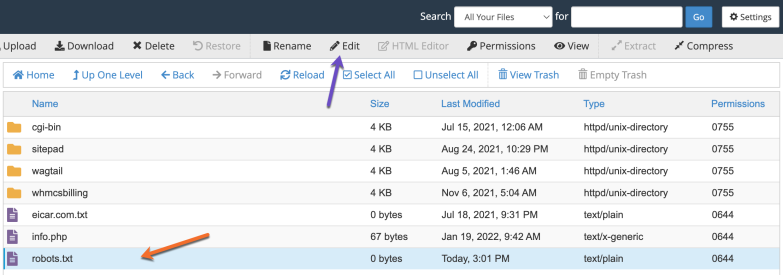
3) After you make the necessary changes click on the “Save Changes” button to make them permanent.
How to Upload a File using File Manager
1) Navigate to the folder where you want to upload the file. We’ll use public_html as an example.
2) Click on the “Upload” button in the top menu.
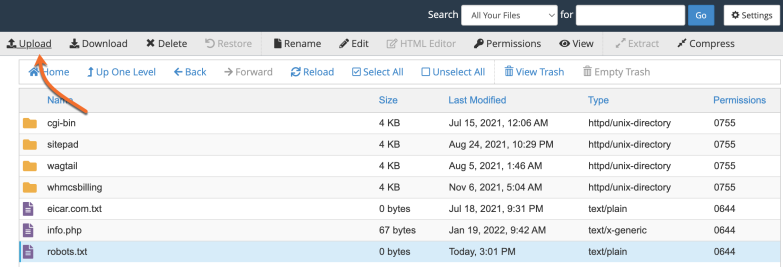
3) Select the file you want to upload from your computer or drag and drop it from your computer to File Manager’s upload tab.
4) A progress bar will appear after you select the file; when the upload is complete at 100% you can go back to File Manager.
That’s it. Now you know how to upload a file using the online File Manager in cPanel.
]]>SSH or Secure Shell is a network communication protocol that enables two computers to communicate and share data. Using an SSH connection you can easily manage or edit all your files and folders directly on the server.
While there are a few different ways of logging into an SSH server in general, you can connect to your ChemiCloud server using SSH keys. SSH keys provide an easy, yet an extremely secure way of logging into your server, that why this is the method we recommend for all users.
SSH key pairs are two cryptographically secure keys that are used to authenticate a client to a server, each key pair consists of a public key and a private key. Luckily you can easily generate and save a key pair from your cPanel account by following this guide.
How to Connect to Your Server Using SSH Keys in MacOS
1) Find the “Terminal” application in launchpad and start it.
2) Save the key from your cPanel account as described here.
3) Now you need to add the Private Key that you downloaded to your Mac OSX Keychain, this can be done by running the following command in the terminal:
ssh-add -K /path/of/private/key
You’ll be asked for the password you used when generating the SSH Key in cPanel.
4) Now you are ready to connect to the server via SSH, you just need to run this command from the terminal:
ssh USER@HOST_NAME -p 1988
USER – this will be the same username as the one you use to log in to your cPanel account.
HOST_NAME (or IP address) – here you should enter either the hostname or the IP of the server to which you wish to connect;
p – the port used for the connection, we use port 1988 for SSH access.
That’s all, you should now be logged into your account.
How to Connect to Your Server Using SSH Keys in Linux
1) Find the “Terminal” application in launchpad and start it.
2) Save the key from your cPanel account as described here.
3) Now you need to add the Private Key that you downloaded to the ssh-agent, this can be done by running the following command in the terminal:
ssh-add -k /path/of/private/key
You’ll be asked for the password you used when generating the SSH Key in cPanel.
4) Now you are ready to connect to the server via SSH, you just need to run this command from the terminal:
ssh USER@HOST_NAME -p 1988
USER – this will be the same username as the one you use to log in to your cPanel account.
HOST_NAME (or IP address) – here you should enter either the hostname or the IP of the server to which you wish to connect;
p – the port used for the connection which is 1988.
That’s all, you should now be logged into your account.
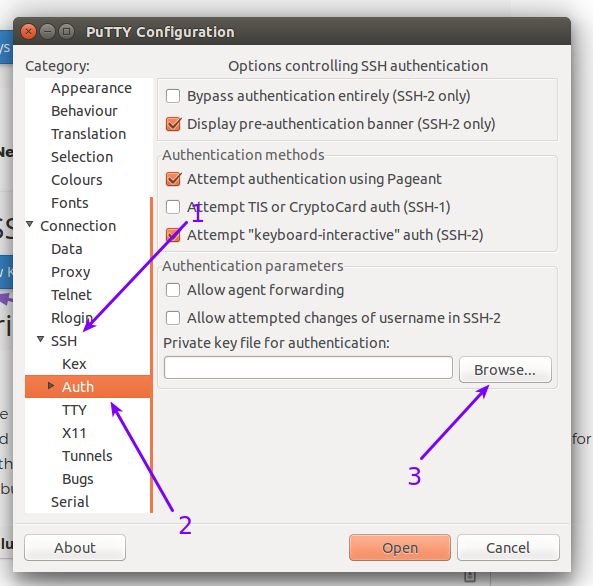
How to Connect to Your Server Using SSH Keys in Windows Using PuTTy
While MacOS and other Linux-based operating systems have an integrated terminal, you will need special software on Windows.
1) Install and run PuTTy. Expand the “SSH” category from the left side and click on the “Auth” button. From the right side window click on the “Browse” button and select downloaded private key, this key needs to have a *.ppk or *.txt extension. This can be downloaded directly from the cPanel account.
2) Click on “Session” tab located in the top left menu, and enter the “IP” and the port:1988 (both are in your welcome letter – this may come as an IP address or a hostname).
3) Under “Saved Sessions” enter a custom name which will be used to save this information fields. Click on the “Save” button to save all the settings so you don’t need to add the key again next time you try to connect.
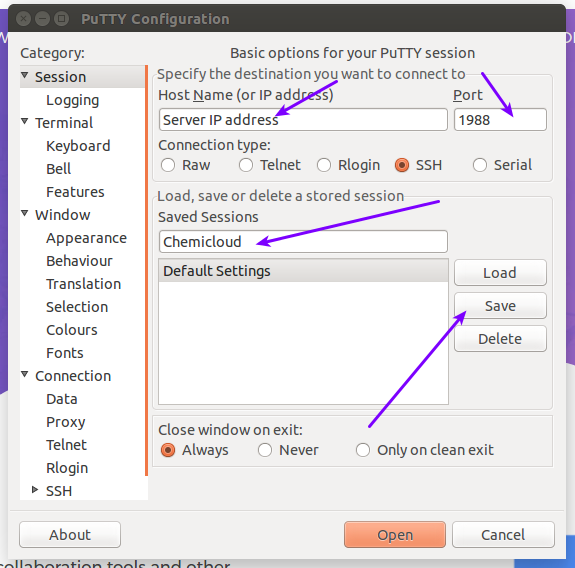
4) That’s all you need to do, now just click “Open” and the server will ask you for the passphrase you have used for your SSH Key after you enter it you’ll connect to the server.
How to Connect to Your Server Using SSH Keys in Windows Using xShell
xShell is a preferred SSH application of many developers and is widely regarded as the most powerful SSH client available. The app is free for personal use and is very easy to setup.
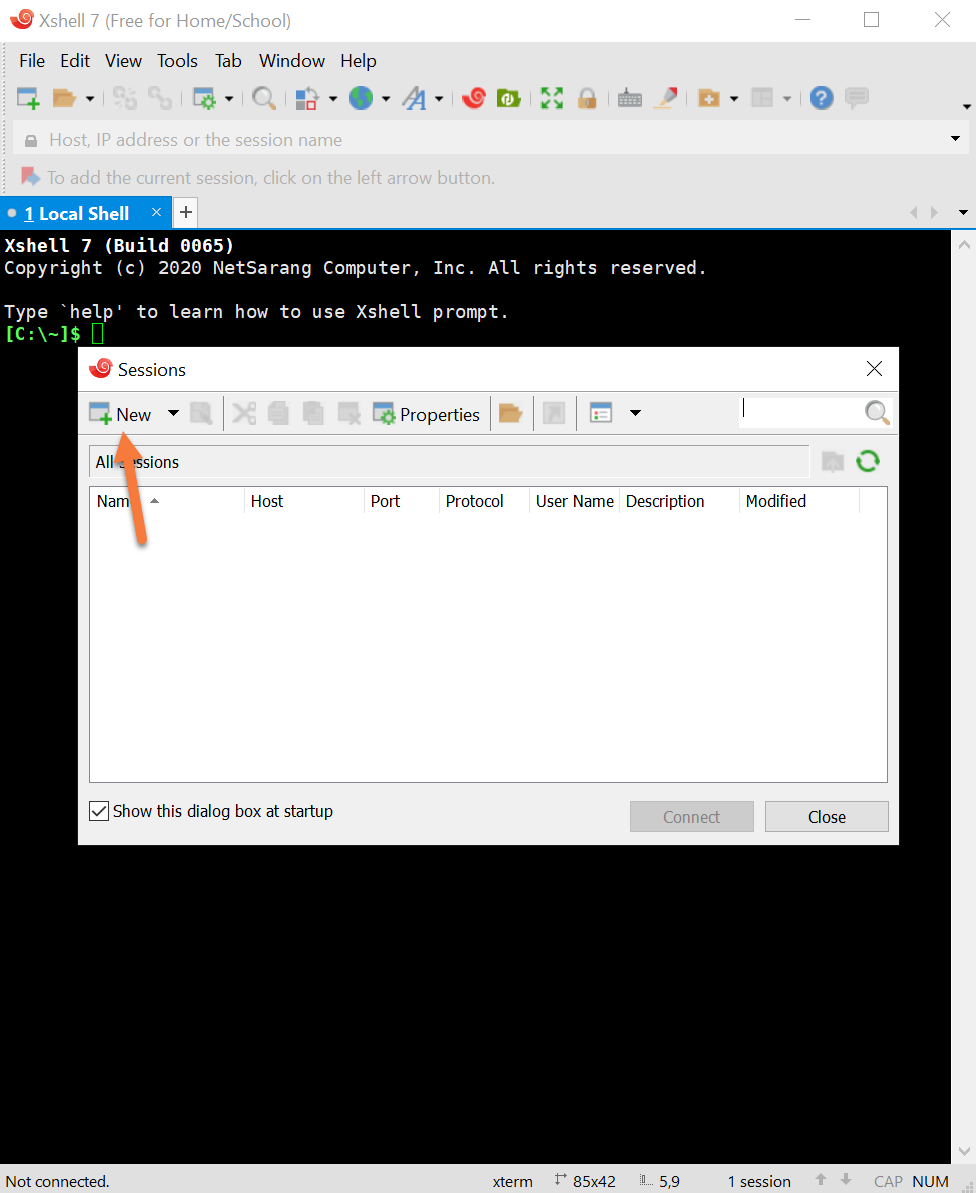
Step 1: Download the app from the xShell website. After the download is complete, open the app. The Sessions tab will open by default. Click the New button in the top left corner.
Step 2: In the Properties of the New Session, you just need to configure a few settings.
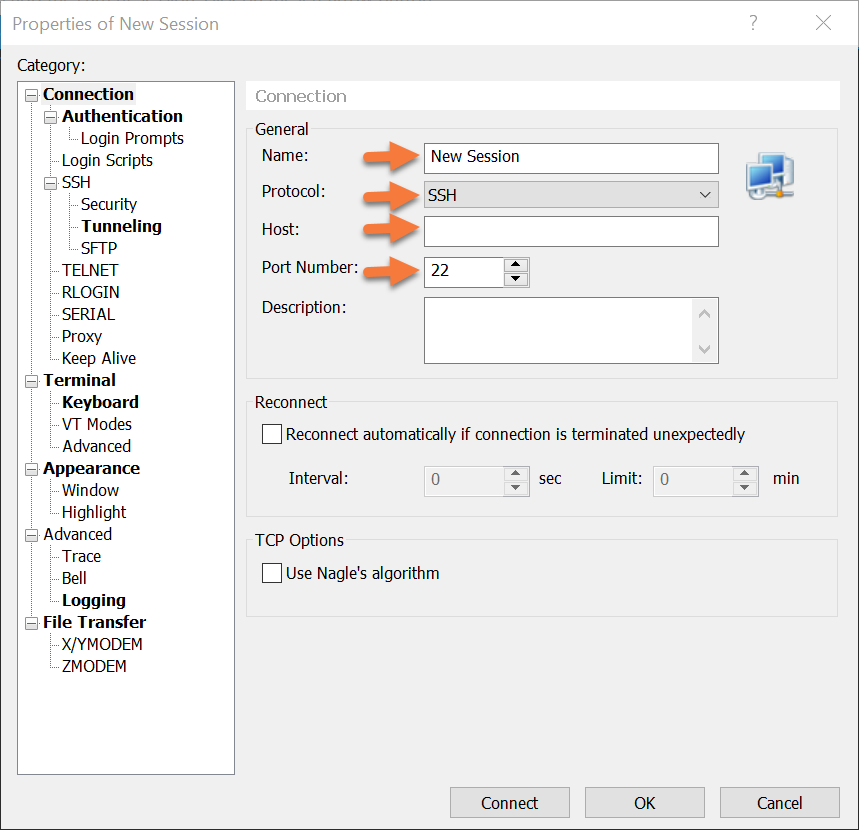 First, enter a name for the session so you know what it is the next time you open xShell.
Second, make sure the Protocol chosen is SSH.
Third, for host enter the IP address, serverhostname, or domain name, to which you are connecting.
Fourth, and perhaps most important, make sure you are using port 1988, not port 22, if you are hosting at ChemiCloud.
Step 3: Next, click the Tunneling option from the menu on the left.
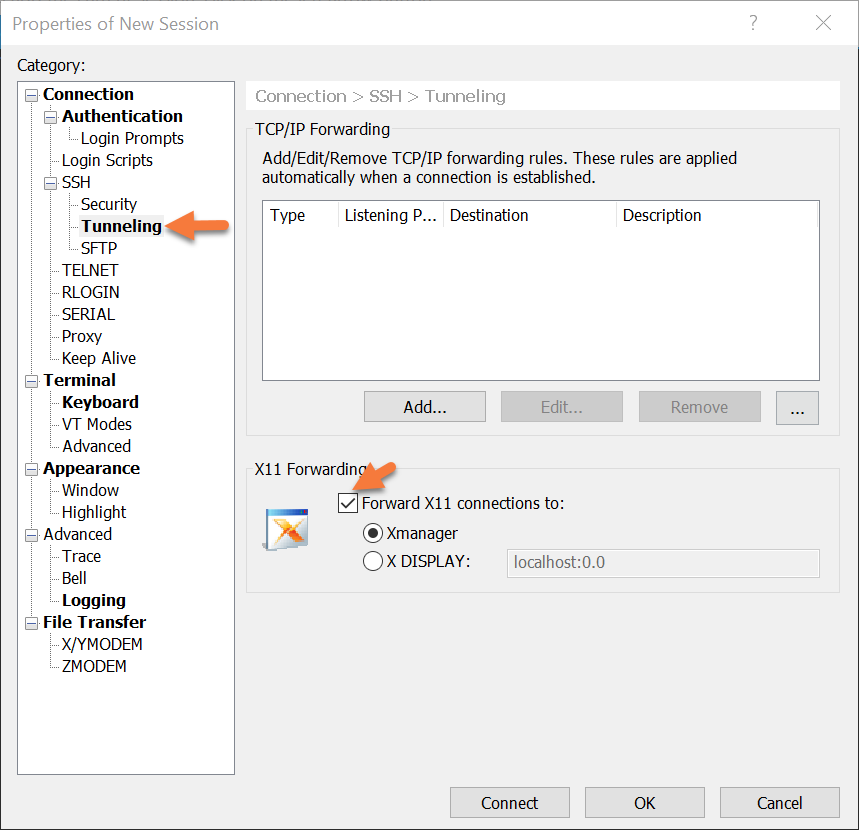 Make sure you uncheck the box next to Forward X11 connections to.
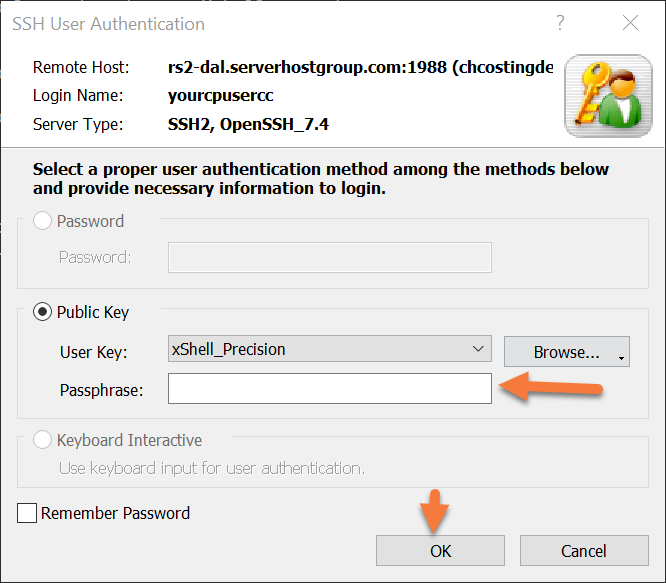
Step 4: Click the Authentication tab.
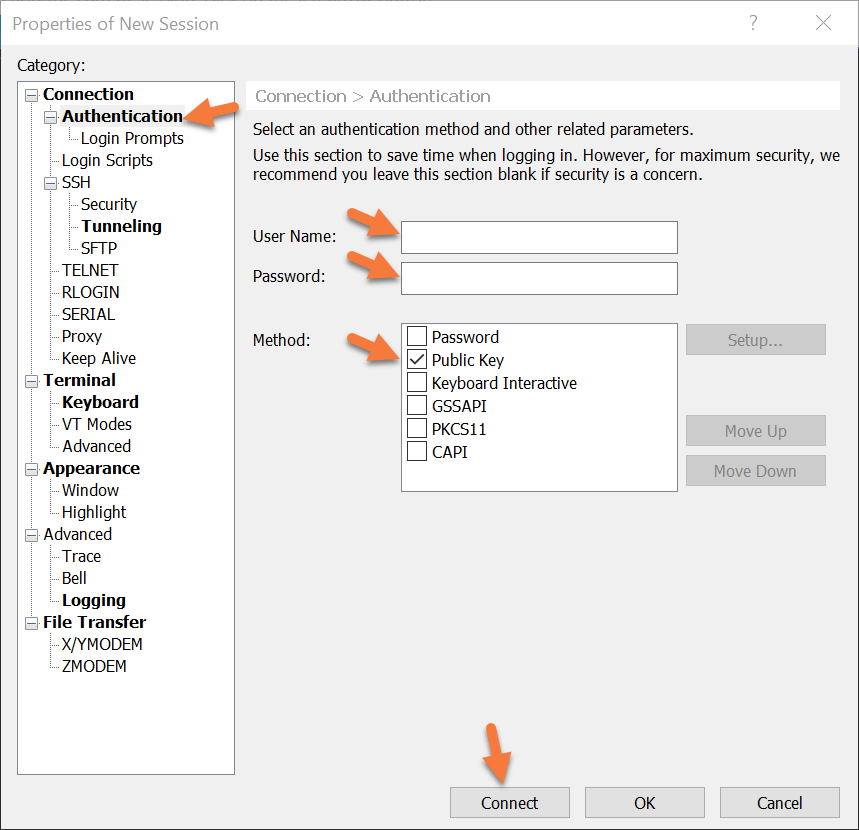
On this screen, enter the username for the SSH user you’re using.
Next, and this is very important, enter the password that goes to the key you are using. Not the password that goes with the SSH user, i.e. your cPanel account.
After that, make sure the checkbox next to Public Key is checked, then click Connect.
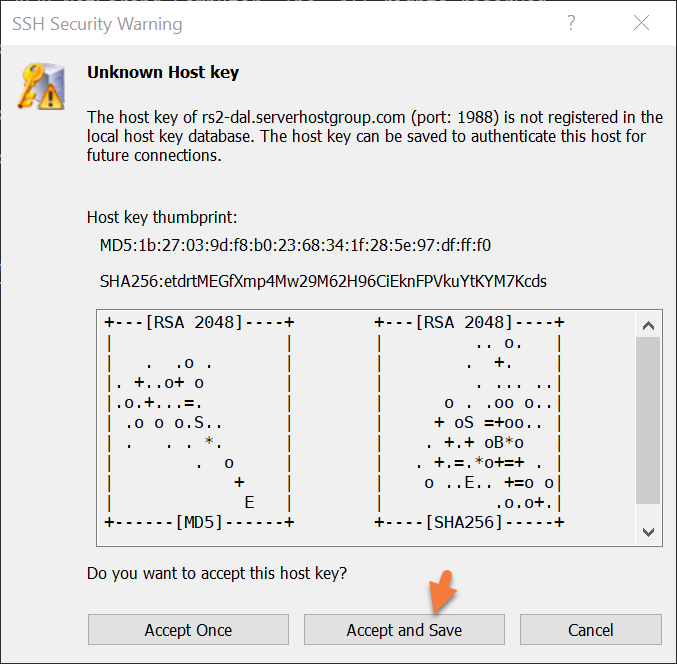
Step 5: You will be prompted to accept the key of the server to which you’re connecting. Click Accept and Save so you don’t have to worry about this again next time you connect.
 Next, you need to enter the password for the key you’re using.
 You will be connected to the server .
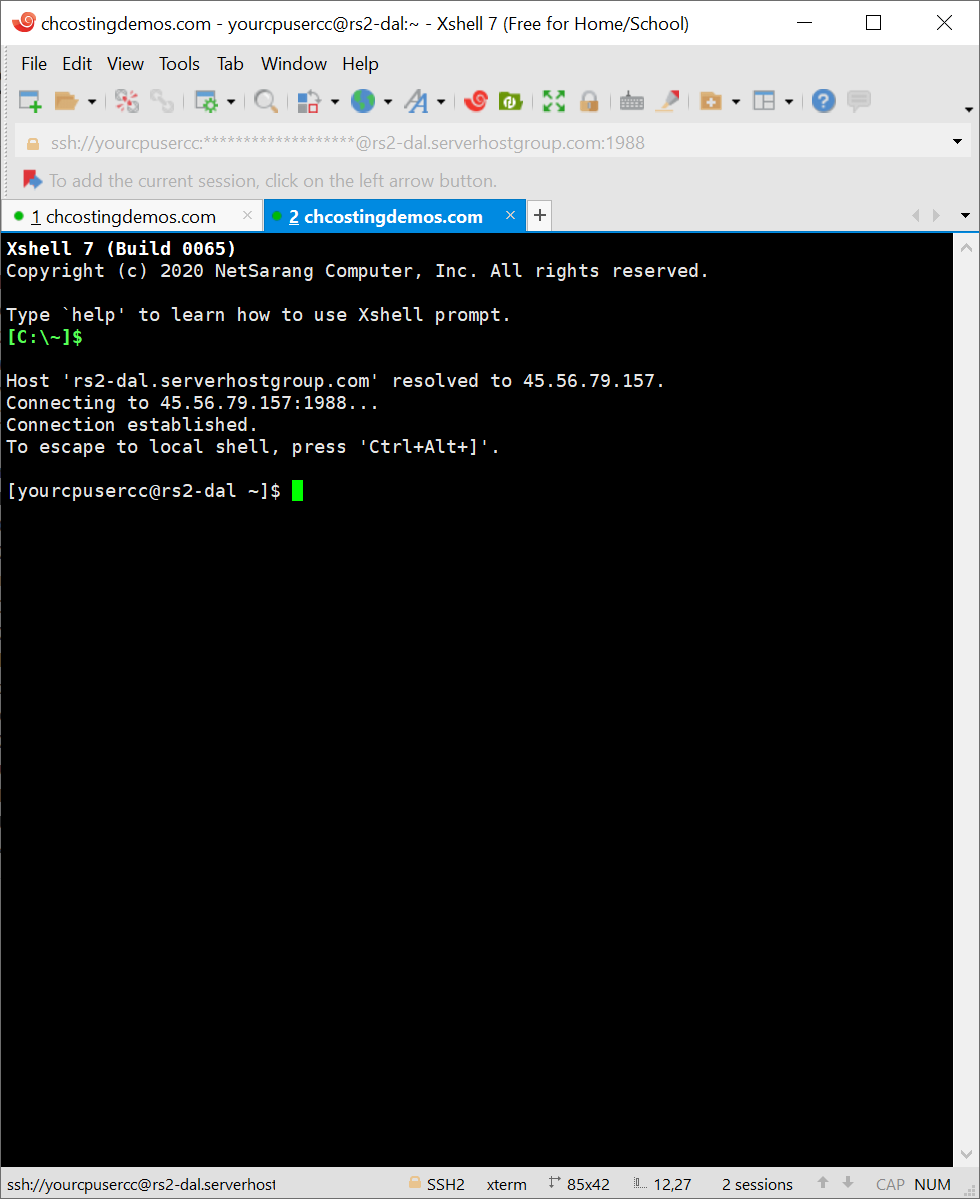 Congrats! You’ve setup Xshell and the next time you open the app, you’ll be able to easily connect!
How to Connect to Your Server Using the Terminal Feature in cPanel
cPanel features an integrated Terminal that you can use in lieu of a stand-alone terminal application. This is handy if you’re working on a different system and don’t have your personalized terminal and SSH keyset installed.
Step 1: Login to your cPanel. If you’re a ChemiCloud customer, there’s a lot of ways to do this, but the sure fire easiest way is to login to your Client Area, then open your cPanel.
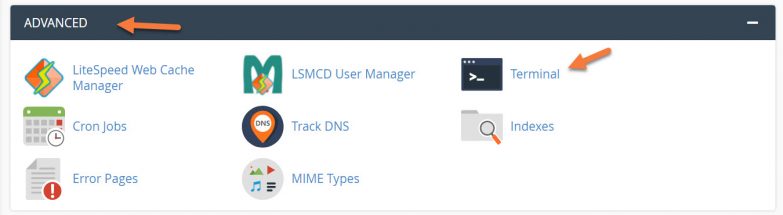
Step 2: Scroll down to the Advanced section and click Terminal to open the Terminal.
Step 3: The terminal will open and you will be able to issue commands direct to the server as your cPanel user.

That’s a wrap! You now know how to easily connect to your account using SSH.
]]>Follow these steps to establish an SFTP connection to your hosting account with FileZilla (make sure to get the “client” version):
1) Download and install FileZilla on your computer.
2) From your cPanel account generate a new SSH key pair and download the private key to your computer in the .ppk format.
3) Open Filezilla and click the Edit button from the menu then select Settings.
4) From the Settings window click on SFTP tab.

5) Next click on “Add Keyfile” and select the private key you generated within cPanel. You will be prompted to convert the file to a supported but unprotected format (no password), confirm it by clicking the Yes button and type your password.
You will be asked to store the key in the putty format, save it on your computer to continue.
6) Use the following login information to connect to your server via SFTP:
During your first connection, you’ll be asked to store the server’s fingerprint. Click the “OK” button to continue connecting and tick the “Always trust this host, add this key to cache” checkbox if you plan to connect to the same server again.
]]>How to generate an SSH key
1) Log into cPanel.
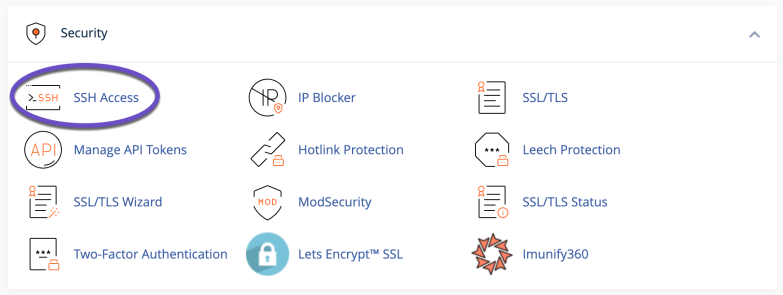
2) Look for the SECURITY section and click on SSH Access
3) Click on the “Manage SSH Keys” button.

4) Click on the “Generate a New Key” button.

5) In the next screen, you’ll be asked to choose a name and a password for your SSH Key. Please ensure you write down this password, as you need it to establish the SSH connection. Next, choose DSA or RSA for the type. It’s recommended that you choose RSA and use the 2048 or higher key size. Once you are ready, click on the “Generate Key” button.
6) After the Key is generated, a confirmation message will appear on the next screen. Click on the “Go Back” icon to view/manage your SSH Key.
How to Authorize an SSH Key
For the new SSH key to function, we must authorize it. This can quickly be done from the “SSH Access” section within cPanel.
1) Click on the “Manage” link next to the key you generated earlier.
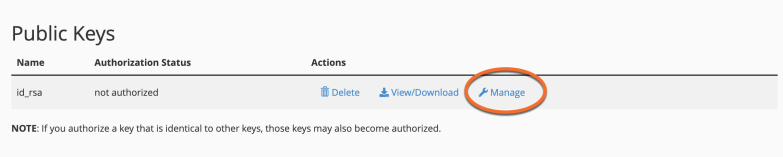
2) Now click the “Authorize” button to complete the process.

How to Download the Private Key
Now that we have generated and authorized the SSH Key, we’ll need to download it.
1) From the SSH Access section, click on the View/Download button corresponding to the key pair you have just generated and authorized.
2) Here, you’ll see two options if you are a Mac/Ubuntu/Other Linux user, copy the text from the window to a file on your PC. You can name it key.ppk. Another option would be to click the “Download Key” button, which will automatically save the Private Key to your computer.
3) If you are a Windows user, you will need to enter the passphrase you set while creating the key and convert the key to a format that Windows software (generally PuTTY) understands, and click on the “Convert” button.
4) Click on “Download Key” to save the key to your computer.
]]>Follow these steps to connect to the FTP server with FileZilla (make sure to get the “client” version):
1) Download and install FileZilla on your computer.
2) Open FileZilla and enter the FTP login details in the fields located at the top of the application.
3) You will need the following details regarding the FTP account on your server:
4) Click the “Quickconnect” button.
Your computer connects to your web server. The directory of folders and files from your local computer appears on the left of the FileZilla FTP client window, and the directory of folders and files on your web server is displayed on the right.
You can now transfer files and folders between your local computer and your hosting account by dragging them from the left pane to the right.
]]>