We hope this was helpful! If you have any questions, feel free to leave a comment, open a ticket from your Client Area, or hit us up on Live Chat 24×7.
This Knowledgebase article will cover how to do this in 2 ways.
How to Update Email Account Settings in Microsoft Outlook 365
How to Update your Email Account Settings from within Microsoft Outlook
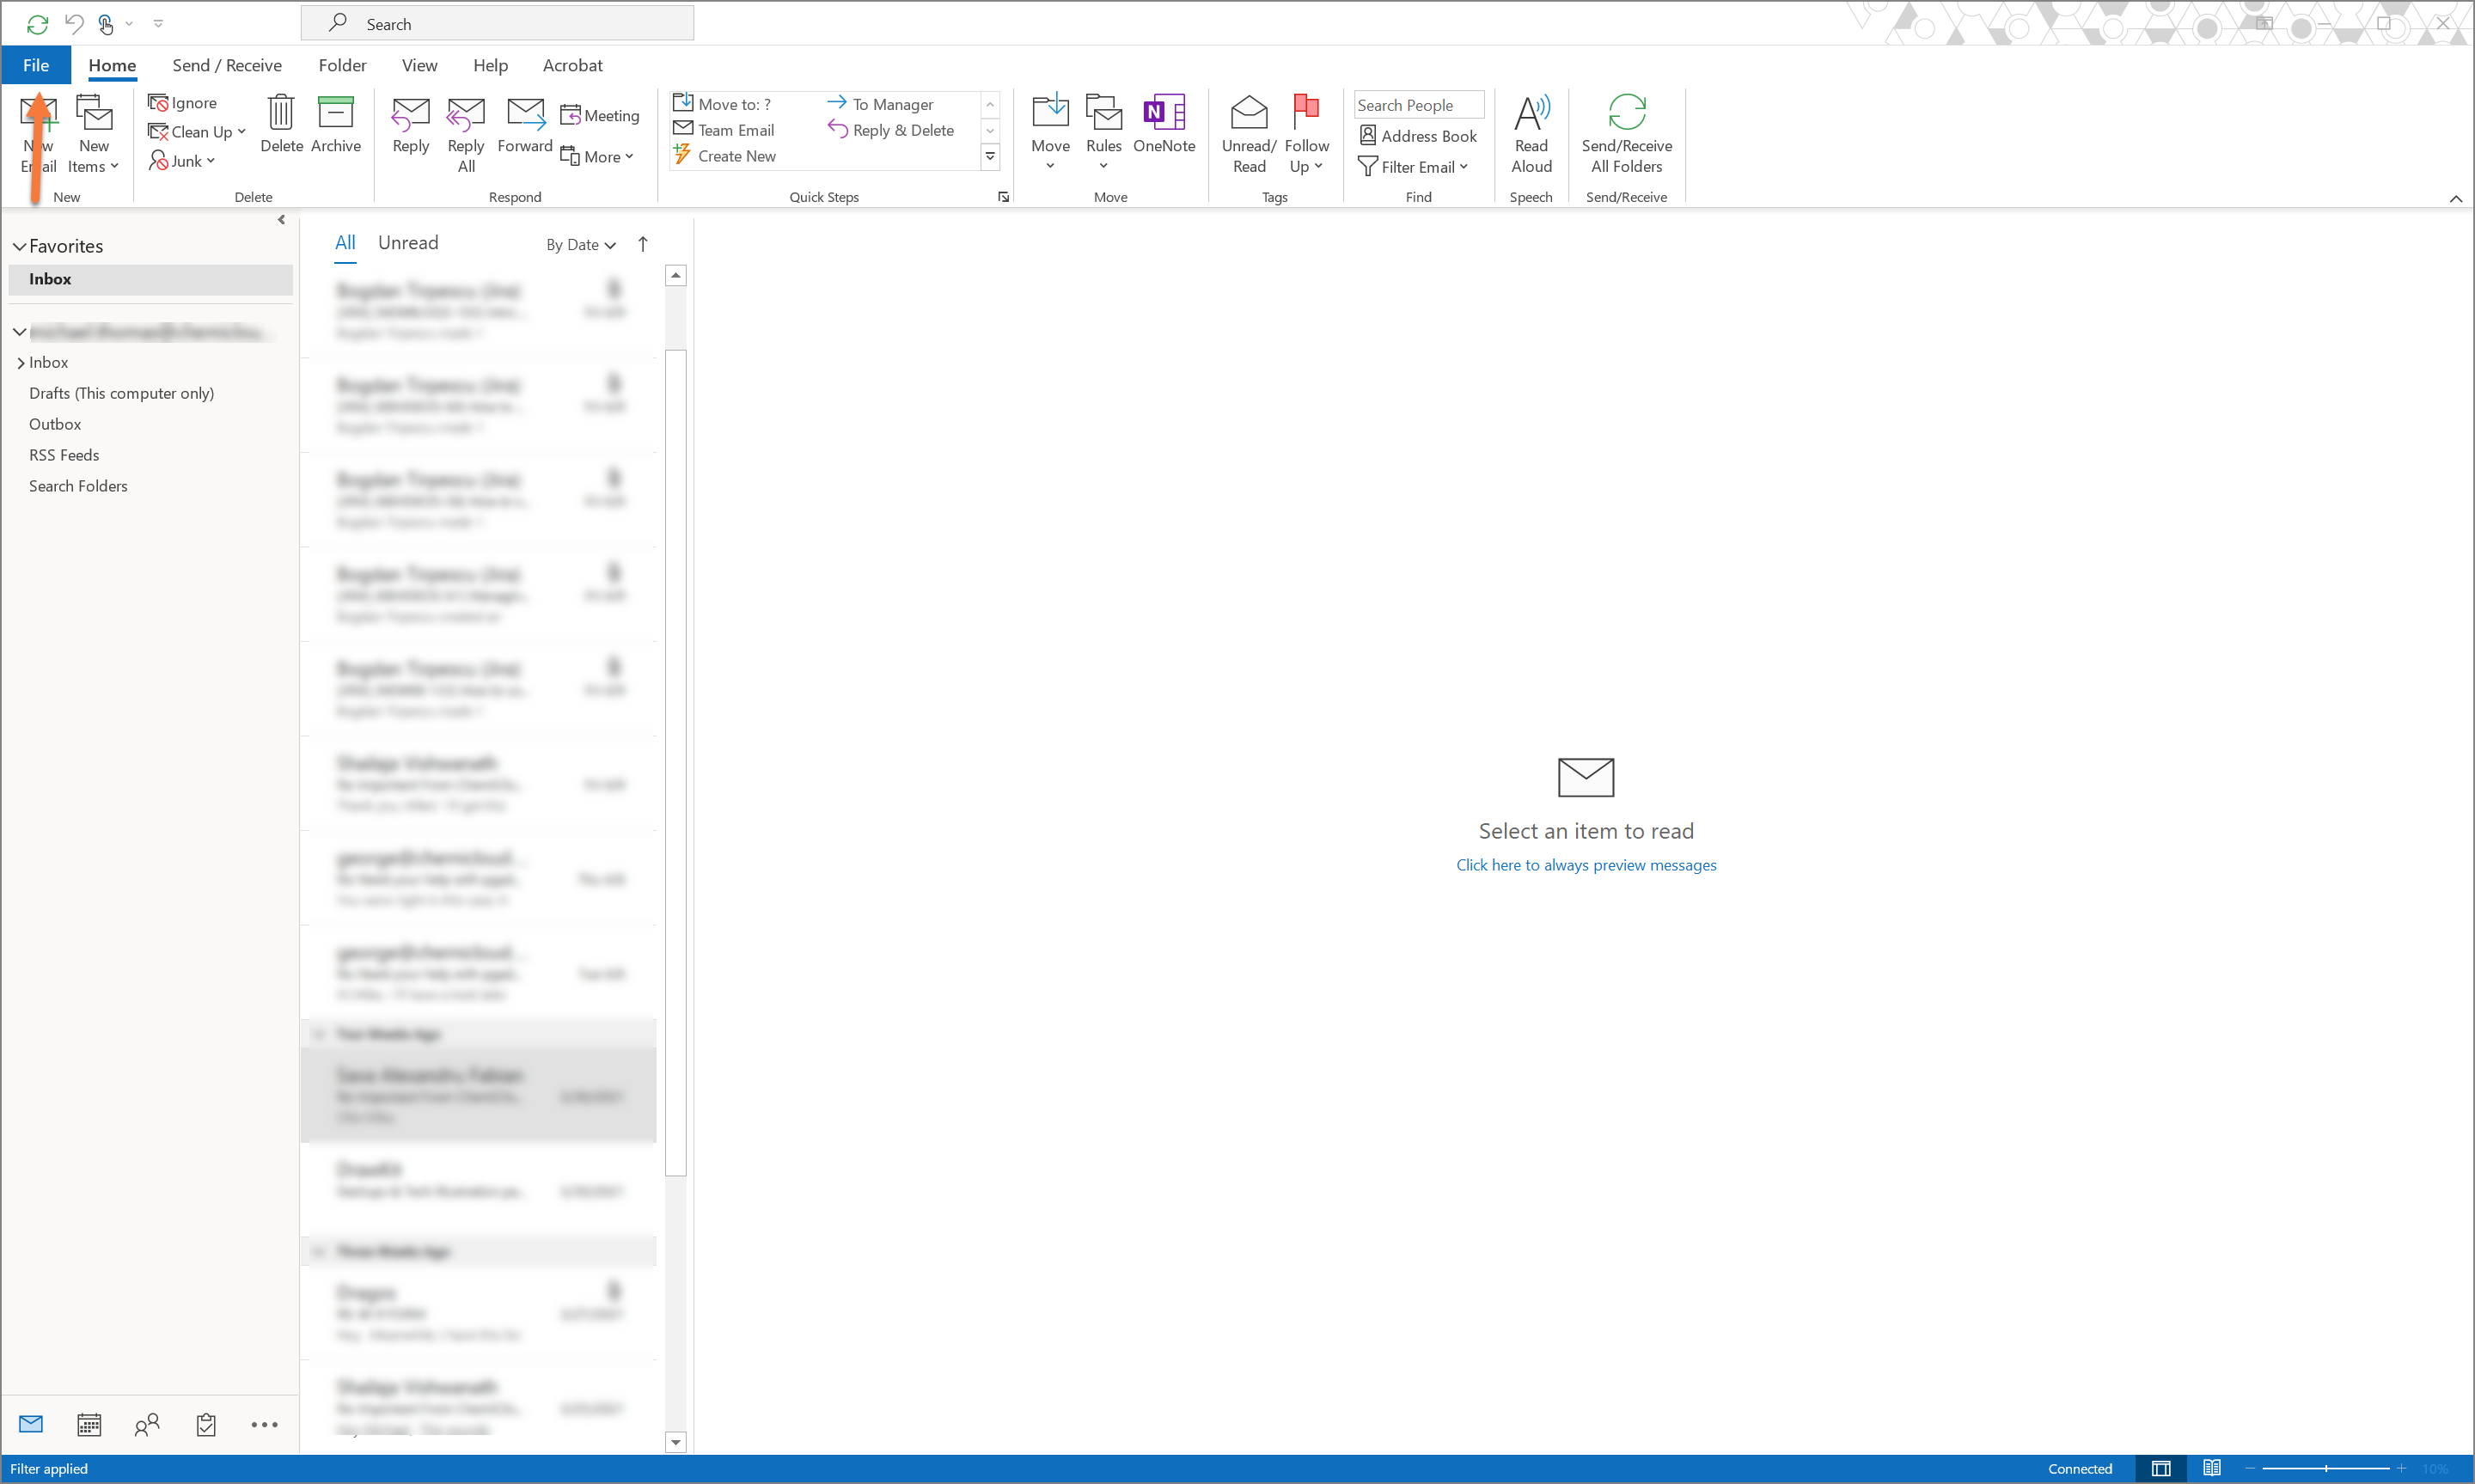
Step 1: Open Microsoft Outlook and click File in the top left corner.
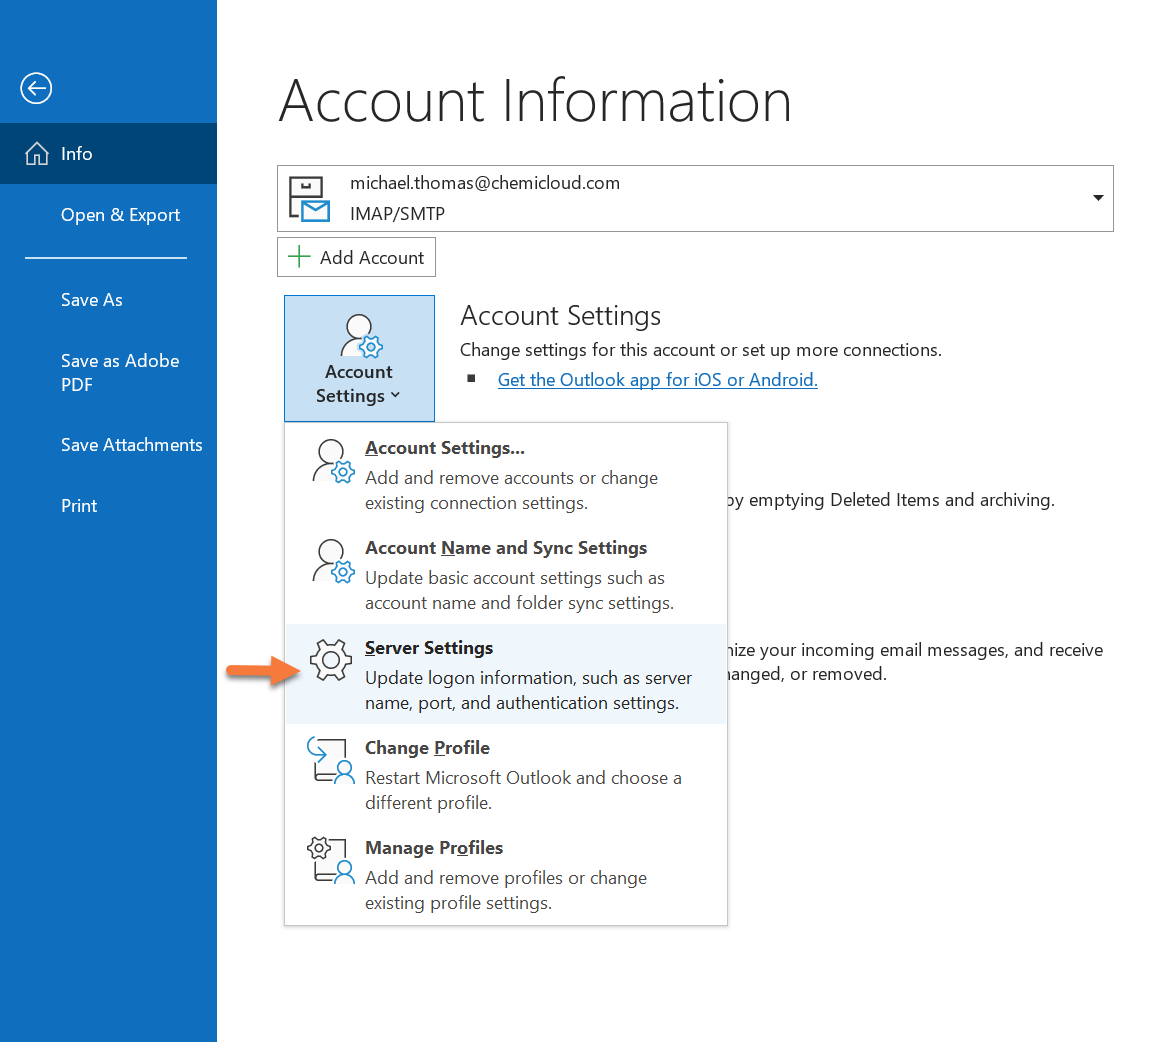
Step 2: Click Account Settings, then choose Server Settings.
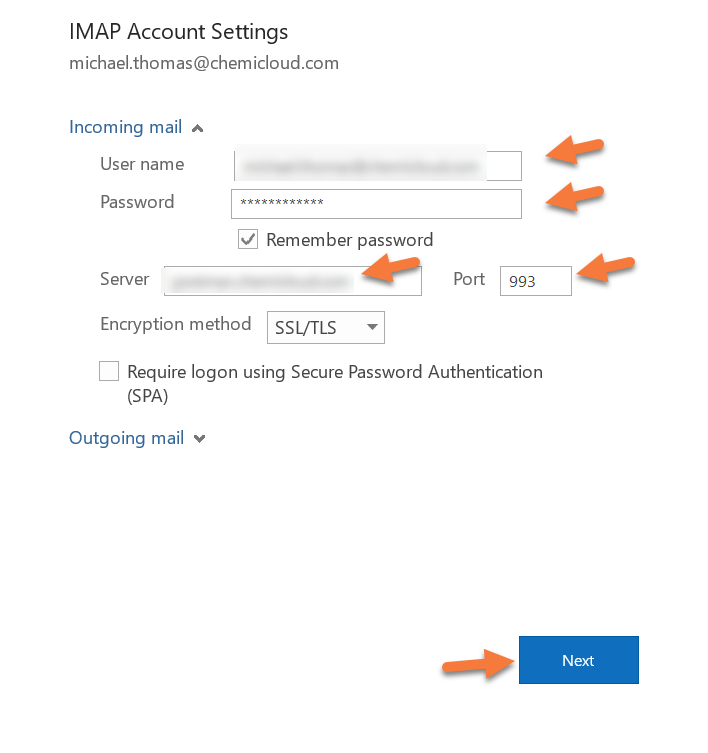
Step 3: Enter your updated credentials or server information, then click Next.
Step 4: Outlook will verify the information is correct and it will send a test message. When it has finished, click Done.

And that’s how you update your email account settings inside of Outlook.
How to Update your Email Account Settings using the Control Panel
Step 1: Open the Start menu by clicking the Windows flag in the lower-left corner, then begin typing the following: Control Panel. When you see the Control Panel at the top, click it to open the Control Panel.

Step 2: In the top right corner of the Control Panel, search for Mail.
When Mail comes up in the Control panel, click it to open this panel.

Step 3: In the Mail window, click Email Accounts.
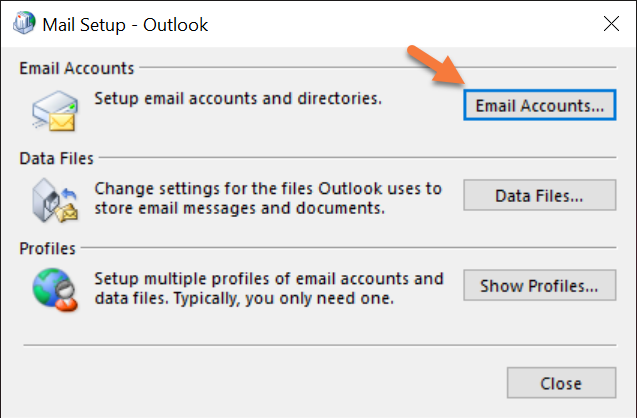
Next, find your account from the list, and click Change.
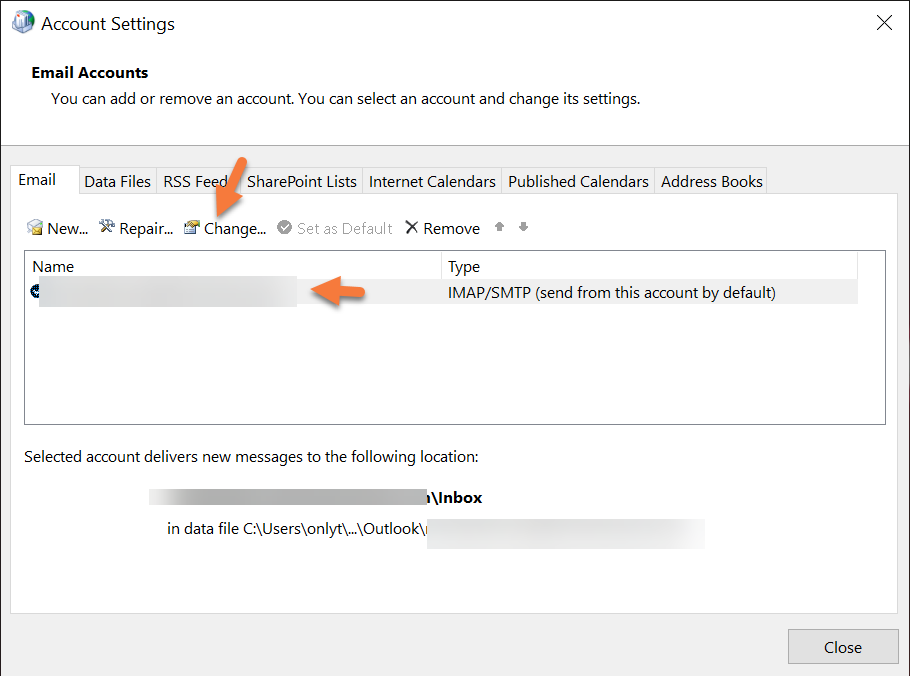
Step 4: Enter your updated account information in the new dialog and then click Next.

Outlook will verify it can connect to the server using the updated settings and will send a test email.
Click Close when finished.

And that’s how you update your email account settings in Outlook without having Outlook open.
And that’s a wrap!
]]>Apple Mail is the default email client that comes with every Mac using OS X 10.15 or later. This tutorial will show you how to configure your email address on Mac using Apple Mail application.
This article is primarily for Mail version 13.4 on mac OS Catalina (Version 10.15.4). Your version of Apple Mail may vary depending on the version of macOS you are using.
Requirements
Before you start, be sure to have these handy:
- Your email address – for more information on how to create an email address, please read this article: How to Create an Email Account
- Your email password
- Your mail client settings (Incoming/Outgoing) – for more information on how find your mail client settings, please read this article: How to Find Mail Client Settings in cPanel
How to Configure Your Email on Mac Using Apple Mail
Let’s begin!
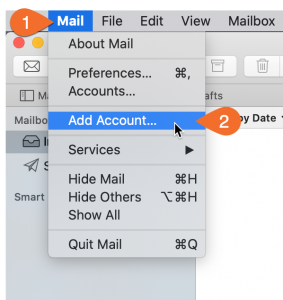
1) Open Mail. If you haven’t added an email account yet, you’ll be taken directly to the Add Account prompt.
If you’re adding an additional account, or this prompt doesn’t otherwise load automatically, you’ll need to select Add Account from the Mail menu.
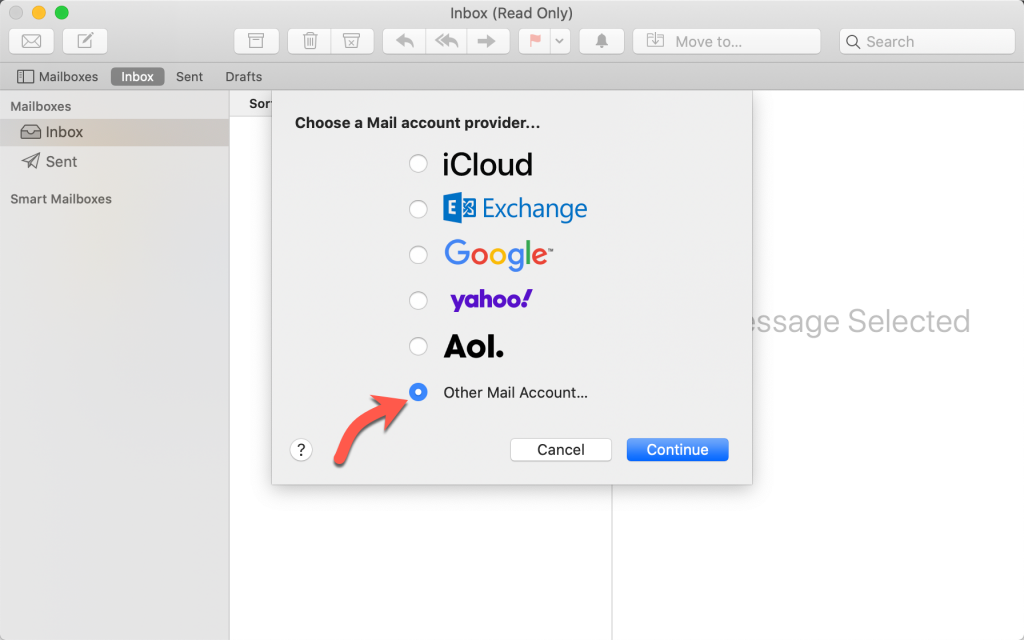
2) From the Add Account prompt, select Add Other Mail Account… and click Continue.
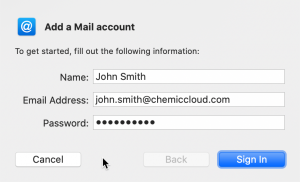
3) Fill out the following information and click Sign In.
- Full Name: Your name as you would like it to appear.
- Email Address: Your full email address.
- Password: The password for your email account.
4) Apple Mail app will attempt to contact the mail server. The default search uses “autodiscover.example.com” — unless you have this subdomain already created and an SSL Certificate installed, this will not work.
If autodiscover setting has been unsuccessful, the message “Unable to verify account name or password” will appear in a new settings box.
5) Fill in the fields using your email info and incoming/outgoing mail settings. For more information on how find your mail client settings, please read this article: How to Find Mail Client Settings in cPanel
- Email Address: Your full email address.
- User Name: Your full email address.
- Password: The password to your email account.
- Account Type: We strongly recommend connecting via IMAP. To learn more, please see: What is the difference between POP3 and IMAP?
- Incoming Mail Server: mail.yourdomain.tld (replace yourdomain.tld with your domain name)
- Outgoing Mail Server: mail.yourdomain.tld (replace yourdomain.tld with your domain name)
6) You’ll then be asked to confirm which apps that you’d like to attach the email account to. Select email and any others that you’d like and click Done.
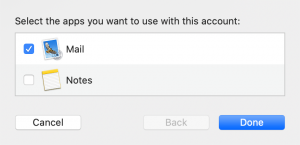
That’s it! You just configured your email address on Apple Mail. As always, if you have any questions, please feel free contact ChemiCloud’s award winning 24/7 support.
]]>By the end of this knowledge base article, you will know how to add your very first Email Account in Samsung Email as well as an additional Email Account.

Adding your first account to Samsung Email
Step 1: If you haven’t downloaded and installed Samsung Email, you can click here to open the Play Store to do so. The very first time you open Samsung Email, you’ll see a screen like the one below:

To proceed in adding a new IMAP account, tap Other.
Step 2: Enter the email address and password for the account you’re adding, then tap Manual setup at the bottom.

Step 3: From the pop-up menu that appears, select IMAP account.

Step 4: There’s a lot of information on the next screen, so let’s look at it in sections.
Under Account:
Enter your email address and password for the account you’re adding.
Under Incoming server:
Enter the IMAP server is mail.yourdomain.tld
Select SSL as the Security type
Enter 993 for Port
Under Outgoing server:
Enter the SMTP server as mail.yourdomain.tld
Select SSL as the Security type
Enter 465 for Port
Ensure Require authentication to send mails is toggled to on (it will be orange, if so)
And lastly, enter the username and password for the mail account you’re adding in the last 2 fields.
Your screen should look similar to the one below:

Tap Next to proceed.
Struggling with the Samsung Email setup? ChemiCloud is the hosting solution designed to save you money and time!  Check out our email hosting plans!
Step 5: On this screen you have the option to select the time period of email you want to sync to your device as well as when you want Samsung Email to check for new email on the server.
Keep in mind, the greater the period of time you’ve chosen to sync, the more space the email will occupy on your device.

Choose your desired settings then tap Done to proceed.
Step 6: On this screen you’re given two options.

The first of which is the name you wish to give this account in Samsung Email. If you have multiple email accounts in the app, giving each a unique name ensure you don’t send mail from the wrong account by mistake.
The second option is the name you wish others to see when you send mail from your phone using the Samsung Email app.
Enter your information, then tap Done to proceed.
Samsung Email will check the account settings and server information you have entered. If it’s correct, you’ll be taken directly to your inbox.
That’s it! Now you know how to add your first IMAP Email Account to Samsung Mail on Android!
How to add additional IMAP Email Accounts to Samsung Mail on Android
Step 1: Open the Samsung Email app and tap the ≡ icon (hamburger menu) in the top left corner, then tap the  cog to open Settings.

Step 2: On the settings menu, tap Add Account.

Step 3: Select Other as the account type.
To proceed in adding a new IMAP account, tap Other.
Step 4: Enter the email address and password for the account you’re adding, then tap Manual setup at the bottom.
Step 5: From the pop-up menu that appears, select IMAP account.
Step 6: There’s a lot of information on the next screen, so let’s look at it in sections.
Under Account:
Enter your email address and password for the account you’re adding.
Under Incoming server:
Enter the IMAP server is mail.yourdomain.tld
Select SSL as the Security type
Enter 993 for Port
Under Outgoing server:
Enter the SMTP server as mail.yourdomain.tld
Select SSL as the Security type
Enter 465 for Port
Ensure Require authentication to send mails is toggled to on (it will be orange, if so)
And lastly, enter the username and password for the mail account you’re adding in the last 2 fields.
Your screen should look similar to the one below:
Tap Next to proceed.
Step 7: On this screen you have the option to select the time period of email you want to sync to your device as well as when you want Samsung Email to check for new email on the server.
Keep in mind, the greater the period of time you’ve chosen to sync, the more space the email will occupy on your device.
Choose your desired settings then tap Done to proceed.
Step 8: On this screen you’re given two options.
The first is the name you wish to give this account in Samsung Email. If you have multiple email accounts in the app, giving each a unique name ensures you don’t send mail from the wrong account by mistake.
The second option is the name you wish others to see when you send mail from your phone using the Samsung Email app.
Enter your information, then tap Done to proceed.
Samsung Email will check the account settings and server information you have entered. If it’s correct, you’ll be taken directly to your new inbox.
That’s it! You know how to add an IMAP account to Samsung Email on Android!
We hope this was helpful! If you have any questions, feel free to leave a comment, open a ticket from your Client Area, or hit us up on Live Chat 24×7.
]]>By the end of this knowledgebase article, you’ll know how to add your first IMAP Email Account to Edison on Android, as well as additional IMAP Email Accounts.

Adding Your First IMAP Email Account
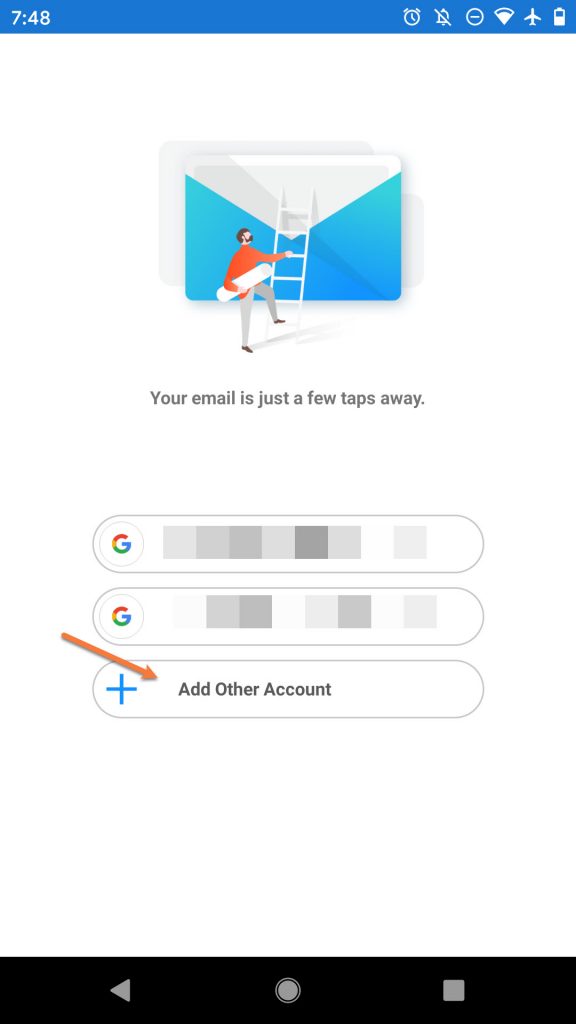
Step 1: If you haven’t downloaded & installed Edison Mail yet, you can click here to open the Play Store and do so. After opening Edison for the first time, you’ll see a screen that looks similar to the one below.
Tap Add Other Account to proceed.
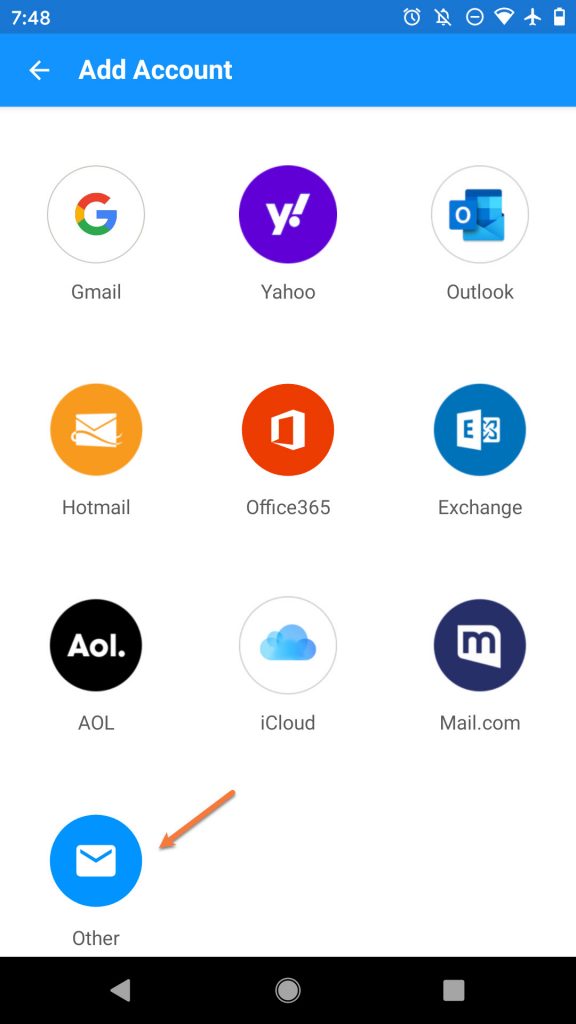
Step 2: Edison is able to connect to a wide variety of email accounts. Since we’re setting up an IMAP Account, tap Other to proceed.
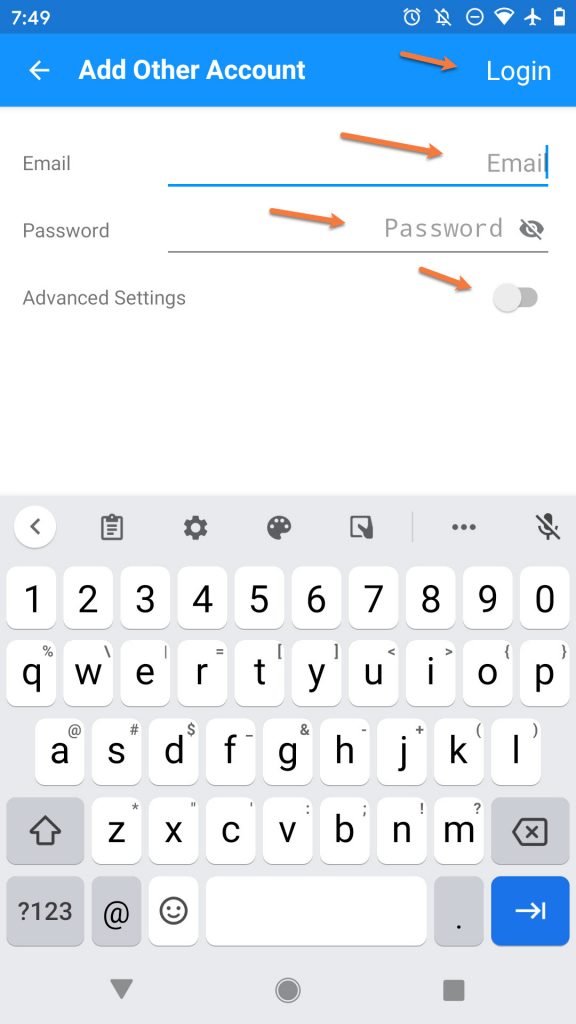
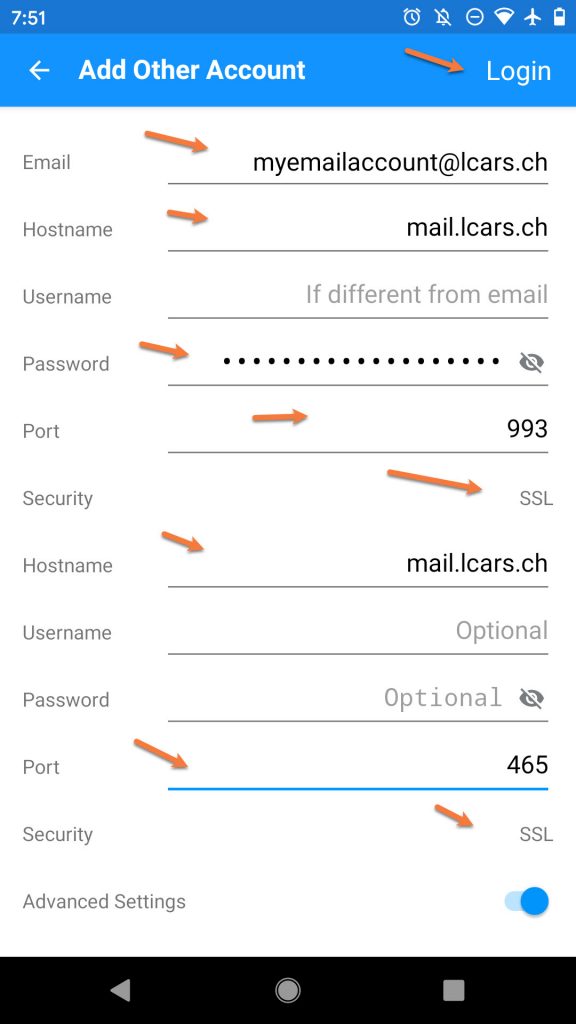
Step 3: Enter the Email Address and Password for the account you are adding. Also, slide the Advanced Settings toggle to on.
Then tap Login in the top right corner.
Step 4: There’s a lot of fields on this screen. Let’s imagine there’s a line dividing the screen into two.
For the top half:
In the Email field, ensure the email address you’re adding is entered.
In the Hostname field, enter mail.yourdomain.tld
You can leave the Username field blank
Enter the password for the account you’re adding
Ensure the Port is set to 993
Ensure SSL is set next to Security.
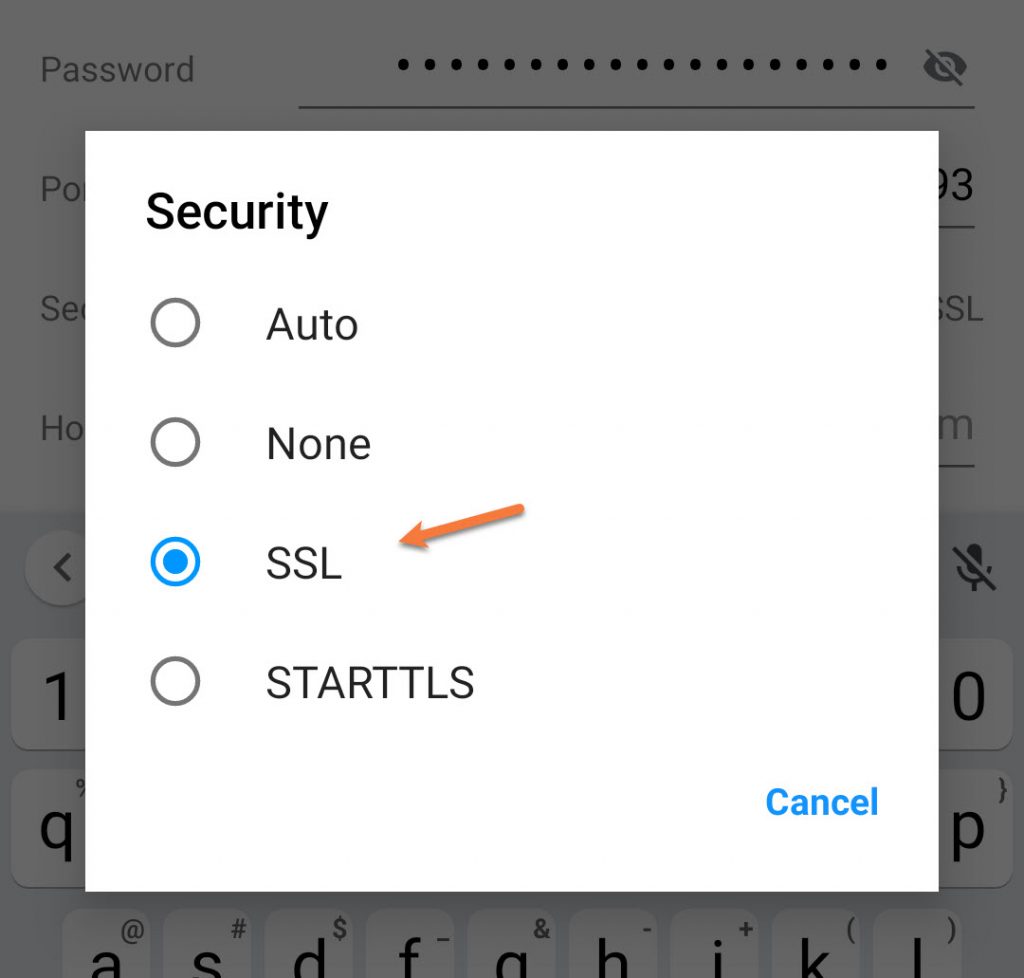
Important Note! When you tap the field next to Security, a pop up like the one below will appear. Choose SSL from this popup, if it is not already chosen for you.
Moving on to the bottom half of this setup screen:
Again, enter the Hostname as mail.yourdomain.tld
You can leave the Username and Password fields blank on this section.
Ensure the Port is set to 465
And lastly, ensure SSL is selected next to Security.
Just like with the Security – SSL setting on the top half. when you tap the section next to Security, a popup will appear with various Security Options. Tap SSL if it is not already chosen for you.
Your configuration should look similar to the one below:
After you’ve entered your account information into each of the necessary fields, tap Login in the top right to proceed.
Struggling with the Edison mail client setup? ChemiCloud is the hosting solution designed to save you money and time! Check out our email hosting plans!
Step 5: Edison will check the account and server settings you have entered and if they are correct, you will see a screen much like the one below confirming the successful addition of the email account.
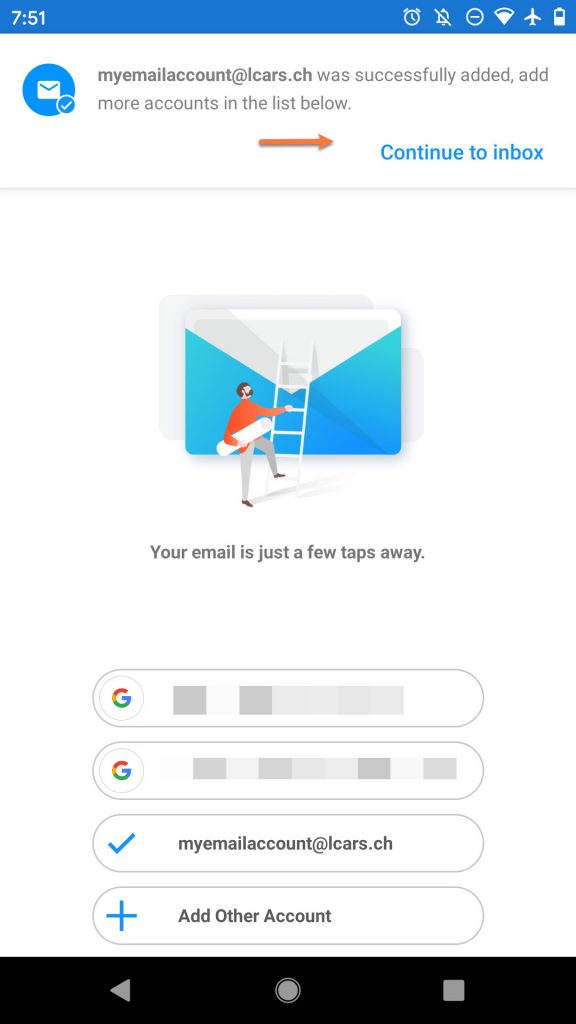
Tap Continue to inbox to proceed.
That’s it! Now you know how to add your first Email Account to Edison on Android!
Adding Additional IMAP Email Accounts
Adding additional email accounts to Edison is super easy!
Step 1: Open Edison and in the top left corner tap the ≡ icon (hamburger menu).
 Step 2: Tap the + icon in the top right corner of the slide out that appears.
 Step 3: Edison will list the accounts already added and give you the option to add another. Tap Add Other Account to continue.
Step 4: Since we’re setting up an IMAP Account, tap Other to proceed.
Step 5: Enter the Email Address and Password for the account you are adding. Also, slide the Advanced Settings toggle to on.
Then tap Login in the top right corner.
Step 6: There’s a lot of fields on this screen. Let’s imagine there’s a line dividing the screen into two.
For the top half:
In the Email field, ensure the email address you’re adding is entered.
In the Hostname field, enter mail.yourdomain.tld
You can leave the Username field blank
Enter the password for the account you’re adding
Ensure the Port is set to 993
Ensure SSL is set next to Security.
Important Note! When you tap the field next to Security, a pop up like the one below will appear. Choose SSL from this popup, if it is not already chosen for you.
Moving on to the bottom half of this setup screen:
Again, enter the Hostname as mail.yourdomain.tld
You can leave the Username and Password fields blank on this section.
Ensure the Port is set to 465
And lastly, ensure SSL is selected next to Security.
Just like with the Security – SSL setting on the top half. when you tap the section next to Security, a popup will appear with various Security Options. Tap SSL if it is not already chosen for you.
Your configuration should look similar to the one below:
After you’ve entered your account information into each of the necessary fields, tap Login in the top right to proceed.
Step 7: Edison will check the account and server settings you have entered and if they are correct, you will see a screen much like the one below confirming the successful addition of the email account.
Tap Continue to inbox to proceed.
And that’s it! Now you know how to add additional IMAP Email Accounts on Edison!
We hope this was helpful! If you have any questions, feel free to leave a comment, open a ticket from your Client Area, or hit us up on Live Chat 24×7.
]]>By the end of this knowledge base article you will know how to add your first IMAP email account to Newton, as well as how to add additional IMAP email accounts.

How to add your first IMAP Email Account to Newton on Android
Step 1: If you haven’t downloaded and installed Newton yet, you can click here to open the Play Store and do that. The first time you open the app, you will see a screen that looks like the one below.

This knowledgebase article assumes we don’t already have a Newton account, so we’re going to tap Get Started.
Step 2: Newton is able to connect to many different email services. On the next screen you will be presented with a list of services. Tap IMAP to proceed.

Step 3: On the next screen, you will be prompted to enter your IMAP account information.
Under Your Name, enter the name you want others to see when you send mail via Newton on this phone.
Enter the email address you are adding as [email protected] and then enter the password for that account.
For IMAP Server Address enter mail.yourdomain.tld
For SMTP Server Address enter mail.yourdomain.tld
Make sure the checkbox next to Use secure connection (SSL) is checked. Your settings should look similar to the ones below:

After confirming your settings are correct, scroll down a bit, complete their “captcha”, then tap the blue Add button.

Step 4: Newton will verify the account and server information you’ve entered, then you will be given the chance to create a Newton account.
Enter a password for your new Newton account, then tap the green Sign Up button to finish.

After tapping Sign Up, you will be taken to your Newton Inbox.
And that’s it! Now you know how to add your first IMAP Email Account in Newton on Android!
Struggling with the Newton mail client setup? ChemiCloud is the hosting solution designed to save you money and time! Check out our email hosting plans!
Adding additional IMAP Email Accounts to Newton on Android
Step 1: Open Newton and in the top left corner tap the ≡ icon (hamburger menu).

Step 2: Tap the cog to open Newton’s Settings.

Step 3: Tap Email Accounts

Step 4: Tap Add More

Step 5: You will be presented with a list of account types. Tap IMAP to proceed.

Step 6: Enter your name as you wish others to see it when you send mail from Newton using this device.
Also enter the email address for the account you are adding as [email protected], then tap the blue Next button to proceed.

Step 7: Enter the password for the email account you are adding.
Under IMAP Server Address, enter mail.yourdomain.tld
Under Security & Port, ensure SSL is selected and port 993 is used.
Tap the blue Next button to continue.

Step 8: Enter your SMTP User Name as the account you’re adding – [email protected] as well as the password for that account.
Under SMTP Server Address enter mail.yourdomain.tld
Under Security & Port, ensure SSL is selected and port 465 is used.
Tap the blue Add button to finish.

Step 9: Newton will check the account and server settings you’ve entered and if they are correct, you will be taken back to the Add Account screen.

And that’s it! Now you know how to add additional IMAP Email Accounts to Newton on Android!
We hope this was helpful! If you have any questions, feel free to leave a comment, open a ticket from your Client Area, or hit us up on Live Chat 24×7.
]]>By the end of this knowledge base article, you will know how to add your first email account as well as additional email accounts to Spark on Android.

How to add your first email account to Spark
Step 1: The first time you open Spark, you’ll see a screen like the one below.

You can tap Next if you wish to review some of the features of Spark, however for the purpose of this guide, we’re moving forward by tapping Skip.
Step 2: Enter the email address you’re adding, then tap Next.

Step 3: On this screen, enter the email address & password for the account you’re adding, then tap Additional Settings.

Step 4: There’s a lot of information on the next screen, so we’ve broken it into 2 sections.
In the email field, ensure the address you’re adding is entered as [email protected]
Under Incoming Mail Server (IMAP):
Enter the Username as the full email address you’re adding – [email protected]
Enter the password for the account
Enter the Server as mail.yourdomain.tld
Enter 993 for Port
And lastly, ensure SSL is selected next to Security. Your settings should look similar to the ones below:

For the next section, under Outgoing Mail Server (IMAP):
Enter the Username for the account you are adding as [email protected]
Enter the password for the account
The server should be set to mail.yourdomain.tld
Set the Port to 465
And finally, ensure SSL is selected next to Security. Your settings should look similar to the ones below:

After you’ve entered your settings, tap Sign in to continue.
Step 5: You’ll see 2 screens advance automatically while Spark checks the account settings you’ve entered. If the information you entered was correct you’ll see this screen below:

Just tap Start Using Spark to be taken to your inbox!
That’s it! Now you know how to add your first mail account to Spark on Android.
Struggling with the Spark mail client setup? ChemiCloud is the hosting solution designed to save you money and time! Check out our email hosting plans!
Adding Additional IMAP Email Accounts to Spark on Android
If you’re like me, you probably have multiple email accounts on your phone. This section of the knowledge base article will walk you through adding additional IMAP email accounts to Spark.
Step 1: Open Spark and tap the ≡ icon (hamburger menu) in the top left corner to open Spark’s menu.

Step 2: At the bottom of the menu, tap Settings.

Step 3: Tap Mail Accounts to open the list of accounts added in Spark.

Step 4: Tap Add Account

Step 5: Spark will present you with a list of account types. Since we’re adding an IMAP account, tap Other to proceed.

Step 6: Enter the Email Address and Password for the account you are adding. Then tap Additional Settings to continue.

Step 7: There’s a lot of information on the next screen, so we’ve broken it into 2 sections.
In the email field, ensure the address you’re adding is entered as [email protected]
Under Incoming Mail Server (IMAP):
Enter the Username as the full email address you’re adding – [email protected]
Enter the password for the account
Enter the Server as mail.yourdomain.tld
Enter 993 for Port
And lastly, ensure SSL is selected next to Security. Your settings should look similar to the ones below:

For the next section, under Outgoing Mail Server (IMAP):
Enter the Username for the account you are adding as [email protected]
Enter the password for the account
The server should be set to mail.yourdomain.tld
Set the Port to 465
And finally, ensure SSL is selected next to Security. Your settings should look similar to the ones below:

Tap Sign in to continue.
Step 8: Spark will check the account settings and server information you have entered to ensure it’s correct and Spark is able to connect. If you entered the information correctly, you will be taken back to the list of Mail Accounts, like the screen below:

And that’s it! Now you know how to add additional IMAP email accounts to Spark on Android!
We hope this was helpful! If you have any questions, feel free to leave a comment, open a ticket from your Client Area, or hit us up on Live Chat 24×7.
]]>After reading this KB Article, you’ll be able to add your first IMAP Email Account to the app and also additional accounts.
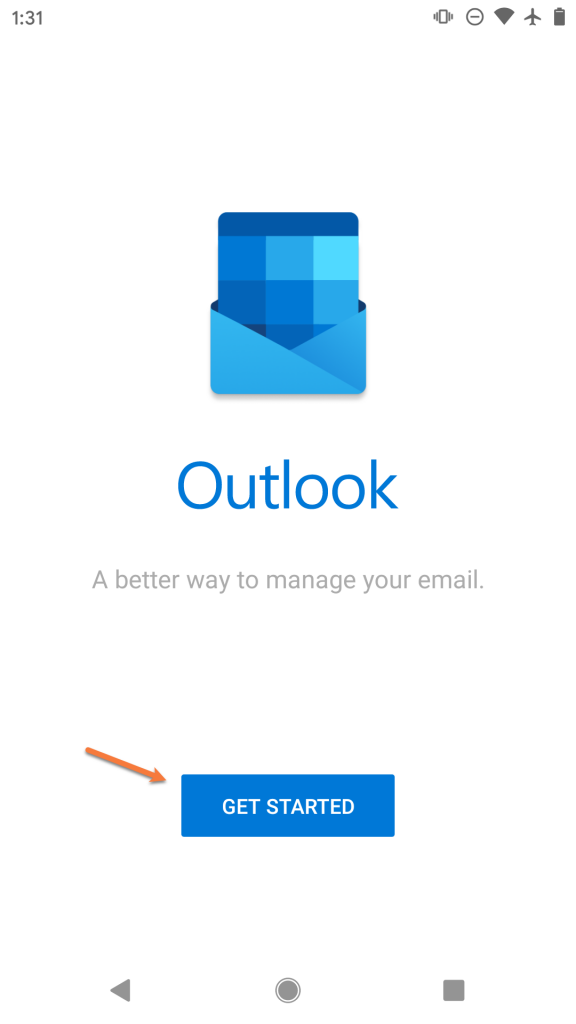
How to add your first IMAP Email Account to Outlook on Android
Step 1: If you haven’t already downloaded & installed Outlook, you can click here to open the Play Store.
Step 2: The first time you open Outlook, you’ll see a screen like the one below.
Tap Get Started
Step 3: Enter the email address you are adding as [email protected]
Then tap Continue

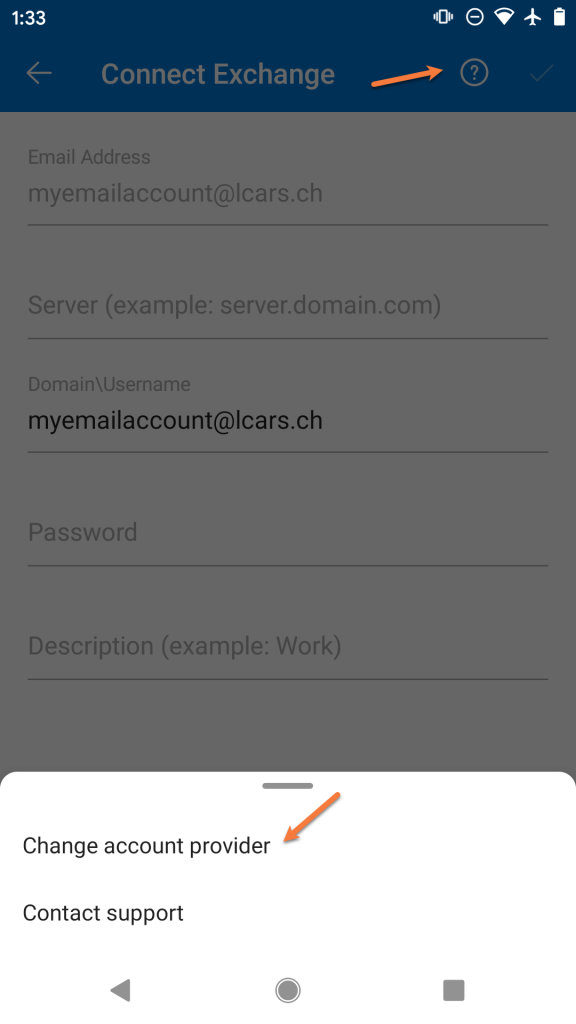
Step 4: Outlook will attempt to help you setup your email account as though you are connecting to a Microsoft Exchange mail server. We’ll need to switch the account type to continue setup.
To do this, tap the? mark in the circle located in the top right corner of the screen. Then tap Change account provider
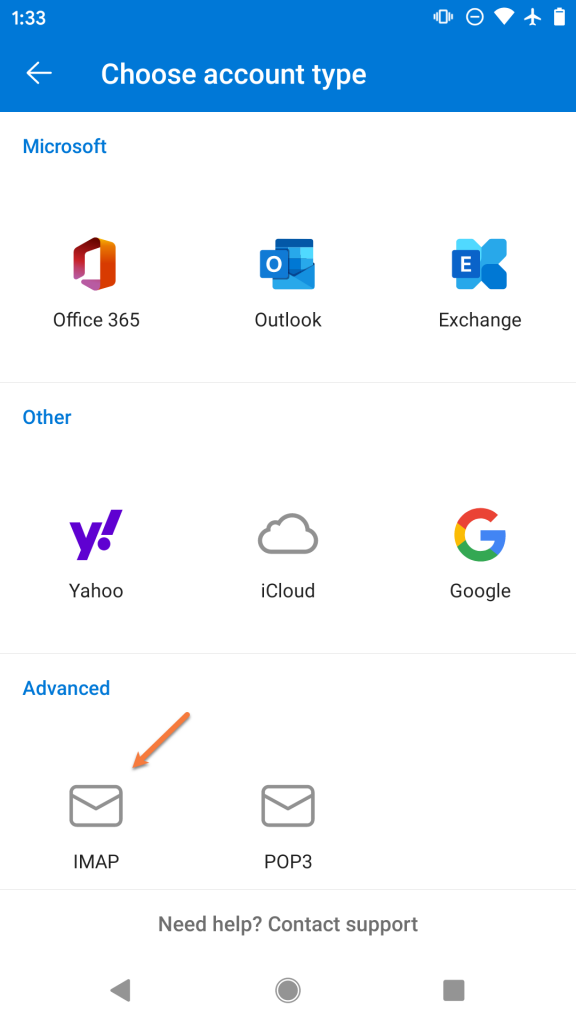
Step 5: Outlook will provide you with a list of common account types. In the 3rd section, tap IMAP to continue.
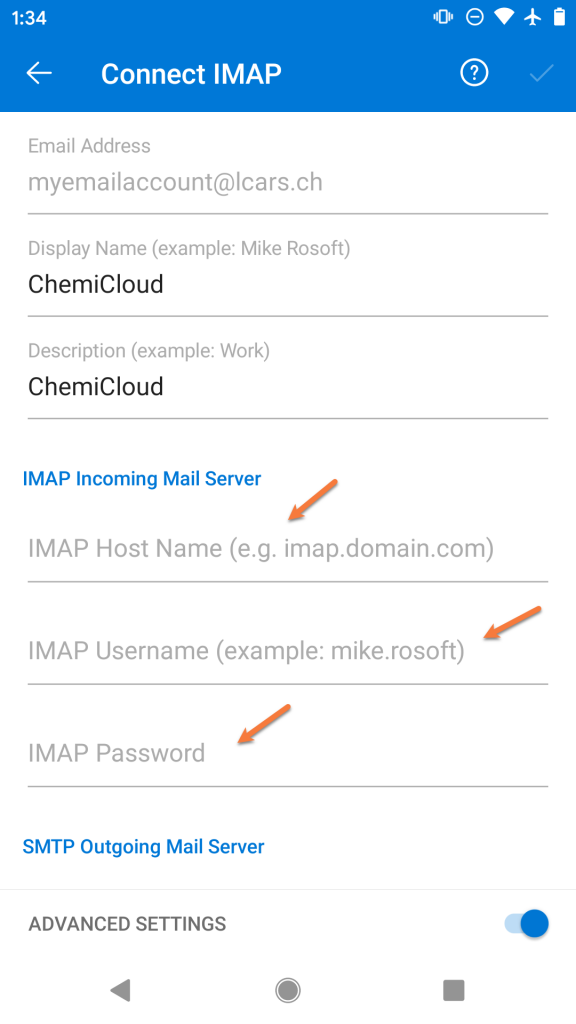
Step 6: On the next screen, you will be prompted to enter the account credentials for this new account.
Enter the password for the email account you are adding.
Next, enter the name you want other people to see when you use Outlook to send mail.
Then, give the account a name so you can easily identify it in Outlook. This is useful if you have multiple accounts setup in Outlook.
Next, tap the toggle in the bottom right to enable the advanced settings.

Step 7: We will examine the next screen in 2 parts.
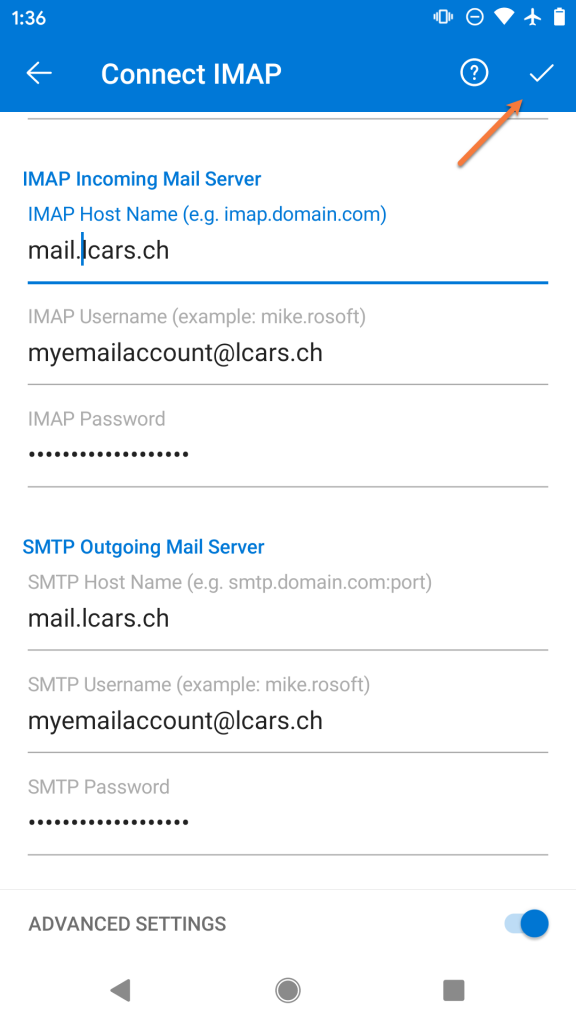
Firstly, we’ll need to enter the incoming IMAP server information. Enter this as mail.yourdomain.tld
Then enter the username for the account you’re adding as [email protected]
And finally, enter the password for the account you are adding.
Next, you’ll need to scroll down so you can enter the SMTP Outgoing Mail Server settings.
Enter mail.yourdomain.tld as the SMTP Host Name
Enter your [email protected] as the SMTP Username
And enter the password for the account you’re adding
To proceed, tap the  mark in the top right corner.
Step 8: That’s it! If the settings you typed are correct, you’ll see a screen like the one below!
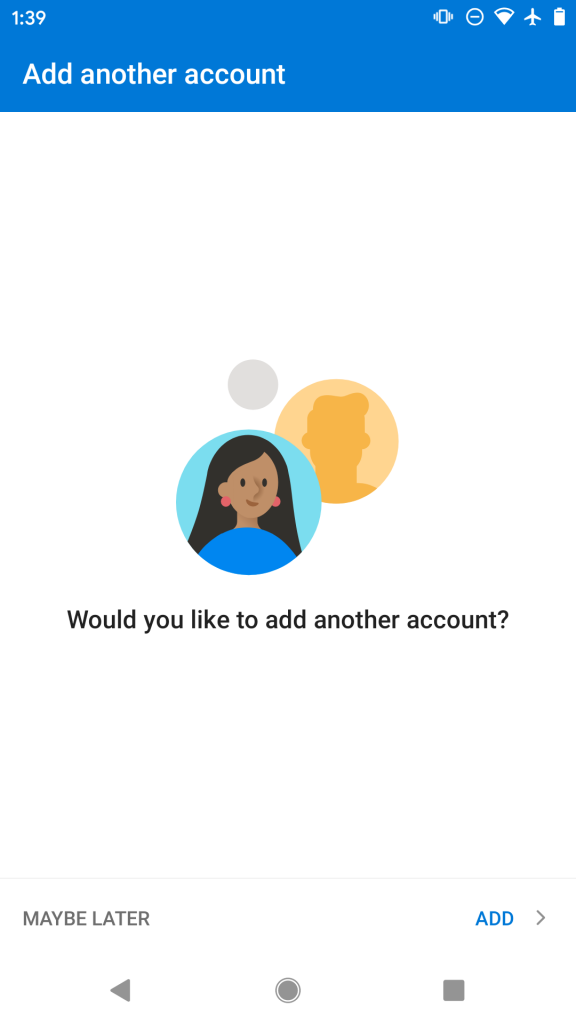
If you want to add another account, you can tap Add or to continue to your inbox, tap maybe later.
Struggling with the Outlook mail client setup? ChemiCloud is the hosting solution designed to save you money and time! Check out our email hosting plans!
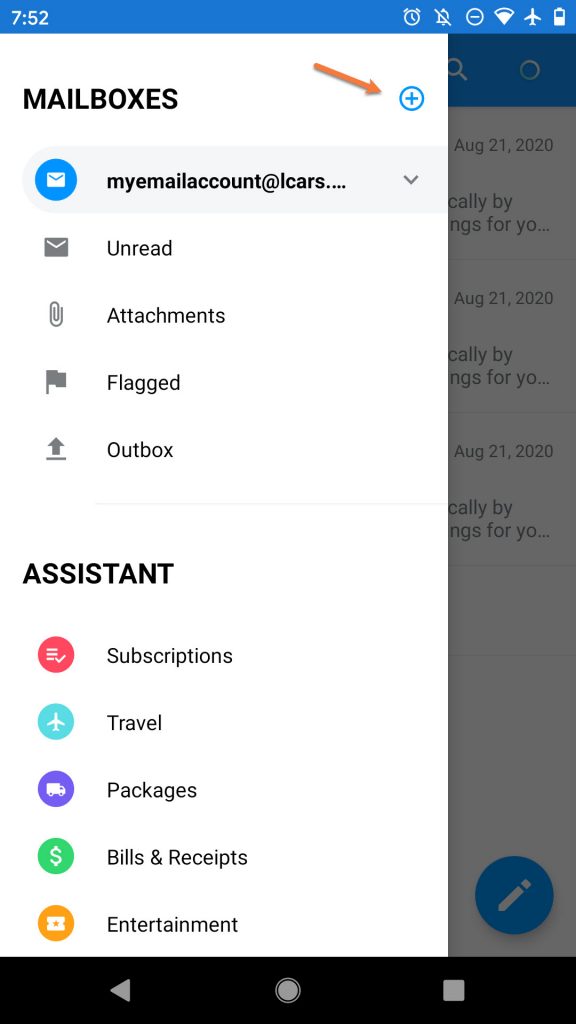
How to add additional IMAP Email Accounts to Outlook on Android
Let’s say it’s been a few weeks since you started using Outlook on Android and you need to add a second email account to the App. This section of the guide will get you sorted!
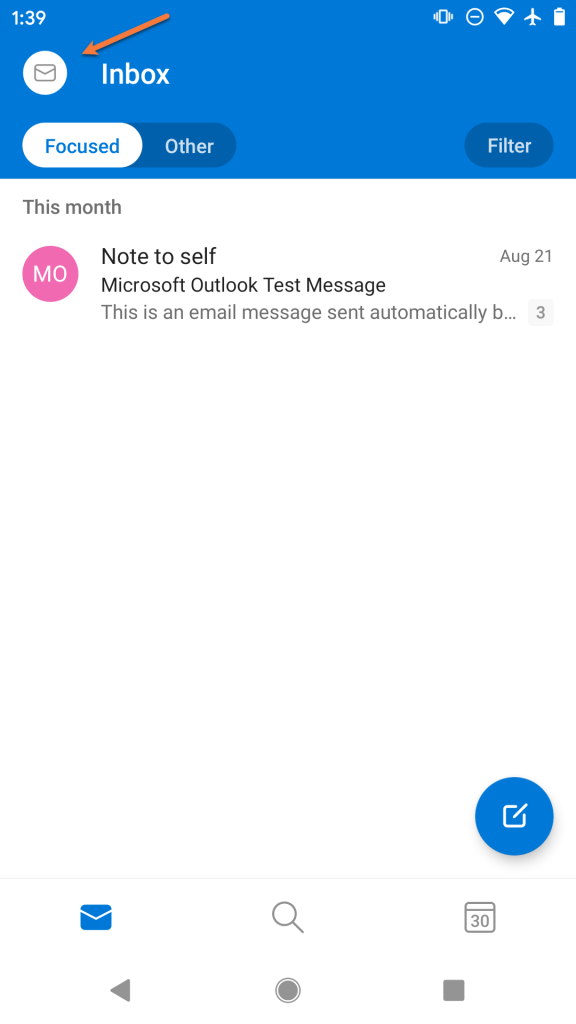
Step 1: Open the Outlook app and tap the  icon in the circle located in the top left of the app.
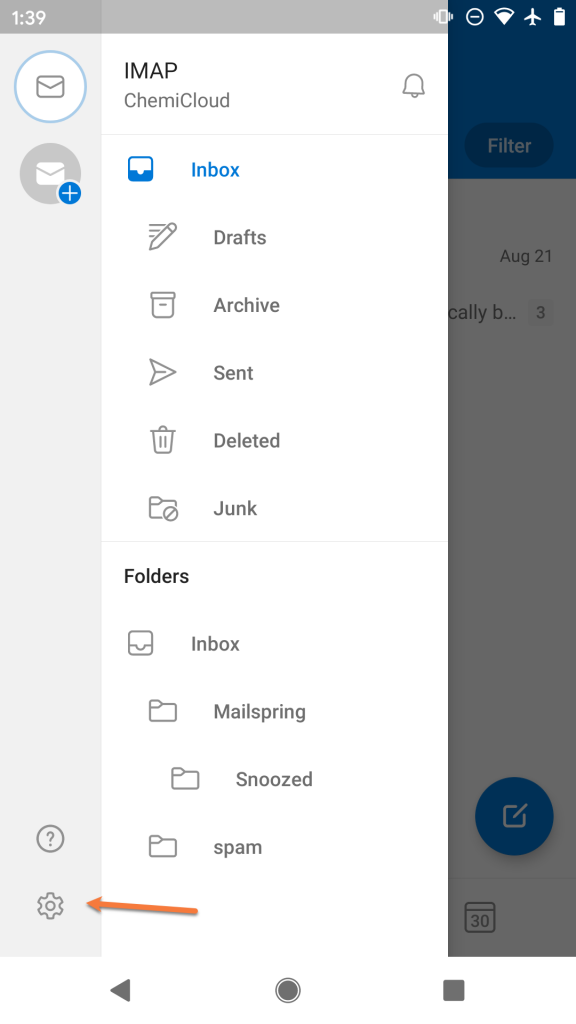
Step 2: Tap the icon in the bottom left to open the Settings area in Outlook.
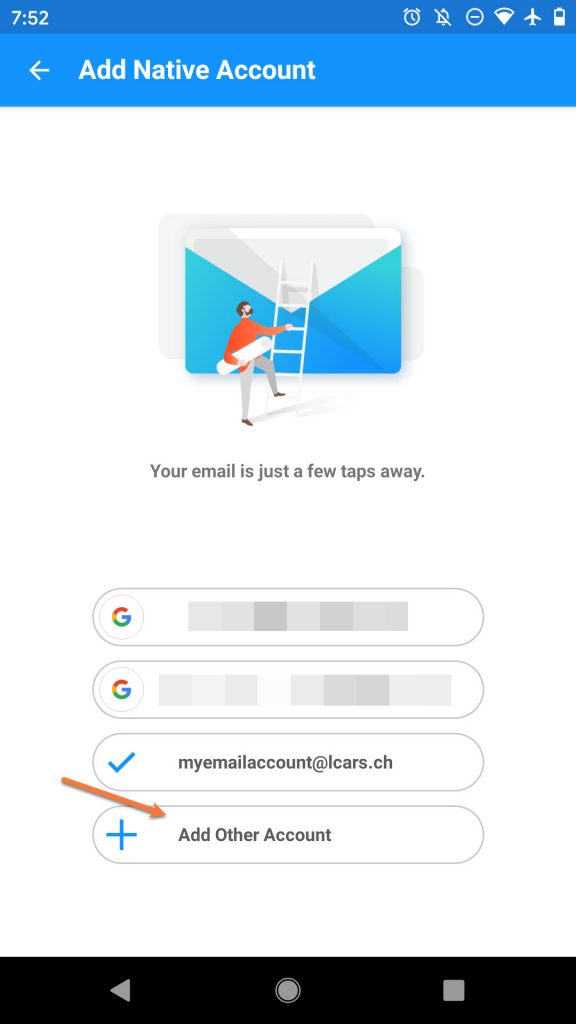
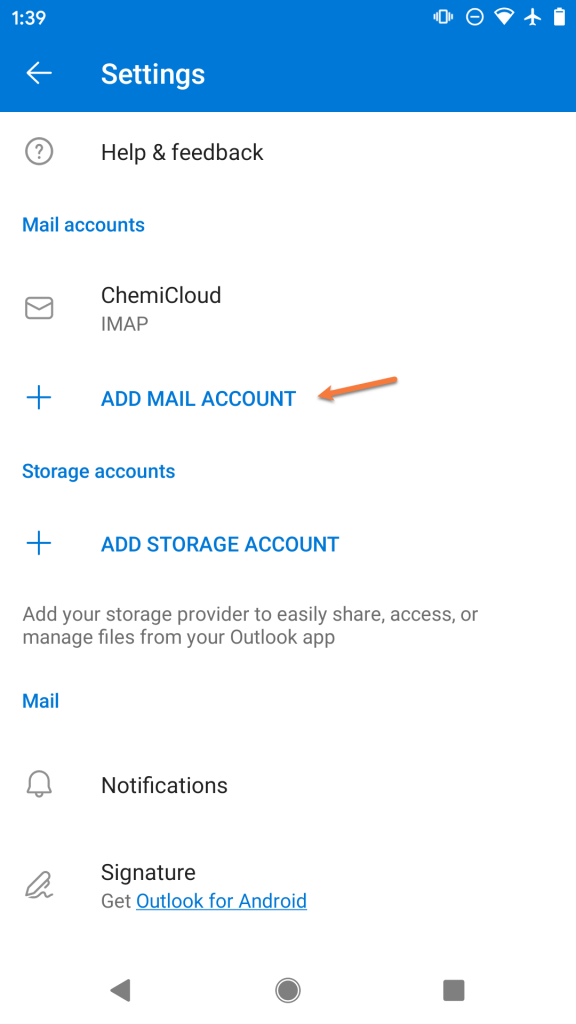
Step 3: Tap Add Mail Account to proceed.
Step 4: Enter the email address you are adding as [email protected]
Then tap Continue
Step 5: Outlook will attempt to help you setup your email account as though you are connecting to a Microsoft Exchange mail server. We’ll need to switch the account type to continue setup.
To do this, tap the ? mark in the circle located in the top right corner of the screen. Then tap Change account provider
Step 6: Outlook will provide you with a list of common account types. In the 3rd section, tap IMAP to continue.
Step 7: On the next screen, you will be prompted to enter the account credentials for this new account.
Enter the password for the email account you are adding.
Next, enter the name you want other people to see when you use Outlook to send mail.
Then, give the account a name so you can easily identify it in Outlook. This is useful if you have multiple accounts setup in Outlook.
Following this, tap the toggle in the bottom right to enable the advanced settings.
Step 8: We will examine the next screen in 2 parts.
Firstly, we’ll need to enter the incoming IMAP server information. Enter this as mail.yourdomain.tld
Then enter the username for the account you’re adding as [email protected]
And finally, enter the password for the account you are adding.
Next, you’ll need to scroll down so you can enter the SMTP Outgoing Mail Server settings.
Enter mail.yourdomain.tld as the SMTP Host Name
Enter your [email protected] as the SMTP Username
And enter the password for the account you’re adding
To proceed, tap the mark in the top right corner.
Step 9: That’s it! If the settings you typed are correct, you’ll see a screen that looks just like the one below!
If you want to add another account, you can tap Add or to continue to your inbox, tap maybe later.
We hope this was helpful! If you have any questions, feel free to leave a comment, open a ticket from your Client Area, or hit us up on Live Chat 24×7.
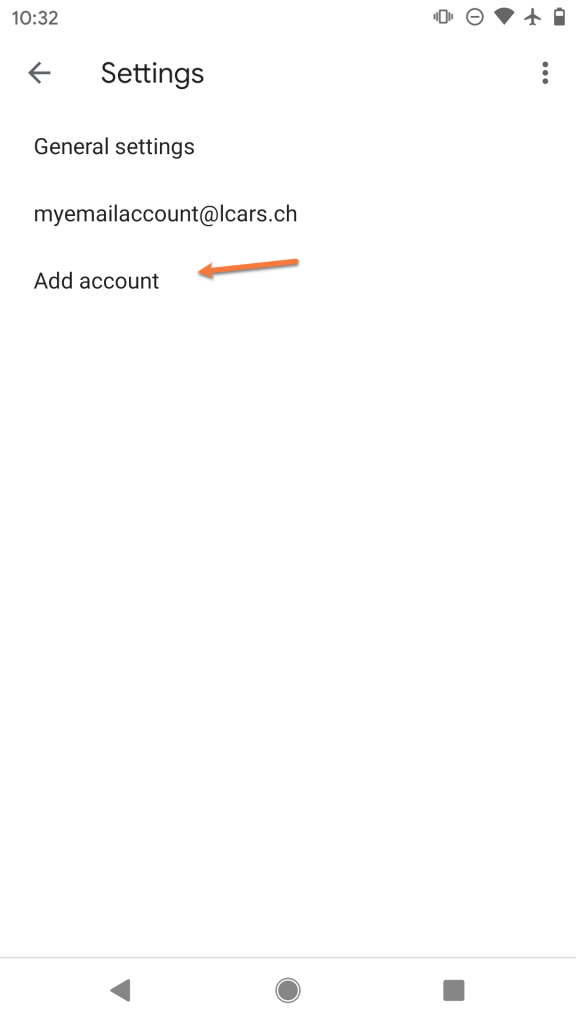
]]>By the end of this knowledgebase article, you will know how to add an account to Gmail on Android for the very first time, as well as how to add additional email accounts.
Adding your first account to Gmail on Android
Gmail is preinstalled on most Android devices, however if you need to download it, you can click here to open the app on the Play Store and download + install the app.
Step 1: Open Gmail. On most Android devices, you can swipe up from the bottom of your screen to see the app drawer. Alternatively, your device may have a dedicated app drawer icon on the home screen. Or, Gmail may already be on your home screen.

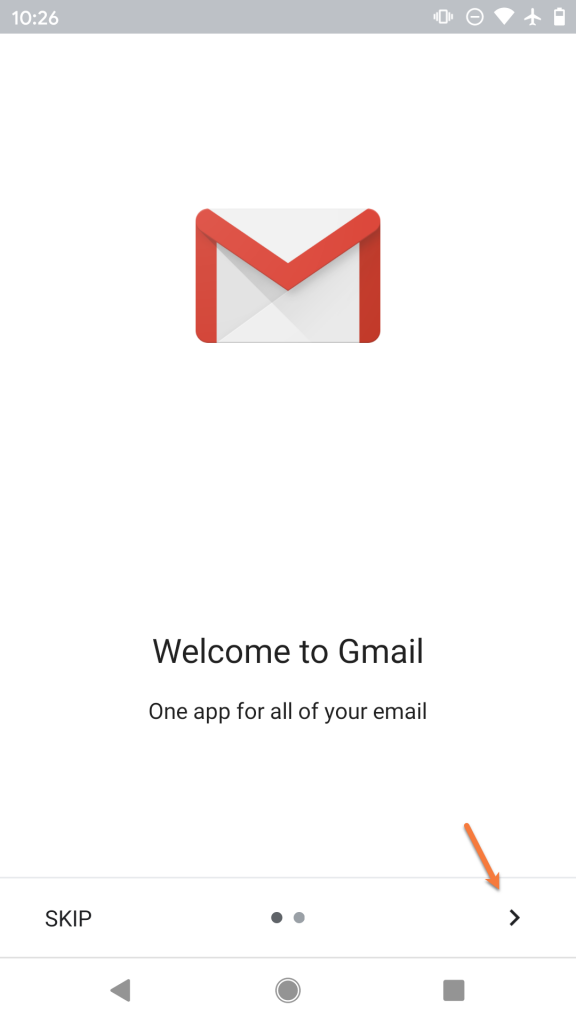
Step 2: The first time you open Gmail on Android, you’ll see a screen like the one below. If you haven’t used Gmail in a while, it might be a great idea to tap the > icon and review some of the new features.
If you’re familiar with Gmail, feel free to tap Skip and move to Step 3.
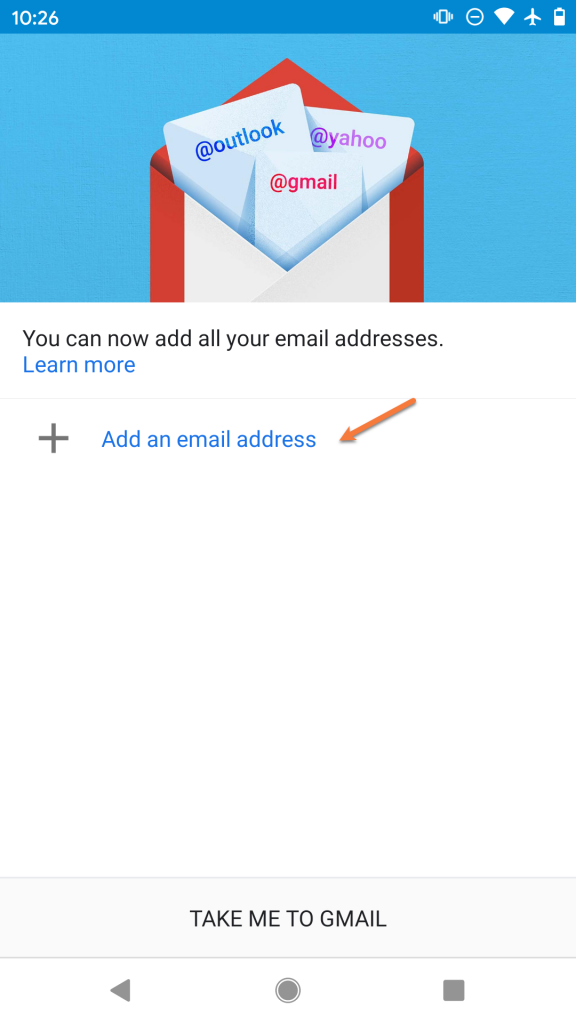
Step 3: Tap + Add an email address
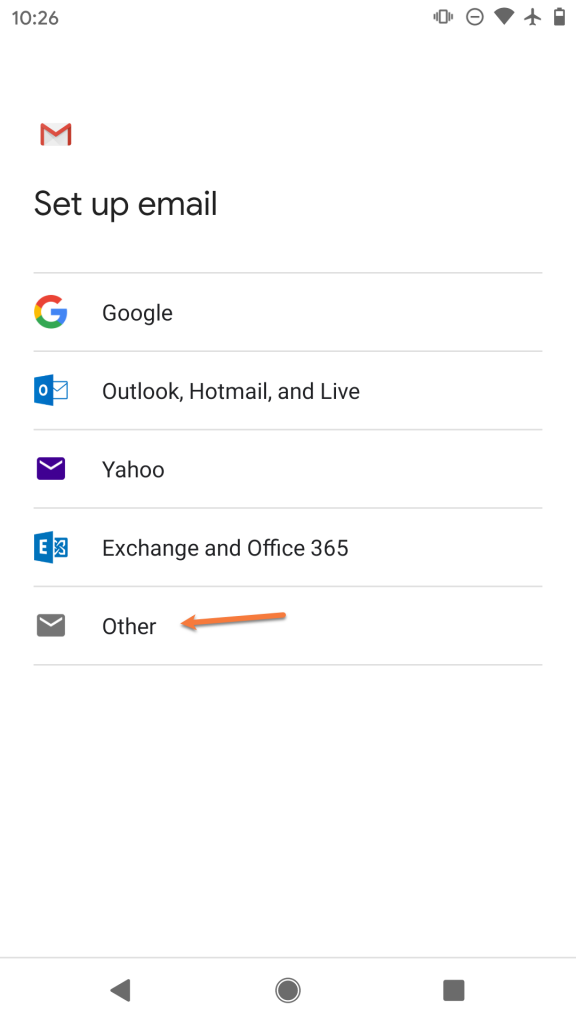
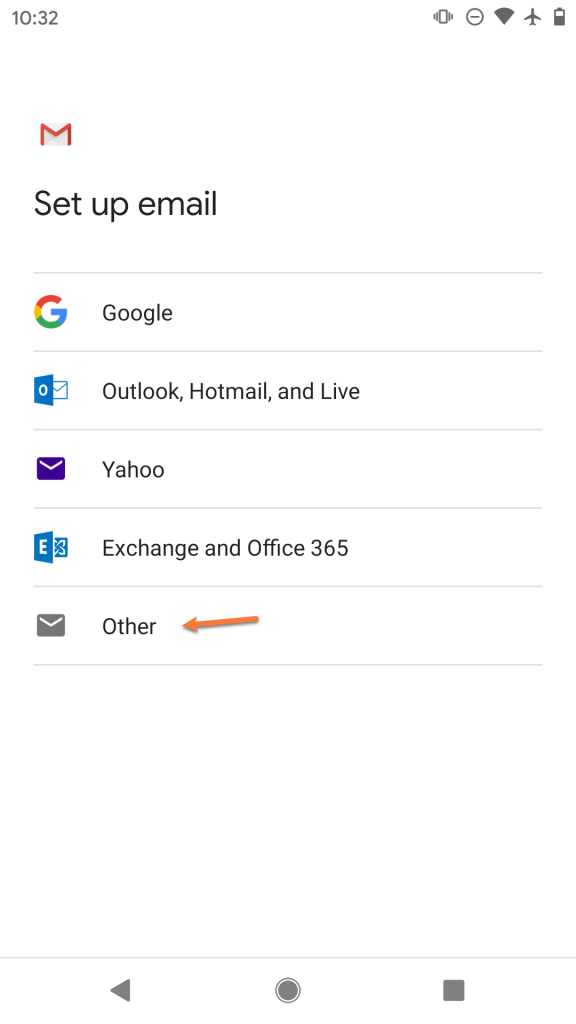
Step 4: From the list of available account options, choose Other.
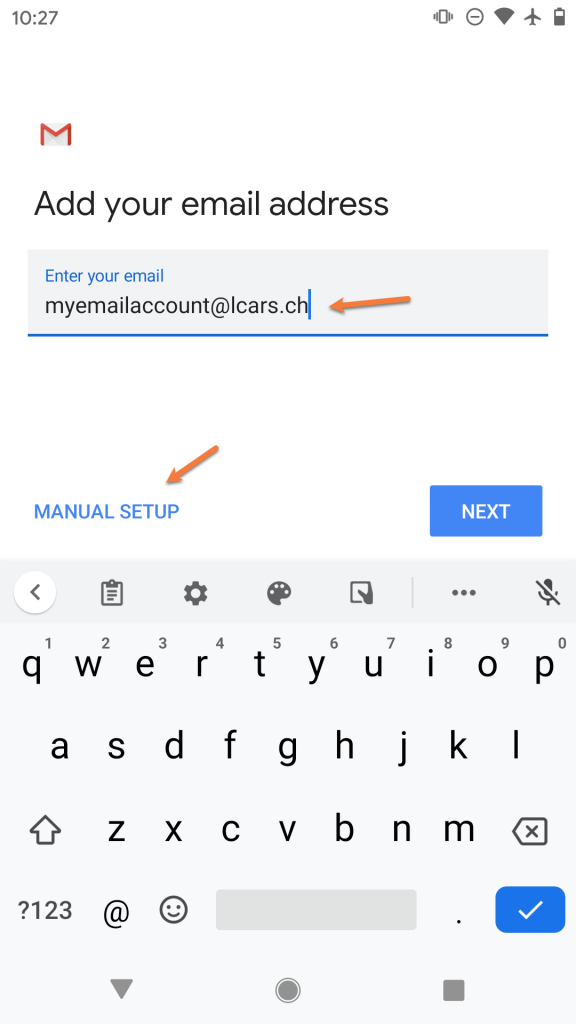
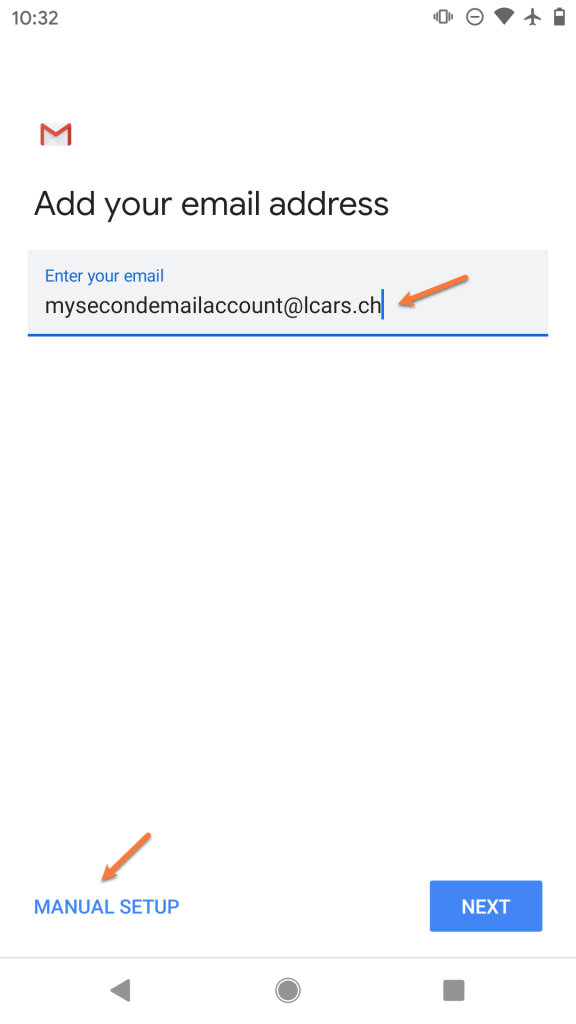
Step 5: Enter the full email address for the account you are adding as [email protected].
Then, tap Manual Setup.
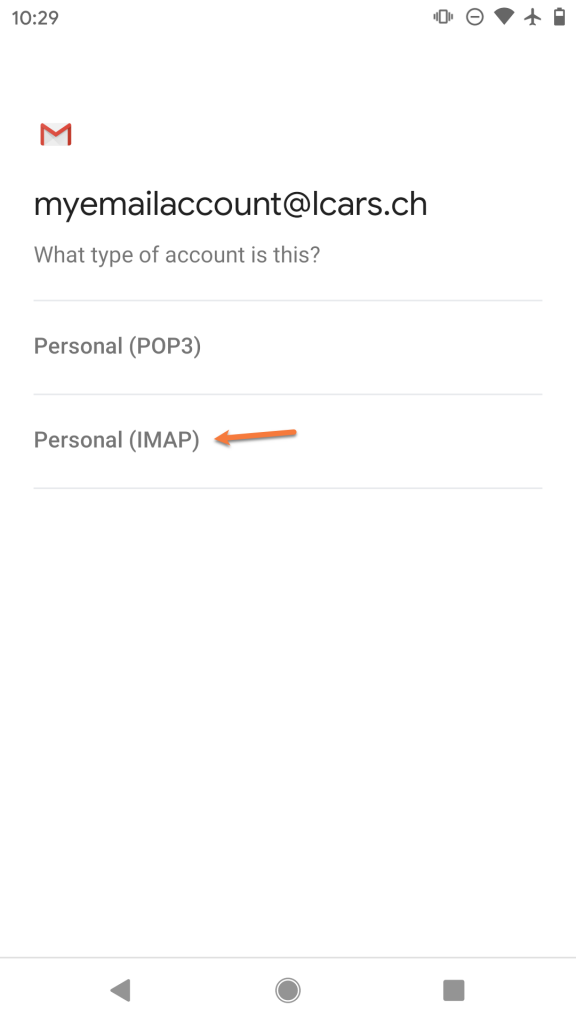
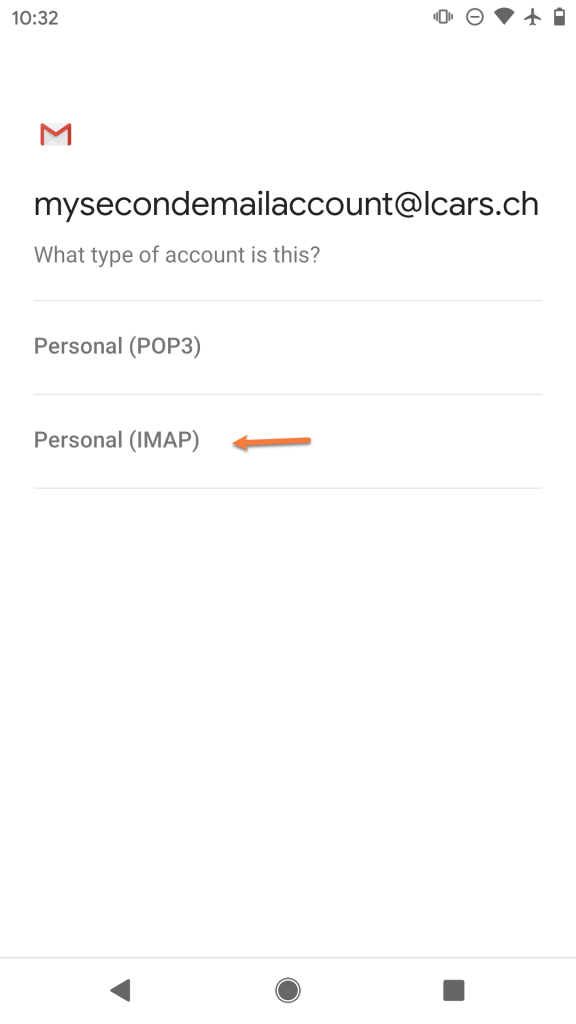
Step 6: Select IMAP from the list of options.
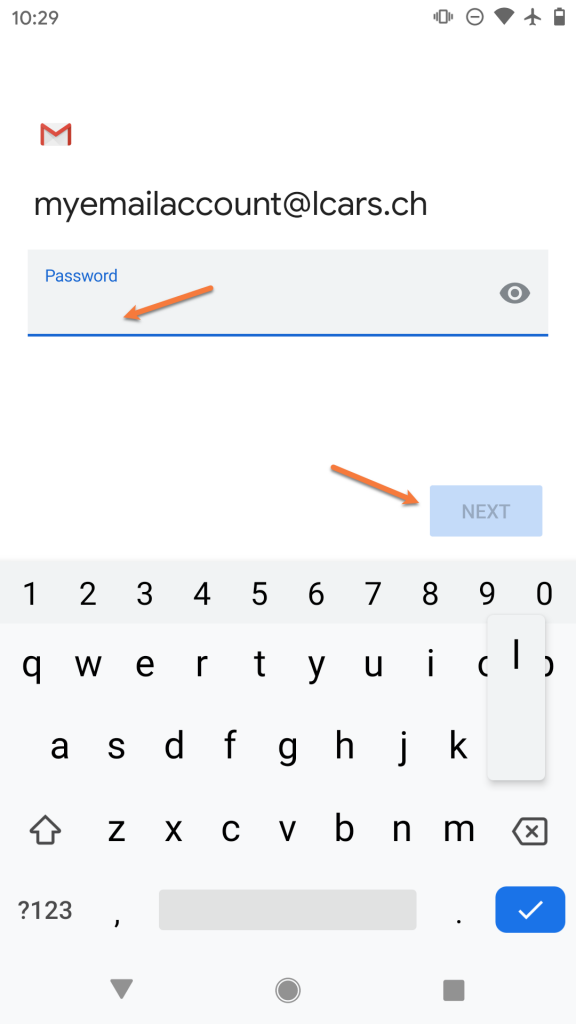
Step 7: Enter the password for the account you are adding. Then, tap Next.
Step 8: On the next screen, ensure your Username and Password are filled in correctly.
In the Server section, enter your server information as mail.yourdomain.tld.
Then, tap Next.

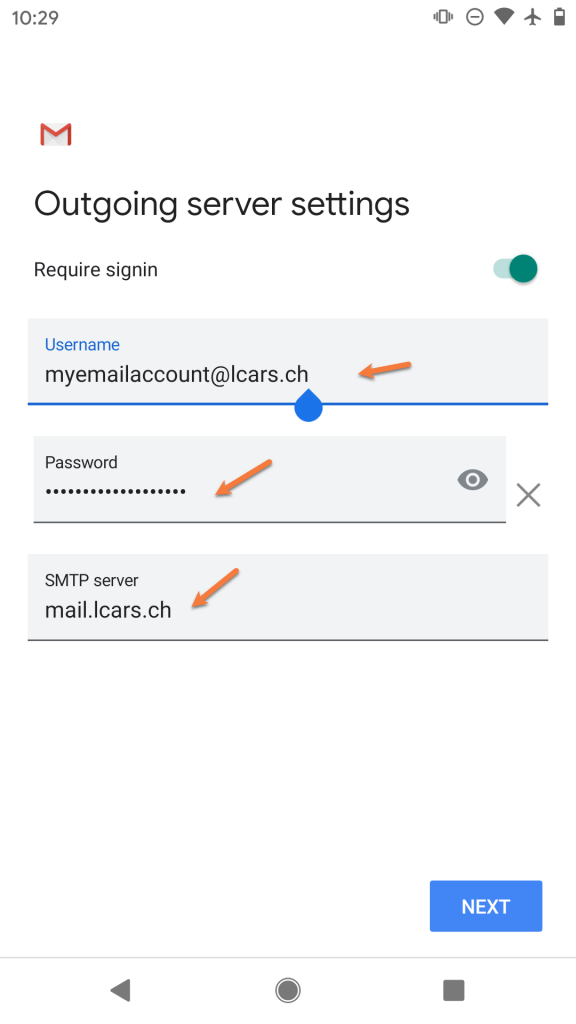
Step 9: On the next screen, ensure the Require signin toggle is slid to the right. Also, check that your Username and Password are filled in correctly.
In the SMTP Server field, ensure the SMTP Server is set to mail.yourdomain.tld
Then, tap Next
Step 10: You’ll briefly see a screen saying Verifying Account Information and then, if the information you entered was correct, you’ll see a screen like the one below:

Feel free to change any of these settings, but leave Sync email for this account checked if you wish to be able to send/receive email on this device.
Tap Next when ready.
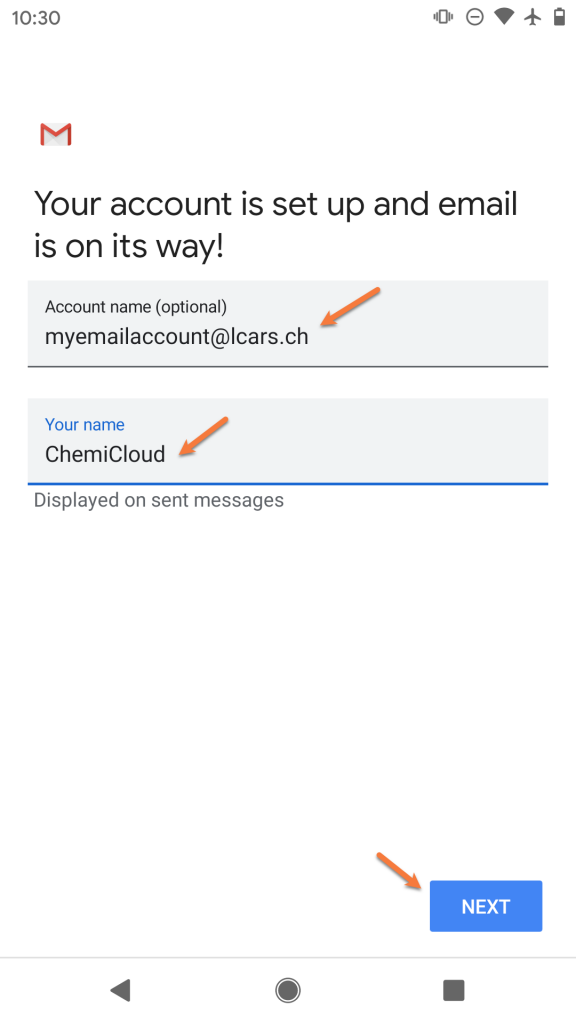
Step 11: On this screen, you can give the account a name, which is super useful if you have multiple email accounts setup in the Gmail App.
Under Your Name, ensure the name you want others to see when you send email on this device using the Gmail App is set appropriately.
Tap Next when ready.
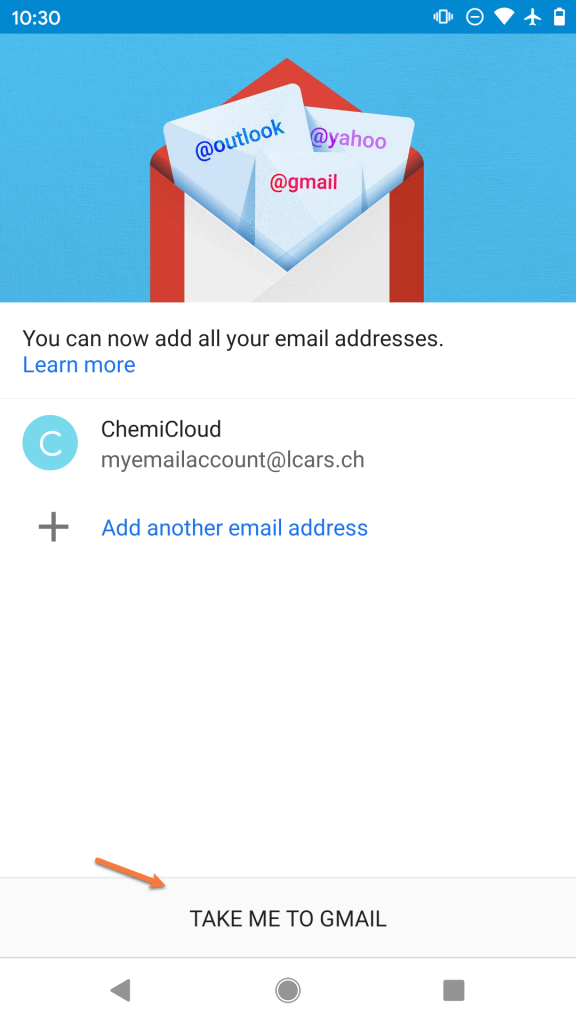
Step 12: That’s it! Not so bad right? If you want to add another email account, you can tap Add another email address or you can tap Take me to Gmail to finish.
Struggling with the Gmail mail client setup? ChemiCloud is the hosting solution designed to save you money and time! Check out our email hosting plans!
Adding additional accounts to Gmail on Android
As you can see from the final screenshot in the section above, you have the option to add additional accounts to Gmail back-to-back. However, let’s say you have already tapped the Take me to Gmail button, it’s been a couple weeks, and you need to add a new account. This section will cover how to add those additional accounts.
Step 1: Open Gmail and tap the ≡ icon (hamburger menu) in the top left to open the Settings panel.
Step 2: Scroll down, if needed, and tap Settings.
Step 3: Tap Add account
Step 4: Under the list of account types, select Other.
Step 5: Enter the full email address you are adding as [email protected]
Then tap Manual setup
Step 6: Select IMAP
Step 7: Enter the password for the account you are adding.
Then, tap Next

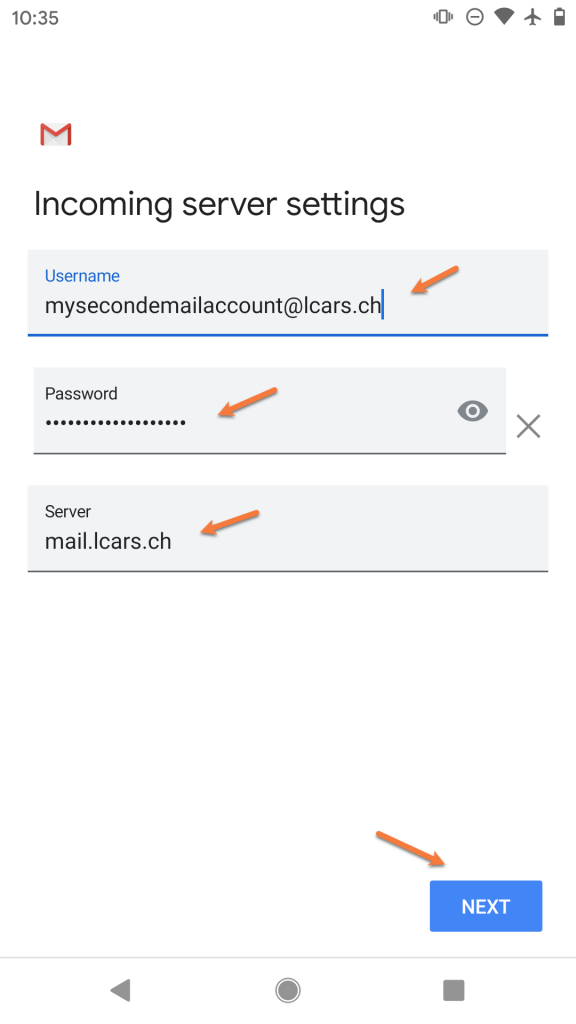
Step 8: On the next screen, ensure your Username and Password are filled in correctly.
In the Server section, enter your server information as mail.yourdomain.tld.
Then, tap Next.
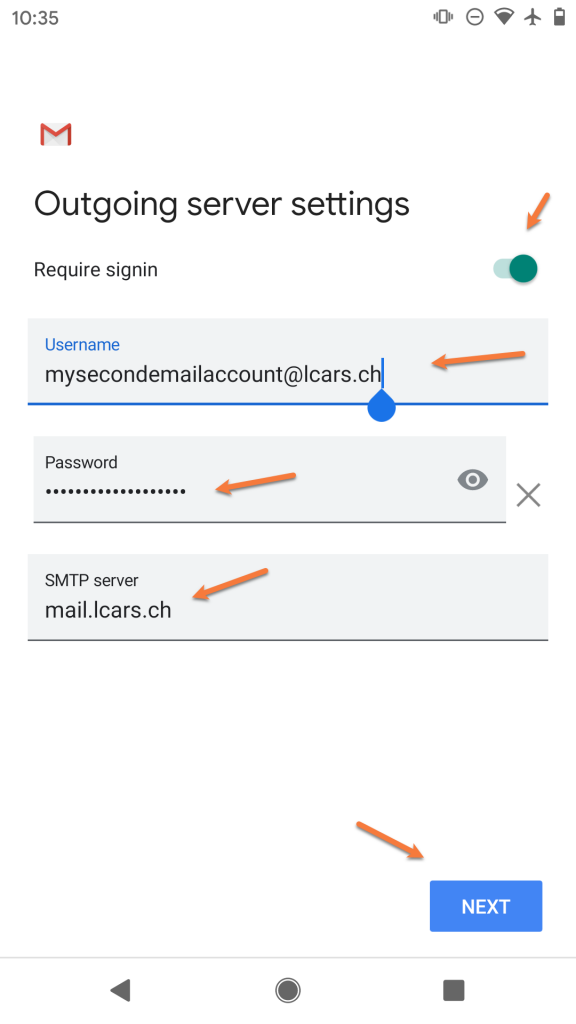
Step 9: On the next screen, ensure the Require signin toggle is slid to the right. Also, check that your Username and Password are filled in correctly.
In the SMTP Server field, ensure the SMTP Server is set to mail.yourdomain.tld
Then, tap Next
Step 10: You’ll briefly see a screen saying Verifying Account Information and then, if the information you entered was correct, you’ll see a screen like the one below:
Feel free to change any of these settings, but leave Sync email for this account checked if you wish to be able to send/receive email on this device.
Tap Next when ready.
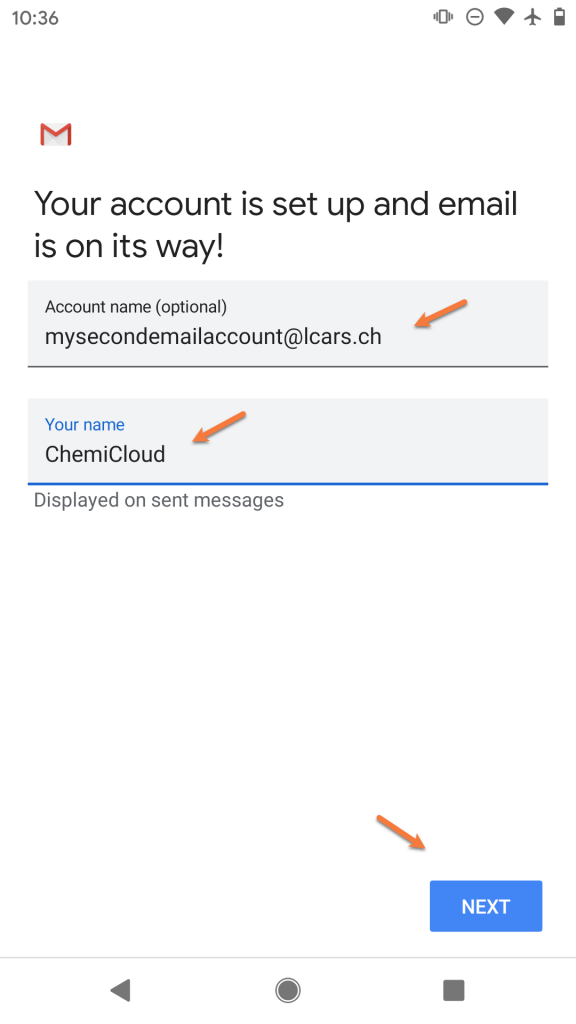
Step 11: On this screen, you can give the account a name, which is super useful if you have multiple email accounts setup in the Gmail App.
Under Your Name, ensure the name you want others to see when you send email on this device using the Gmail App is set appropriately.
Tap Next when ready.
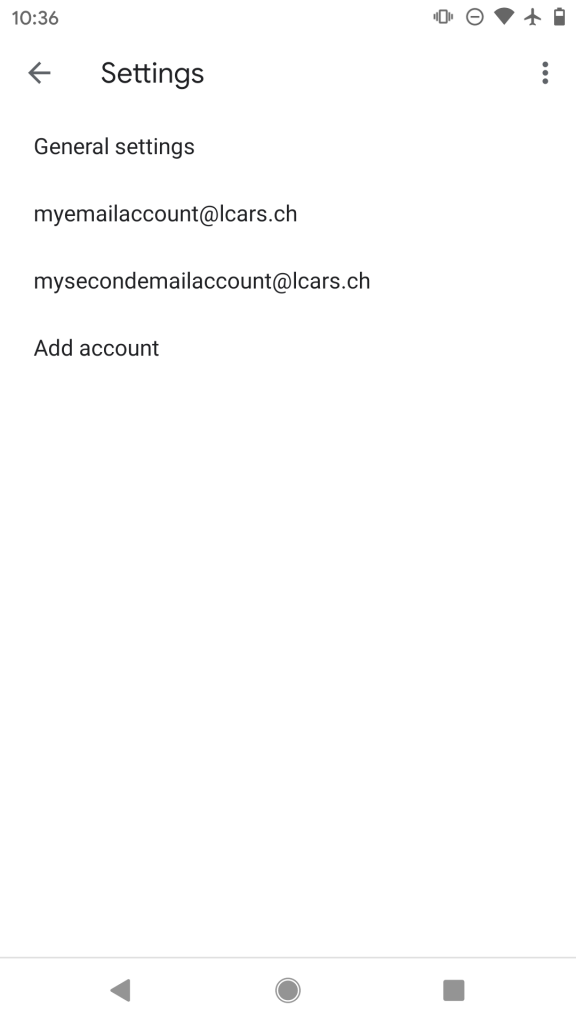
Step 12: That’s it! You’ll be returned to the Accounts List page where you can add another account if you want.
We hope this was helpful! If you have any questions, feel free to leave a comment, open a ticket from your Client Area, or hit us up on Live Chat 24×7.
]]>
How to add your first email account to Mailspring
Step 1: Open Mailspring. This can be done by clicking the![]() logo in the bottom left corner of your taskbar on your keyboard type mailspring, then select Mailspring from the search results.
logo in the bottom left corner of your taskbar on your keyboard type mailspring, then select Mailspring from the search results.
The first time you open Mailspring, you’ll see this screen:

Click IMAP / SMTP.
Step 2: On the Add your IMAP account screen, enter your name, as you wish others to see it when you send mail from Mailspring, as well as the e-mail address and password for the account you’re adding.
Then click Continue.

Step 3: Mailspring will prompt you for the Incoming Mail (IMAP) and Outgoing Mail (SMTP) credentials:

Reviewing the options on the left side of this account setup screen:
Incoming Mail (IMAP) server should be mail.yourdomain.tld
Port should be set to 993
The security dropdown menu should have SSL / TLS selected
Do not check Allow insecure SSL
In username, enter the full username for the account you’re adding – [email protected]
In the password field, enter the password for this account.
Reviewing the options on the right side of this account setup screen:
Outgoing Mail (SMTP) server should be mail.yourdomain.tld
Port should be set to 465
Do not check Allow insecure SSL
In username, enter the full username for the account you’re adding – [email protected]
In the password field, enter the password for this account.
When you’ve completed the fields, click Connect Account.
Step 4: Mailspring will test the account & server settings you have provided. If the account details you have entered are correct, you will see this screen:

One of the key features in Mailspring is it’s customization features. On the screen above, you can select a layout of the reading pane as well as a set of keyboard shortcuts you might be familiar with, such as those used in Outlook or Gmail.
Once you’ve made your decision, click Looks Good! to finish.
And that’s it! Now you know how to add an IMAP account to Mailspring!
Struggling with the Mailspring mail setup? ChemiCloud is the hosting solution designed to save you money and time! Check out our email hosting plans!
Adding additional IMAP accounts to Mailspring
Adding extra accounts to Mailspring is pretty easy, but keep in mind the free version of Mailspring currently limits you to 4 accounts total.
Step 1: From the Mailscreen main page, click the ≡ icon (hamburger menu) in the top right corner of Mailspring, just below the X button.

Step 2: In the menu that appears, click Add Account.

Step 3: The Connect an email account screen appears, just like the first time you added an account to Mailspring.
Select IMAP / SMTP to continue.
Step 4: Mailspring will prompt you for the Incoming Mail (IMAP) and Outgoing Mail (SMTP) credentials:

Reviewing the options on the left side of this account setup screen:
Incoming Mail (IMAP) server should be mail.yourdomain.tld
Port should be set to 993
The security dropdown menu should have SSL / TLS selected
Do not check Allow insecure SSL
In username, enter the full username for the account you’re adding – [email protected]
In the password field, enter the password for this account.
Reviewing the options on the right side of this account setup screen:
Outgoing Mail (SMTP) server should be mail.yourdomain.tld
Port should be set to 465
Do not check Allow insecure SSL
In username, enter the full username for the account you’re adding – [email protected]
In the password field, enter the password for this account.
When you’ve completed the fields, click Connect Account.
Step 5: Mailspring will test the account & server settings you have provided. If the account details you have entered are correct, you will be taken to the main Mailspring page where you can see both accounts.

And that’s it! Now you know how to add an additional account to Mailspring!
This article will help you setup a IMAP email account in Mozilla Thunderbird version 78 on Windows 10.

Adding your first email account to Thunderbird
If you just installed Thunderbird and need to add your first email account, you’re in the right spot!
Step 1: Open Thunderbird. This can be done by clicking the![]() logo in the bottom left corner of your taskbar on your keyboard type mail, then select Thunderbird from the search results.
logo in the bottom left corner of your taskbar on your keyboard type mail, then select Thunderbird from the search results.
Step 2: When Thunderbird opens for the first time, you’ll see a screen that looks like this:
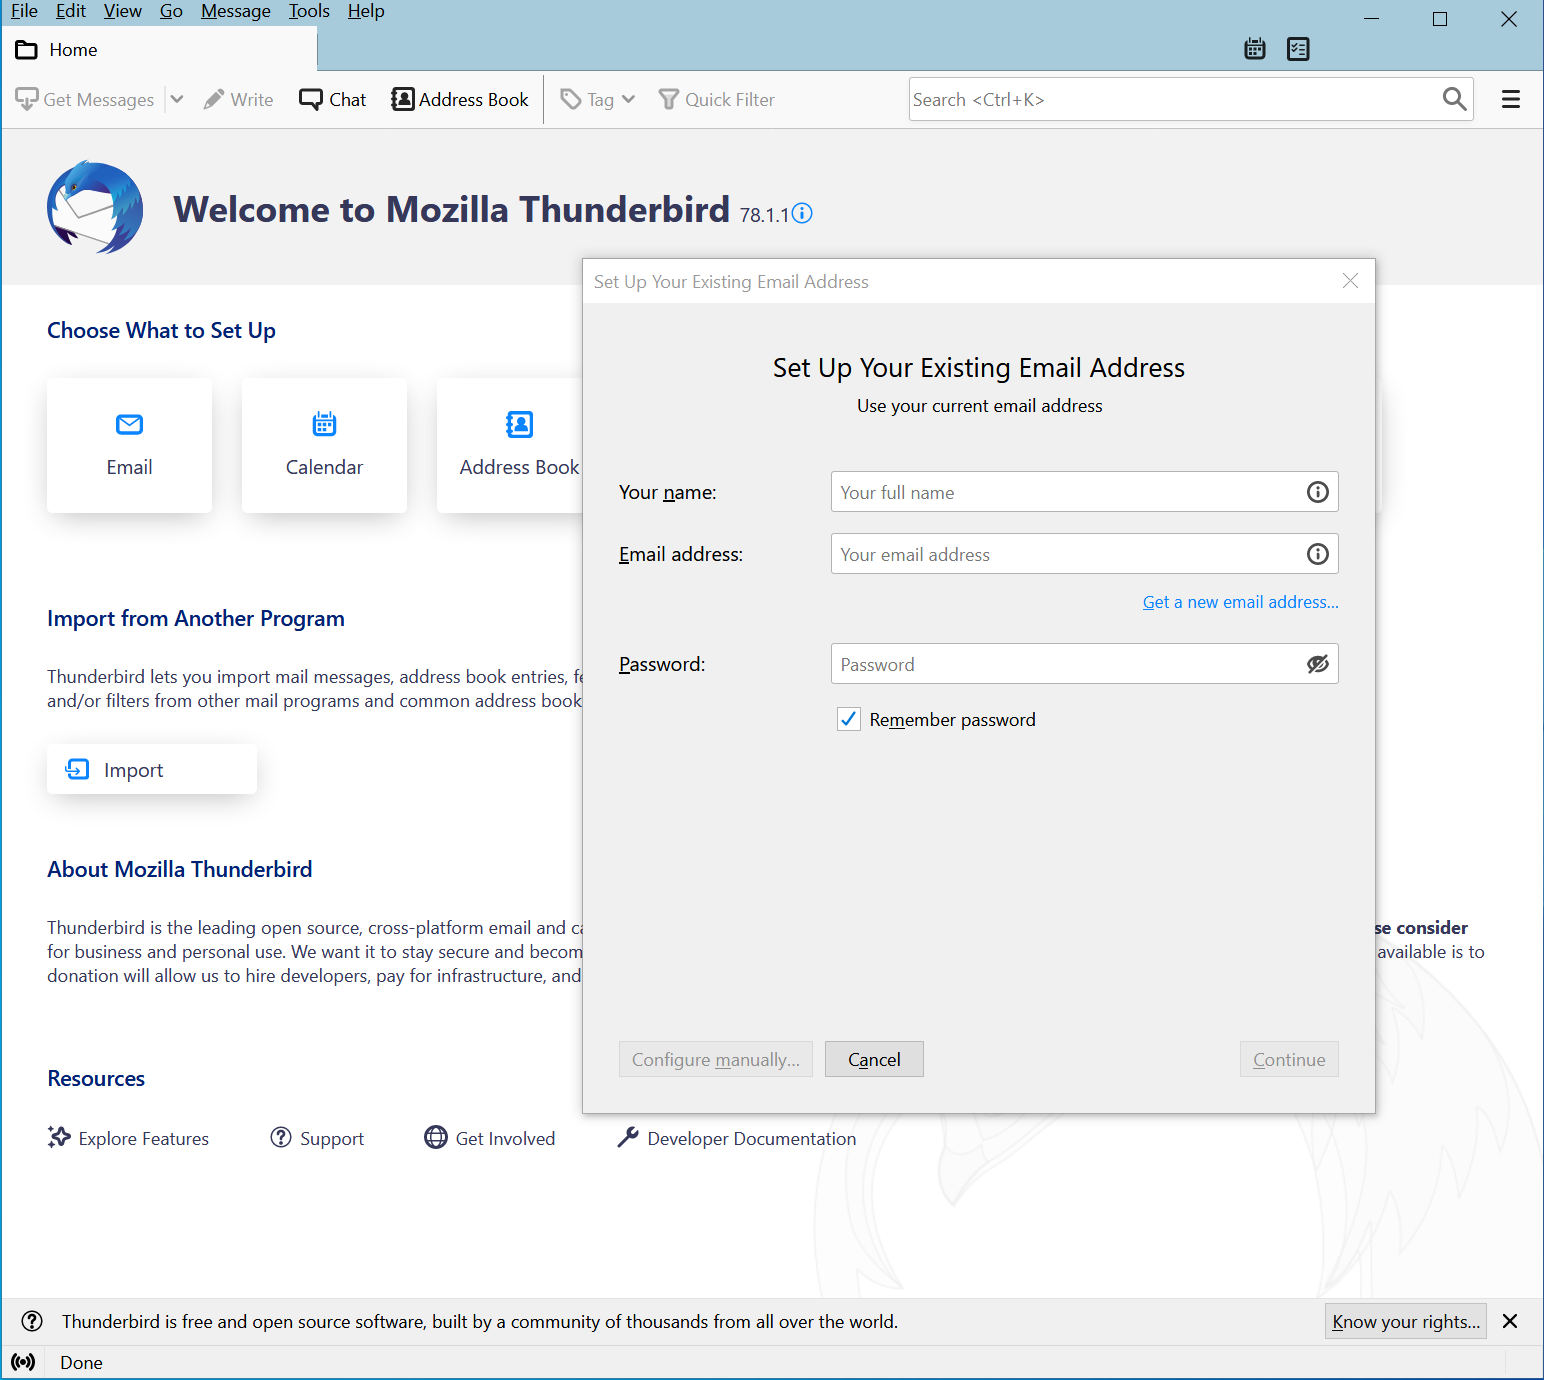
Step 3: Enter your Name, as you wish others to see it when you send e-mail via Thunderbird, as well as the e-mail address and password for the account you’re adding.
In the bottom left, click Configure manually. The window will expand so you can enter server and protocol information.
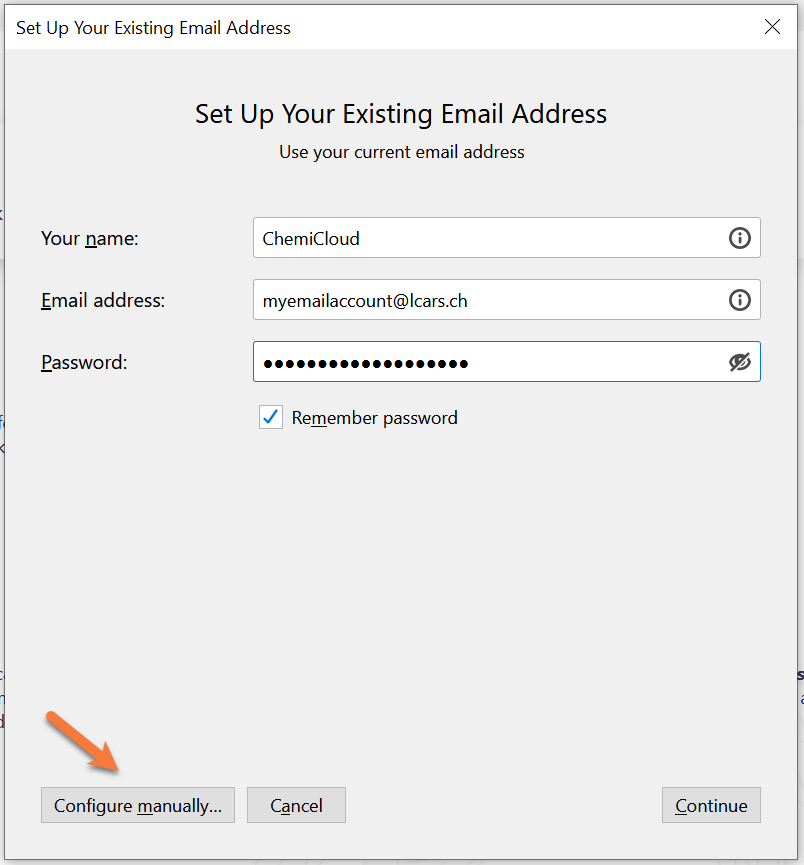
Step 4: Since we’re configuring this account manually, you will need to enter your incoming and outgoing server information, as well as other information. Let’s review the information at the bottom of this window:

Under the Incoming column:
The Protocol we are using is IMAP.
The server should be mail.yourdomain.tld
The port should be 993
In the drop down next to SSL, select SSL/TLS
In the drop down next to Authentication, select Normal password
In the box next to Username enter the full [email protected] username for the account you’re adding.
Under the Outgoing column:
The server should be mail.yourdomain.tld
The port should be 465
In the drop down next to SSL, select SSL/TLS
In the drop down next to Authentication, select Normal password
In the box next to Username enter the full [email protected] username for the account you’re adding.
When you’ve finished, click Done. Thunderbird will perform a connection test to validate the server information + username and password you have provided in the configuration are correct.
Step 5: That’s it! If you see a window prompting you whether you want to make Thunderbird the default client for Mail, Calendars, and Contacts and not an error message, then congrats! You’ve added your first IMAP account to Thunderbird! 
Adding additional IMAP email accounts to Thunderbird
Adding additional IMAP accounts in Thunderbird is pretty easy. This section of the knowledgebase article will walk you through this process.
Step 1: Open Thunderbird. This can be done by clicking the![]() logo in the bottom left corner of your taskbar on your keyboard type mail, then select Thunderbird from the search results.
logo in the bottom left corner of your taskbar on your keyboard type mail, then select Thunderbird from the search results.
Step 2: When Thunderbird opens, you’ll see a screen that looks like this:

Looking at this image, we can see in the top left where I have already added an e-mail account.
Struggling with the Thunderbird mail client setup? ChemiCloud is the hosting solution designed to save you money and time! Check out our email hosting plans!
To add a new account, click the ≡ icon (hamburger menu) in the top right corner of Thunderbird below the X to close the application.
Step 3: In the menu that drops down, click Account Settings.

Step 4: The Account Settings window will open. In this window, you have the option to edit the settings for accounts you have already added to Thunderbird, as well as add new ones.
To add a new email account, click Account Actions in the bottom left corner, then click Add Mail Account.

Step 5: A familiar window will open. Yep, it’s the same one we saw when we added our first email account to Thunderbird.
Enter Your name (as you wish others to see it when you send mail via Thunderbird), Email address, and Password for the account you’re adding.
Then click Configure manually.

Step 6: As before, the Setup window will expand and you will have the option to enter the server configuration information for the email account which you are adding.

Under the Incoming column:
The Protocol we are using is IMAP.
The server should be mail.yourdomain.tld
The port should be 993
In the drop down next to SSL, select SSL/TLS
In the drop down next to Authentication, select Normal password
In the box next to Username enter the full [email protected] username for the account you’re adding.
Under the Outgoing column:
The server should be mail.yourdomain.tld
The port should be 465
In the drop down next to SSL, select SSL/TLS
In the drop down next to Authentication, select Normal password
In the box next to Username enter the full [email protected] username for the account you’re adding.
When you’ve finished, click Done. Thunderbird will perform a connection test to validate the server information + username and password you have provided in the configuration are correct.
Step 5: That’s it! After adding the new account, you’ll be taken back to Thunderbirds Account Settings area where you can add additional accounts if you wish, or make changes to existing ones.

That’s it! Now you know how to add additional accounts to Mozilla Thunderbird.
We hope this was helpful! If you have any questions, feel free to leave a comment, open a ticket from your Client Area, or hit us up on Live Chat 24×7.
]]>