If you are not familiar with locating your API Token in WHM, this Knowledge Base article will help you!
How to locate and use the API Token in WHM
Step 1: Login to your WHM. There’s a lot of ways to do this, but the sure fire easiest way is to login to your Client Area, then open your WHM.
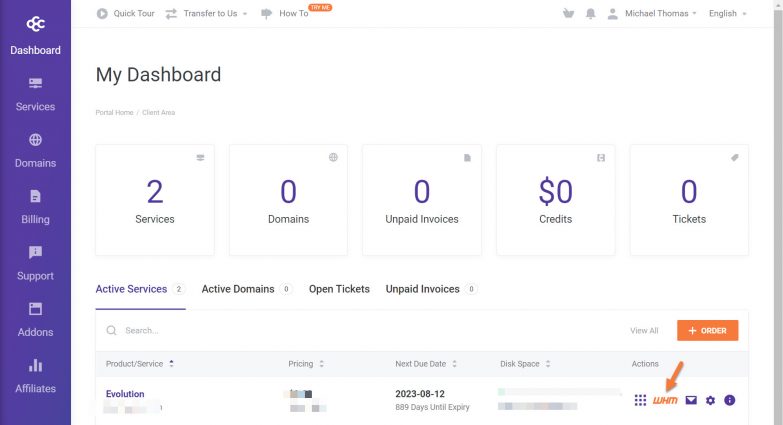
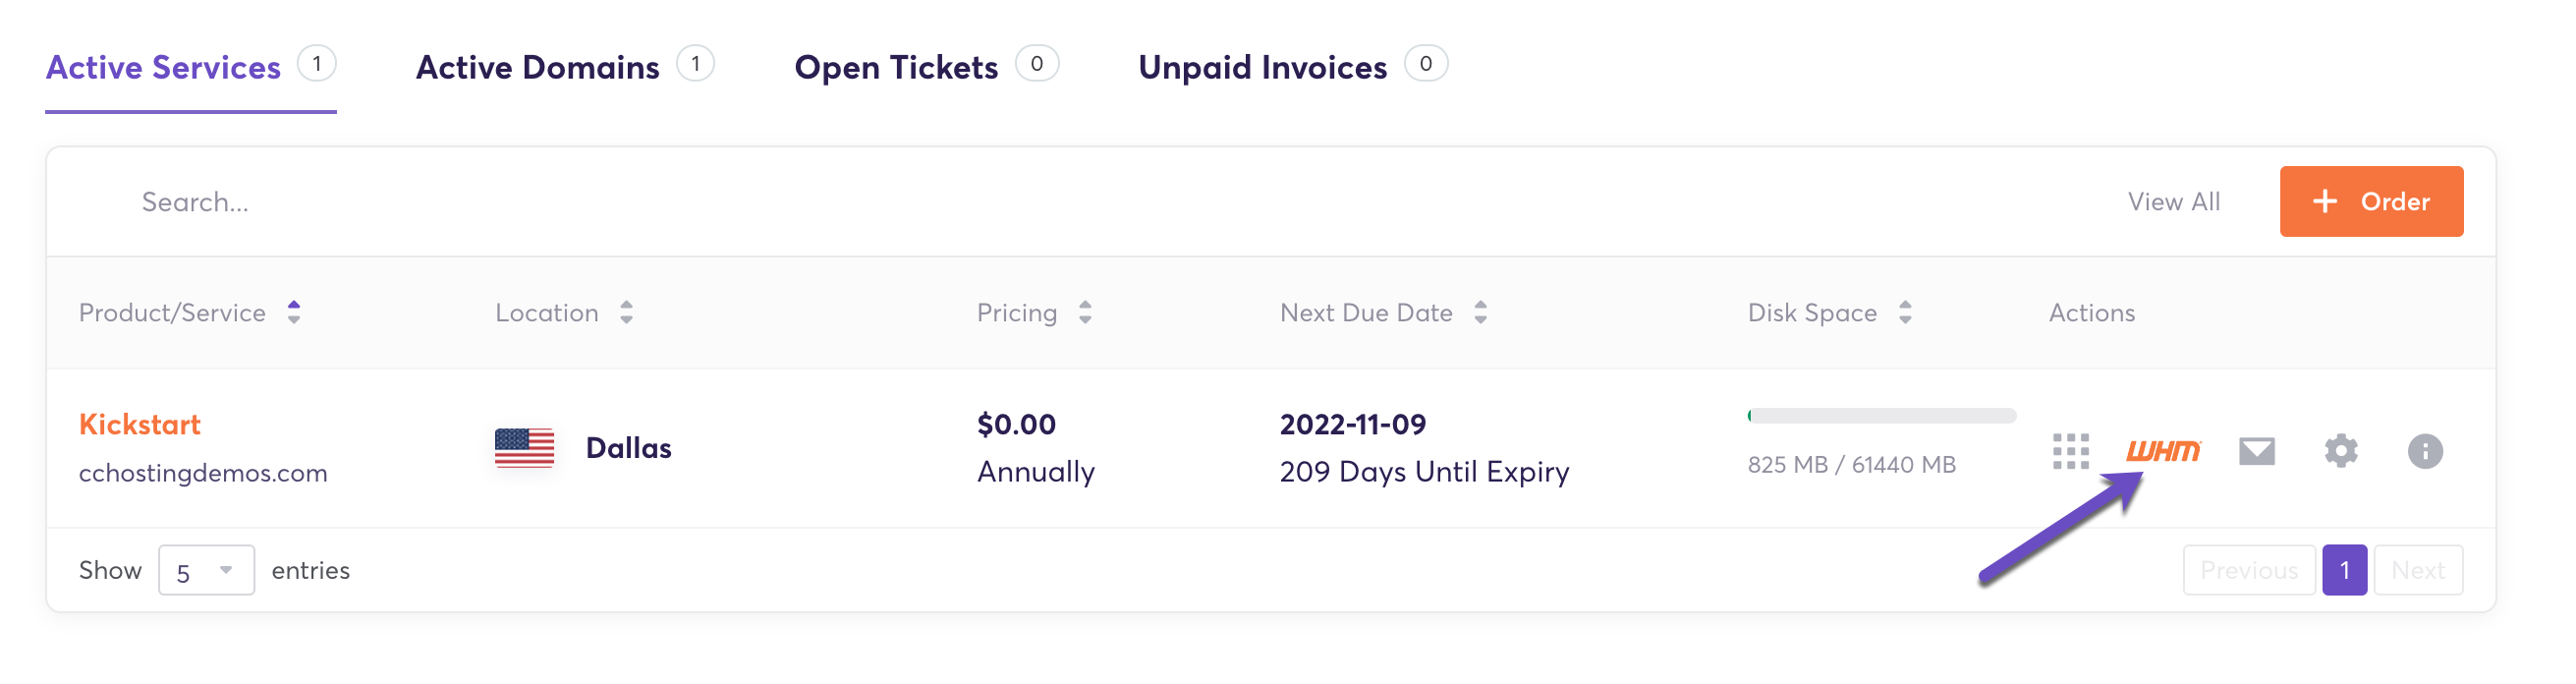
Step 2: Once you’ve logged in to your ChemiCloud Client Area, you will be presented with your Dashboard.
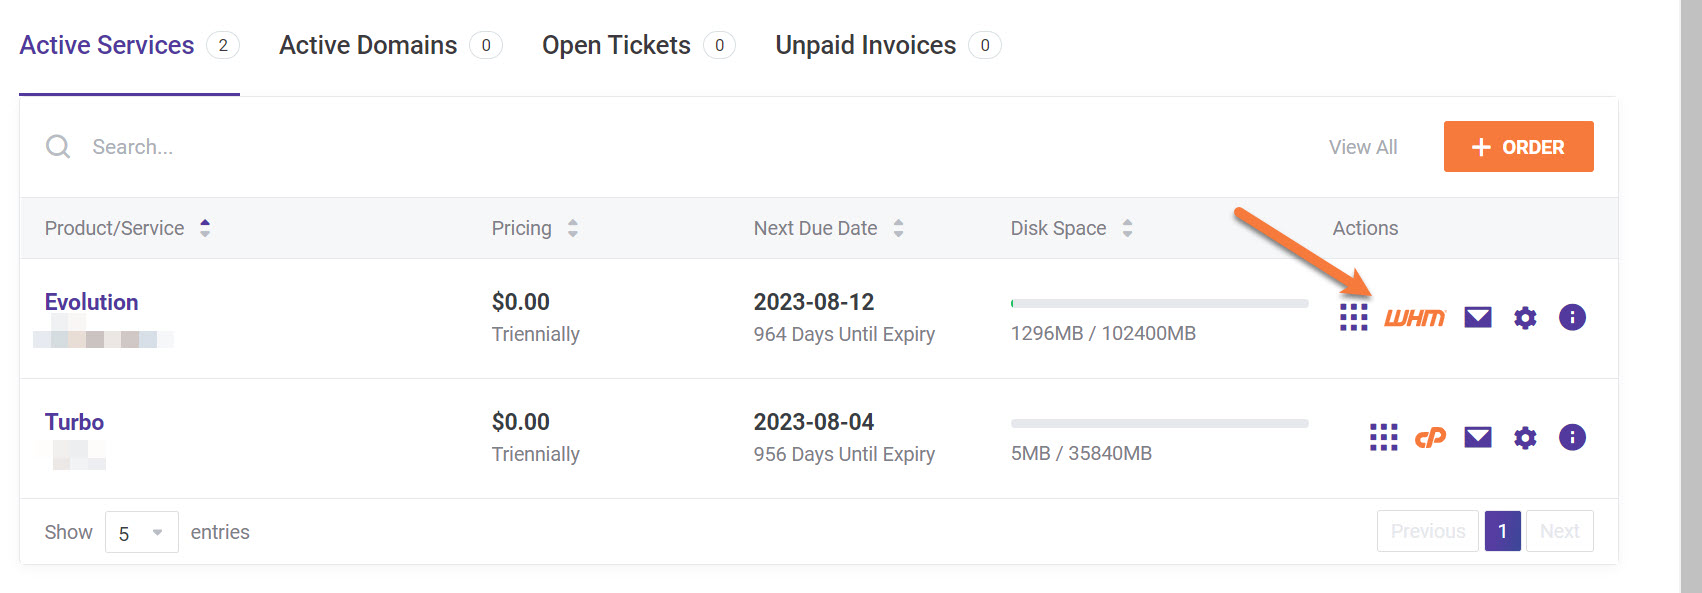
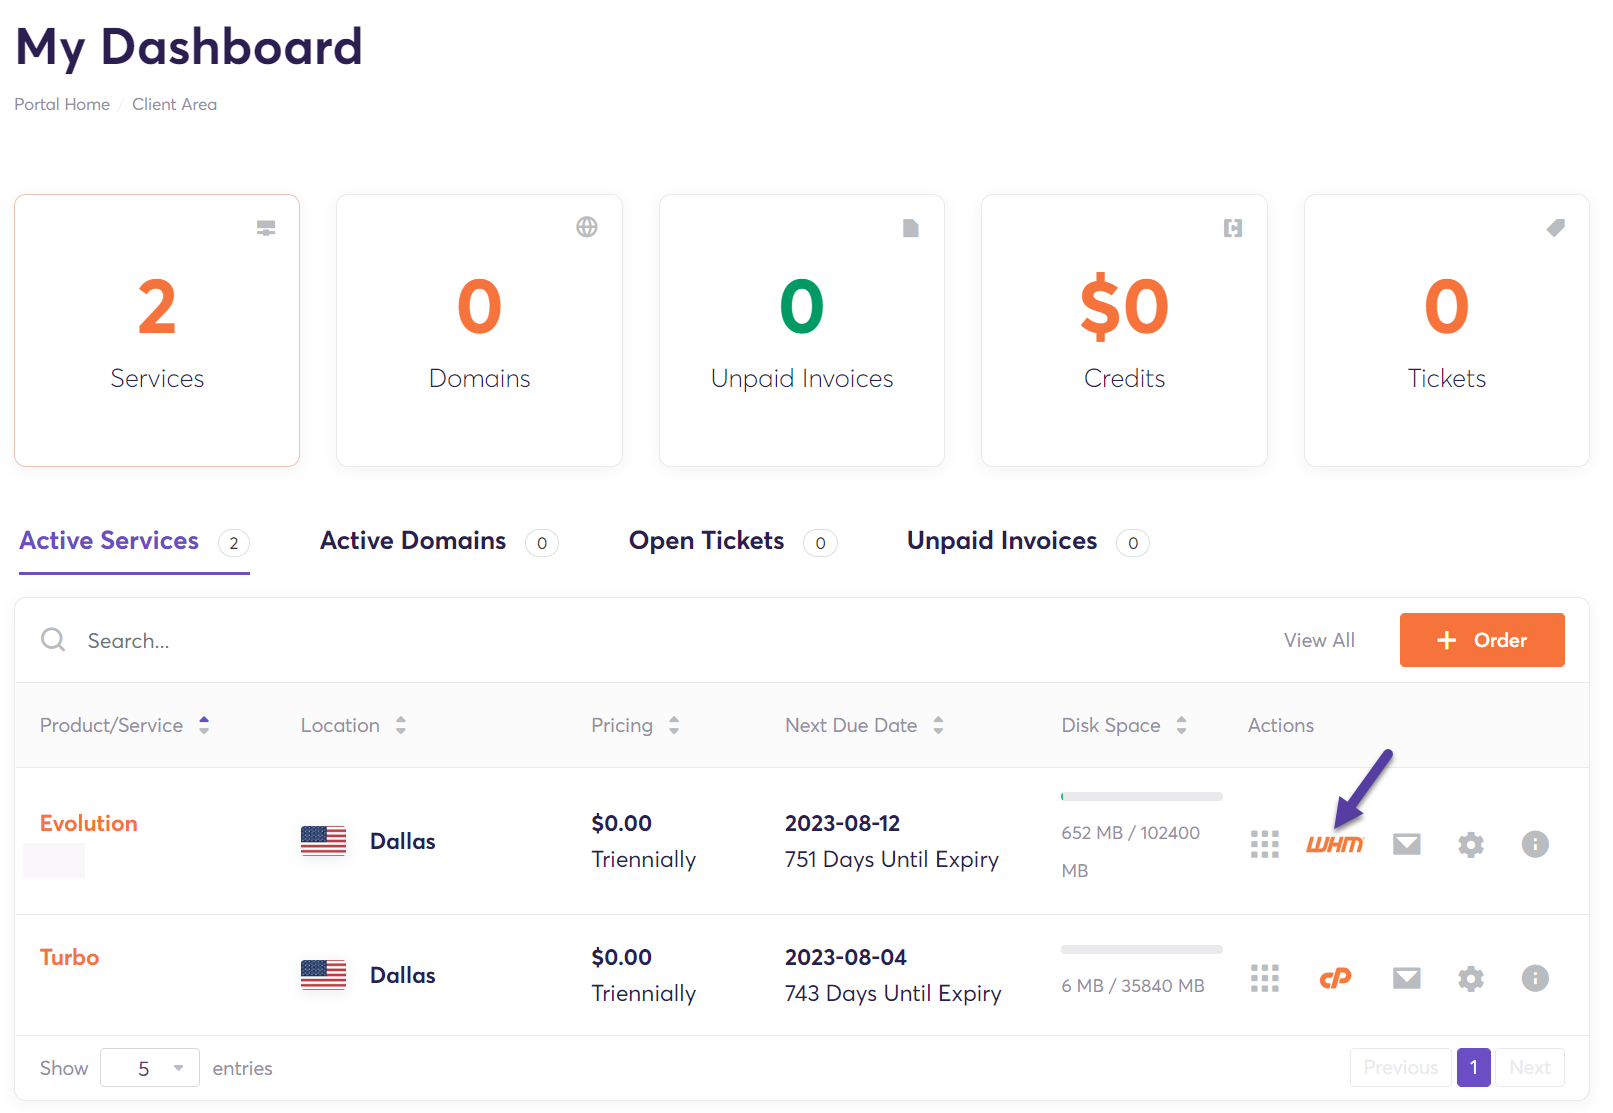 Click WHM next to your reseller account to open your WHM application.
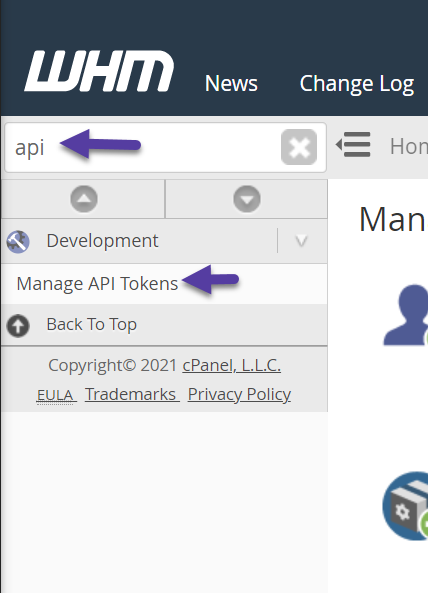
Step 3: Once WHM loads, use the search function located in the top left corner and search for API.
In the search results will be returned the option “Manage API Tokens”. Open this Utility.
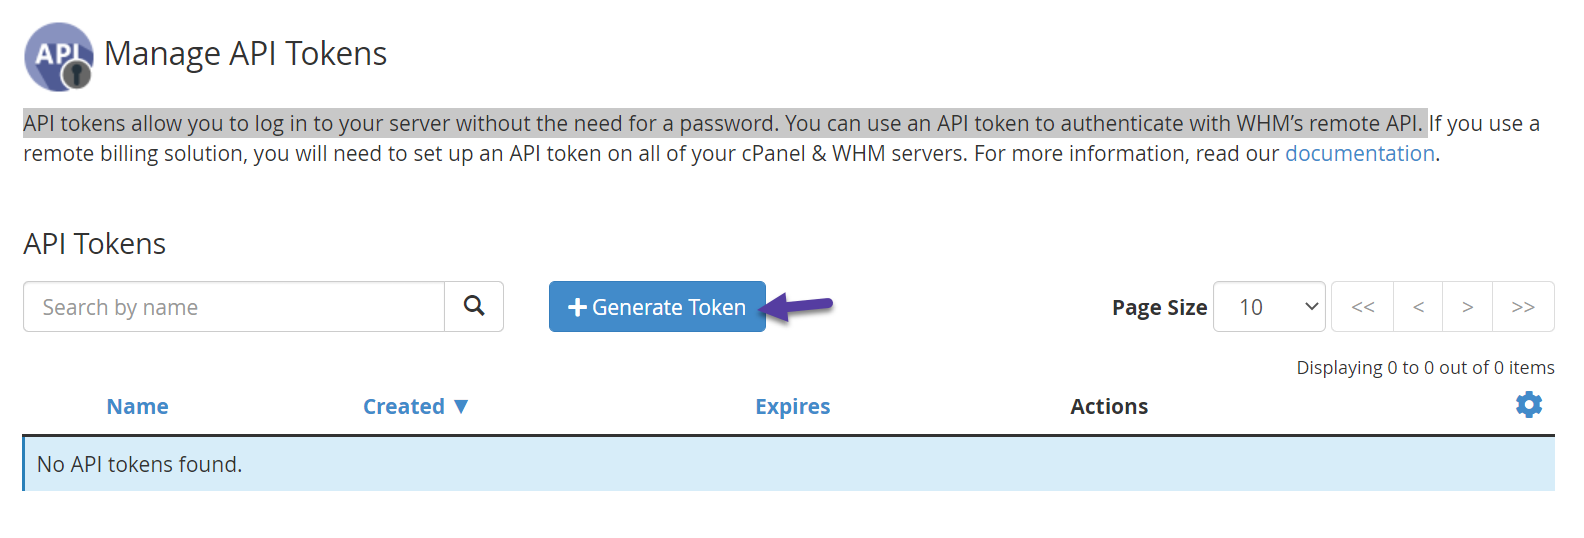
Step 4: Once the API Tokens area loads, you will be presented with a list of your API tokens. Unless you’ve created some previously, your default list should be empty.
To create a token, click the blue + Generate Token button.
 Step 5: You’ll need to fill in a few options on the Generate API Token page. Let’s review them:
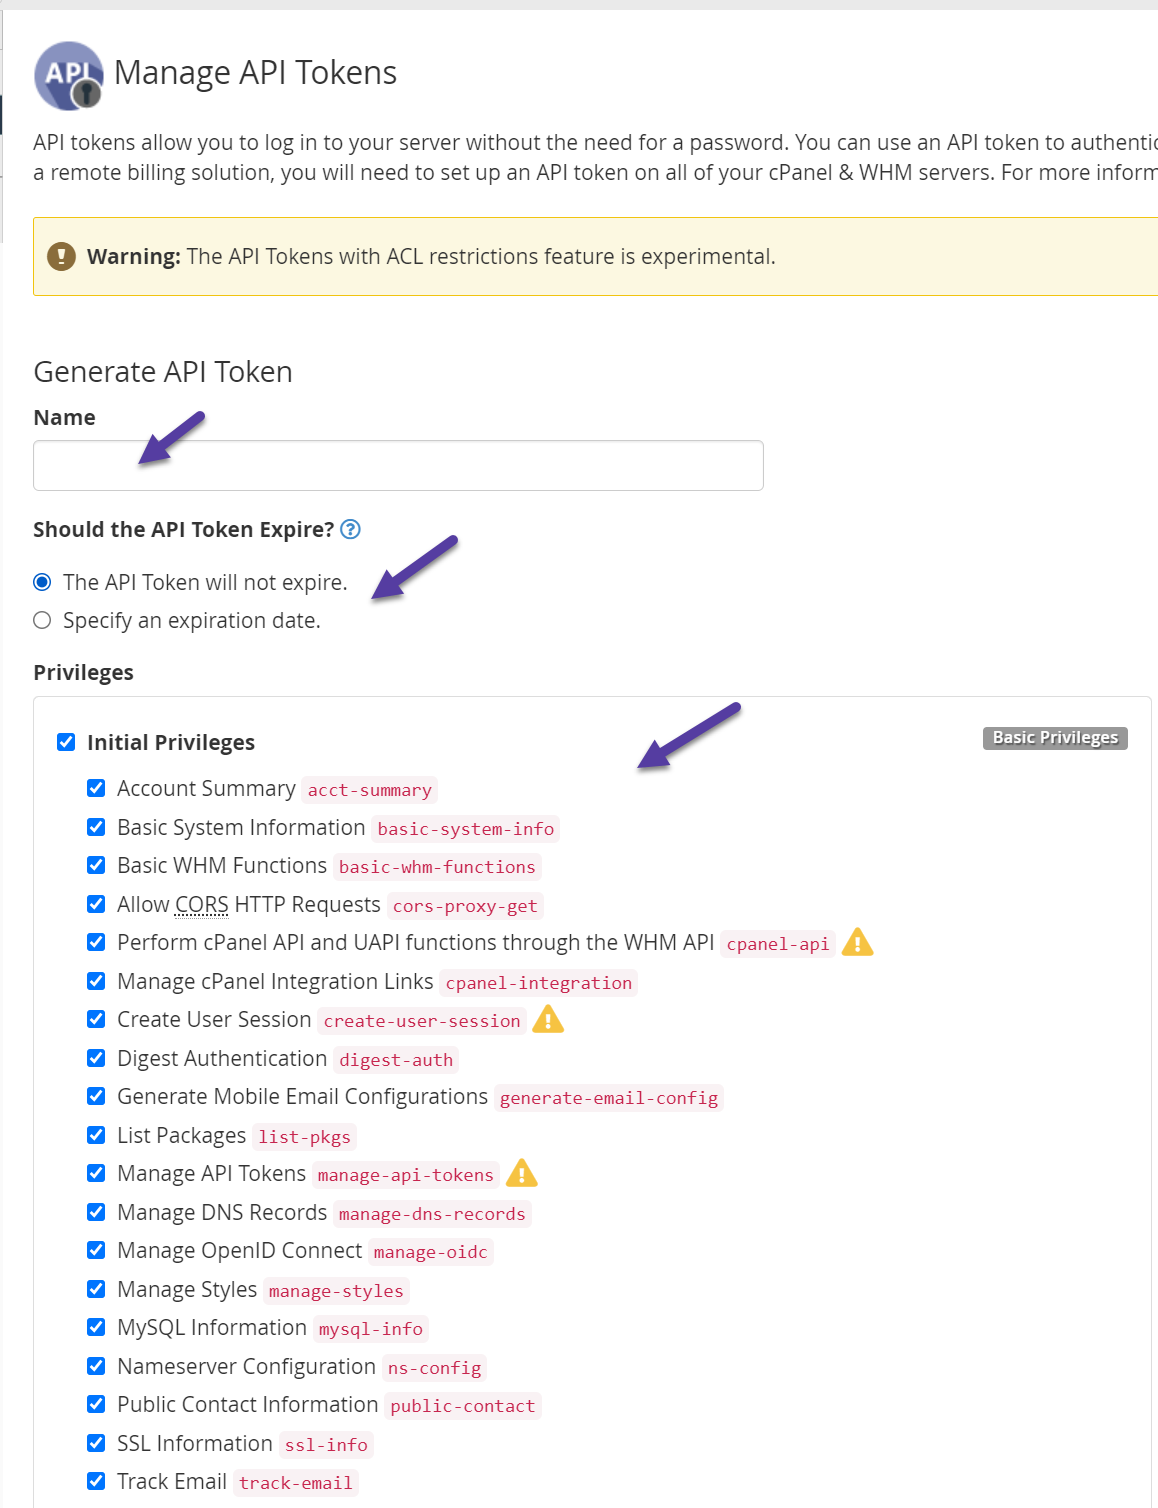 First you’ll need to give your Token a name.
- Second, you’ll need to specify if the API token should expire. For WHMCS, you should set the option “The API Token will not expire.”
- Third, you’ll need to check your Privileges. If you’re creating this token for WHMCS, you should check ALL of the Privileges because WHMCS needs all of them to function properly.
- Fourth, click Save at the bottom of the page to save your changes.
Step 6: The new token will be created and you will be given the token key:
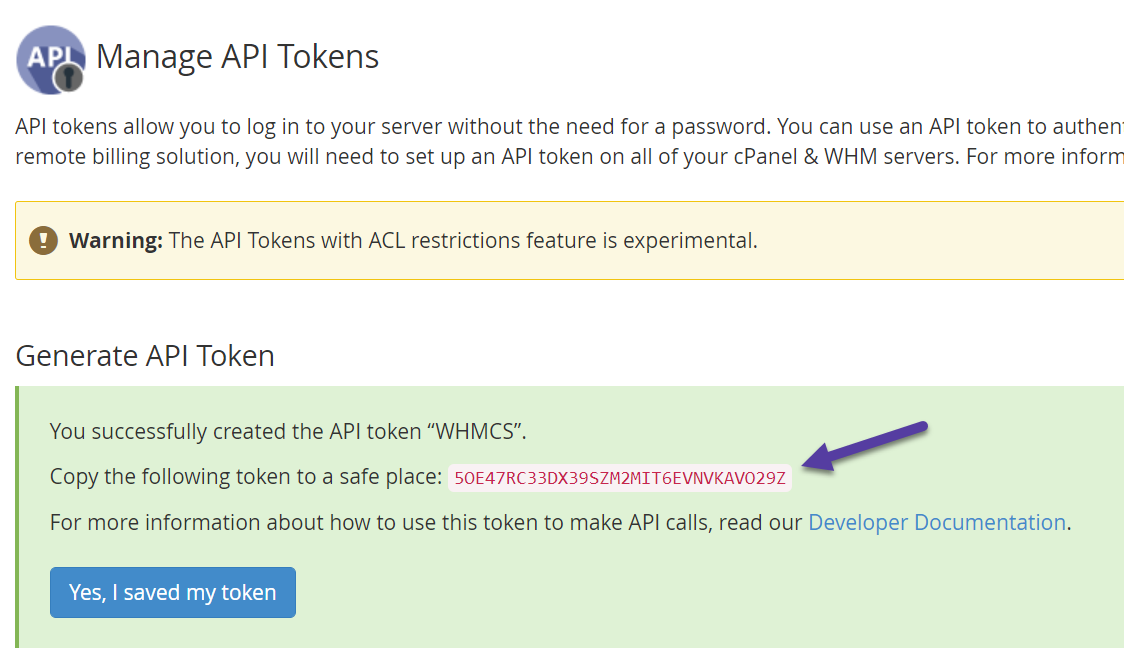
Copy this key to your clipboard or a notepad file to use in WHMCS > Add Server, or any other purpose.
If needed, you can make multiple WHM API Tokens.
And that’s how you create a new WHM API Token!
]]>Let’s begin!
How to Edit a WHM Package and Enable Shell Access
Step 1: Login to your Client Area and open your WHM:
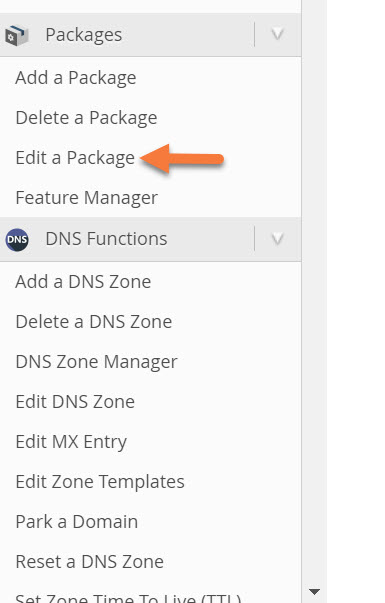
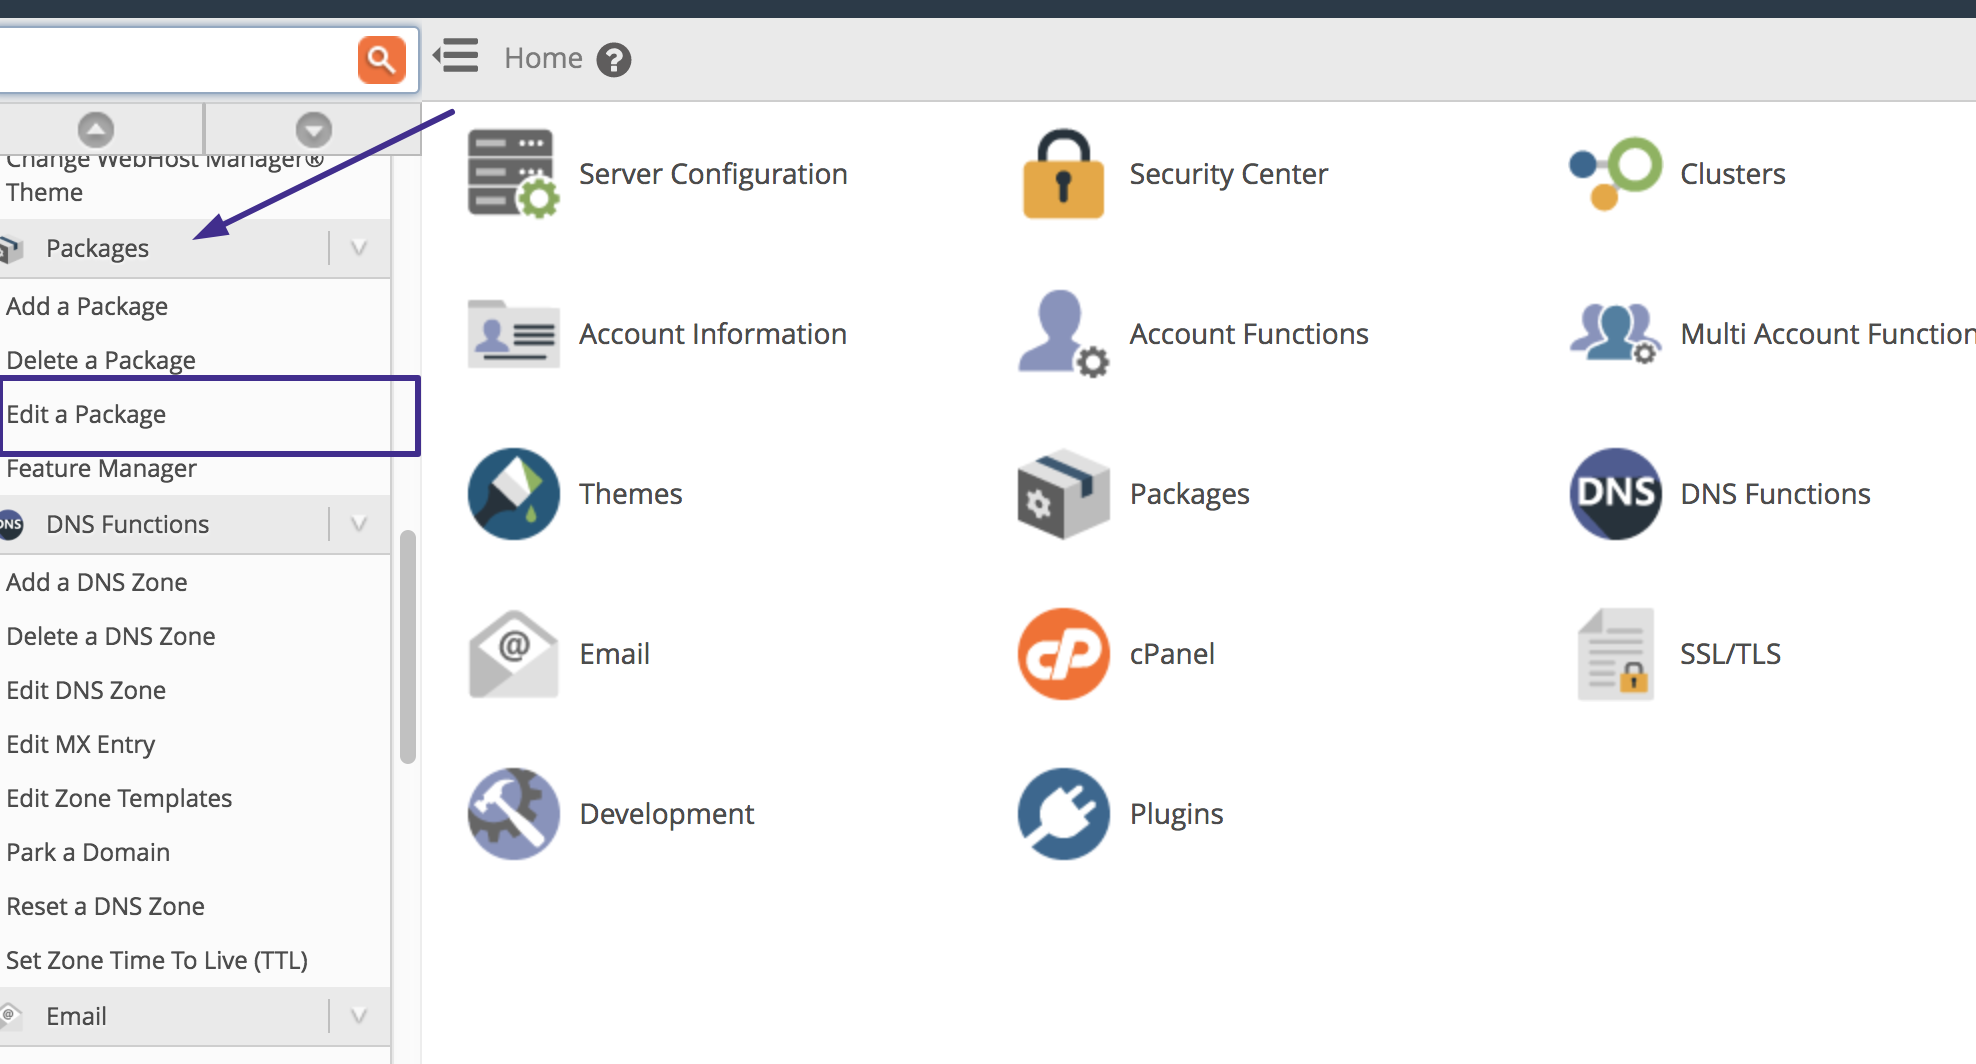
Step 2: On the left side where the various WHM options are, look for the Packages section and click Edit a package.
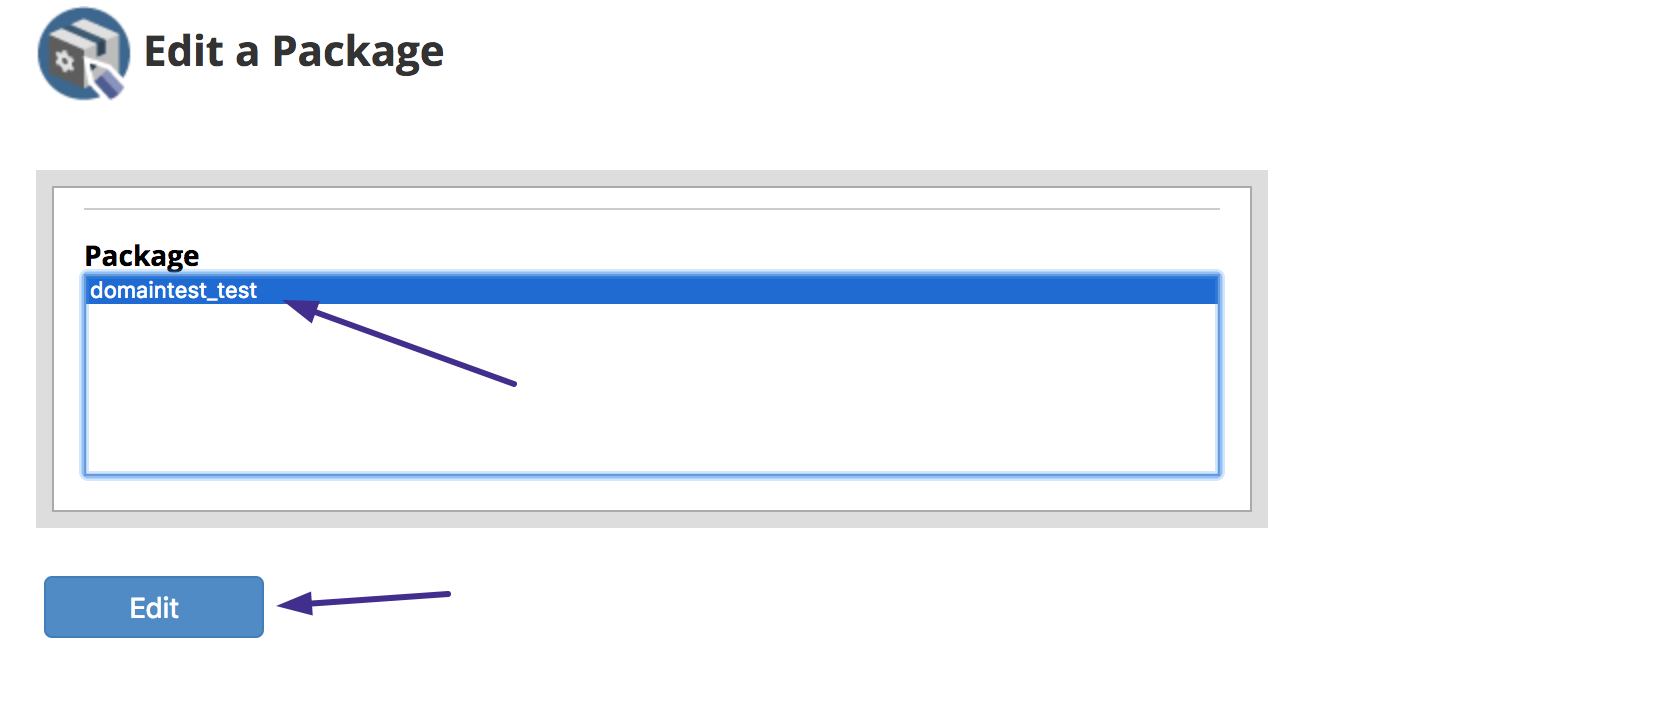
Step 3: You will need to select one of your packages, then click the Edit button.

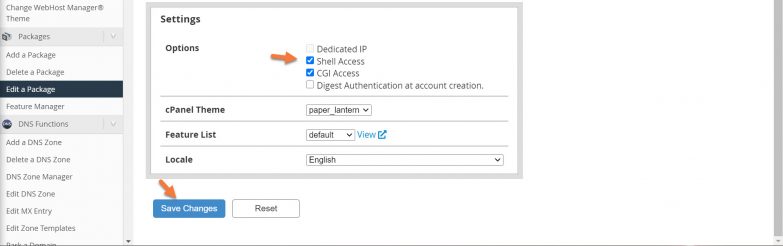
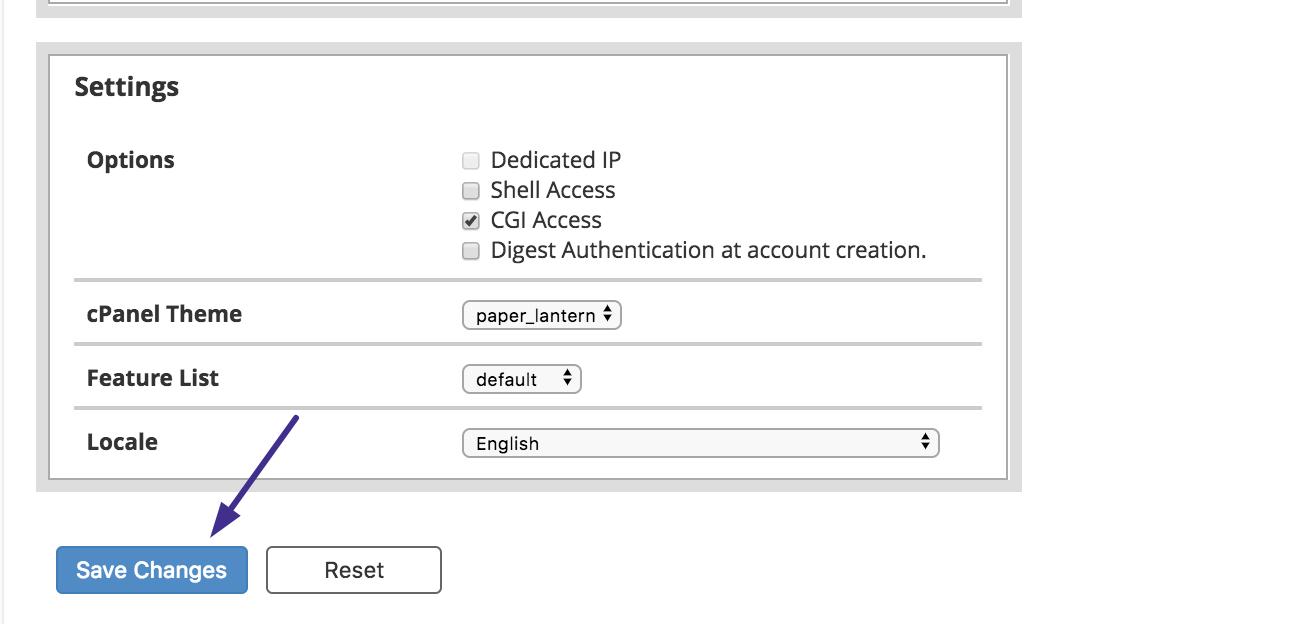
Step 4: Once the package editor has opened, scroll down and look for the Settings area. Then check the checkbox next to Shell Access to enable the feature.
Finally, click Save Changes to save the changes to the package.
And that’s how you edit a Package in your WHM to enable Shell Access. Now your users should be able to connect to their accounts via SSH.
]]>Step 1: Login to your WHM. This can be done a variety of ways, but the sure fire easiest way is to login to Client Area, then click WHM.
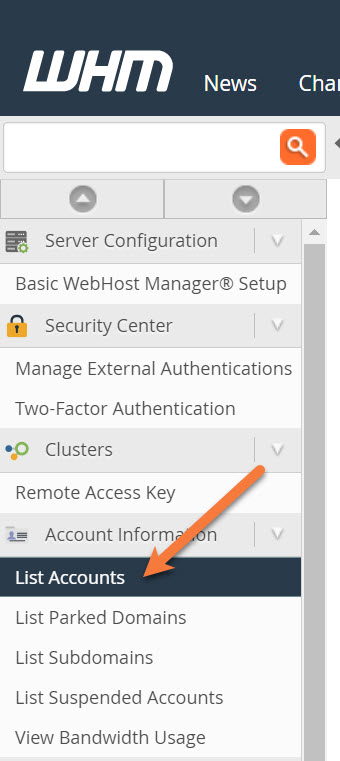
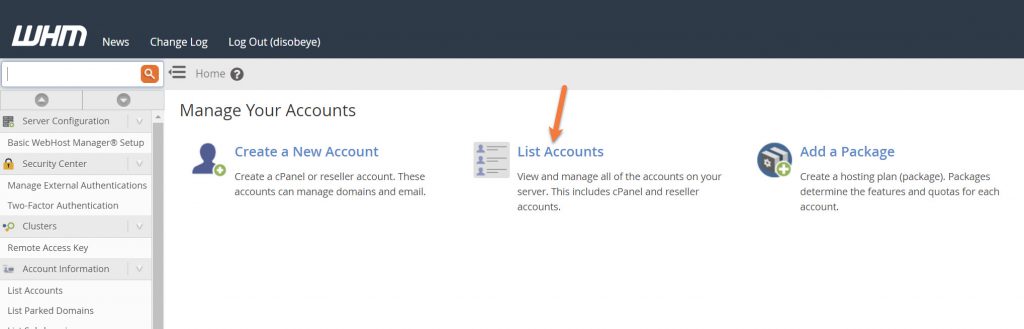
Step 2: On the left side of WHM, beneath Account Information, click List Accounts to show all of your cPanel accounts.
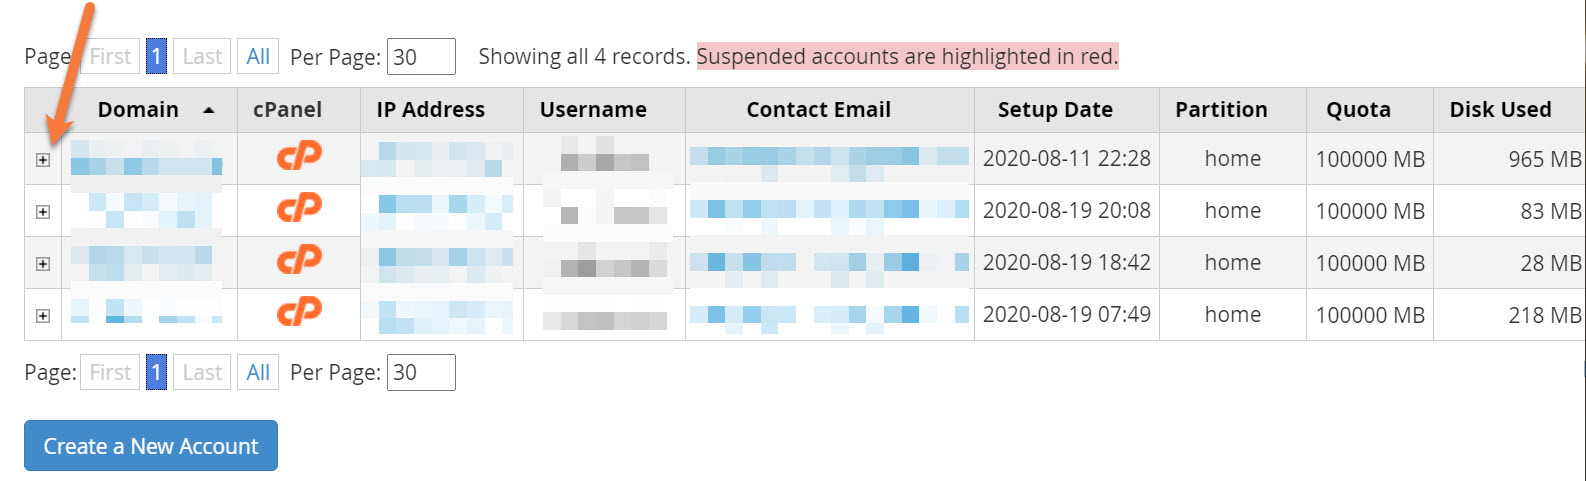
Step 3: Click the + icon to the left of account for which you need to change the password.
Step 4: In the area that expands beneath the account you’ve selected, enter your new password in the Change Password field, then click the blue Change button to change the cPanel password.
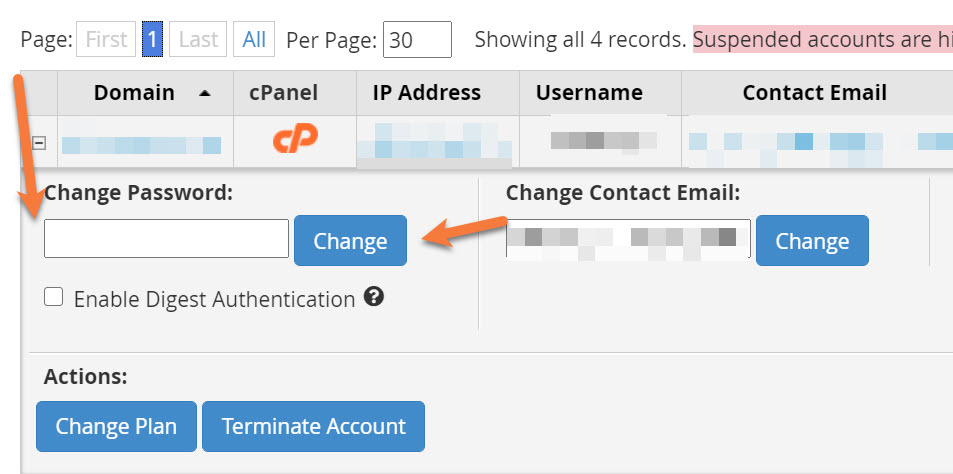
That’s it! Now the password for that users cPanel account has been changed. You can communicate the new password to that user using your preferred medium.
Tired of hassling with hosting management? ChemiCloud is the managed hosting solution designed to save you time and money!  Check out our reseller hosting plans!
Step 1: The first step is to login to WHM.
While there are a number of ways to login to WHM, the sure-fire easiest way is to access WHM by logging into your Client Area.
Step 2: Once you’ve logged in to WHM, click List Accounts.
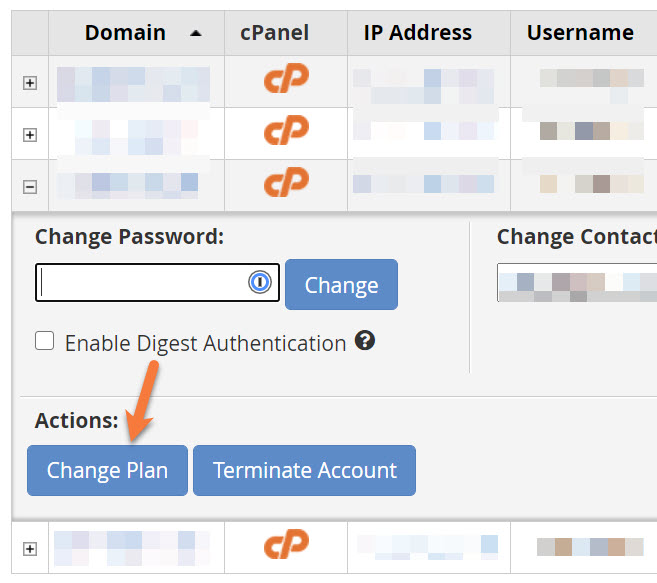
Step 3: In the accounts list, find the account or domain for which you would like to modify the bandwidth, then click the + to the left of the domain name to expand the administrative sections area.

Step 4: Underneath Actions, click the blue Change Plan button.
Step 5: You will be taken to the Packages area of WHM, where you will be able to choose a different package for this account.
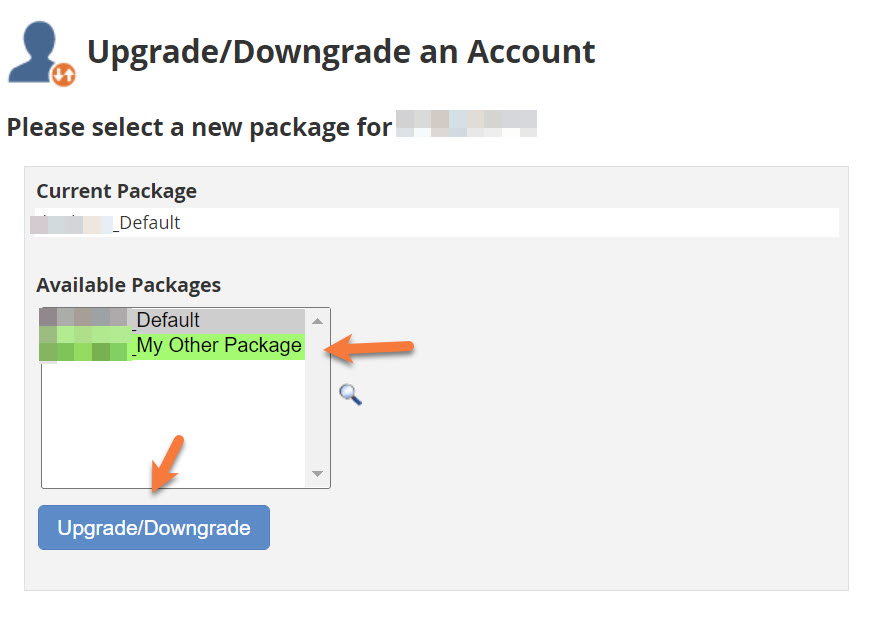 The currently assigned package will be highlighted in grey, while available packages you can assign to this account will be highlighted in green.
Tired of hassling with hosting management? ChemiCloud is the managed hosting solution designed to save you time and money! Check out our reseller hosting plans!
Select another package from the list of Available Packages, then click the blue Upgrade/Downgrade button to complete the change.
Step 6: After clicking the blue Upgrade/Downgrade button, you will see a confirmation screen that looks similar to the one below, confirming your changes.
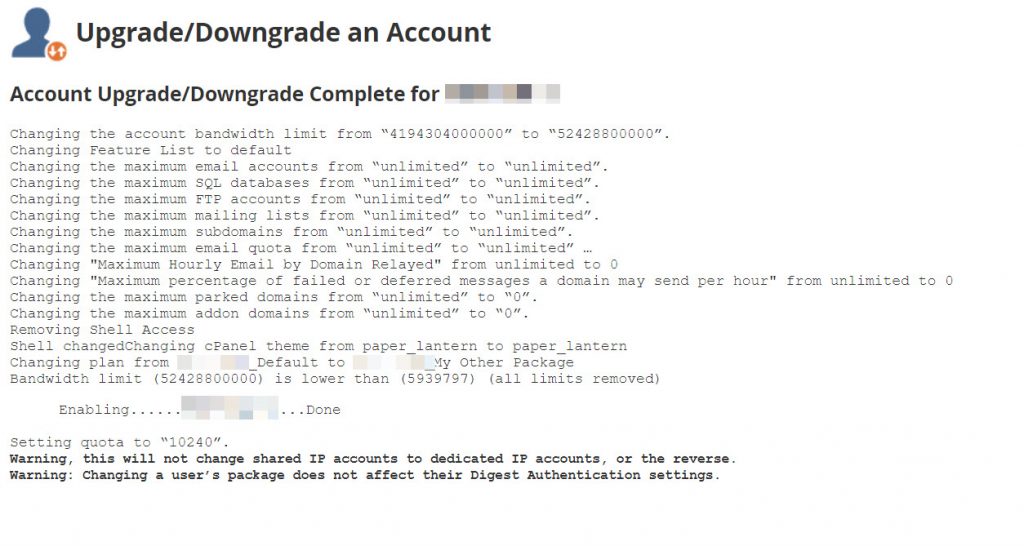
And that’s it! Now you know how to change the bandwidth for an account in your WHM by changing the package it has been assigned!
We hope this was helpful! If you have any questions, feel free to leave a comment, open a ticket from your Client Area, or hit us up on Live Chat 24×7.
]]>In most cases, there is already a default Feature List when packages are made.
In this tutorial, you will need access to your WHM and we will teach you the things that you can do with the Feature Manager.
How to Manage Feature Lists in WHM
1) Log in to WHM.
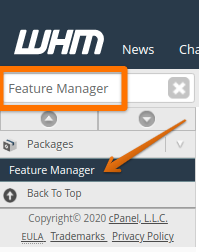
2) You can quickly locate “Feature Manager” by using the search bar located at the top right corner Type Feature Manager into the search and select it from the menu below the search, as seen below.
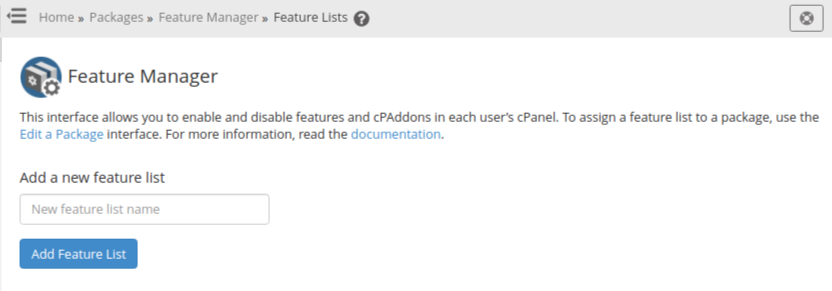
3) Once the Feature Manager interface opens, you will be given the option to create a new feature list or manage existing feature lists.
How to add a Feature List
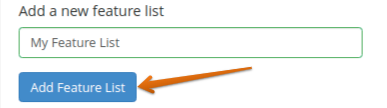
1) To add a Feature List, you need to give it a name under “Add a new feature list”, then click the blue Add Feature List button.
2) On the next screen, you will be able to choose the features enabled for the new feature list. You can also choose individual options, as needed, or click the “Select all features” box to enable all of them quickly.
3) Once you’re done, scroll to the bottom and click “Save”. The screen will return to the initial interface of the Feature Manager and a success message will appear.
How to edit a Feature List
1) Choose the Feature List you’d like to edit from the “Manage Feature List” section.
You can click the drop-down arrow to see the full list. Click “Edit” to begin making changes.
2) On the next screen, you will be able to enable or disable the features for the respective Feature List.
3) Once you’re done, you can scroll to the bottom and click “Save”. The screen will return to the initial Feature Manager menu and a success message will appear.
How to delete a Feature List
1) Choose the Feature List you’d like to delete from the “Manage Feature List” section.
You can click the drop-down arrow to see the full list. Click “Delete” to delete the list.
2) A success message will appear that the feature list is now deleted.
If you’d like more information on feature lists, cPanel has documentation that can be found here.
That’s a wrap! Now you know how to manage a feature list in WHM.
]]>How to login to WHM from your Client Area
This option will allow you to access your WHM directly from your client area (Client Area) without using a username and password.
To access your WHM account from your Client Area, please follow the steps below:
1. Go to chemicloud.com/login and log in to your account.
2. While you are in your Client Area Dashboard, click on the WHM button located on the right side, and you’ll automatically be logged in without needing a username and password.
That’s it! This action will log you into WHM automatically.
How to login to WHM using your Domain Name
This option will allow you to access WHM directly from your web browser, and by using a username and password.
If you are an existing ChemiCloud customer and have your domain DNS pointing to our servers, you can access the cPanel via your domain name.
1. Navigate to the following location in your browser: http://yourdomain.com/whm
Your login screen should look like this:
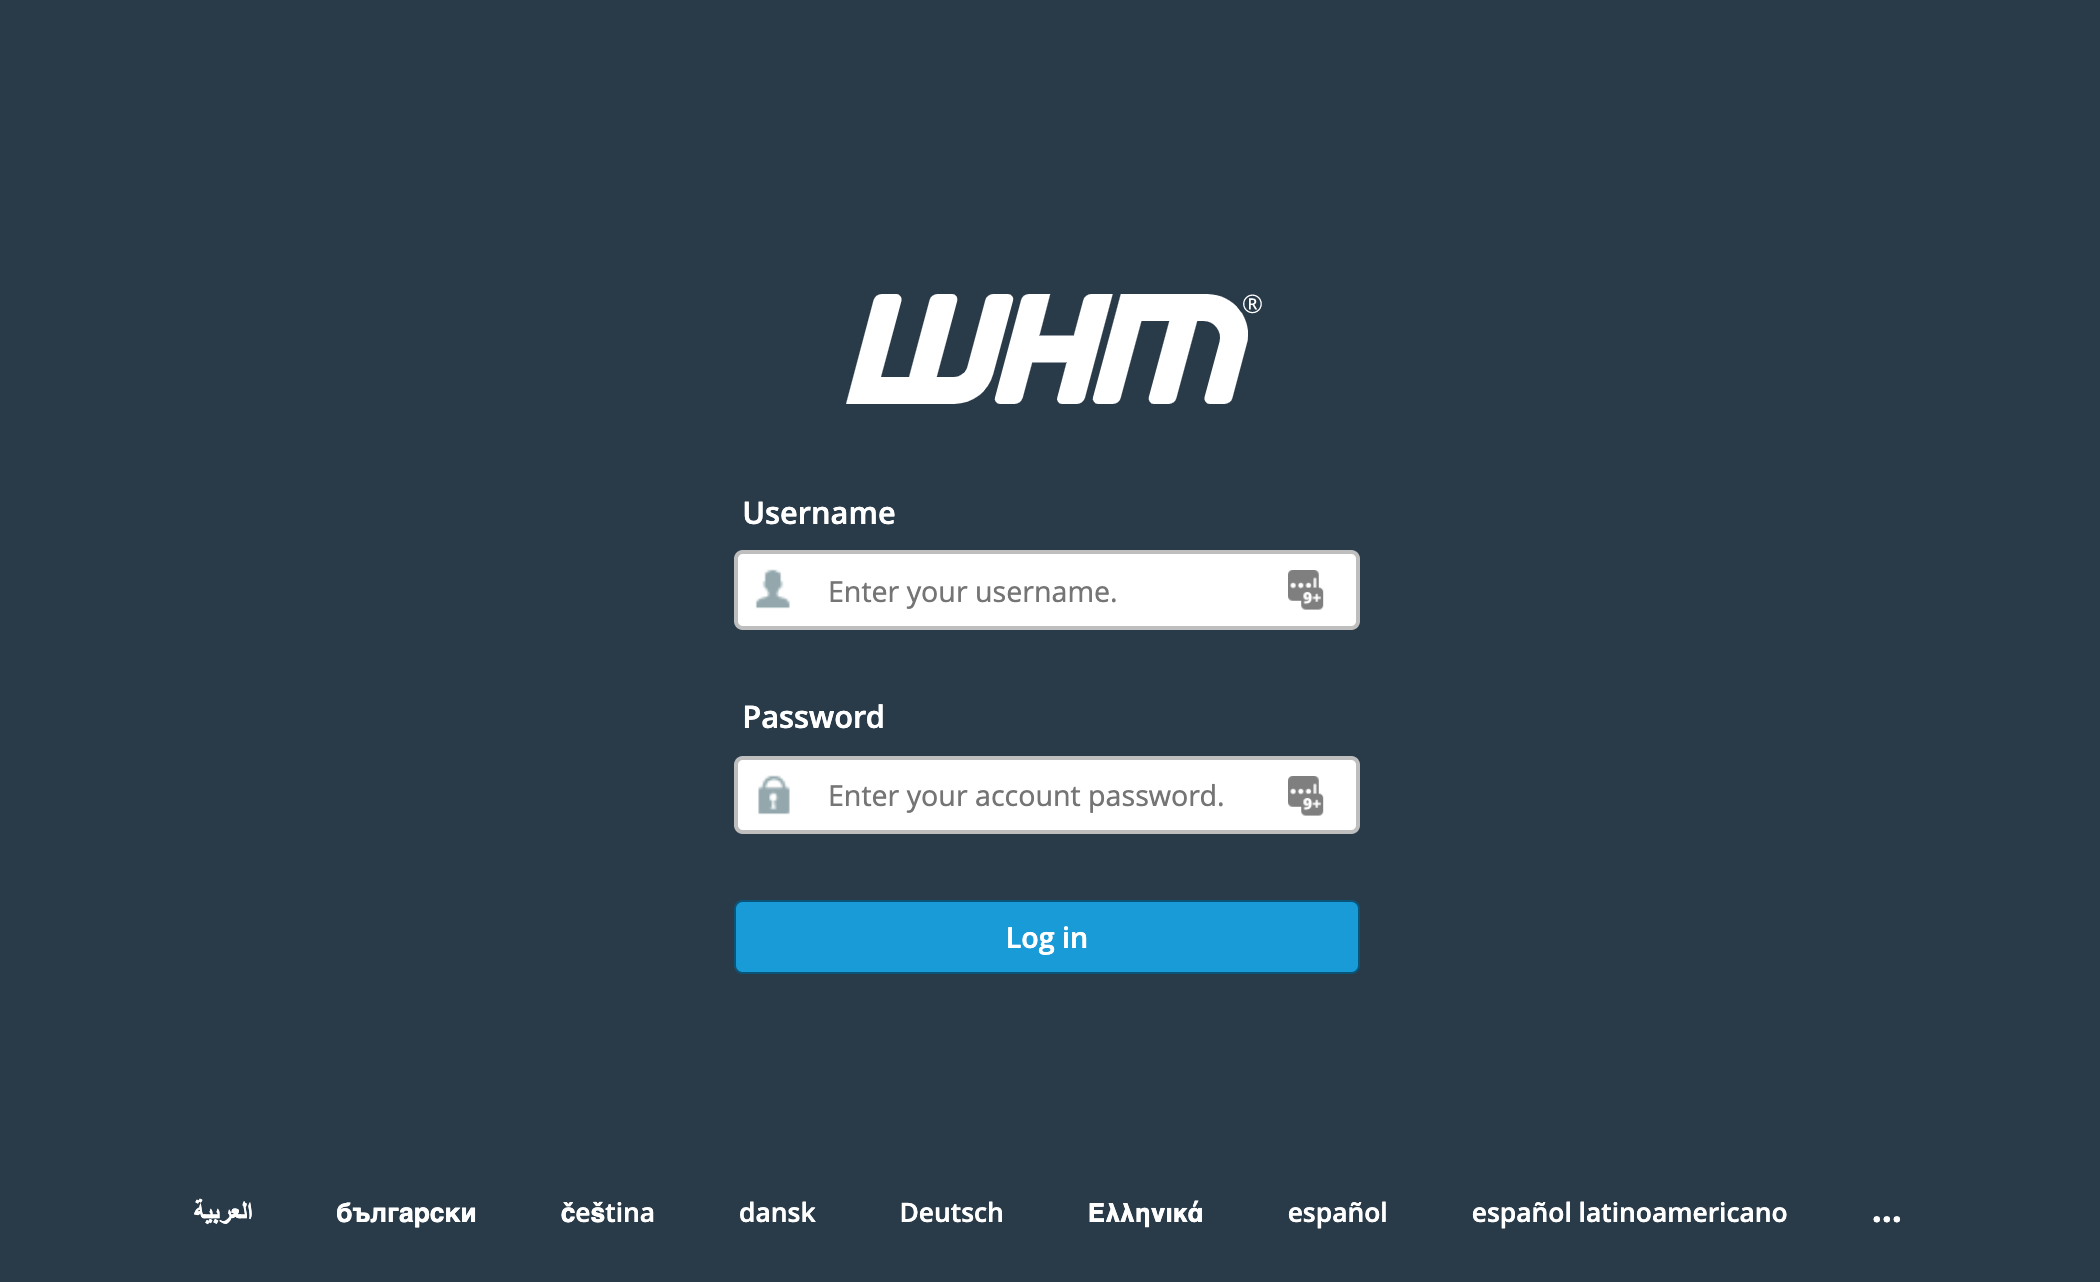
2. Enter your main cPanel username in the Username text box. Then enter your password in the Password text box.
3. Click Log in.
How to login to WHM using your Server’s IP address
If you do not yet have your domain DNS pointing to our servers, you can still access WHM using the IP address that was provided in your welcome email.
- http://YOUR.SERVER.IP/whm
Once you’ve navigated to the cPanel page, you should able to log in!
Troubleshooting WHM access issues
- Your login user or password doesn’t work.
Solution: contact our Support team to reset your cPanel account password.
- I get a 404 error or blank page when I type: http://www.mydomain.com/whm
This may happen if you just changed your DNS Name Servers, wait a few hours until your domain fully propagates across the world.
You can also try to login using the server IP, as you see below:
http://YOUR.SERVER.IP/whm
- The Login Page Fails to Load
There are two possible causes for this:
- Your local office or network administrator may be blocking port 2086 or 2087: You will need to troubleshoot your network connection to allow the use of this port, or point your domain to our server and connect using http://whm.yourdomain.com, which works over port 80.
- You may be being blocked by our firewall: This generally occurs when a number of failed login attempts occur in a row. If you were accessing the panel and are no longer able to do, this is the likely reason.
If you’re not feeling comfortable using the command line interface, we recommend you to do it manually in WHM.
To do so, navigate to Account Information >> List Accounts area. Here you will see all the accounts listed. Then click on the ‘+’ sign in front of the username then change the contact email for the account(s) that you want.
In case you prefer doing it for a single or few accounts from the command line, you can use:
cpapi2 --user=user CustInfo savecontactinfo [email protected]
How to Bulk Update/Change Contact Email for accounts in WHM
The contact email address for each cPanel account is stored in two different files:
- /var/cpanel/users/user
- /home/user/.contactemail
Let’s say that you need to change an existing contact email: [email protected] and to replace it for all the cPanel accounts with [email protected].
Tired of hassling with hosting management? ChemiCloud is the managed hosting solution designed to save you time and money! Check out our web hosting plans!
While you are in your terminal, connected to your server, browse to /var/cpanel/users/:
cd /var/cpanel/users/
And do a grep for “[email protected]” in each file:
grep -irl "[email protected]" .
It will start listing the files that have a match for the search term. E.g:
./user1
./user2
./user3
Now you will have to create a text file in /var/cpanel/users/ e.g: users.txt and to add the results of your search using grep command.
Next, we’ll use sed to replace all the instances matching [email protected] with [email protected]. The command line is:
for i in $(cat users.txt); do sed -i 's/[email protected]/[email protected]/g' $i; done
The same steps will need to be applied to do the bulk change of the email stored in /home/user/.contactemail.
]]>To change the cPanel package for an account, just follow the instructions posted in this tutorial, just make sure that the new plan has a higher Bandwidth limit set then the current plan.
If you wish to keep the current plan and just update the bandwidth limit for it, please follow the steps in this article.
]]>You can easily make these changes from WHM by following these steps:
1) Log into WHM
2) Scroll down and click on the Edit a Package button located under the Package section.
3) Select the package you want to edit and click on the Edit button.
4) In the next screen, you can edit the Resources and Settings assigned to this package
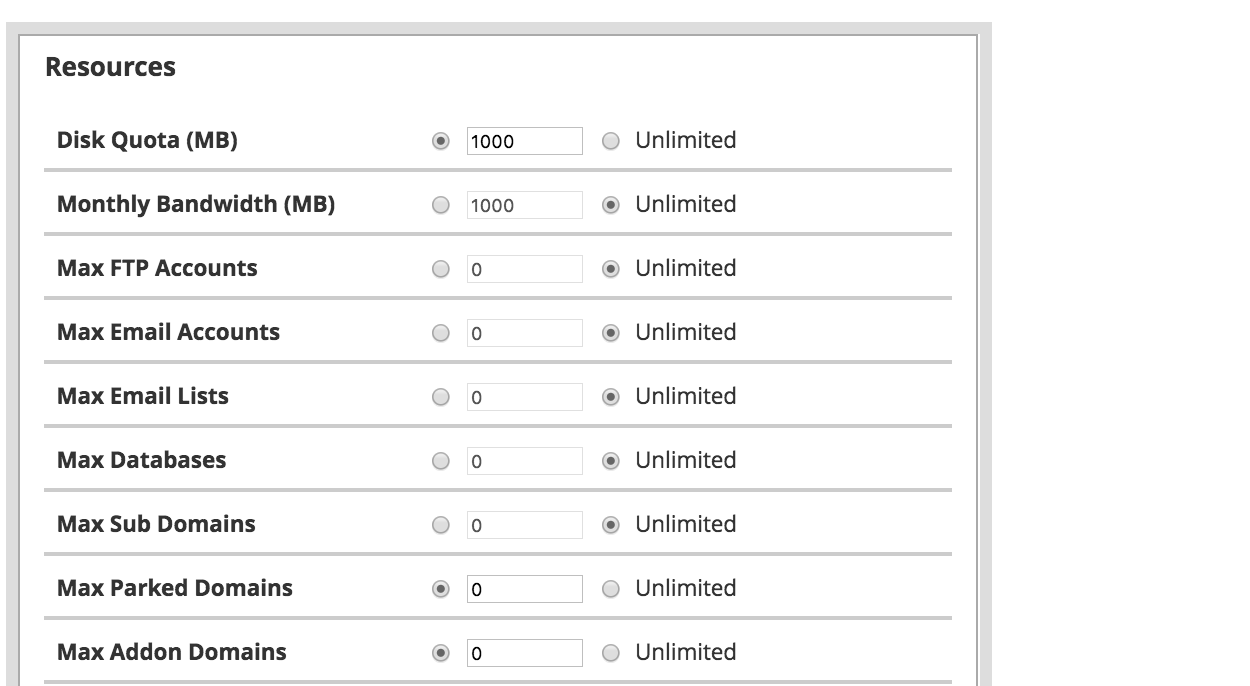
5) After you make the necessary changes, just click on the Save Changes buttons to apply the new values for this package.
These new values will be applied to all cPanel accounts that use this cPanel package.
That’s it! Now you know how to customize the hosting packages you can offer inside WHM.
]]>You can easily remove a hosting account from your reseller plan which you no longer need or use from WHM by following these steps:
2) Scroll down and click on the Terminate Accounts button located under the Account Functions section.
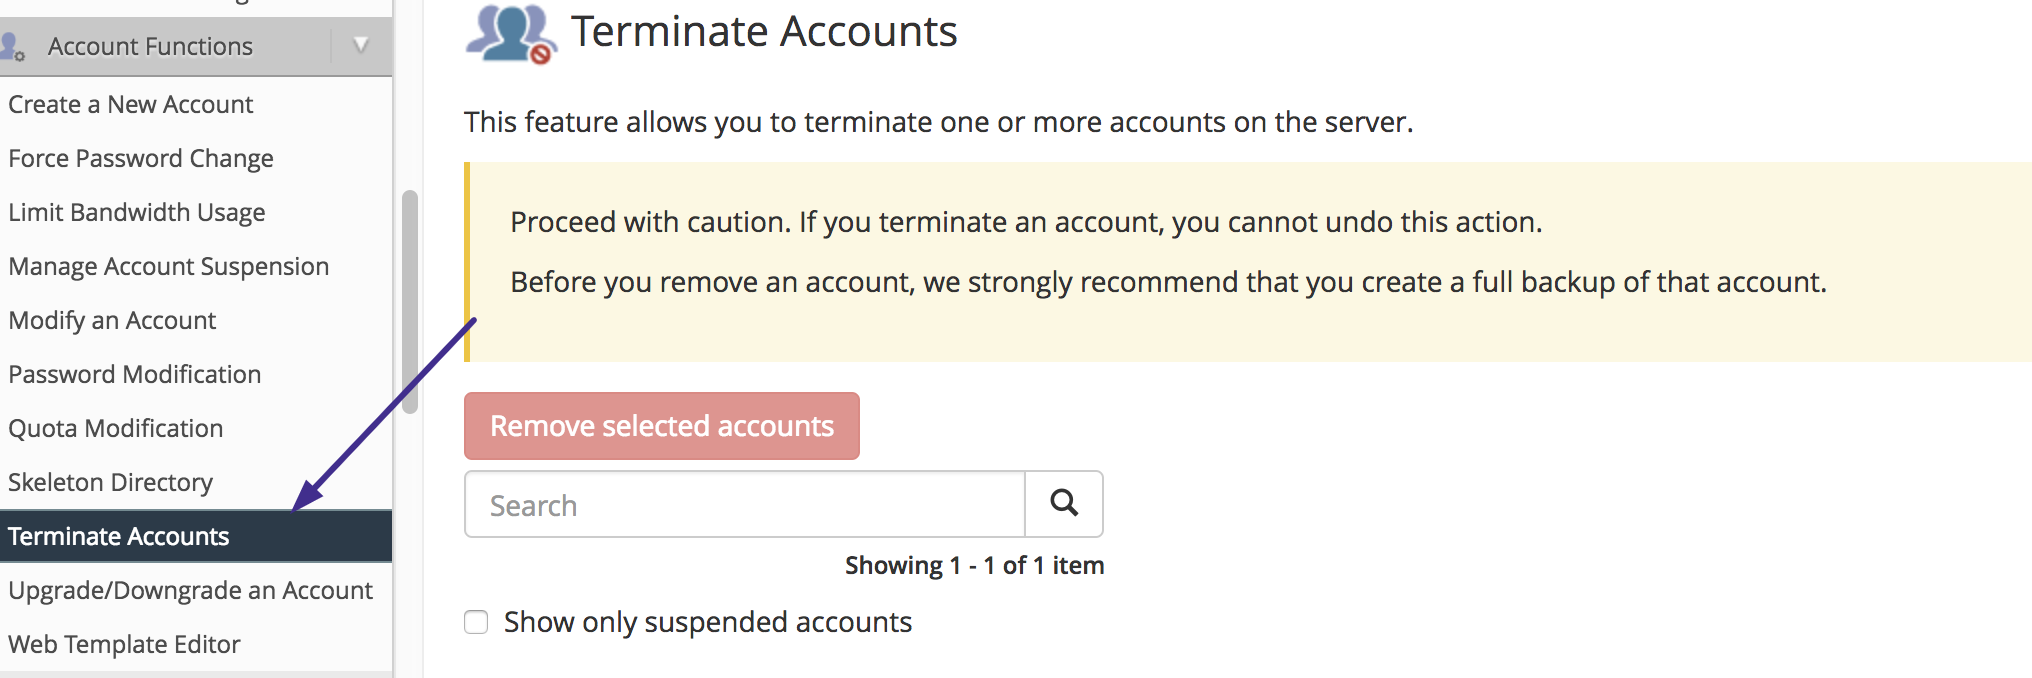
3) Select one or multiple accounts by clicking on the checkbox located in front of the username.
You can use the search function to find the account by using either the domain name or the username of the account.
If you’d like to keep the account’s DNS Zone, check the box for this option.
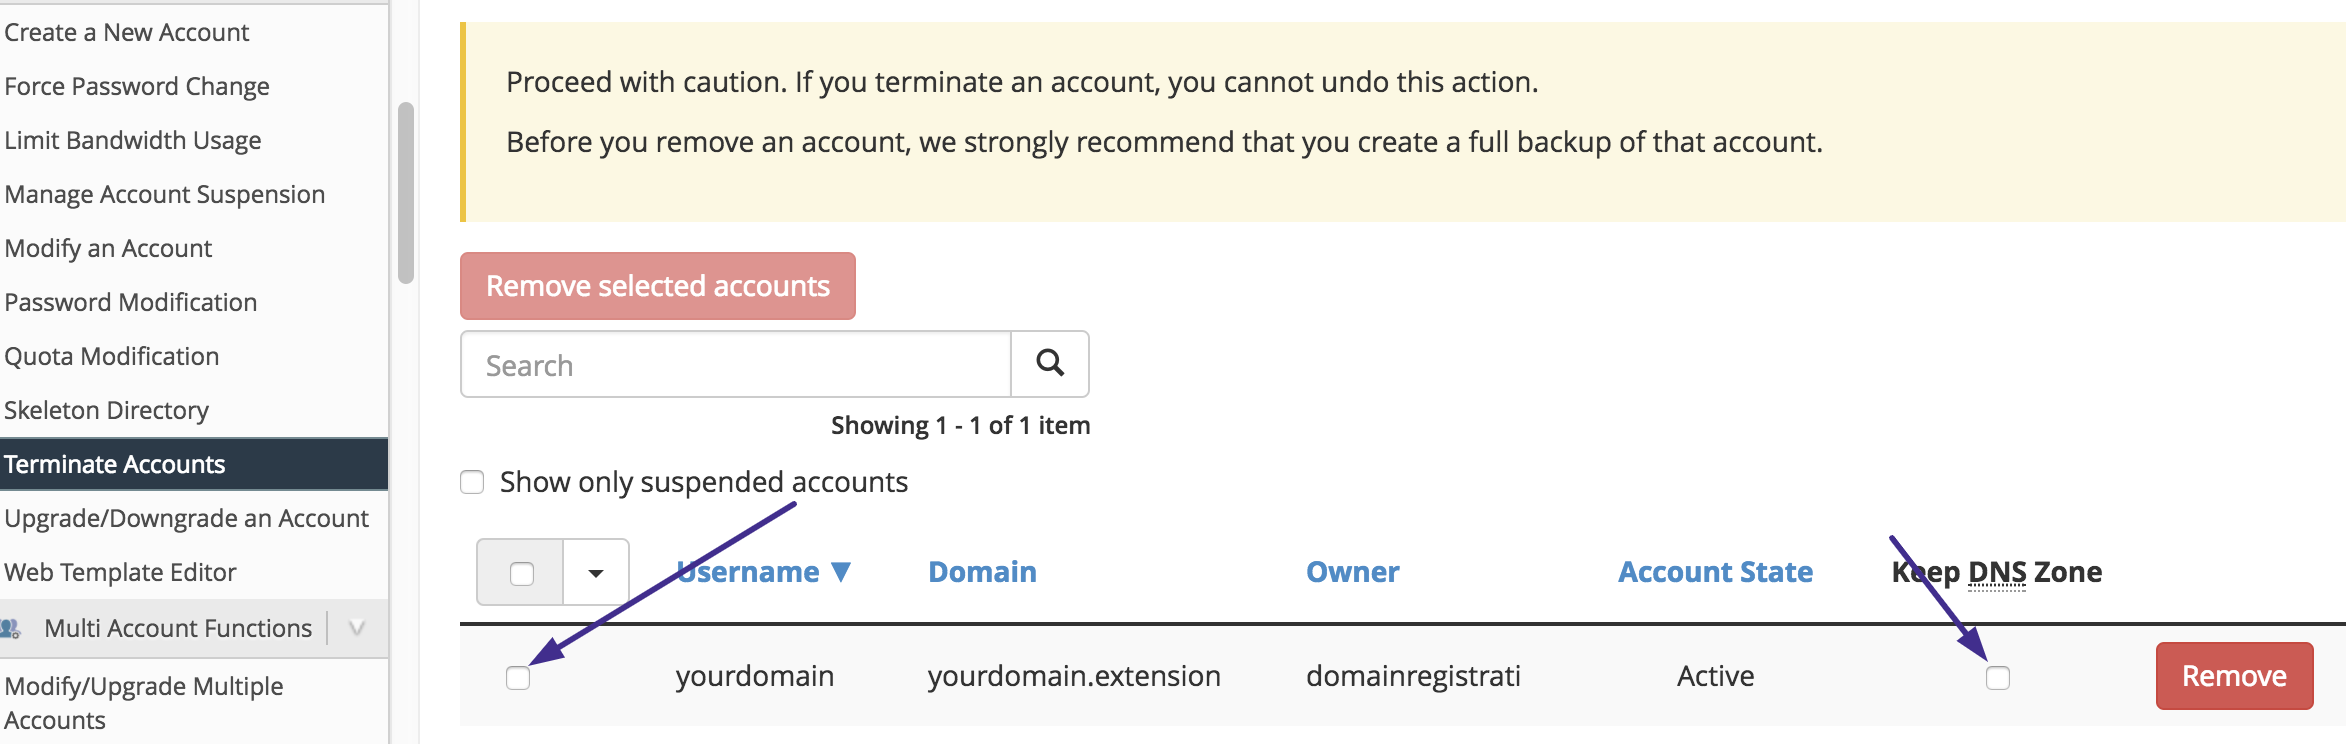
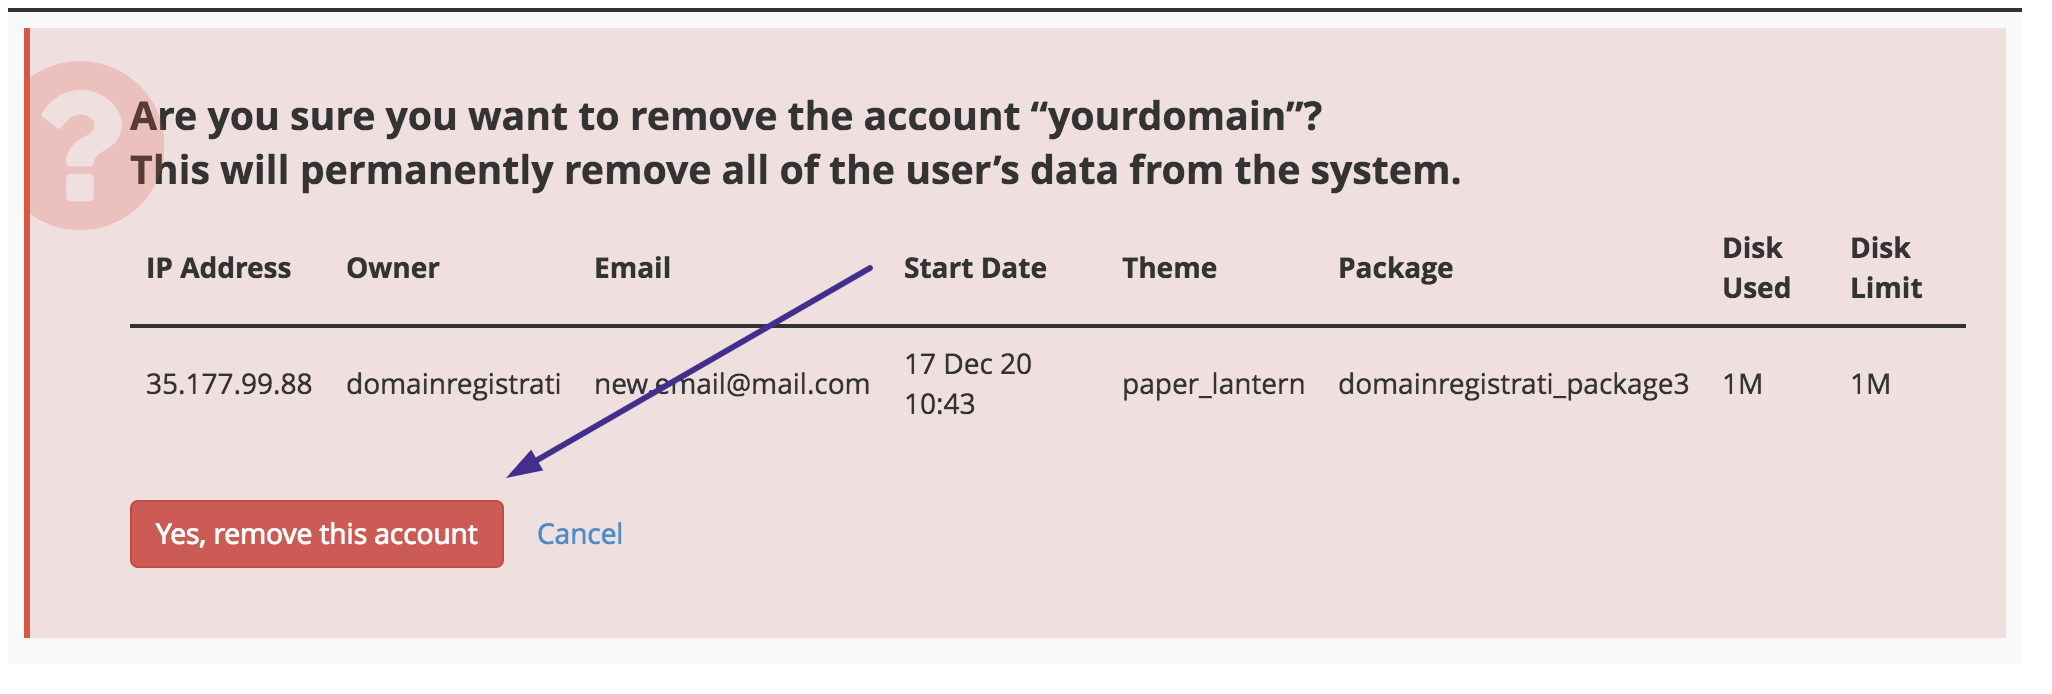
4) Click on Terminate button to proceed with the termination.

5) A warning message will appear next, review everything and click YES if you want to proceed.