
Let’s begin!
You can follow the step-by-step instructions in this article or watch out our video tutorial.
How to Configure Domain Registrars in WHMCS
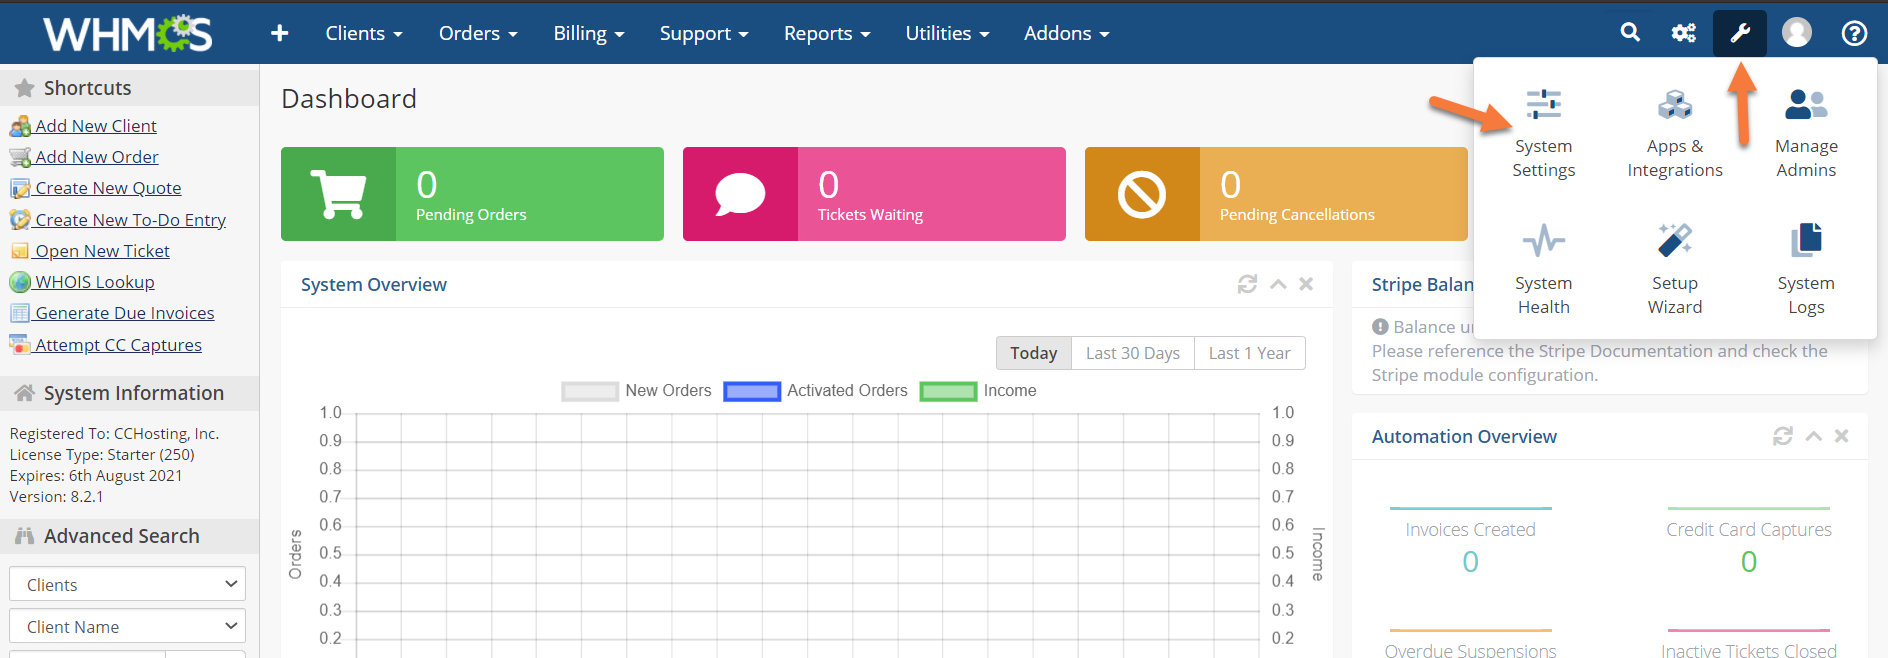
Step 1: First, log in to your WHMCS Admin. Once logged in, click the wrench in the top right corner, then click System Settings.
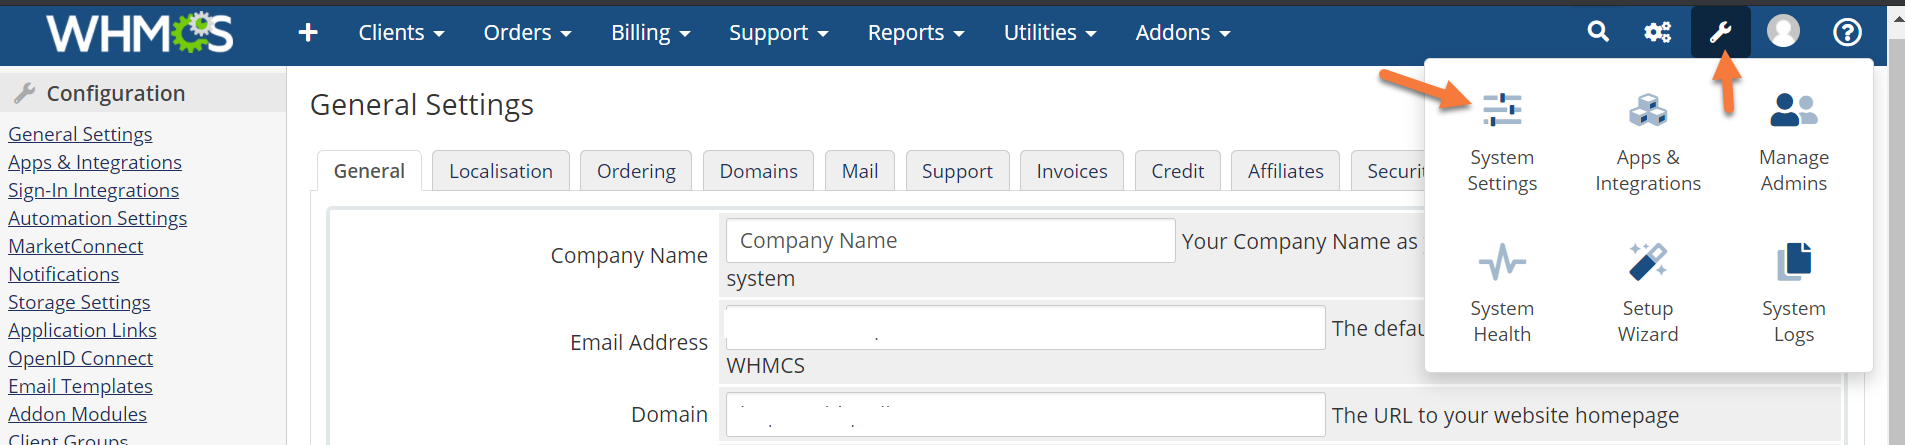
Step 2: Once the System Settings panel loads, use the search feature at the top of the page to search for domain, then when the results load, click Domain Registrars.

Step 3: A list of Domain Registrars who can integrate with WHMCS will load. If you are not a ChemiCloud customer, there are quite a few domain reseller companies from which you can choose.
How to Add the ChemiCloud Domain Reseller Module to your WHMCS and/or Blesta
If you are a ChemiCloud customer with a Reseller Web Hosting account, you received a set of Login Credentials that go with your ChemiCloud Domain Reseller account in the Welcome Email that was sent when you opened your account at ChemiCloud.
Make note of the username and password that goes with your Domain Reseller account as you’ll need it for the steps below.
To add the ChemiCloud Registrar to this list of resellers, you’ll need to install a custom module inside your WHMCS. Don’t worry, this is very straightforward! Just follow the steps below.
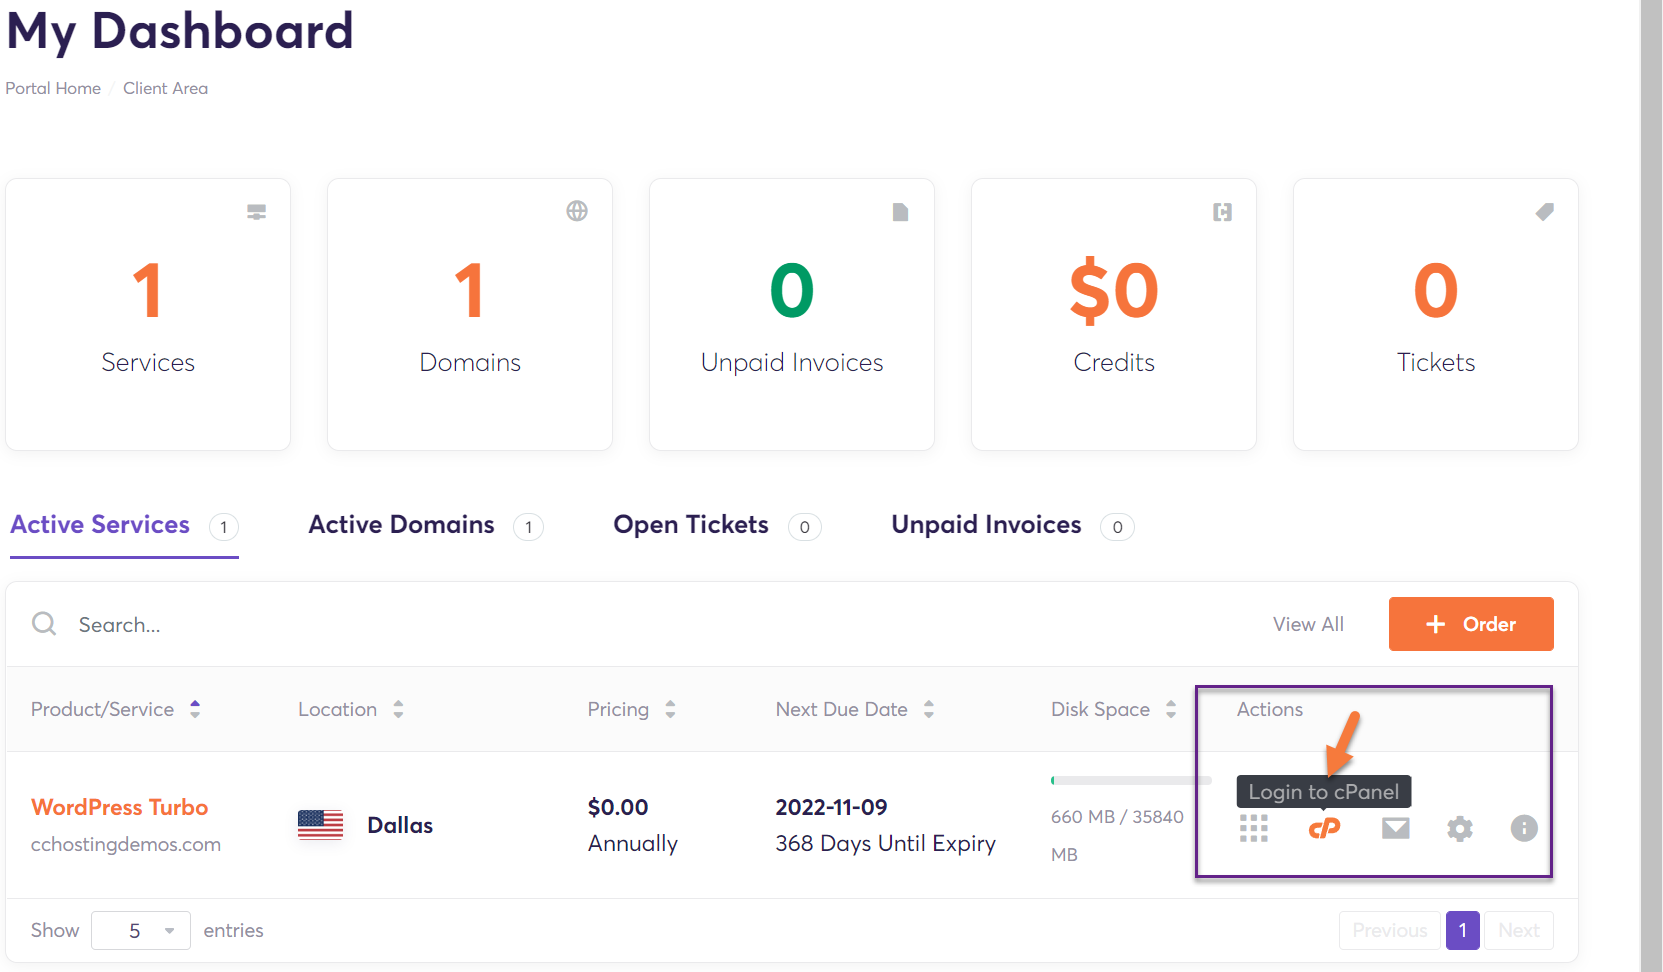
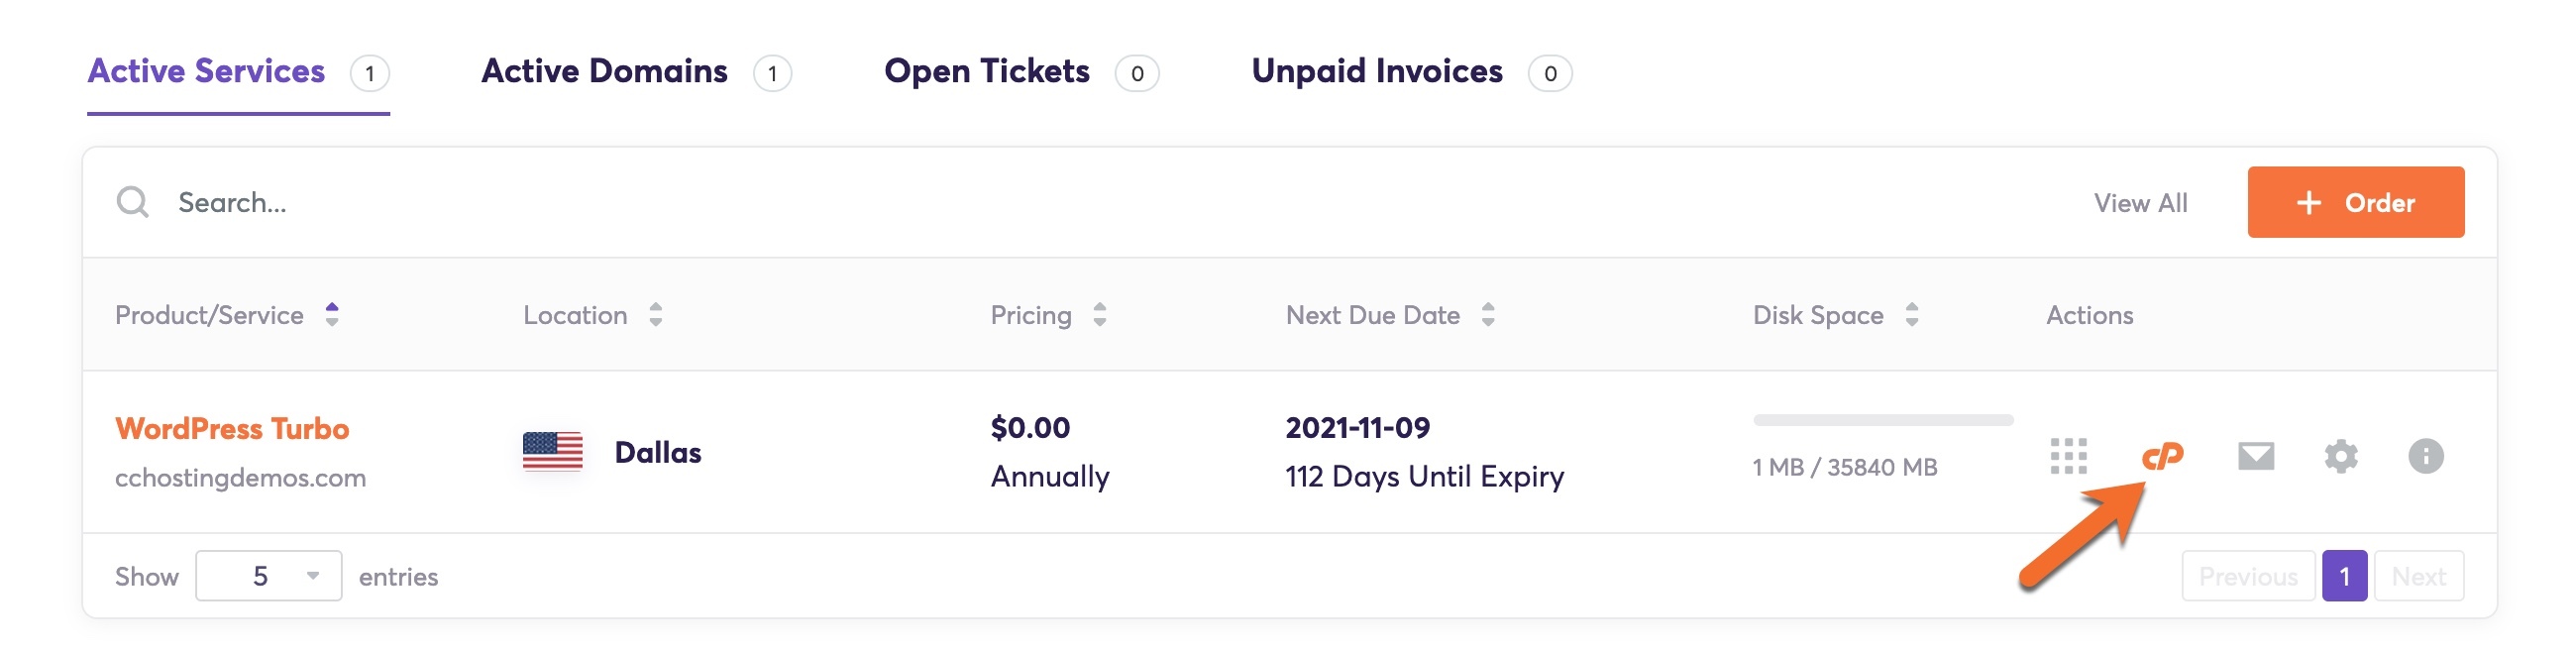
Step 1: First, login to your ChemiCloud account. Click here to open the ChemiCloud Account Login page in a new tab.
Once you have logged in, click the cPanel icon next to the domain which corresponds with the domain used for your WHMCS installation.
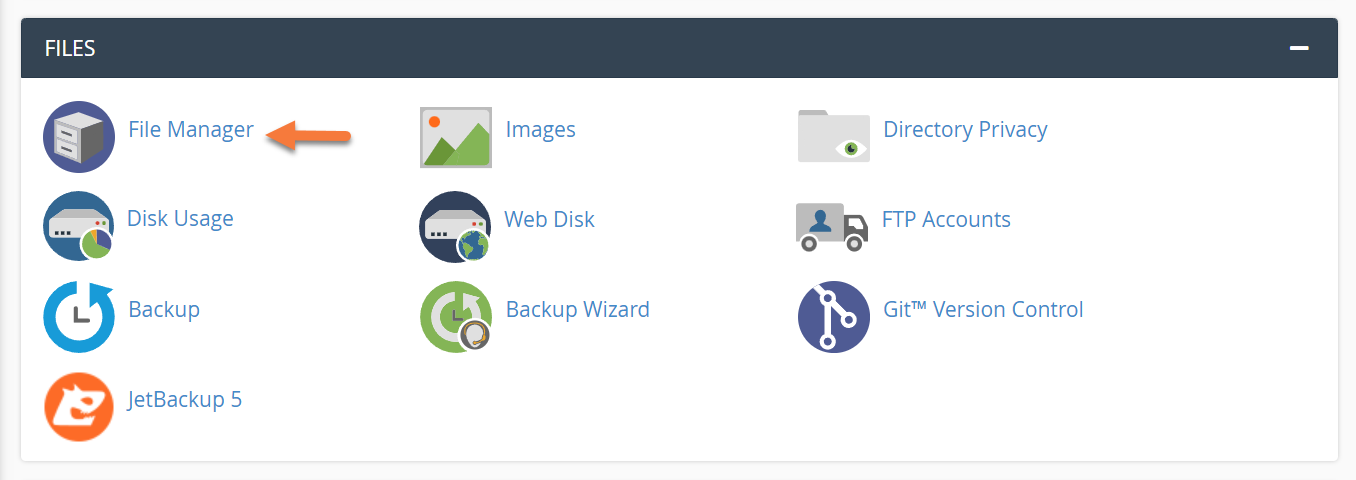
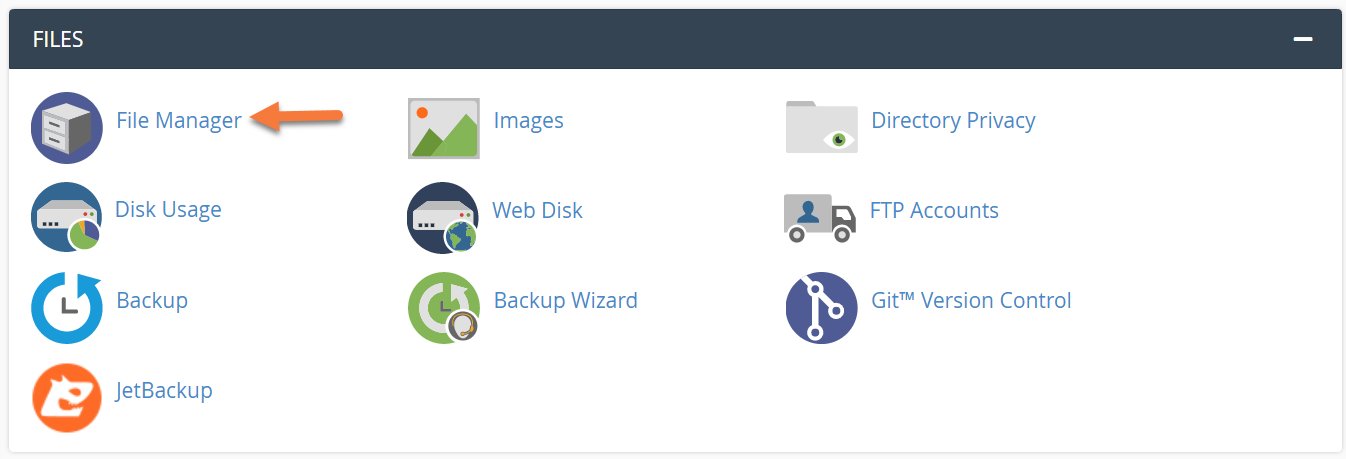
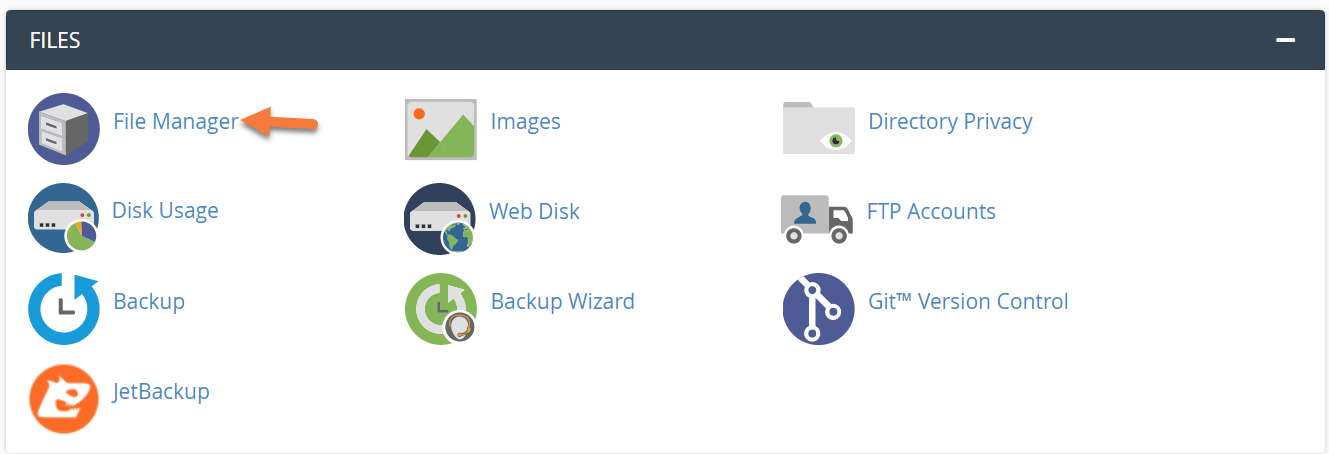
Once your cPanel has opened, look for the Files section and click File Manager.
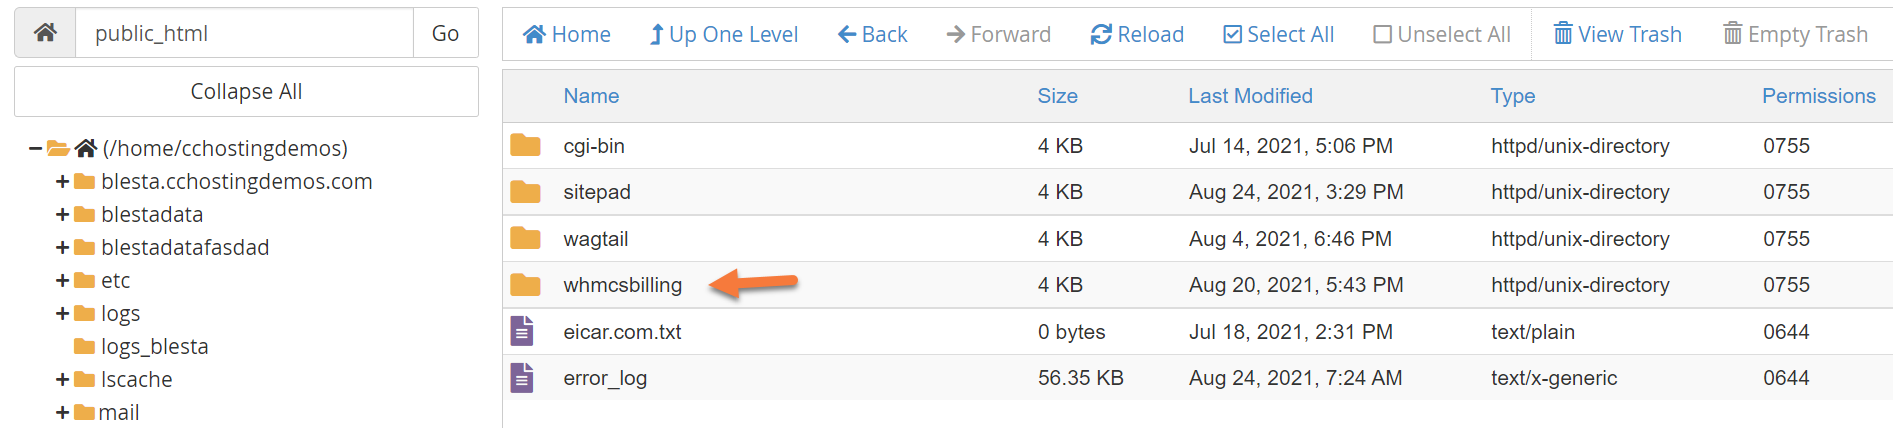
Using your File Manager, navigate to the directory where your WHMCS is installed. This is typically within your public_html folder. In my example, it’s public_html/whmcsbilling/
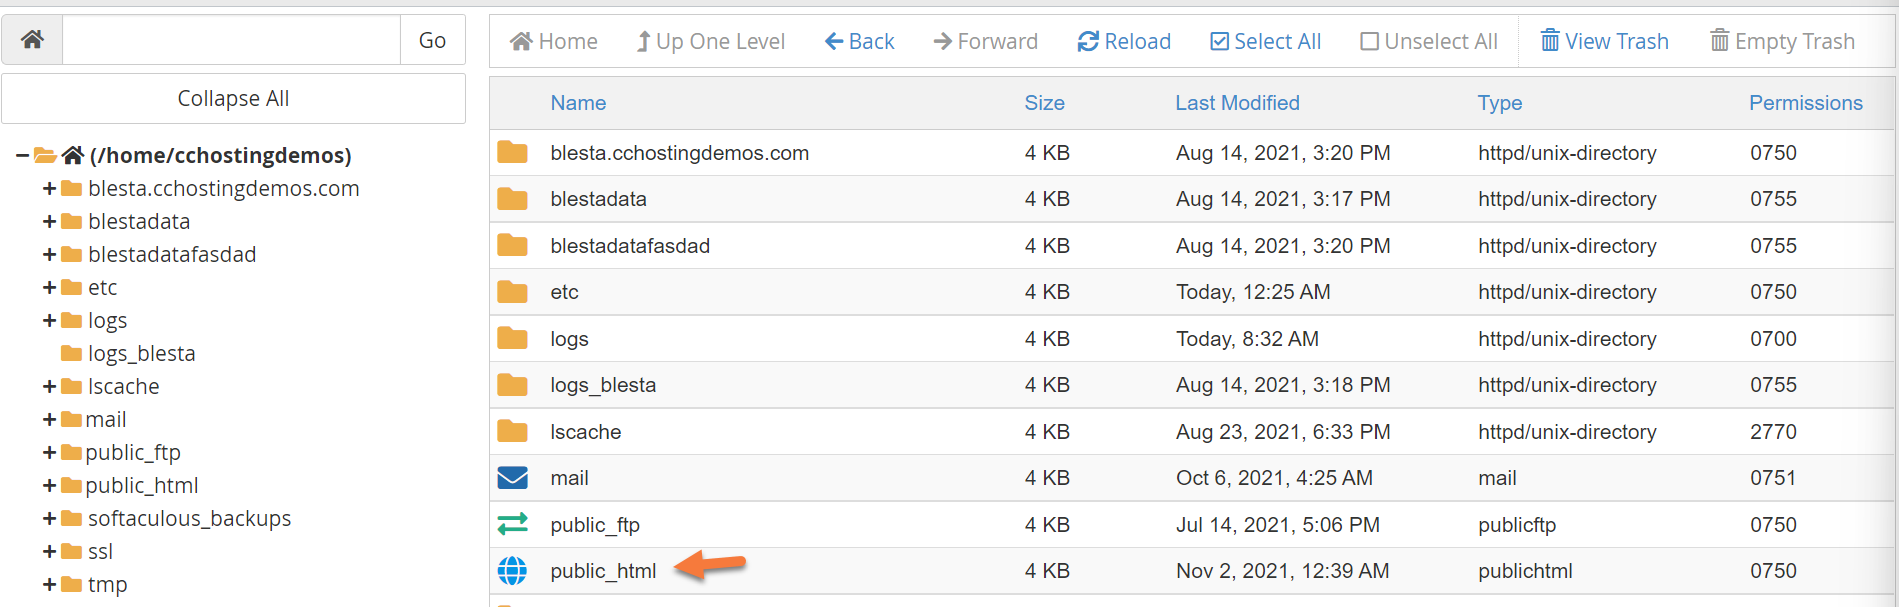
After opening the public_html directory, find and open the directory where WHMCS is installed:
Once the directory where WHMCS is installed is opened, look in the menu at the top of the File Manager for the Upload option. Click the menu option to open the Upload tool.
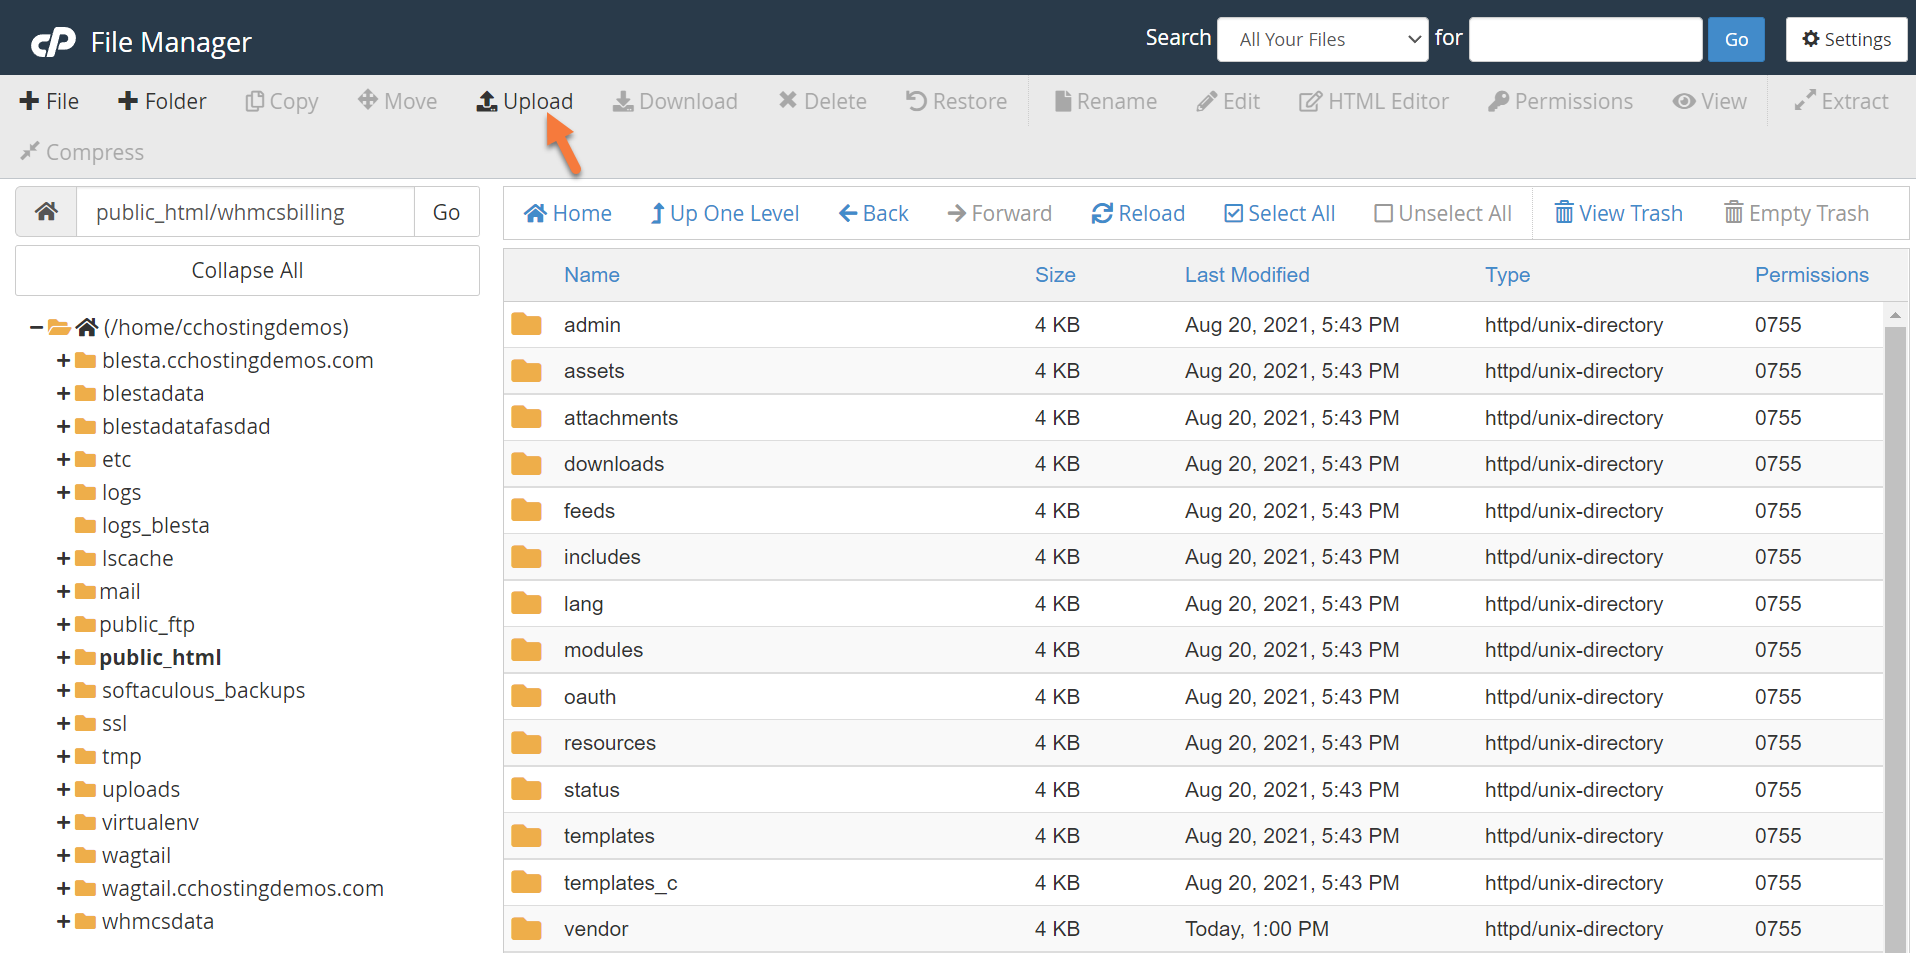
Once the Upload tool has opened, click the blue “Select File” button to open the finder on your computer.

Using the dialog window which has opened, navigate to the directory on your computer where the ZIP file you downloaded earlier was stored. In my example, it’s my Downloads folder.
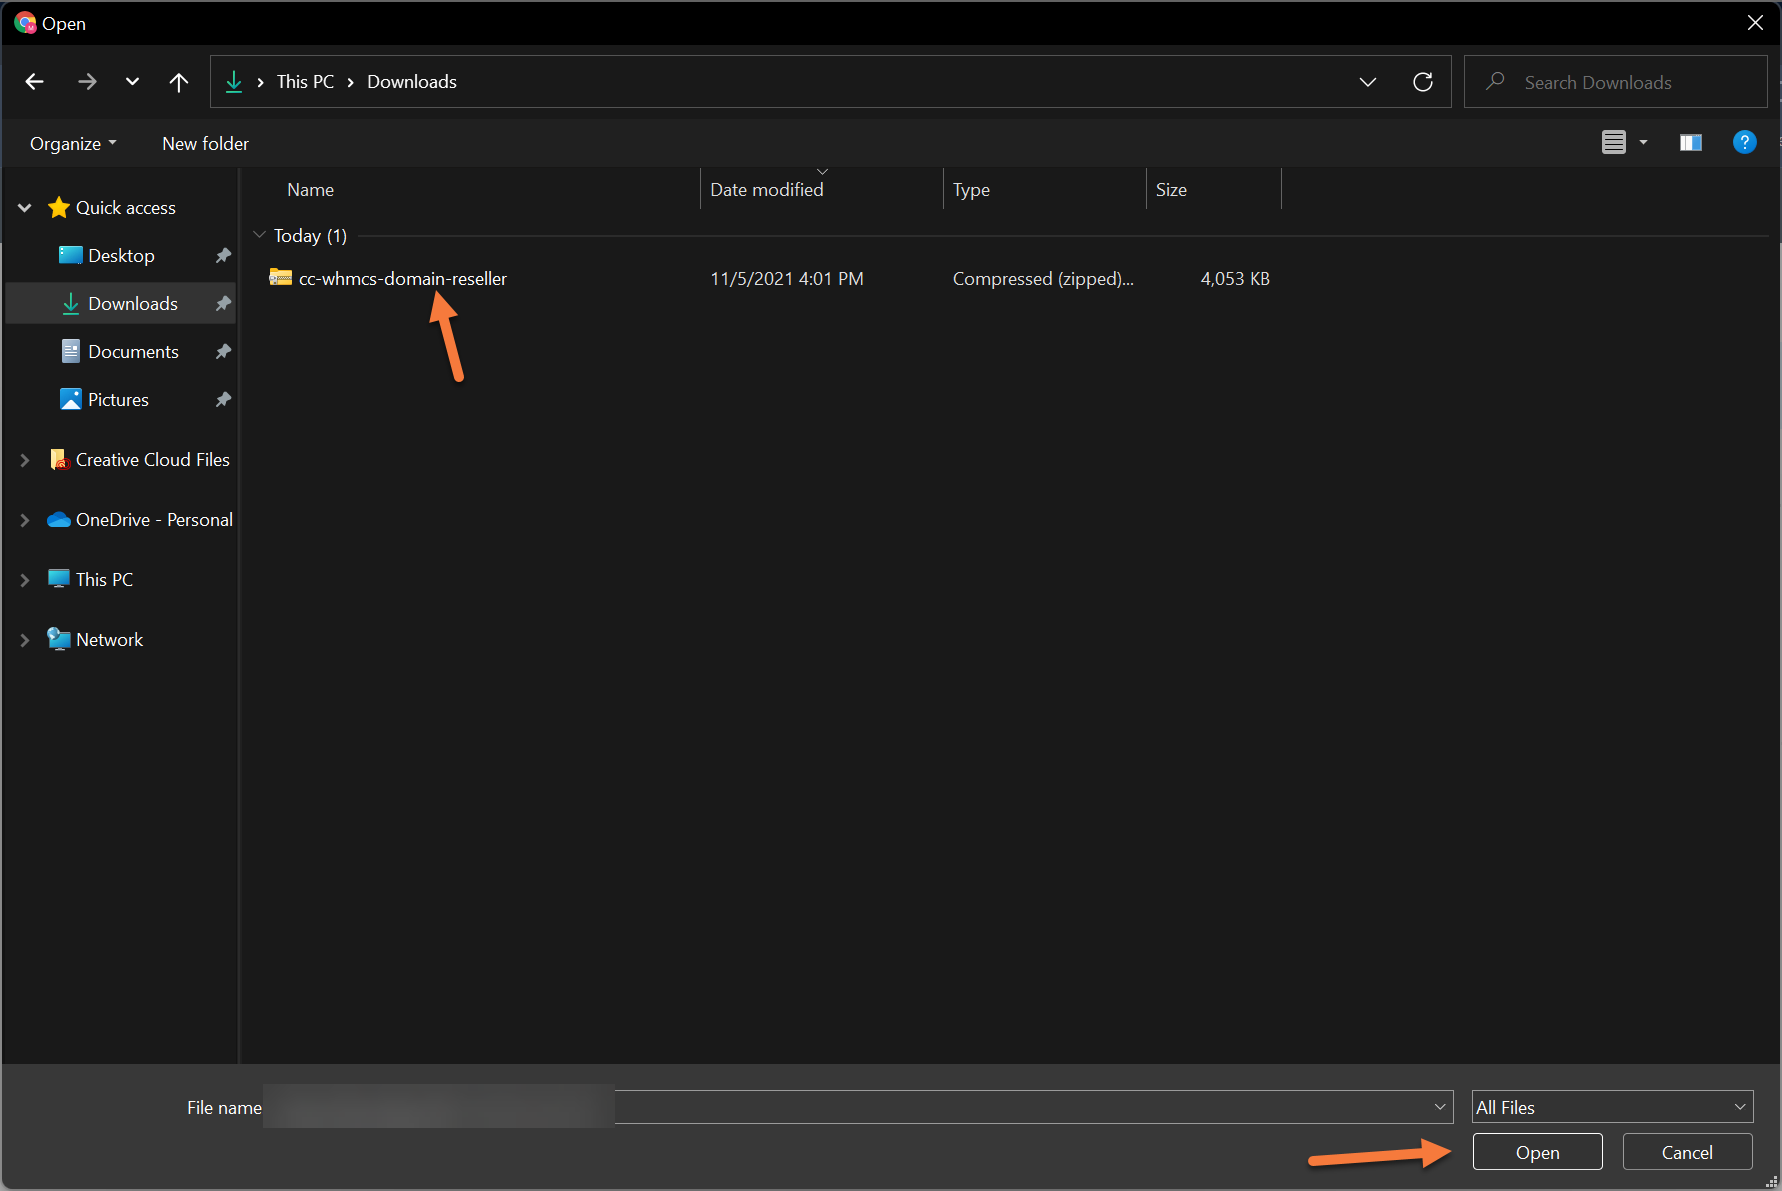
Select the file, then click Open. This will begin the process of uploading the file to your WHMCS directory on the web server.
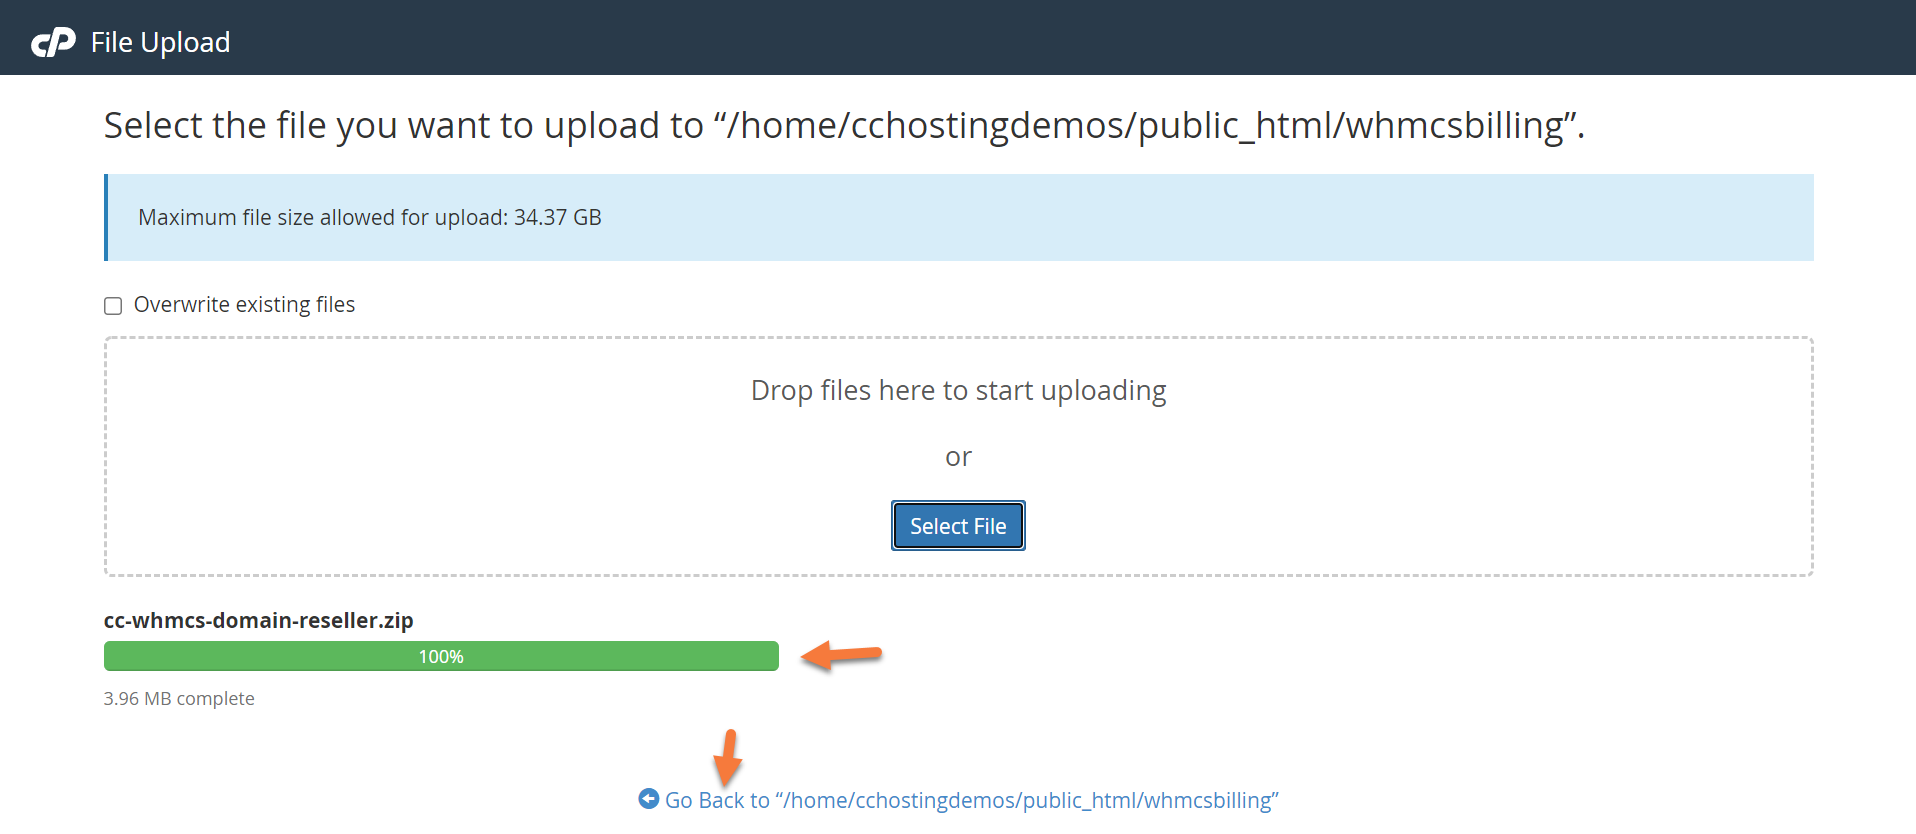
Once the Upload Progress indicator has turned green and says 100%, click the link at the bottom to Go Back to /home/youruser/public_html/your_whmcs_directory.
You will be returned to the file manager.
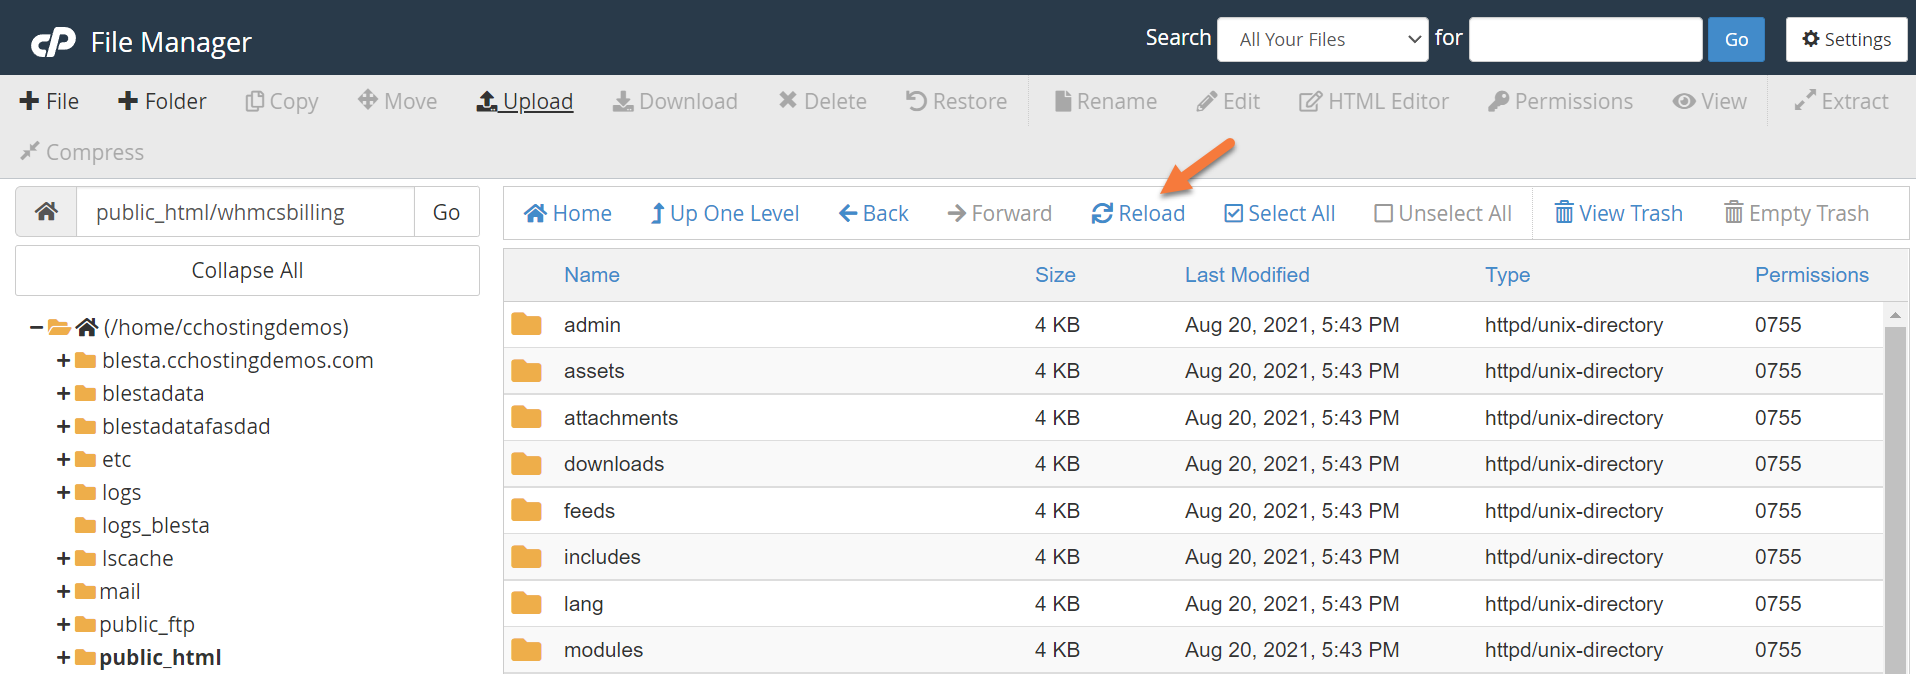
At first, you will not see the newly uploaded ZIP file. You’ll need to reload the file manager. To do this efficiently, look in the menu at the top of File Manager and click the Reload button.
Upon reload, you will see the ZIP file. Click it one time to select the file. The file will turn blue when it is selected. See below:
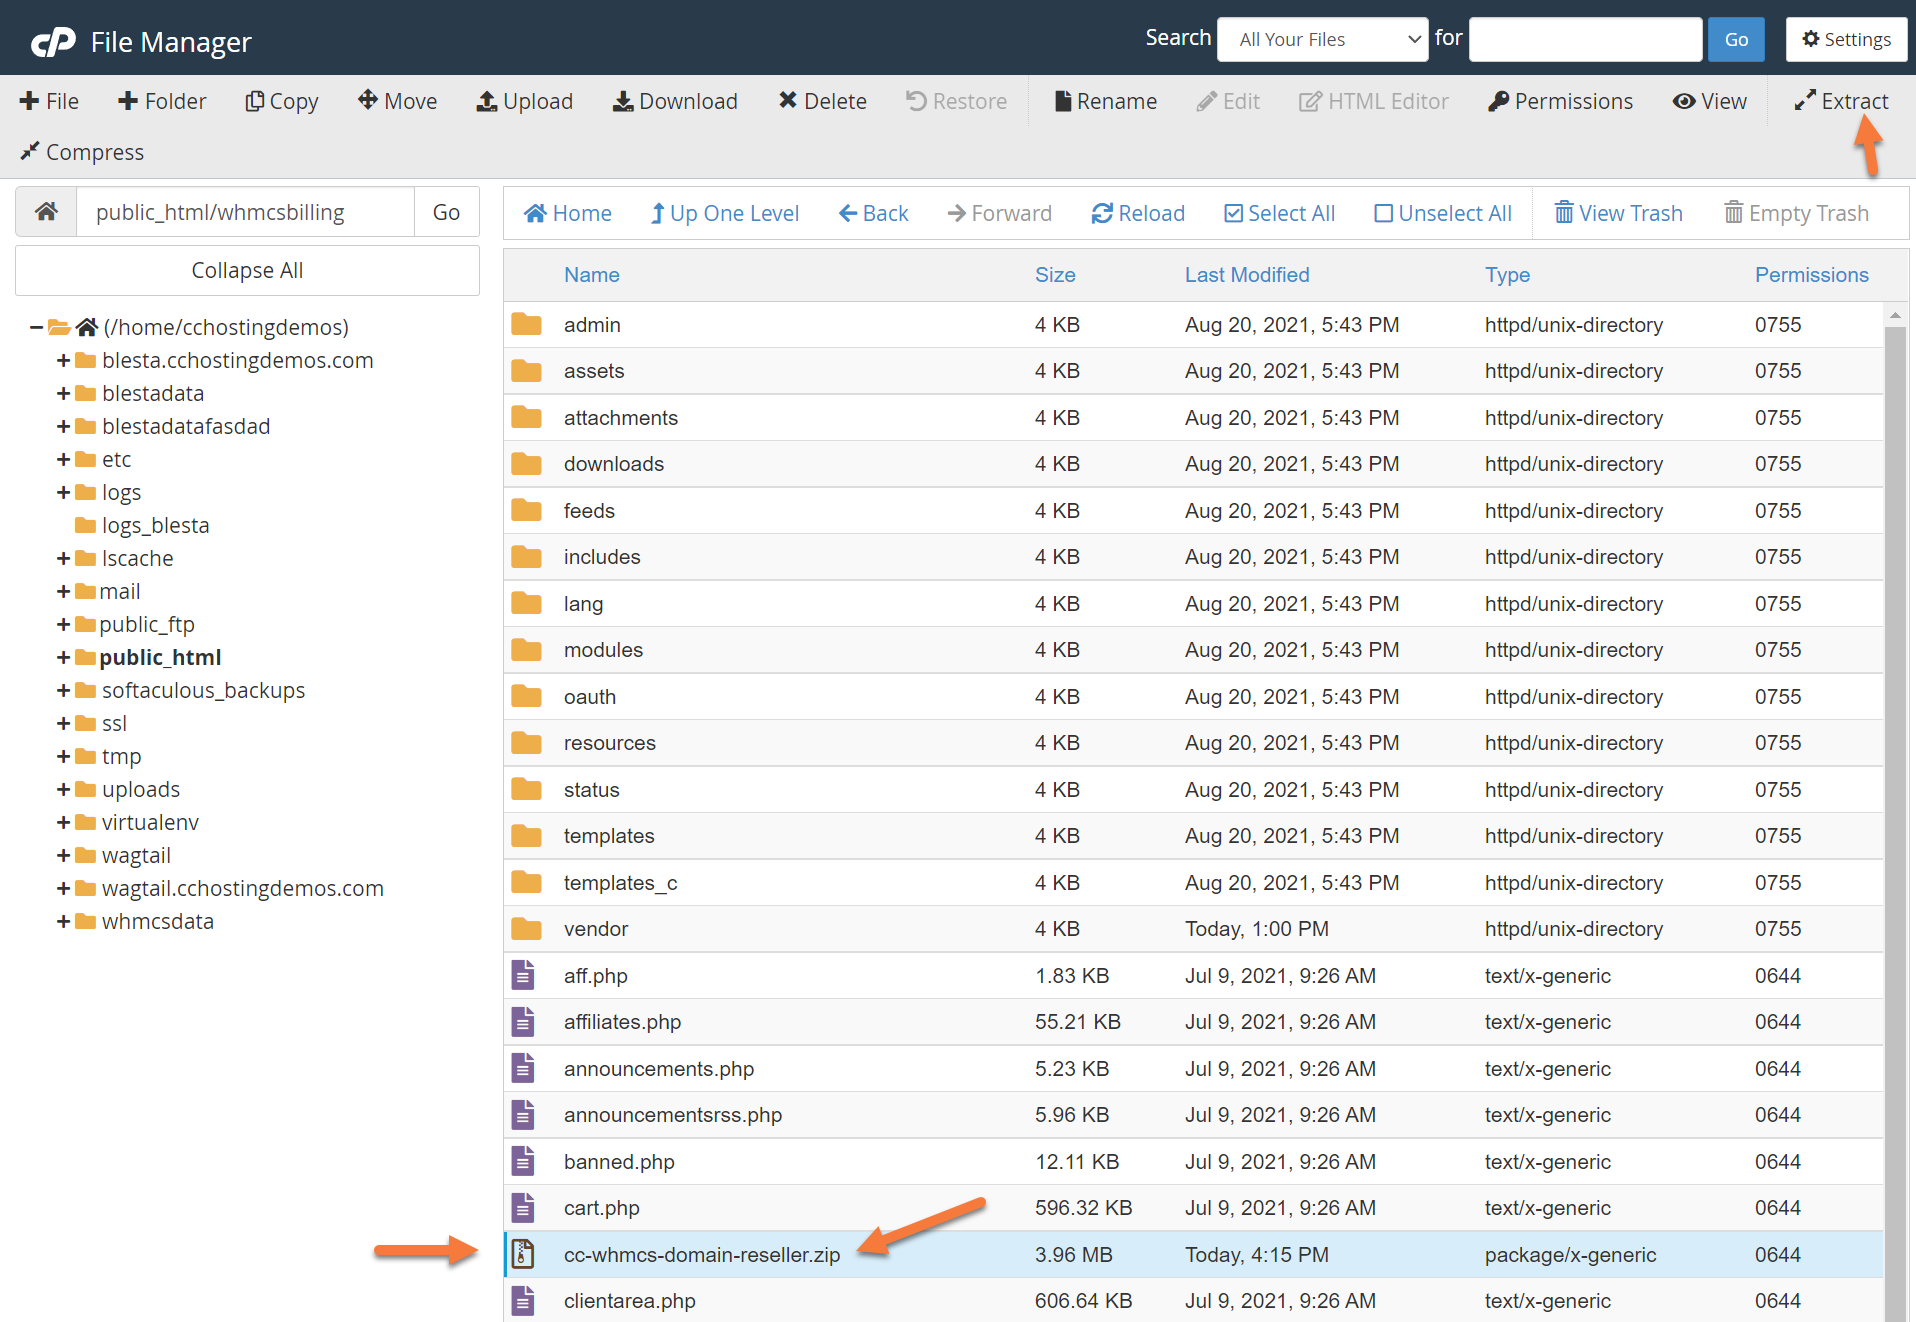
Once the file is selected, look at the top of the File Manager and in the row of options, click Extract.
After doing this, the extract modal window will open:
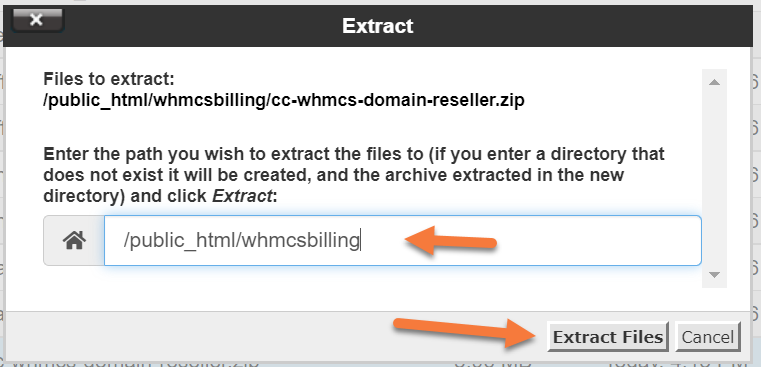
Click the Extract Files button. This will unzip the ZIP file and put the files within the ZIP into the directory where your WHMCS is installed.
Once the unzip is done, you will see a modal that looks like the one below:
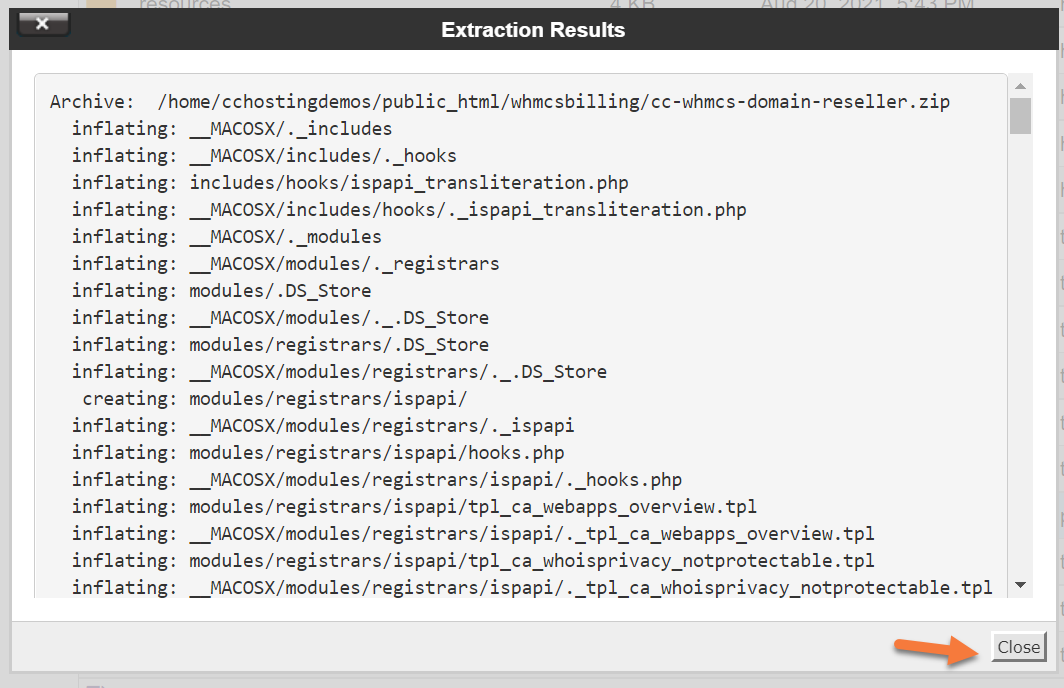
Click Close to close the modal.
Congrats, that’s all you need to do with your File Manager and cPanel. You can close the tabs where they are open and return to your WHMCS Admin > Domain Registrars page.
Step 2: Now that you have the Domain Registrars page open, refresh the page using the refresh feature in your browser. This is typically done with Control + R on a PC and ⌘ + R on MacOS.
After the page reloads, you will see ChemiCloud.com has appeared in the list of Domain Registrars.
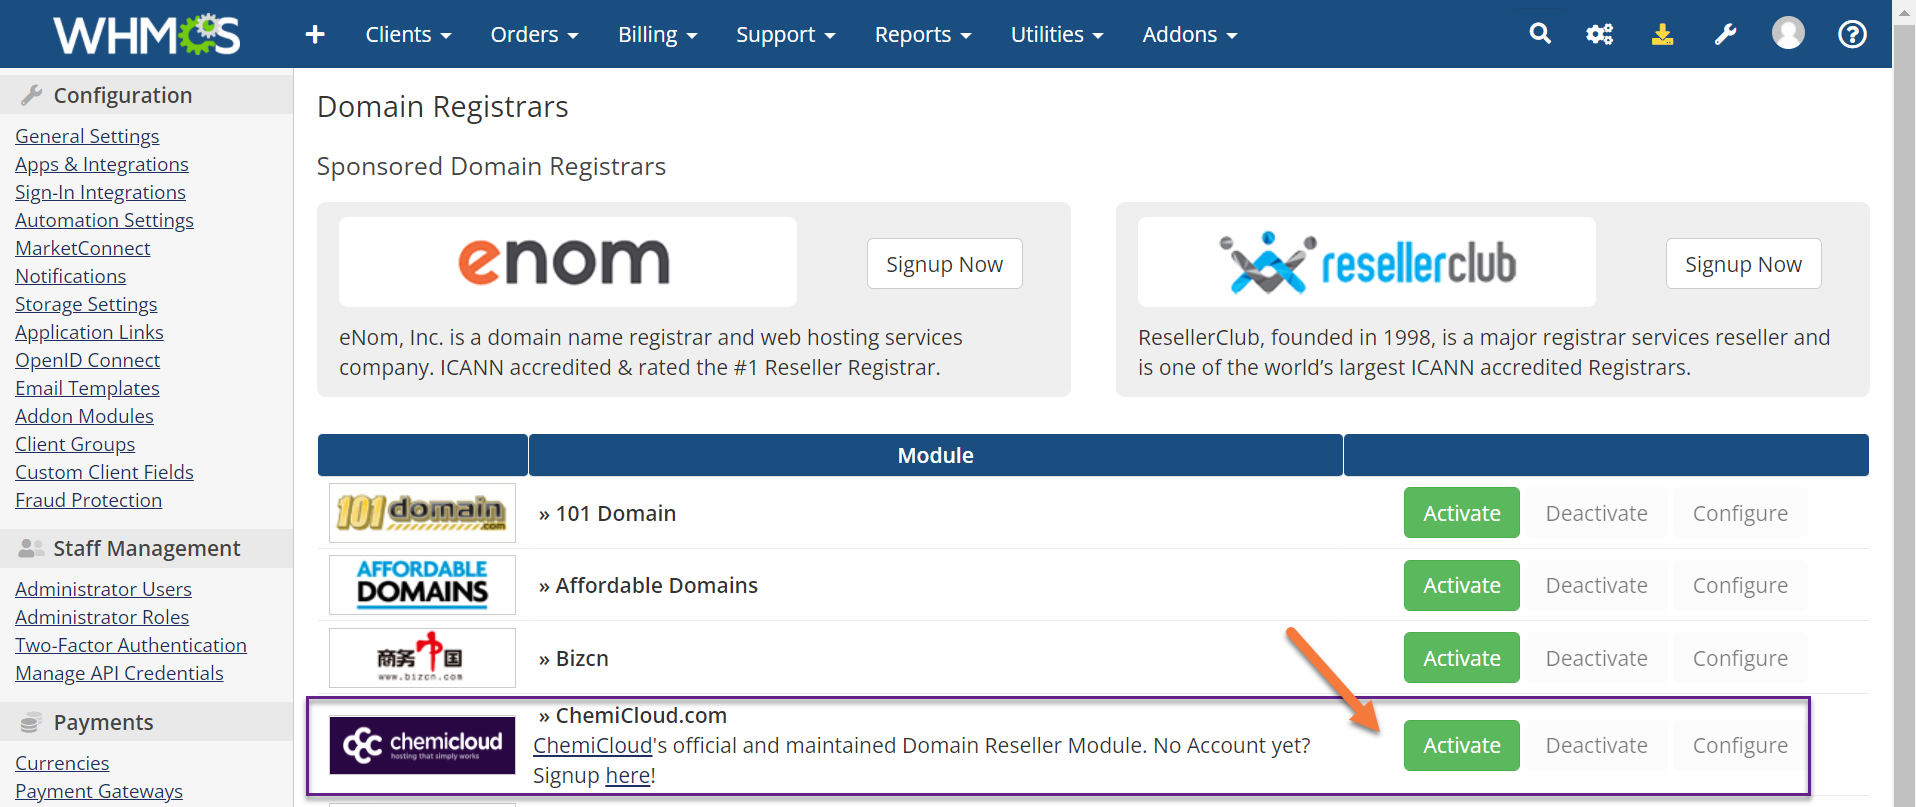
Click the green activate button to continue.
Step 3: The ChemiCloud.com Domain Reseller module will activate and expand. You will see a green message that says Registrar Module Activated and a number of new options have opened up beneath the Registrar Activation line.
Do not worry about the big red message at the bottom of the module.
See below:

Along with your ZIP file, when you requested access to a ChemiCloud Domain Reseller account, you received a username and password which goes with the account. You’ll need to enter the username and password in the respective fields.
The other options in the above-drawn purple box are entirely optional and up to you if you wish to enable them. There are a few useful options here, including:
- Automatic Transfer Lock – This will automatically enable the lock feature on a customer’s newly registered domain. This is helpful because it’s an additional layer of safety that keeps the domain from being transferred away, potentially unxpectedly.
- WHOIS Output and ERRP Settings – When enabled the customer will have the option to edit the WHOIS fields for each of the contact types, not just the registrant contact. Some companies like this because their Tech Contact is the IT Department while the Registrant Contact might be their legal department.
After entering your Username and Password + selecting the option you wish to use, click the blue Save Changes button at the bottom of the page.
The page will reload and if the credentials you provided are correct, you’ll see a green message at the top of the module which says “Changes Saved Successfully” and at the bottom, you’ll see a message which says “Connection to the LIVE Environment established.”
Congrats! When it comes to linking your new Domain Reseller Account with your WHMCS installation, you’re done! This means you can visit your store in your browser to search for and register new domains!
How to Configure Domain Pricing in WHMCS
Step 1: After linking your Domain Reseller Account to WHMCS, you’ll need to enable Automatic Domain Registration so you can automate the submission of registration and transfer requests with the built-in registrar(s).
When you enable this, WHMCS will automatically submit the request to the registrar as soon as your customer pays for the domain or transfer. WHMCS never submits domain registrations before you receive payment.
To do this, return to your System settings area by clicking the wrench in the top right corner, then click System Settings.
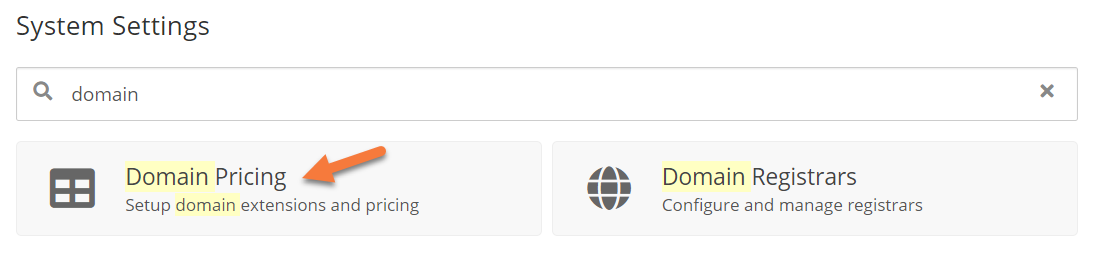
Next, use the search feature at the top of the page to search for domain. Once the result load, click Domain Pricing.
Step 2: When the Domain Pricing screen opens, you will be presented with a list of all the TLD’s you can sell, assuming you have linked your WHMCS installation with your Domain Reseller account of your choosing.
In our example, we have only added one TLD – .com. You should have many others.
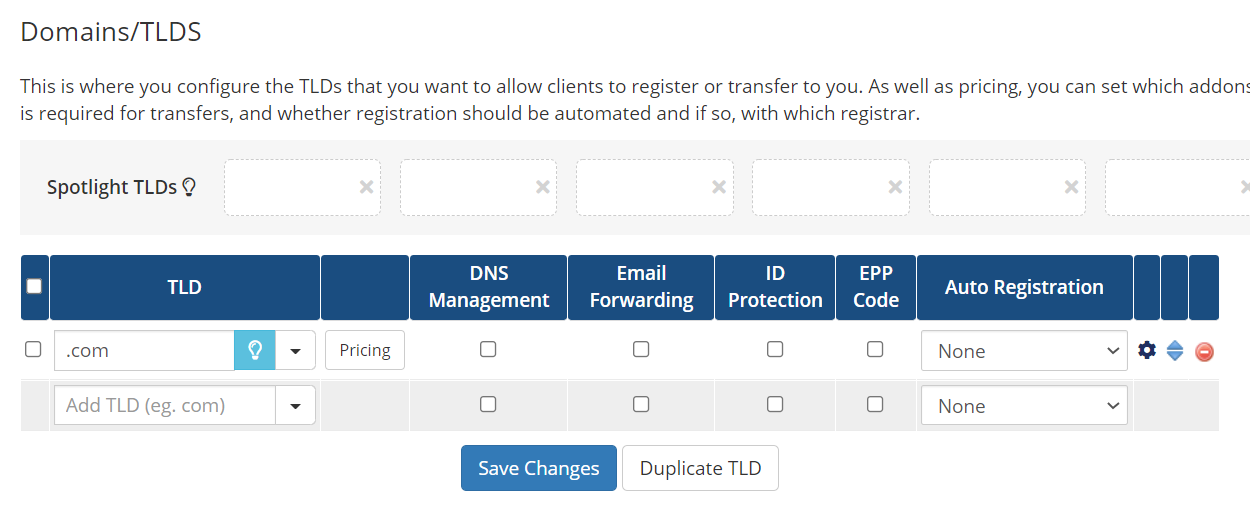
To set the pricing for the TLD, click the Pricing button just to the right of the TLD in the TLD column.
A new window will open where you can set the domain registration price for 1, 2, and even up to 10 years.
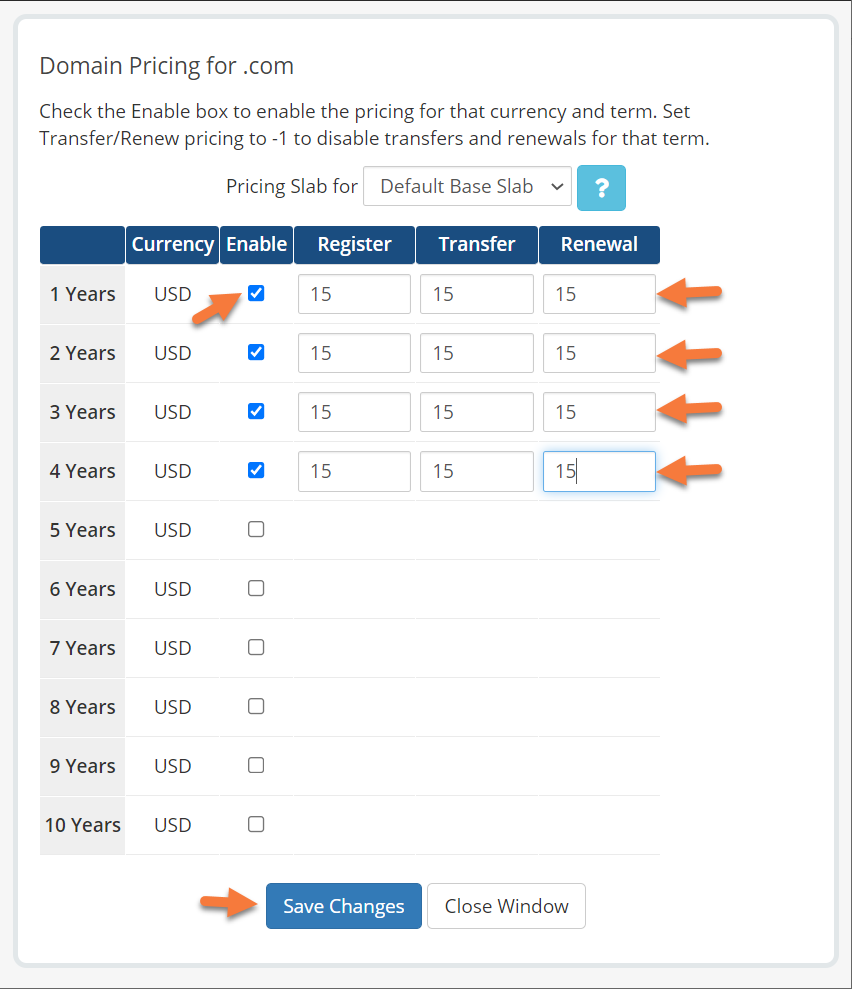 First, tick the check box beneath the Enable column in order to allow customers to register a domain for that period of time.
Next, enter the Register, Transfer, and Renewal Prices for each period of registration.
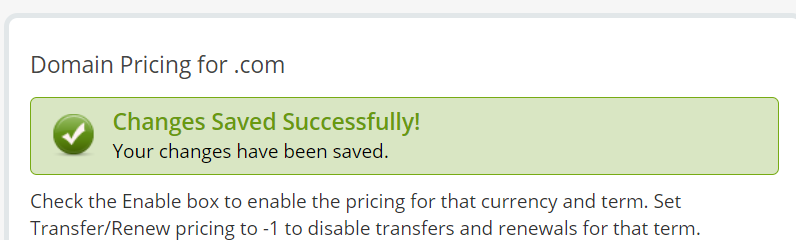
When you’ve finished, click Save Changes. You will see a message stating your changes have been saved successfully.
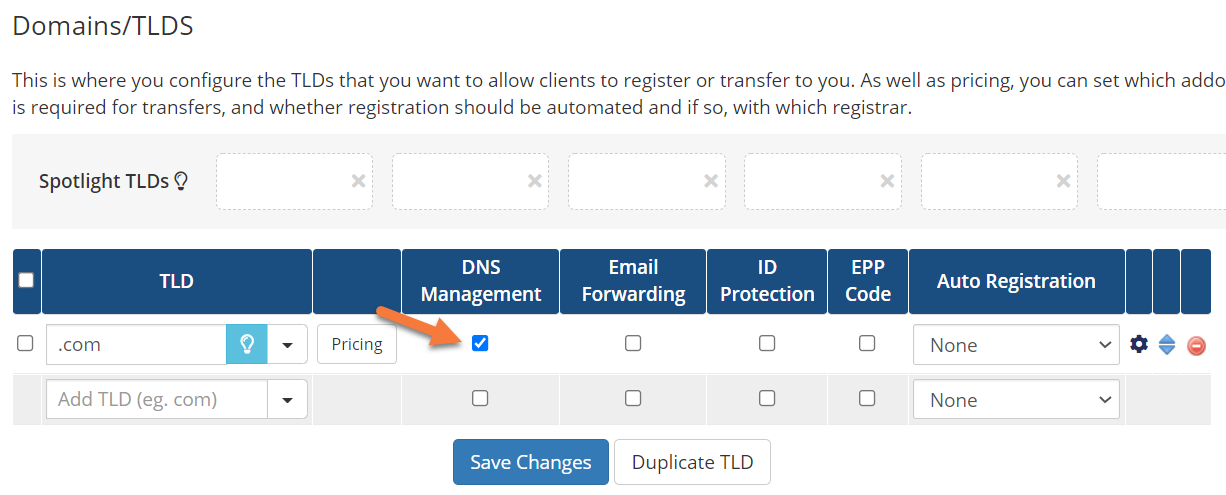
Step 3: If you want your customers to be able to control things like their DNS, Email Forwarding, ID Protection/WHOIS Protection, and request their EPP Code, you’ll need to tick the checkboxes for those options in the table for each TLD listed.
Step 4: Finally, to enable automatic registration with your domain reseller account when a customer purchases a new domain with this TLD, choose your Domain Reseller account from the drop-down menu under the Auto-Registration column.
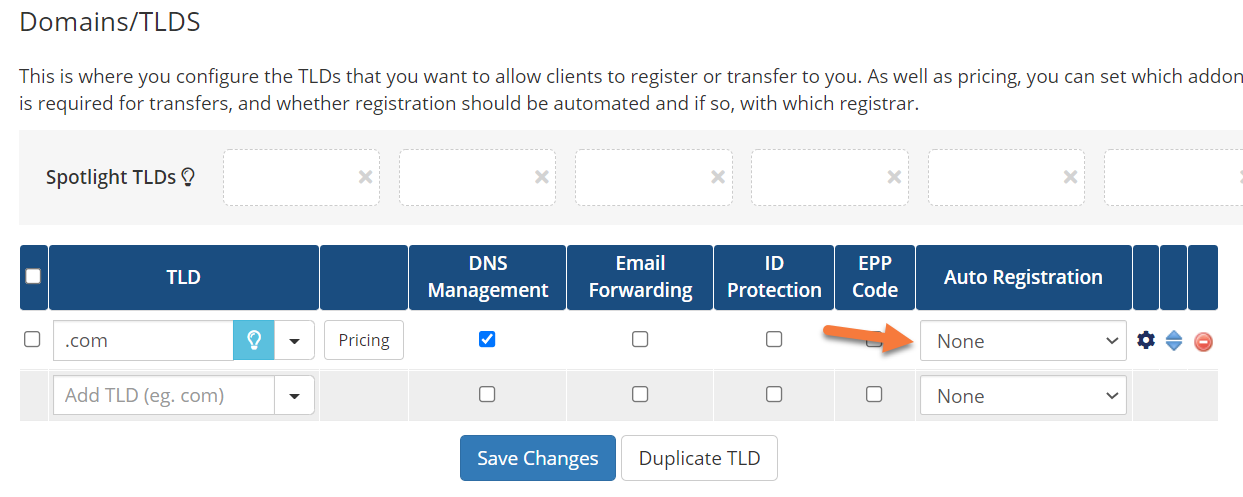 When you’ve finished making changes, click the blue Save Changes to save said changes.
Bulk Domain Management
If you have a lot of TLDs available for registration, you probably don’t want to set their pricing one at a time, as that can be rather tedious. To make things easy for you, WHMCS does offer Bulk Management for this feature
Located on the same page as your Domains/TLDs, but on the lower right side:
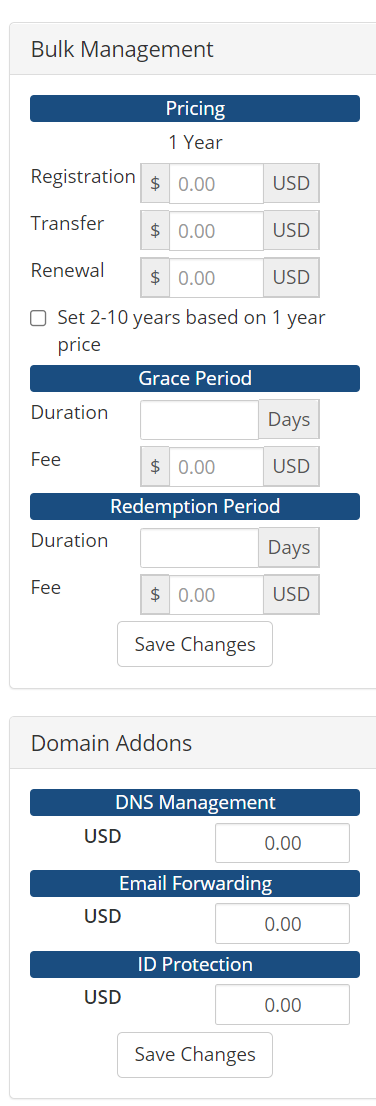
With the Bulk Management tool, you can set the price for Domain Registration, Renewal, and Transfer for all of your domains with the click of a button.
You can also set the Domain Grace Period and Redemption Period Length and Price.
Finally, if you offer domain addons, like DNS Management, Email Forwarding, and ID Protection, you can set the price of those options here.
Be sure to click that Save Changes button at the bottom to save your bulk changes.
And that’s how you configure Domain Registrars in WHMCS!
 Please join us in the next tutorial where we will walk you through how to Add Funds to Your ChemiCloud Domain Reseller Account.
With WHMCS MarketConnect, you can increase sales, offer competitive pricing, and use one powerful platform that’s fully automated to sell services with ready-made landing pages.
This Knowledge Base article will cover how to get started with WHMCS MarketConnect!
How to Get Started with WHMCS MarketConnect
You can follow the steps in this article or watch out our video tutorial.
Activate WHMCS MarketConnect
Before you can begin using MarketConnect, you must activate it in WHMCS.
Step 1: Login to your WHMCS. Once you’ve logged in, open the System Settings by hovering over the wrench in the top right and clicking System Settings.
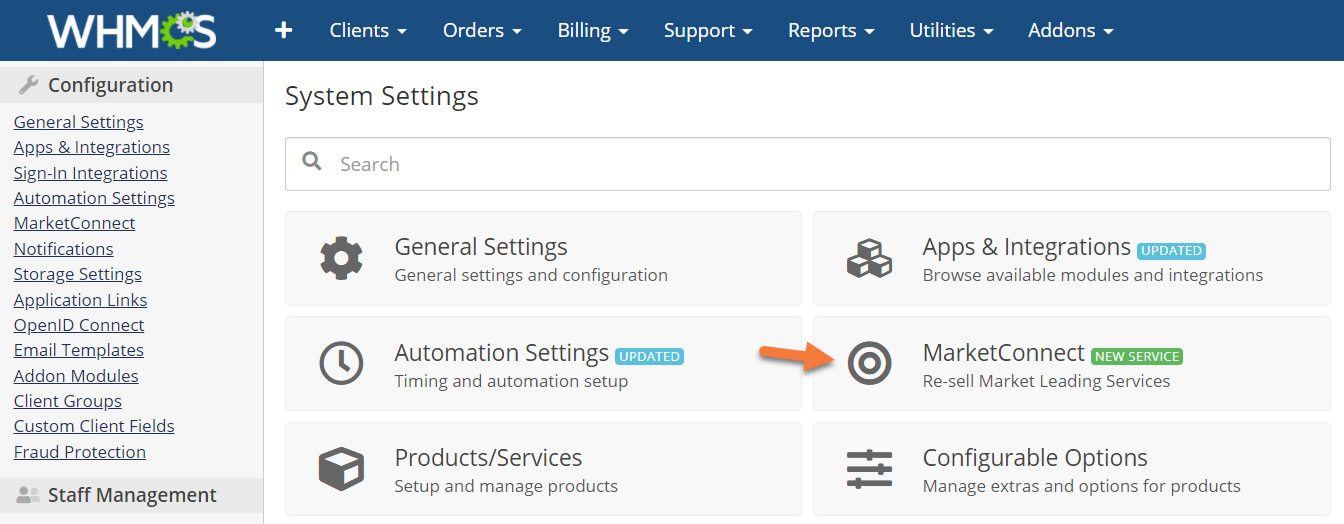
Step 2: Click MarketConnect in the list of System Settings.
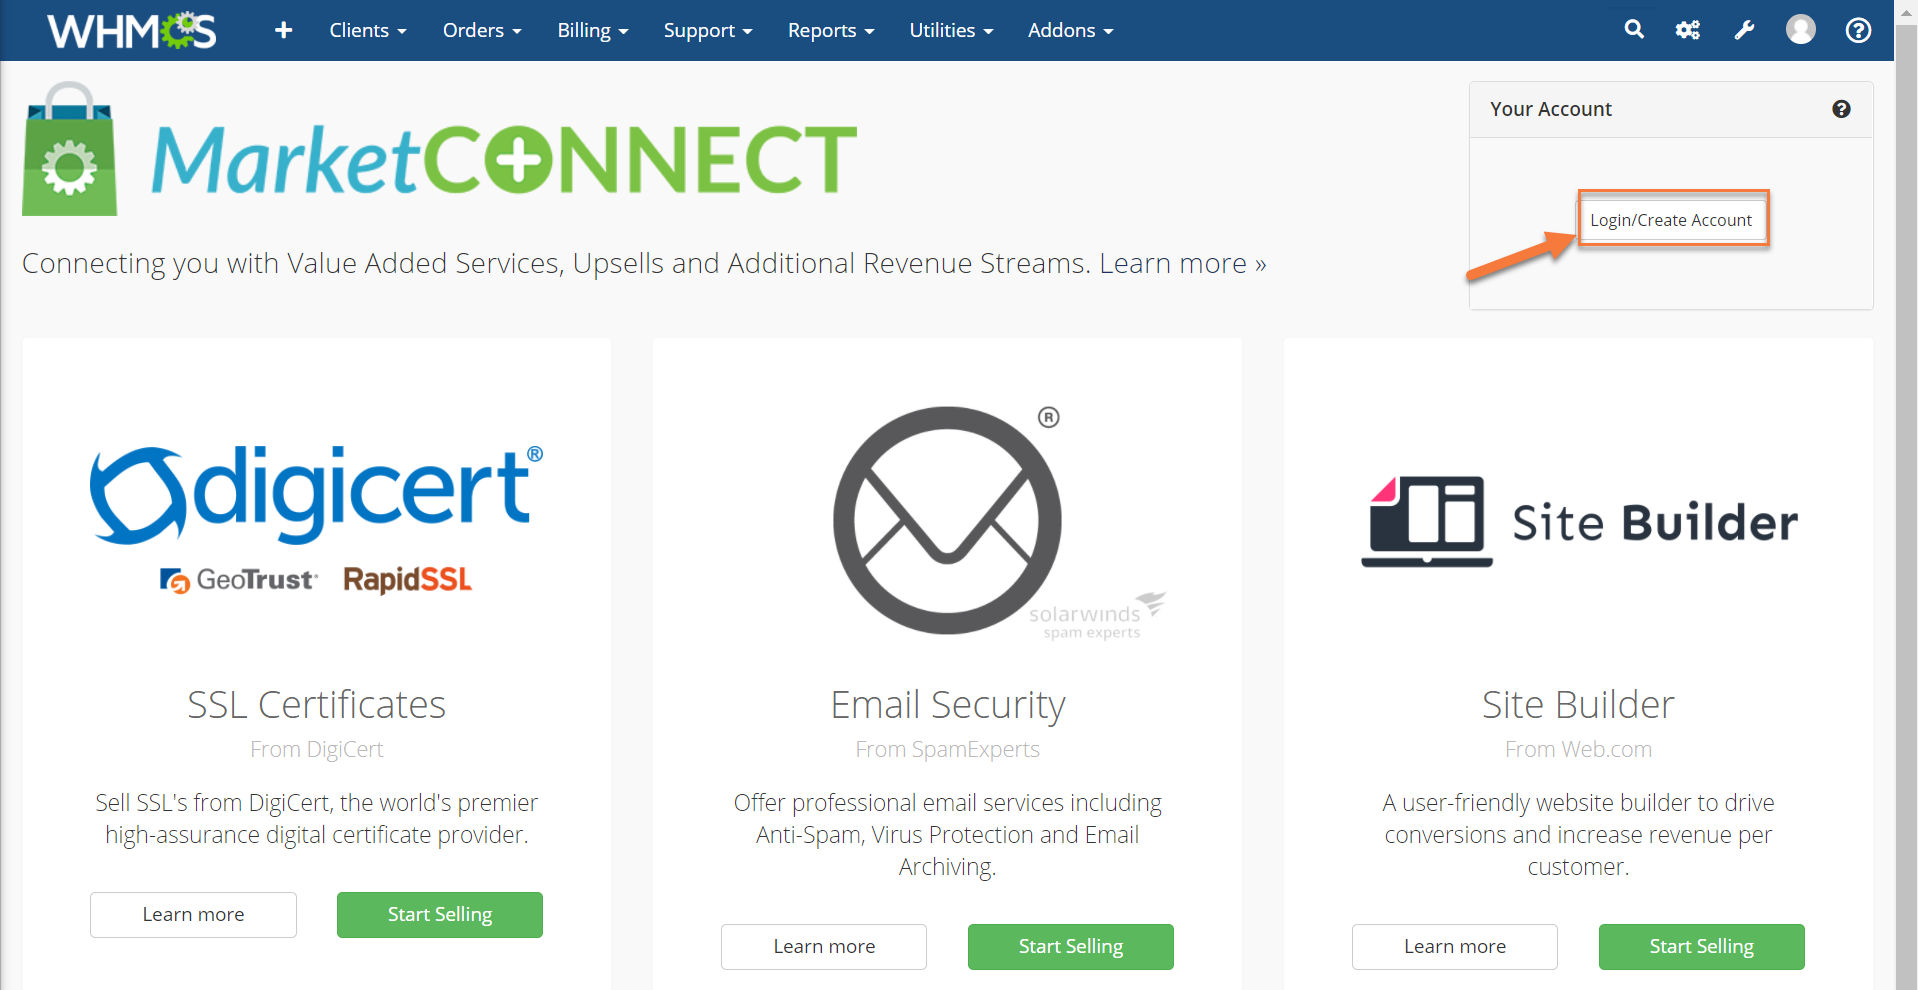
Step 3: Before you can sell any of the services listed on the WHMCS MarketConnect page, you have to create a WHMCS MarketConnect account. To do this, click the Login/Create Account button in the top right corner just above the Site Builder icon.
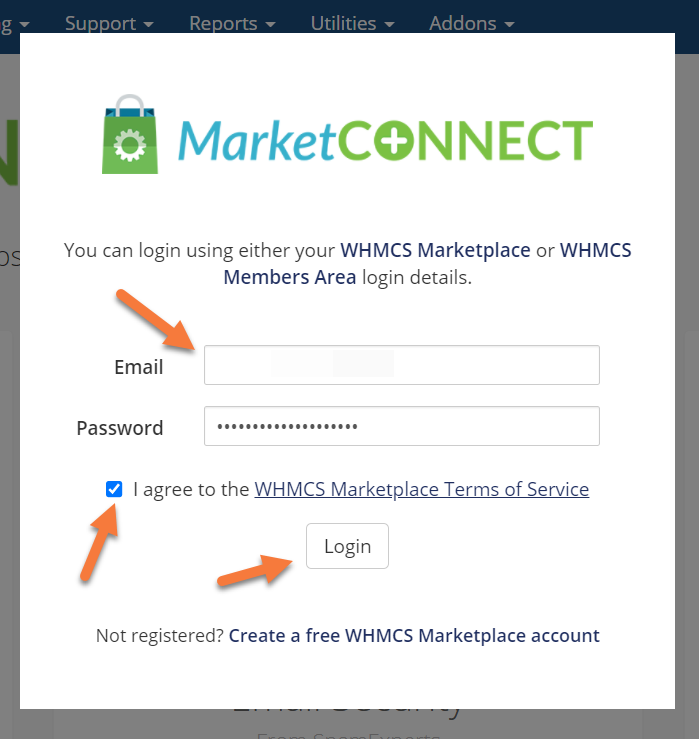
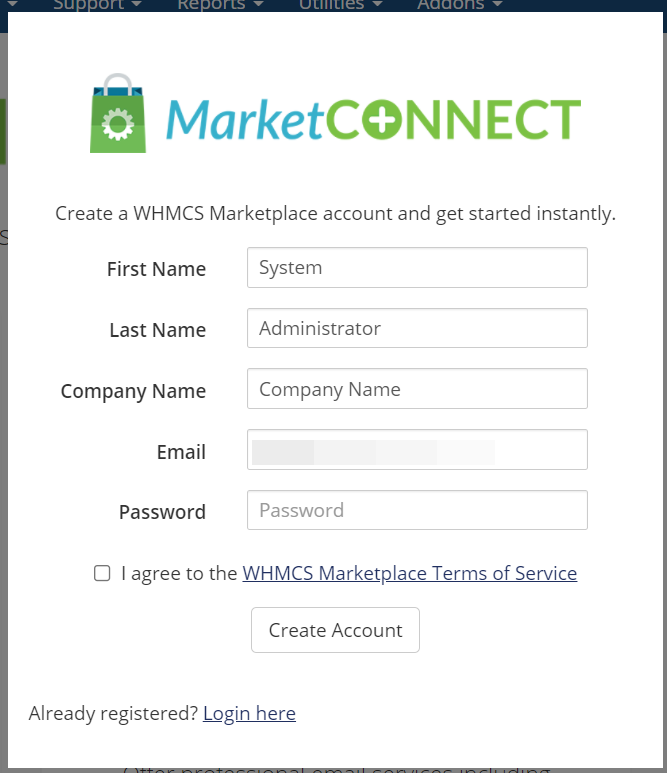
A modal will appear with the option to login to an existing account or create a new one. If you have an existing WHMCS Marketplace account, feel free to login. If not, click “Create a free WHMCS Marketplace account” at the bottom of the modal.
 If you’re creating a new account, you’ll be asked for the information shown in the image below:
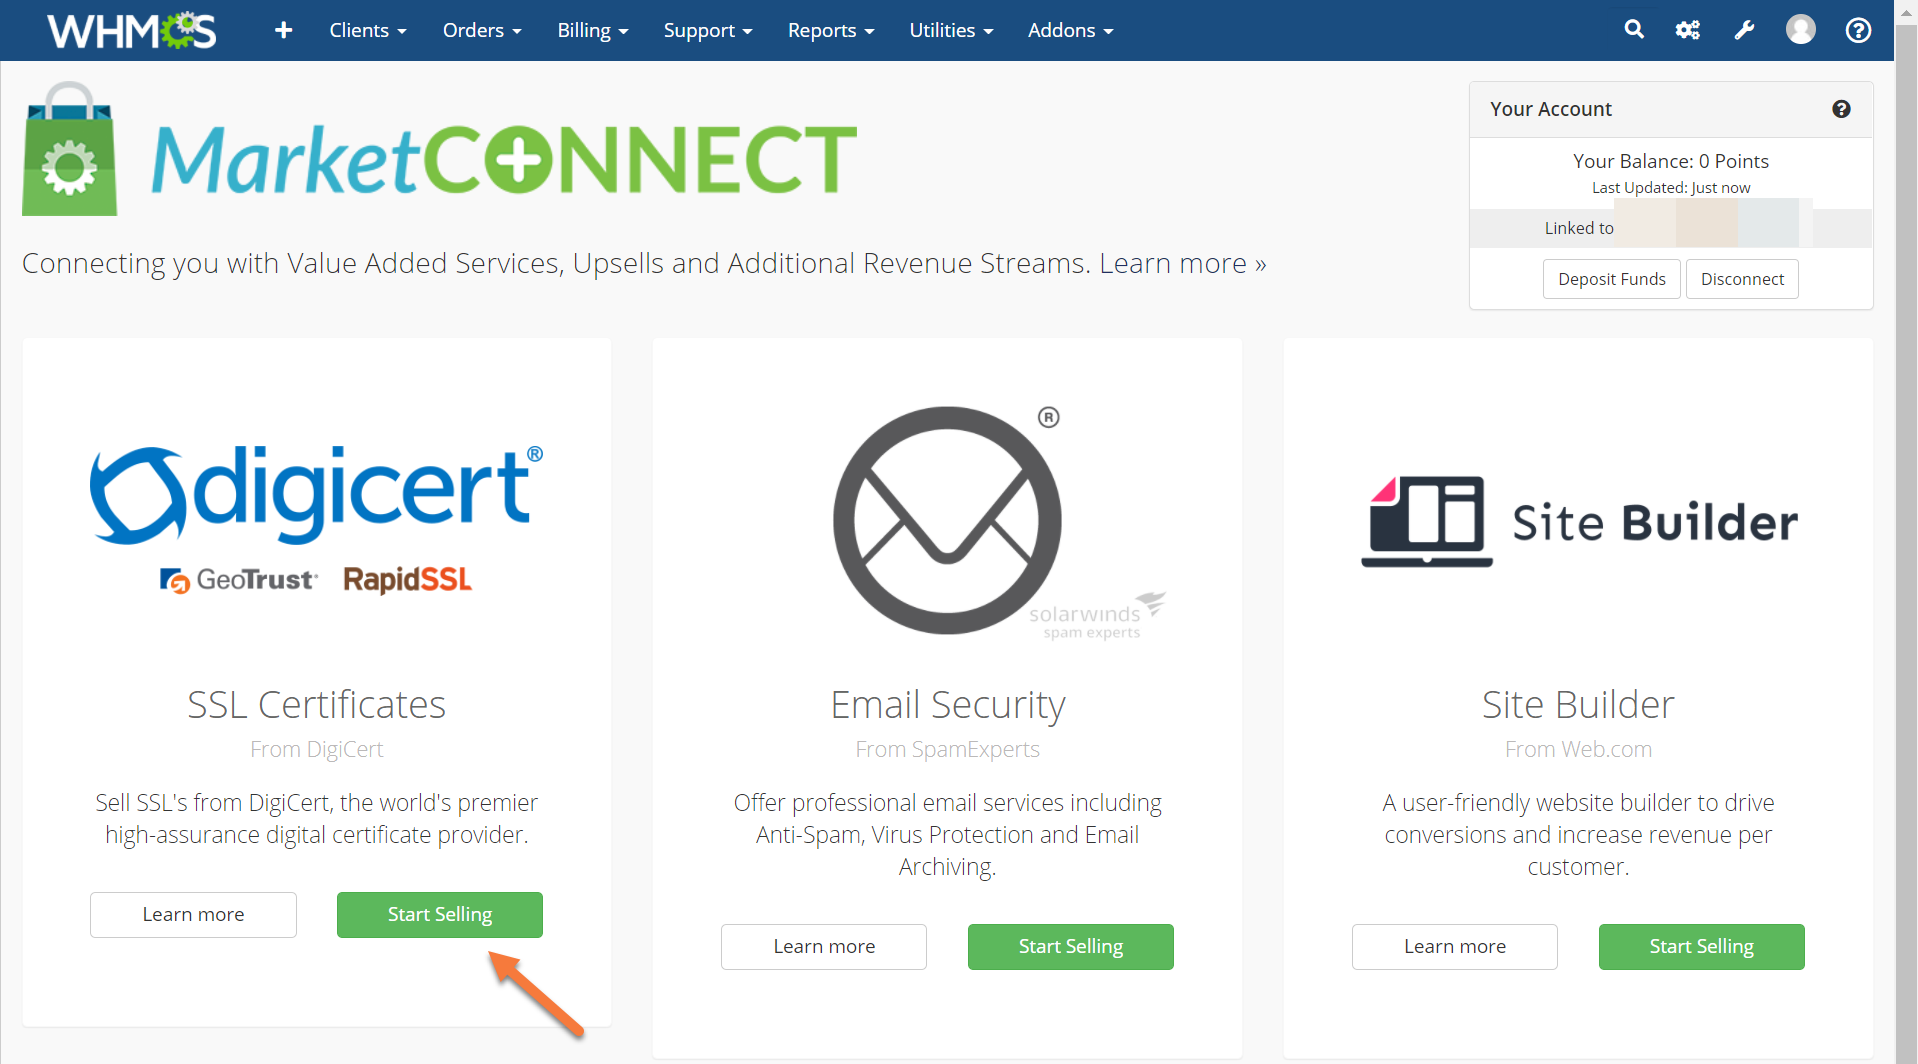
 Once you’ve logged in, you’ll see your name in the top right corner, along with your WHMCS Marketplace Balance.

Congratulations! You’ve now activated WHMCS MarketConnect!
Step 5: Now you can choose one of the products to sell by clicking Start Selling:
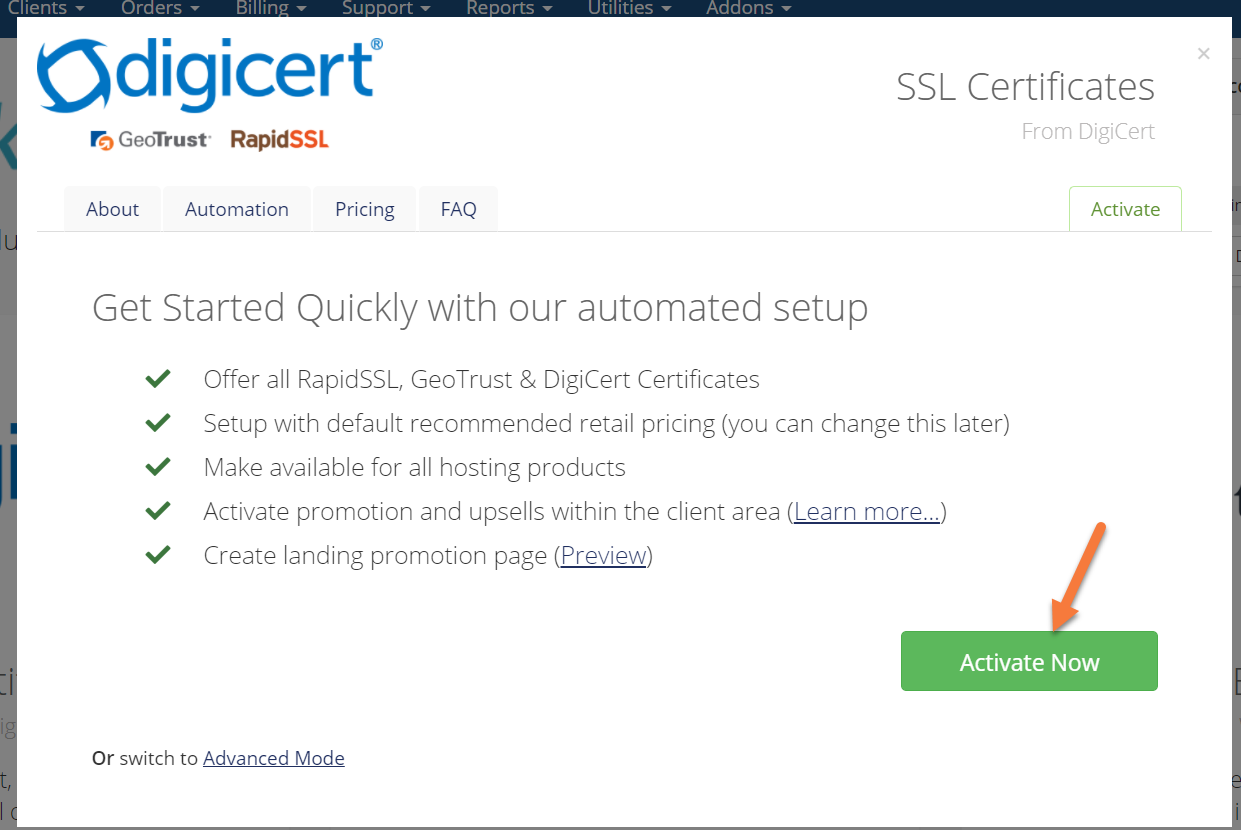
 Once you click Start Selling, a modal will appear and all you need to do is click the green Activate Now button to add the selected item to your WHMCS installation as an item you can sell to customers, if you choose.
 Once you activate the product, you’ll see a success message. Just click okay to return to the other products in the MarketConnect program.
Set Your Product Pricing
Once you’ve activated products in WHMCS MarketConnect, you’ll need to set your pricing so you can begin selling the product. To do that, follow the steps in this section.
Step 1: Login to your WHMCS. Once you’ve logged in, open the System Settings by hovering over the wrench in the top right and clicking System Settings.
Step 2: Click MarketConnect in the list of System Settings.
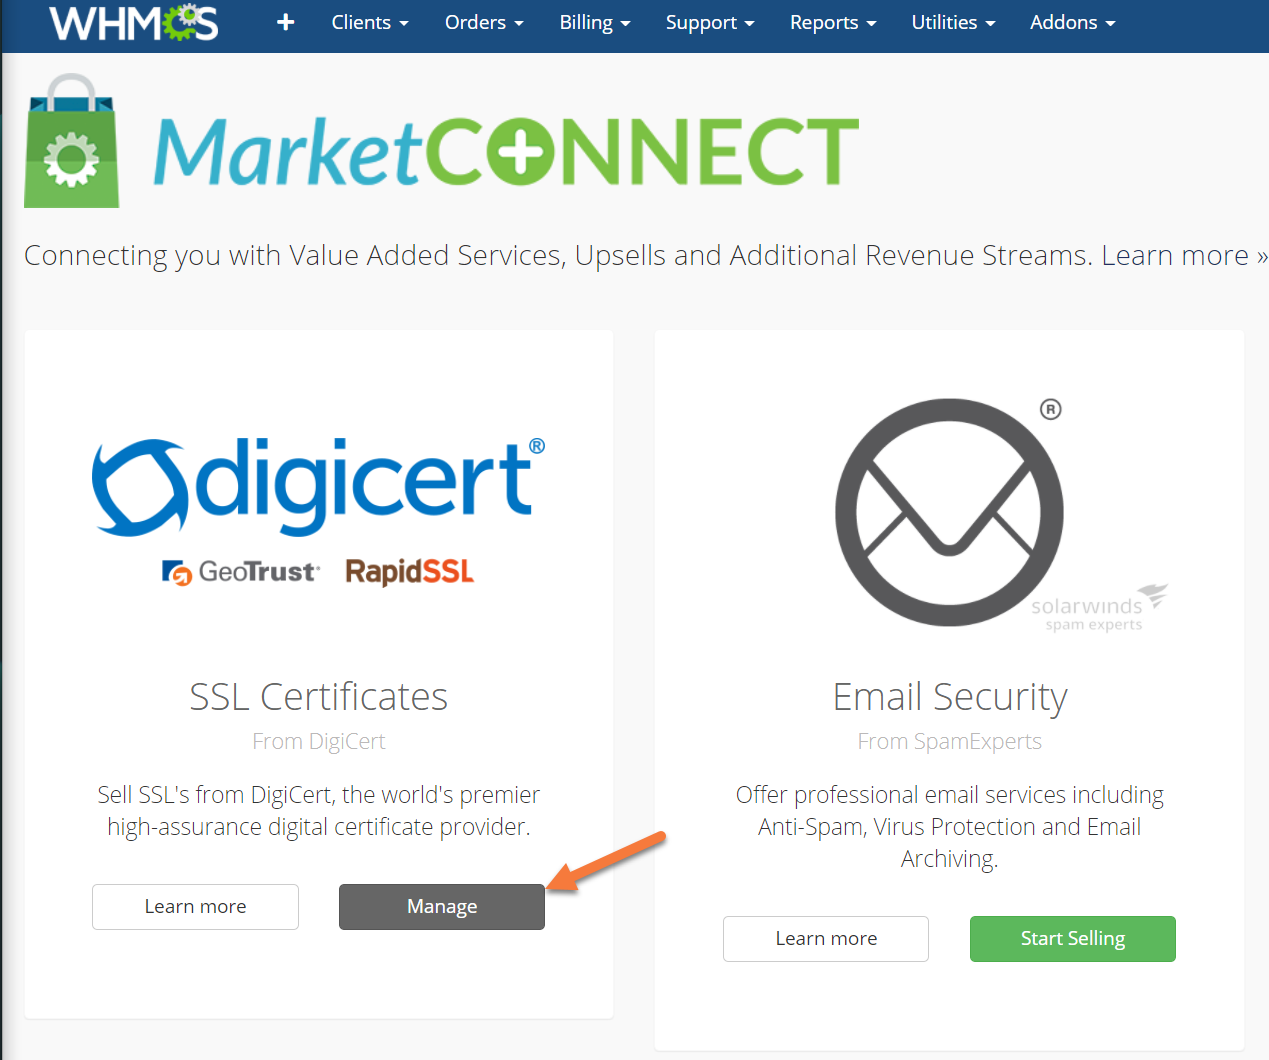
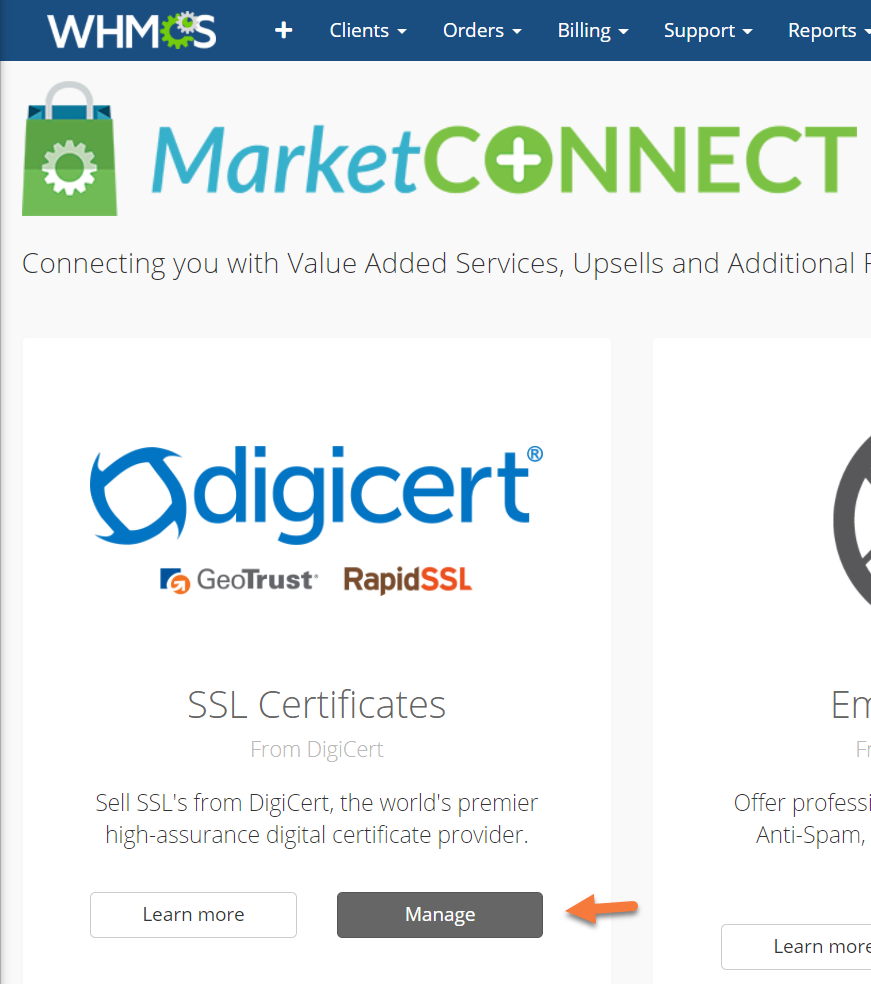
Step 3: Find the product for which you wish to set pricing and click Manage.
 A modal will open and you will have a few options.
Step 4: For our example, we’ll be setting pricing for our DigiCert SSL Certificates. Click the Products tab. 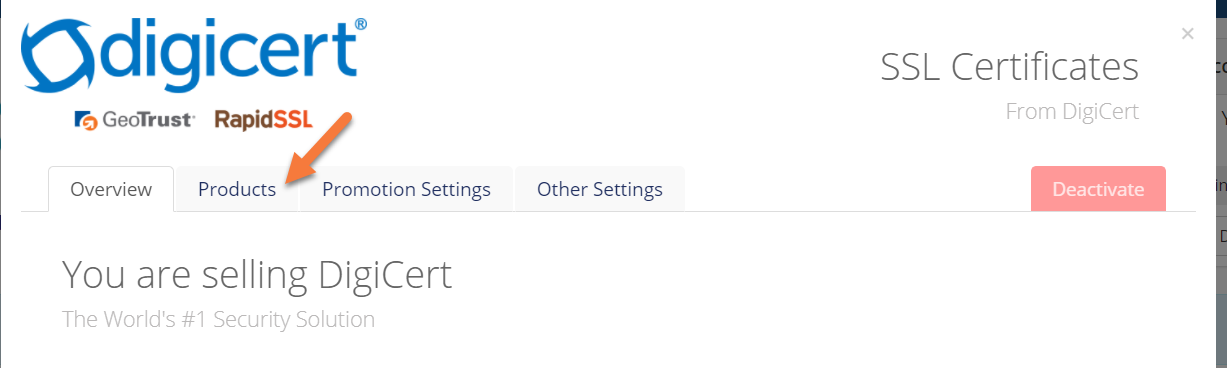 The list of different SSL Certificates you can sell will be presented. Click the > icon next to the SSL for which you want to adjust the price and that product will expand and you will be able to set the pricing:
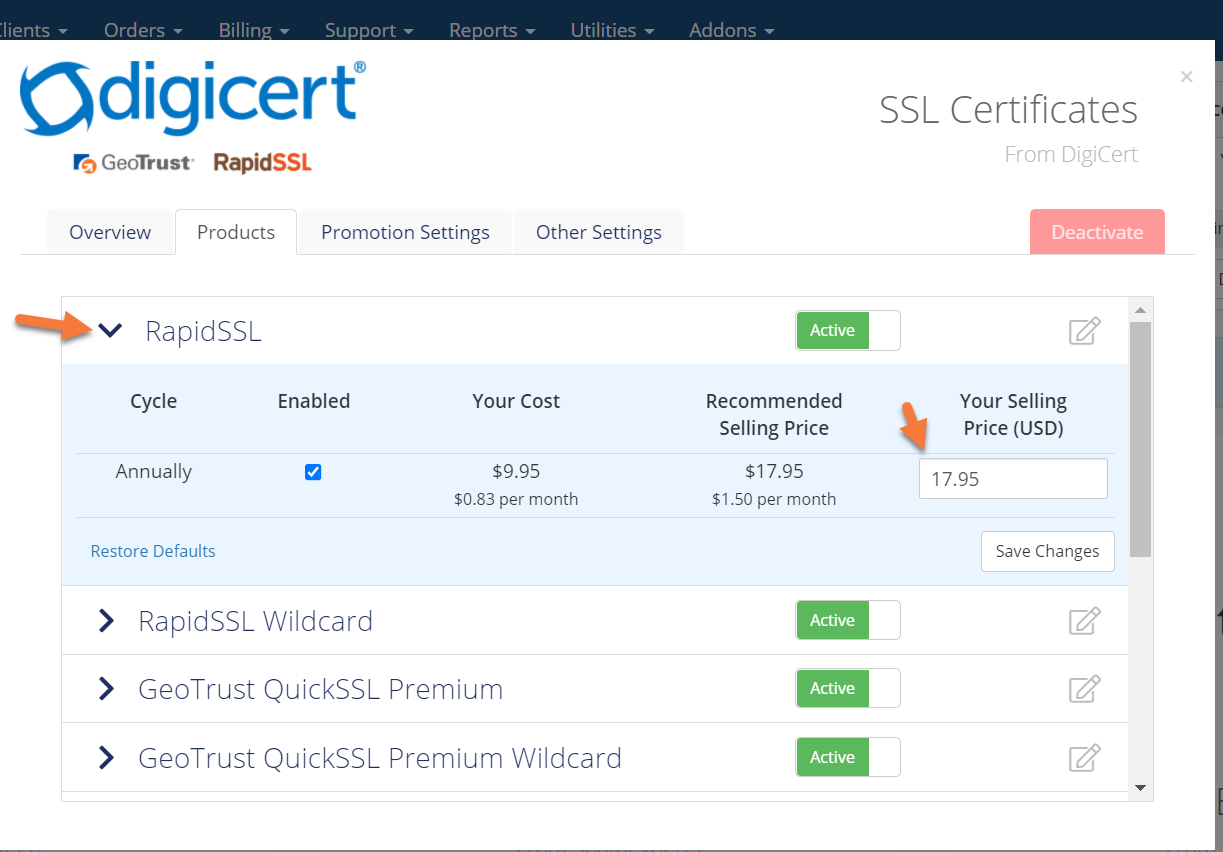
Enter the price in the Your Selling Price field, and be sure to click Save Changes when done.
You’ll need to do this to each product you sell from DigiCert, for example.
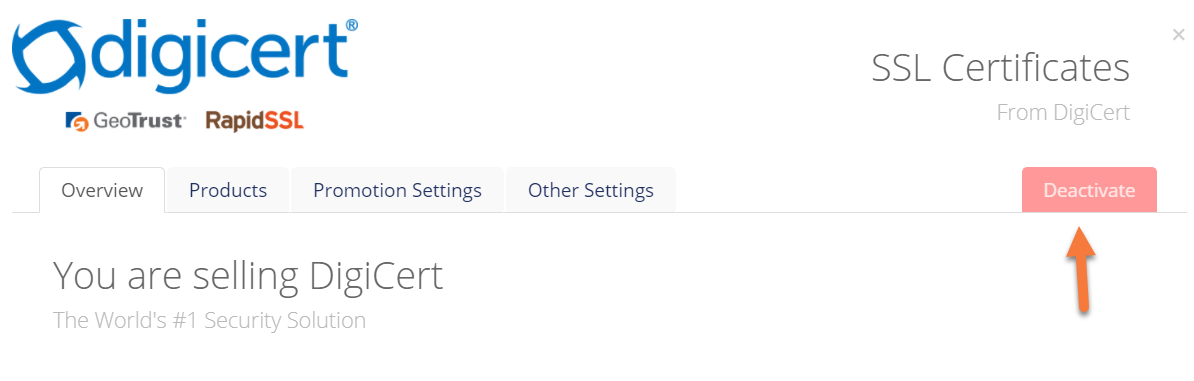
It’s also on this modal window where you can choose to not sell a product from DigiCert, or whichever provider you’ve selected in WHMCS MarketConnect. To opt not to sell a product, simply click the active button to set it from active to inactive.
And that’s how you configure pricing for products in WHMCS MarketConnect!
Setup Product Promotions
You may want to run promotions to attract new and existing customers to your newly added WHMCS MarketConnect products! Fortunately, the WHMCS MarketConnect plugin has some really great options for promotions. Use the steps below to set up promotions.
Step 1: Login to your WHMCS. Once you’ve logged in, open the System Settings by hovering over the wrench in the top right and clicking System Settings.
Step 2: Click MarketConnect in the list of System Settings.
Step 3: Find the product for which you wish to setup Promotions and click Manage.
A modal will open and you will have a few options.
Step 4: For our example, we’ll be setting promotions for our DigiCert SSL Certificates.
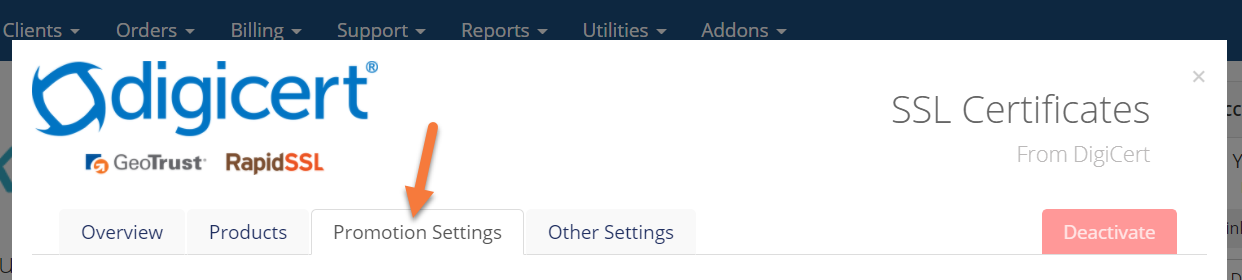
To do this, click Promotion Settings from the top row of options.
Step 5: You can choose which promotions you want to enable or disable. By default, they are all enabled giving your products the best opportunity of being seen by your customers.
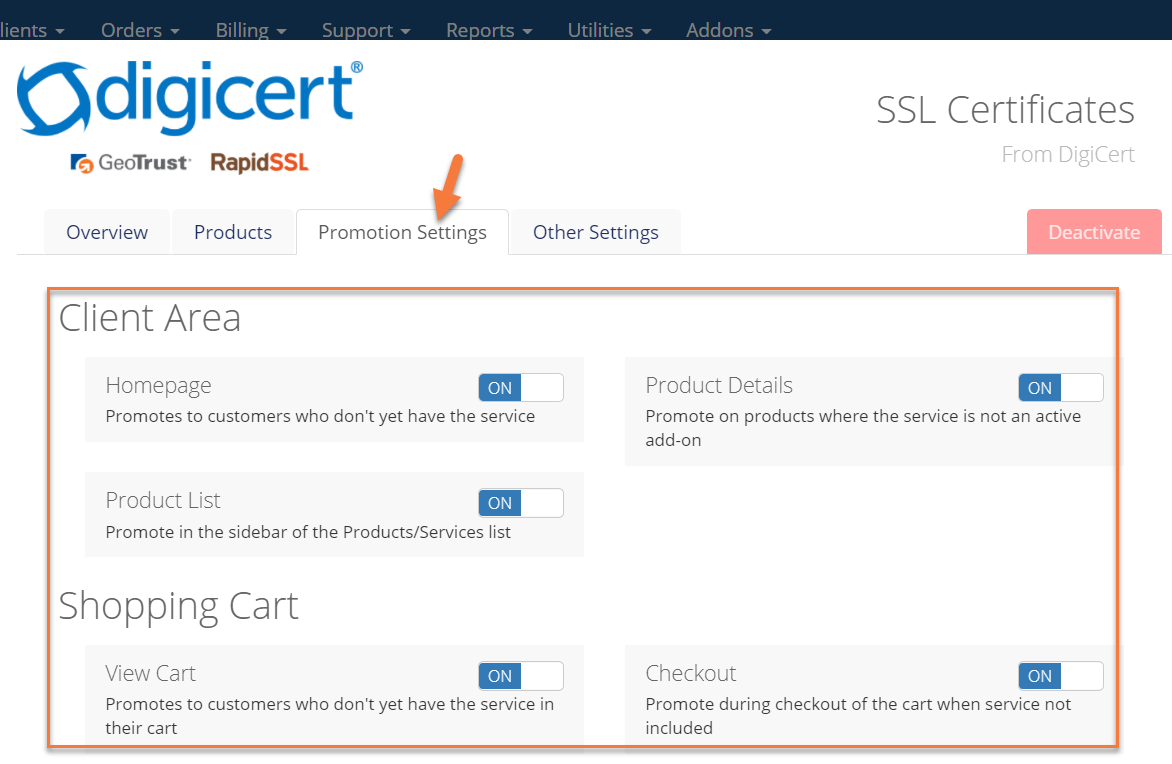
The toggles update automatically, so there is no Save Changes button. Set the Promotions as you wish and you’re good to go!
Deposit Funds
Funds are required to be in your account before you can sell things to your customers. Funds are used to pay for the items they buy from you.
Additionally, funds are listed as credits to be currency-neutral, but you should think of 1 credit = 1 of whatever your currency is.
Use the steps below to add funds to your WHMCS MarketConnect account.
Step 1: Login to your WHMCS. Once you’ve logged in, open the System Settings by hovering over the wrench in the top right and clicking System Settings.
Step 2: Click MarketConnect in the list of System Settings.
Step 3: Click Deposit Funds in the top right corner.
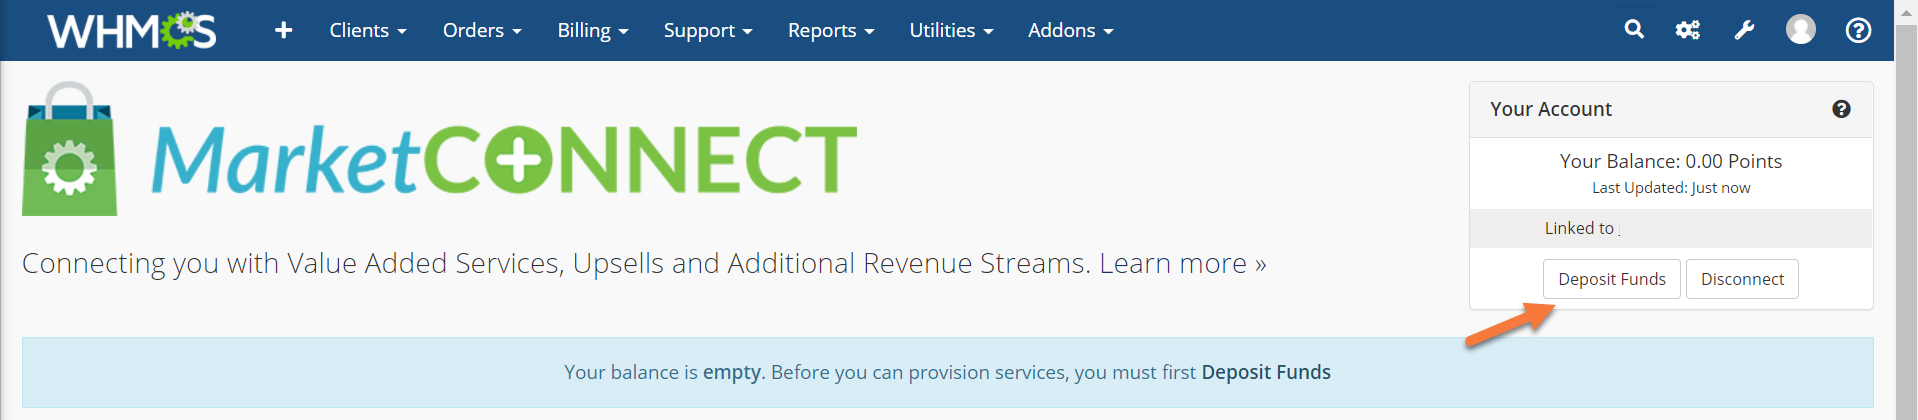
After clicking Deposit Funds, you’ll be taken to Your Account > Deposit Funds where you can use PayPal or a Credit/Debit card to deposit funds into your WHMCS MarketConnect account.
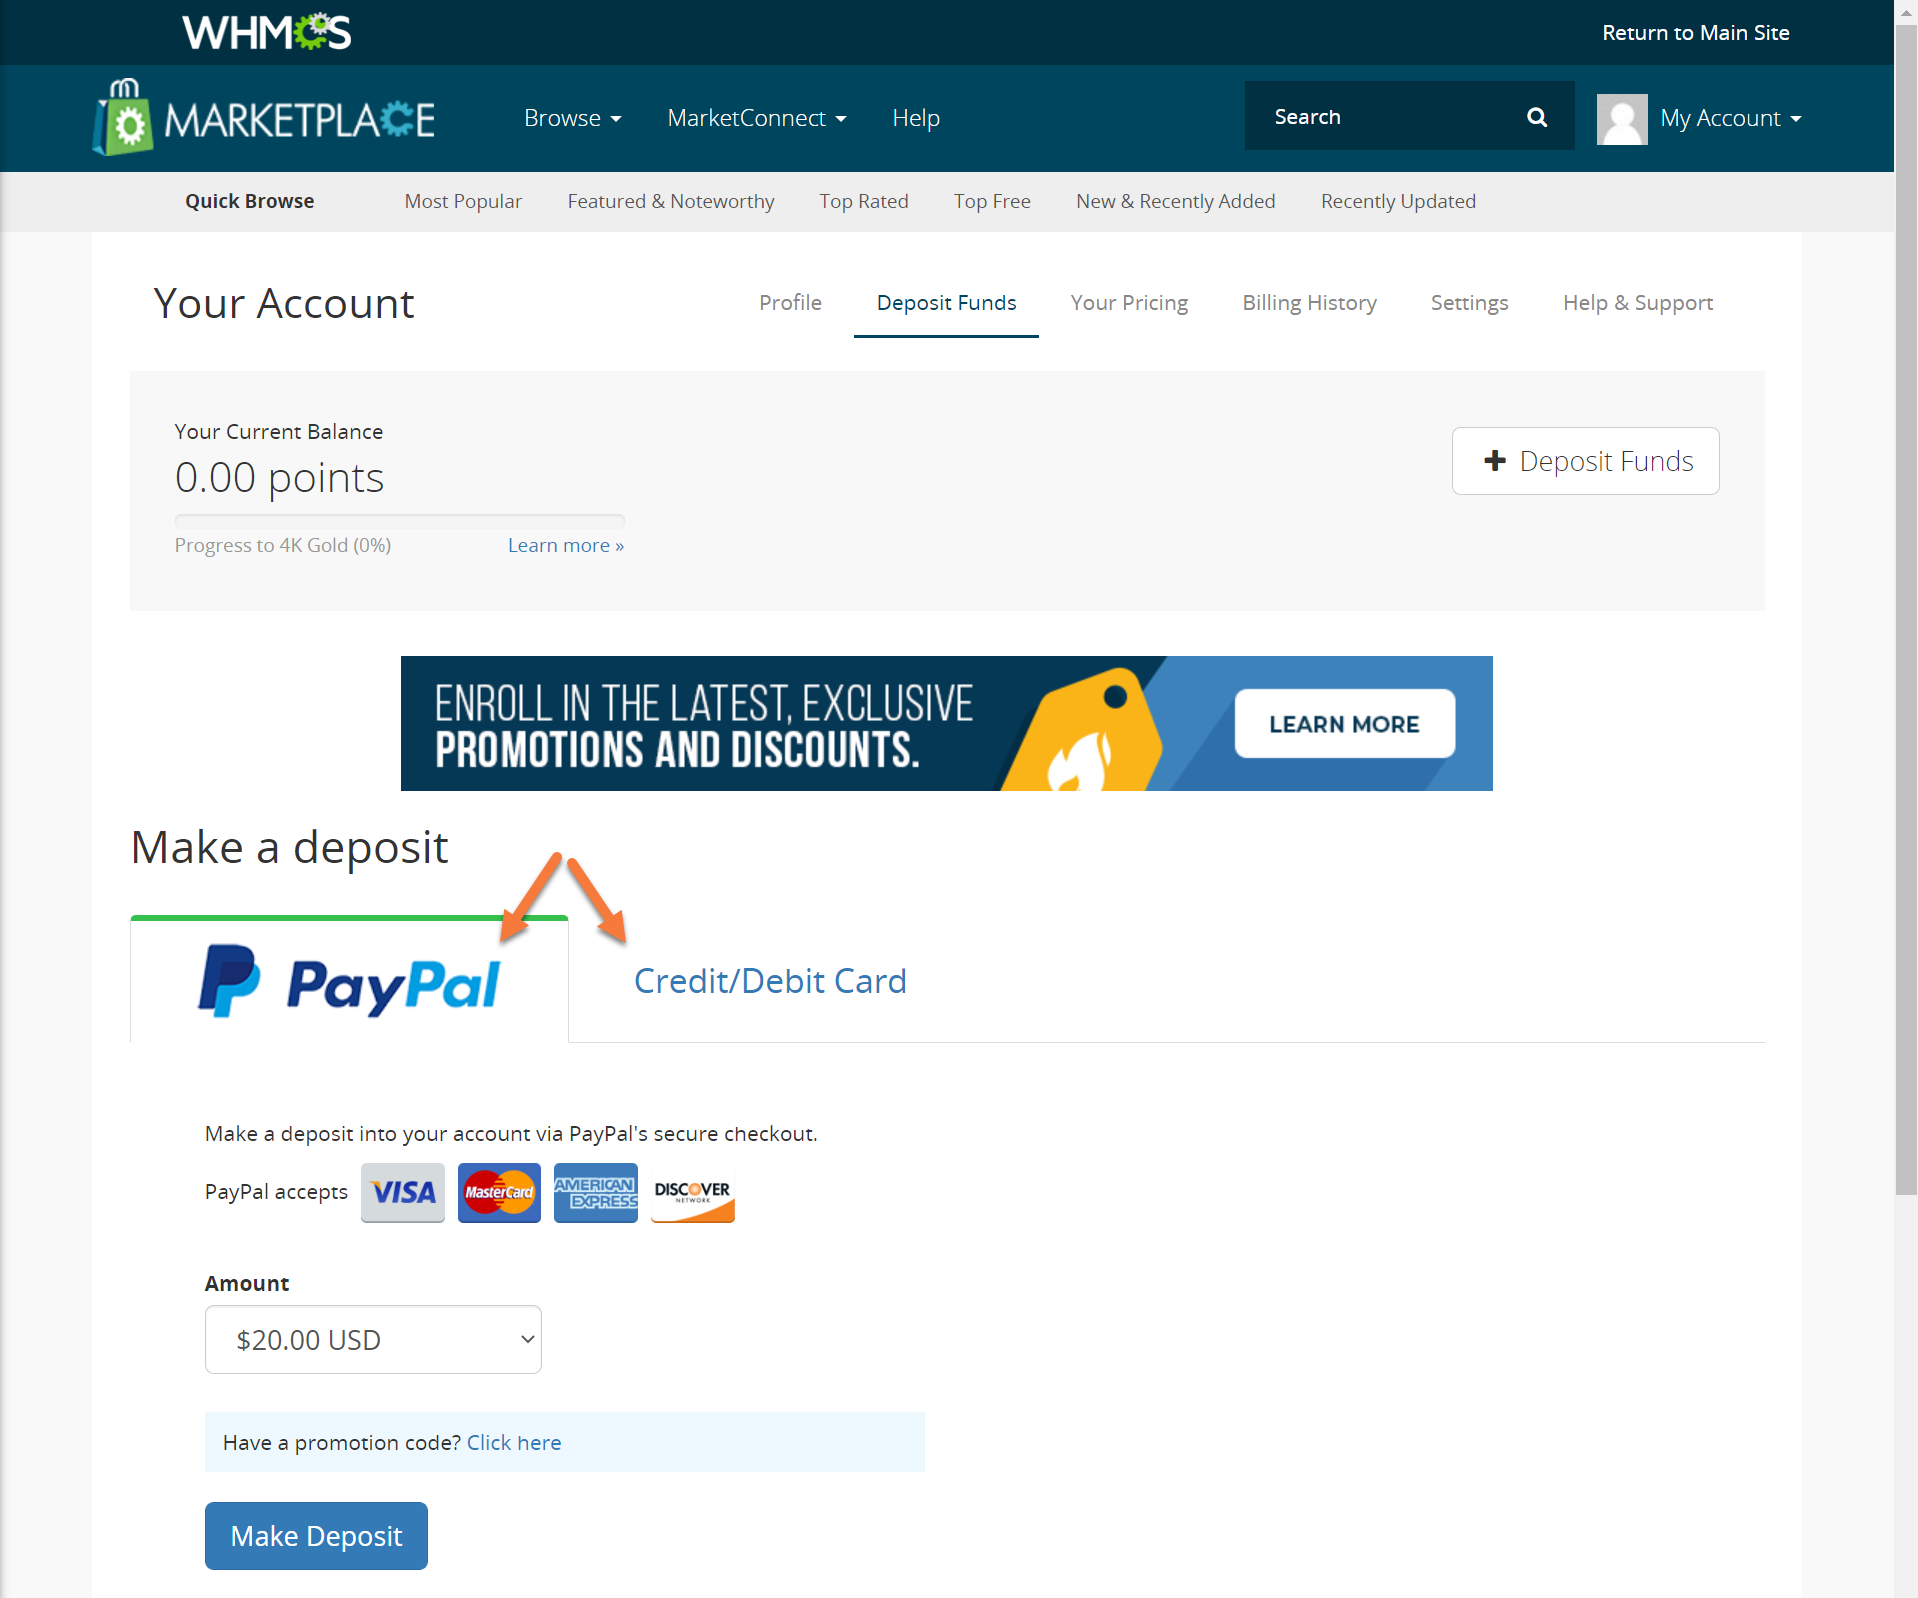
There are a few things you should know about depositing funds:
- WHMCS accepts payments via PayPal as well as all major debit and credit cards.
- All deposits are non-refundable.
- There is a $20 minimum to keep transaction processing costs at WHMCS lower and to avoid any deposit convenience fees.
- WHMCS does not store your credit card information and will never bill you automatically. Any fund deposits you make must be initiated by you.
- If you deposit $2500 or more, you’ll be automatically upgraded to 4K Gold Pricing.
Managing Services
WHMCS MarketConnect orders appear in the Orders list in the Admin area. All MarketCOnnect products have fully automated provisioning that begins as soon as payment has been processed.

Clicking Addon for that item gives you access to a variety of module commands you can perform.
The commands will vary based on the service being managed.

And that’s everything you need to know to get started with WHMCS MarketConnect!
Please join us in the next tutorial where we will walk you through how to Configure Domain Registrars in WHMCS.
This Knowledge Base article will help you do just that.
Let’s begin!
WHMCS Security Checklist: 5 Ways to Secure Your Installation
Secure Your Writable Directories
WHMCS recommends moving all writeable directories to a non-public location to prevent web-based access. There are three required writeable directories in WHMCS:
- attachments
- downloads
- templates_c
If you change the location of these writable directories, you must specify their new location in WHMCS. This is done in 2 places:
- File Storage
- and Templates Cache
File Storage:
You have the option to move the attachments and downloads storage directories to a local location, or you can store them remotely on an AWS S3-compatible service. (If you aren’t familiar with S3-type services, we recommend using the Local Storage option.)
To change your storage locations, use the steps below.
Step 1: Create your tertiary storage location in the new service. This could either be one of the following:
- A writeable directory on your web server in a directory above your public_html folder.
- or a non-public AWS S3-compatible storage bucket.
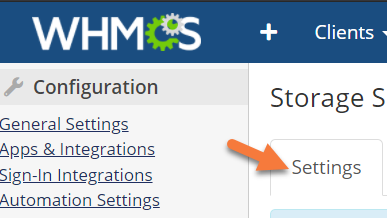
Step 2: Login to your WHMCS installation and once logged in, click the wrench in the top right corner, then click System Settings.

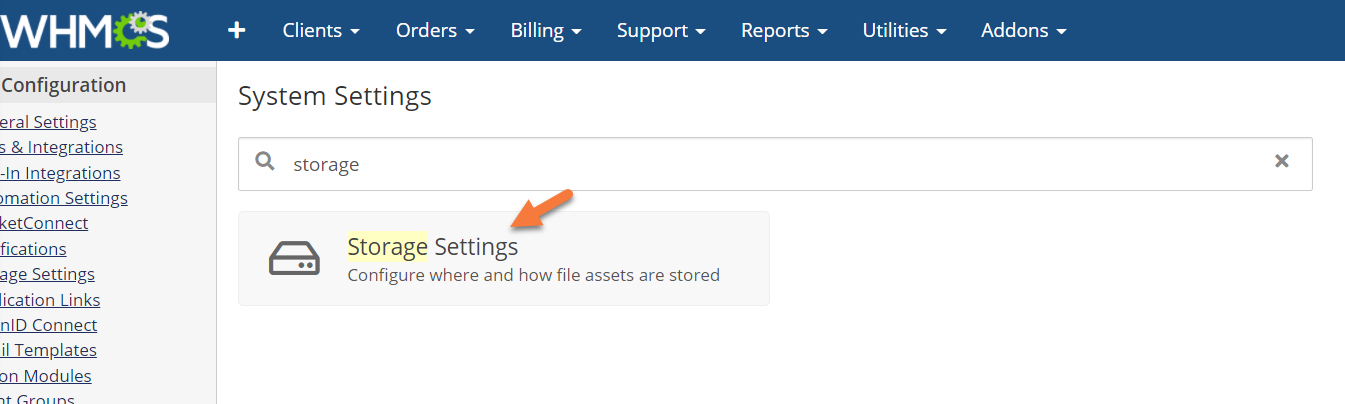
Step 3: Using the search function at the top, search for storage. Once the Storage Settings option loads, click it to open the Storage Settings.
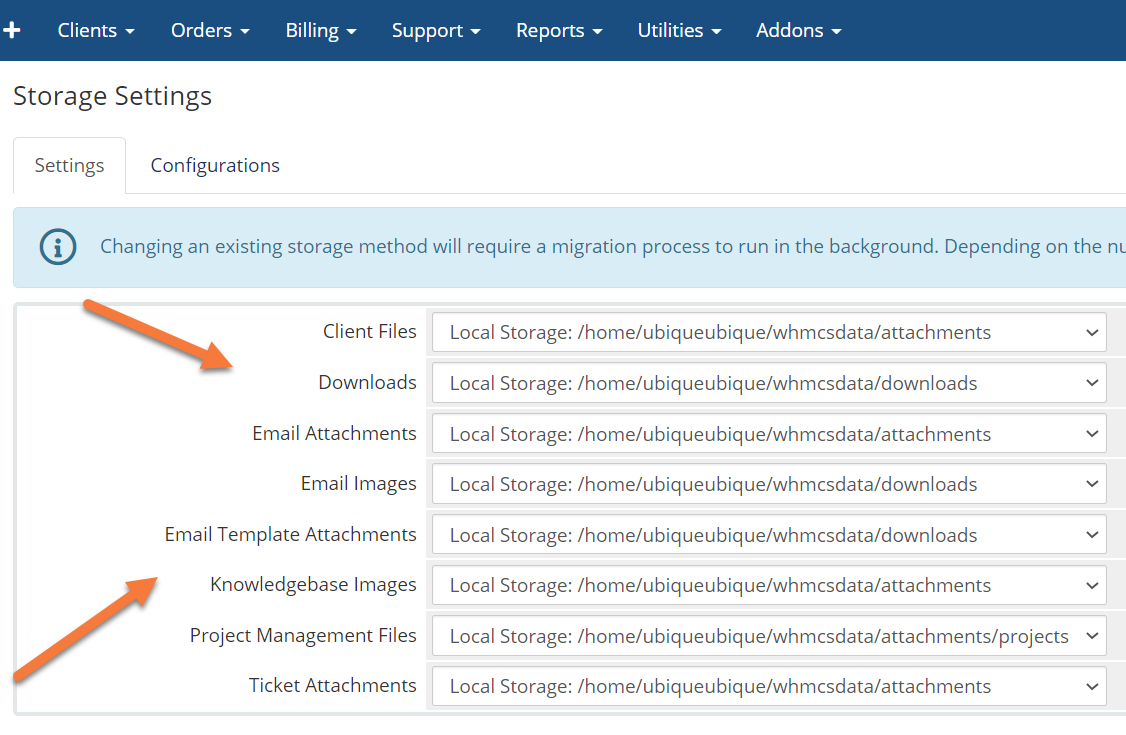
Step 4: Once the Storage Settings load, you’ll be presented with a list of all storage types and their locations:
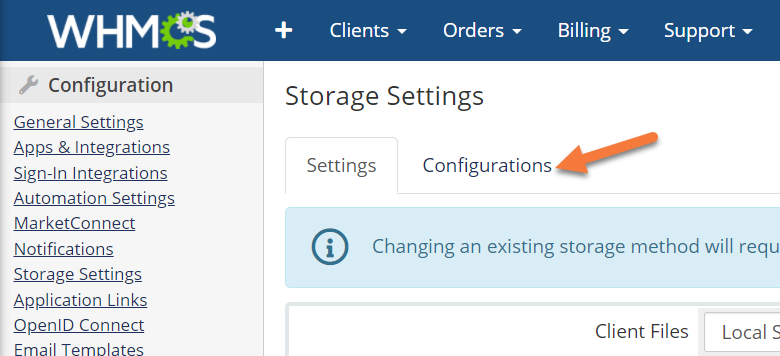
In order to set a offsite or S3-type storage, you’ll need to click the Configurations option at the top:
Once the configurations load, you’ll be presented with a list of the three local configurations plus the option to Add New Configuration.
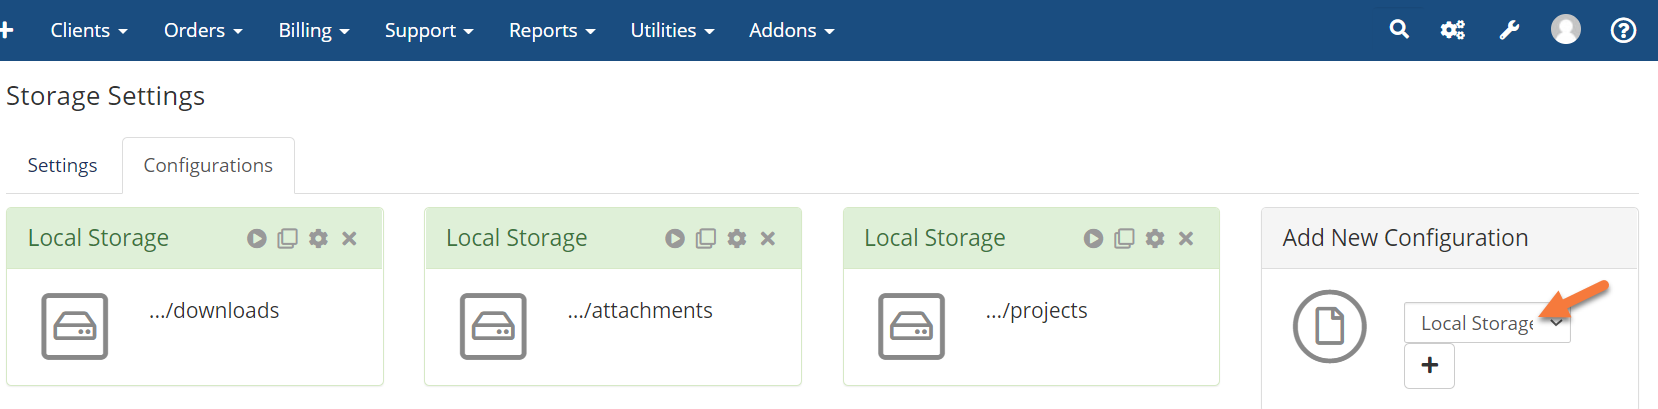
Click the drop-down next to Local Storage and choose S3, then click the + to add the configuration.
 In the modal that appears, you’ll need to enter the Access Key & Secret, plus the Bucket name and region, and an optional endpoint URL in order to successfully set this up.
Once you’ve entered that information, click Save Changes.
Next, return to the Settings by clicking Settings.
Once the list of locations loads, click the drop-down menu next to the location you want to set to remote, then choose the newly created remote destination from the drop-down menu.
Templates Cache:
You can use the templates cache (templates_c) to improve the performance of templated pages and emails. To do this, follow the steps below:
Step 1: Create a templates_c directory in the desired location…. i.e. above your public_html folder.
Step 2: This will involve editing the configuration.php file of your WHMCS installation. To do this, log in to your ChemiCloud account by clicking here, then open your cPanel > File Manager.
 Step 3: In your File Manager, navigate to the Directory where your WHMCS installation is located and locate a file called configuration.php.
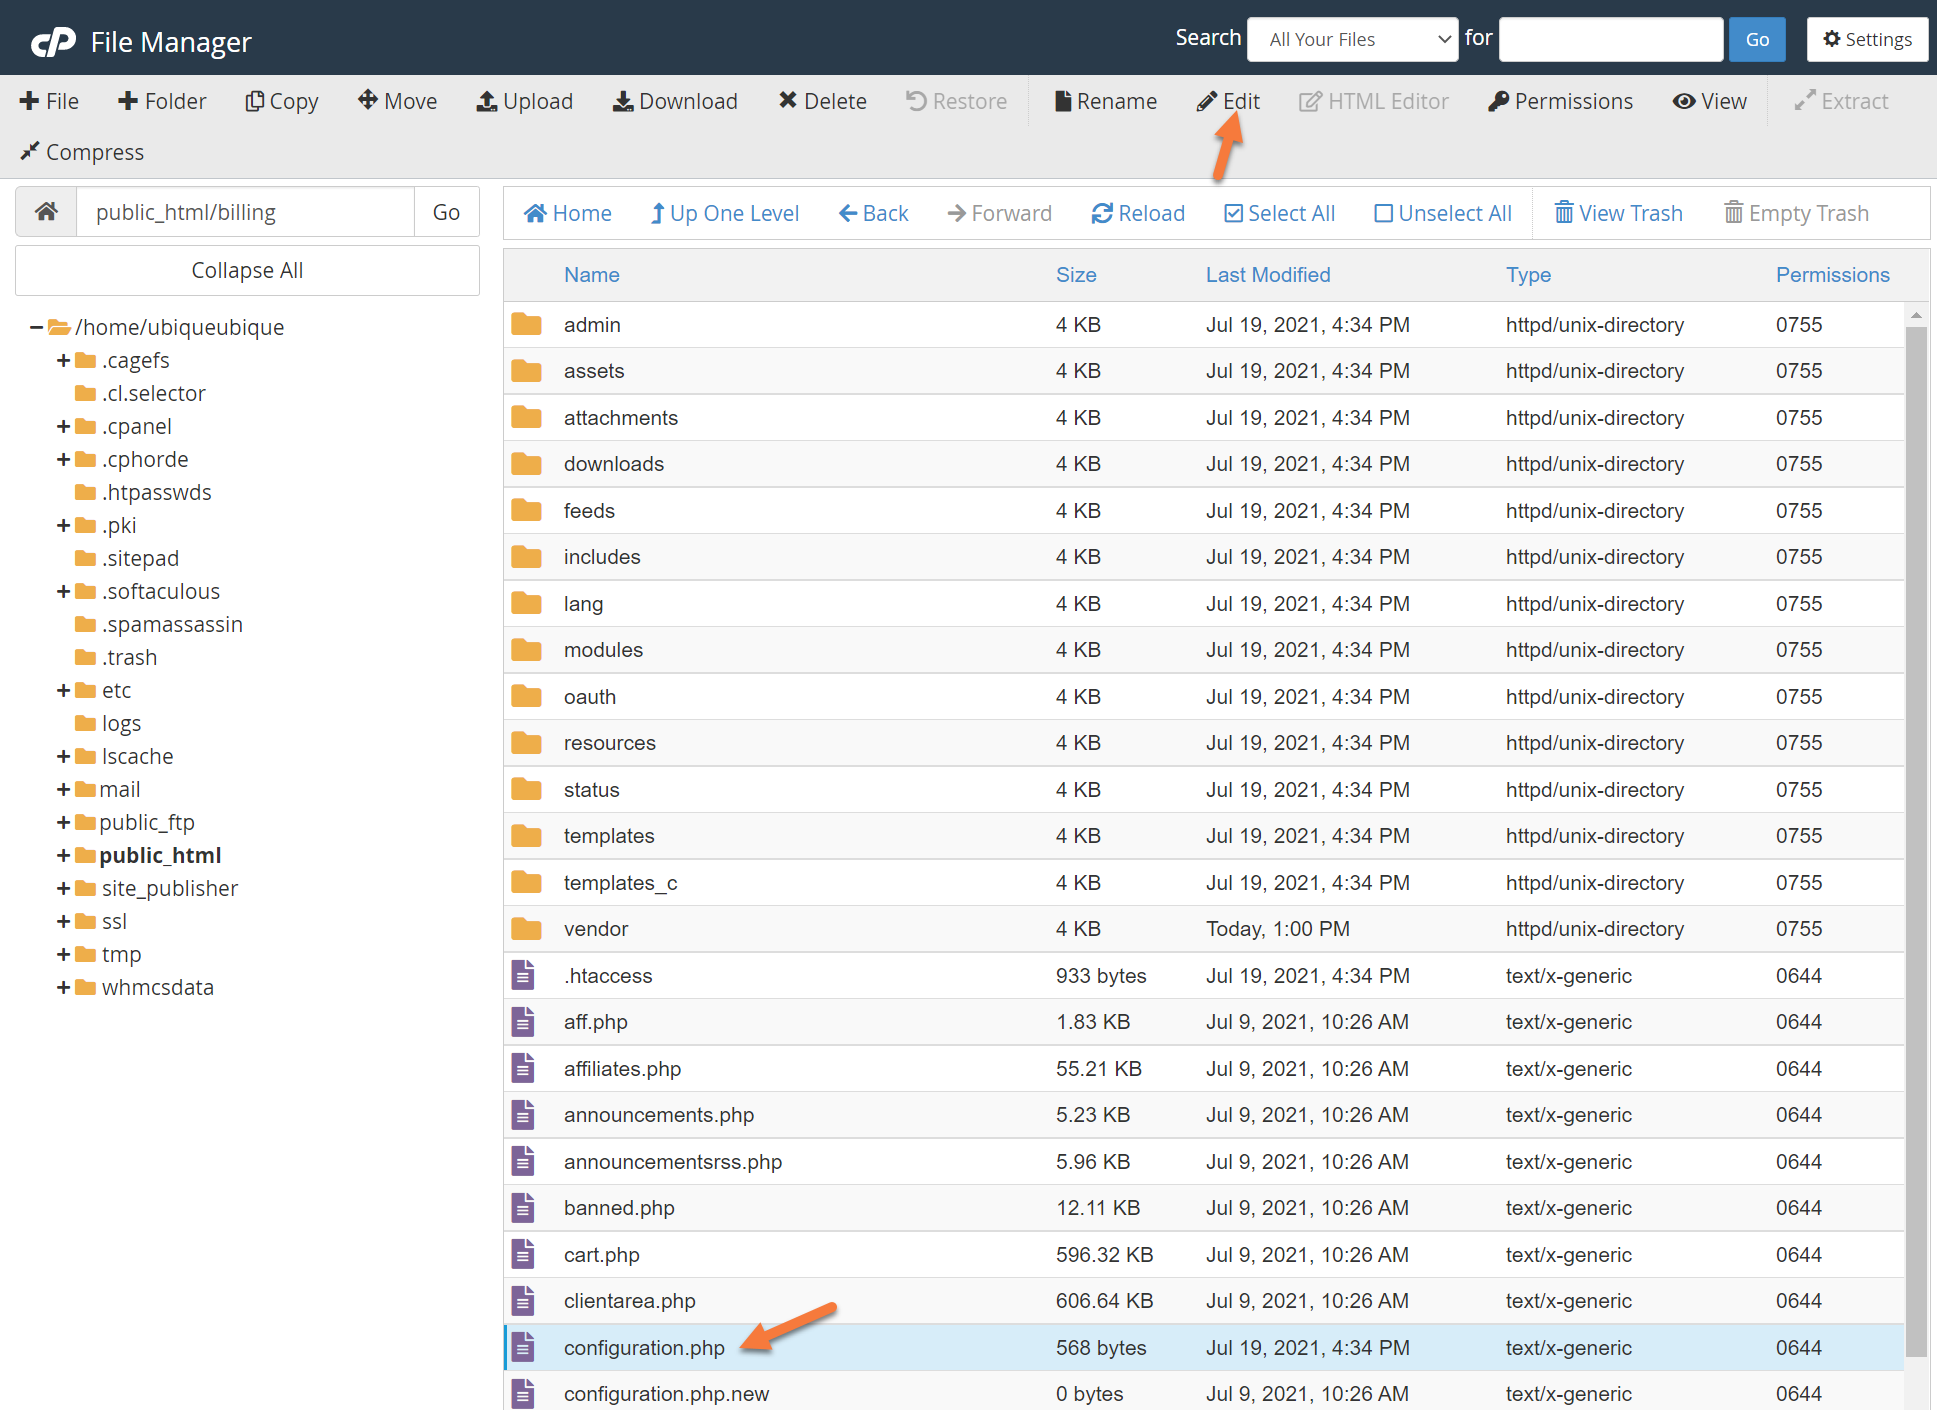
Click on the file, then at the top click Edit in the row of tools. In the modal that appears, click Edit.
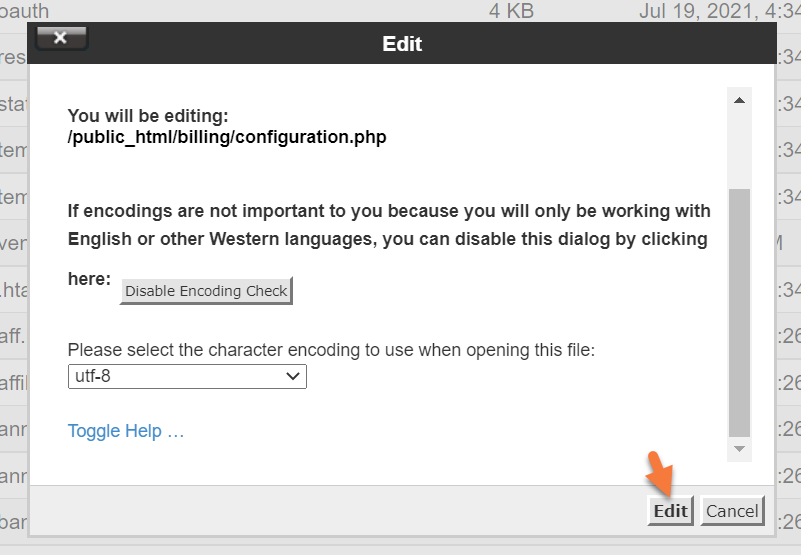
A new tab will open with your WHMCS configuration listed:
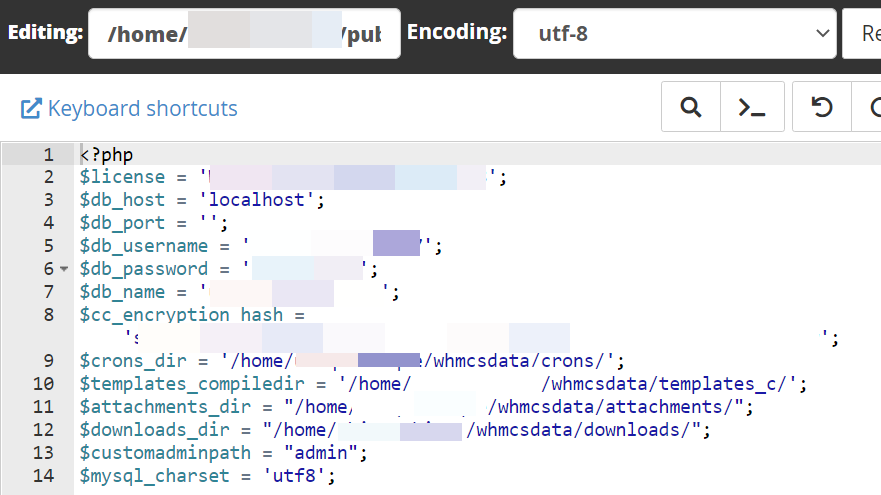
If you are changing the location of the templates_c, specify the new path to the templates_c directory you created on Line 10.
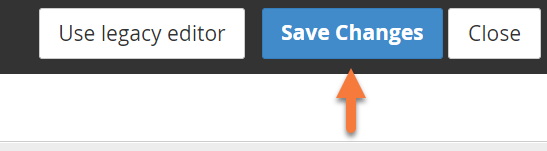
Step 4: When you’ve finished editing, click Save Changes in the top right corner.
Secure the configuration.php File
WHMCS recommends adjusting the permissions for the “configuration.php” file in your WHMCS root directory. This file contains sensitive data that you can’t recover without a backup of the file. To avoid accidentally overwriting, editing, or deleting the file, change the permission setting of this file to 400.
This provides the system with read-only access and prevents anyone else from reading, editing, or executing the file.
To change the permissions on this file, you can use the Terminal app to do. Just follow the steps below:
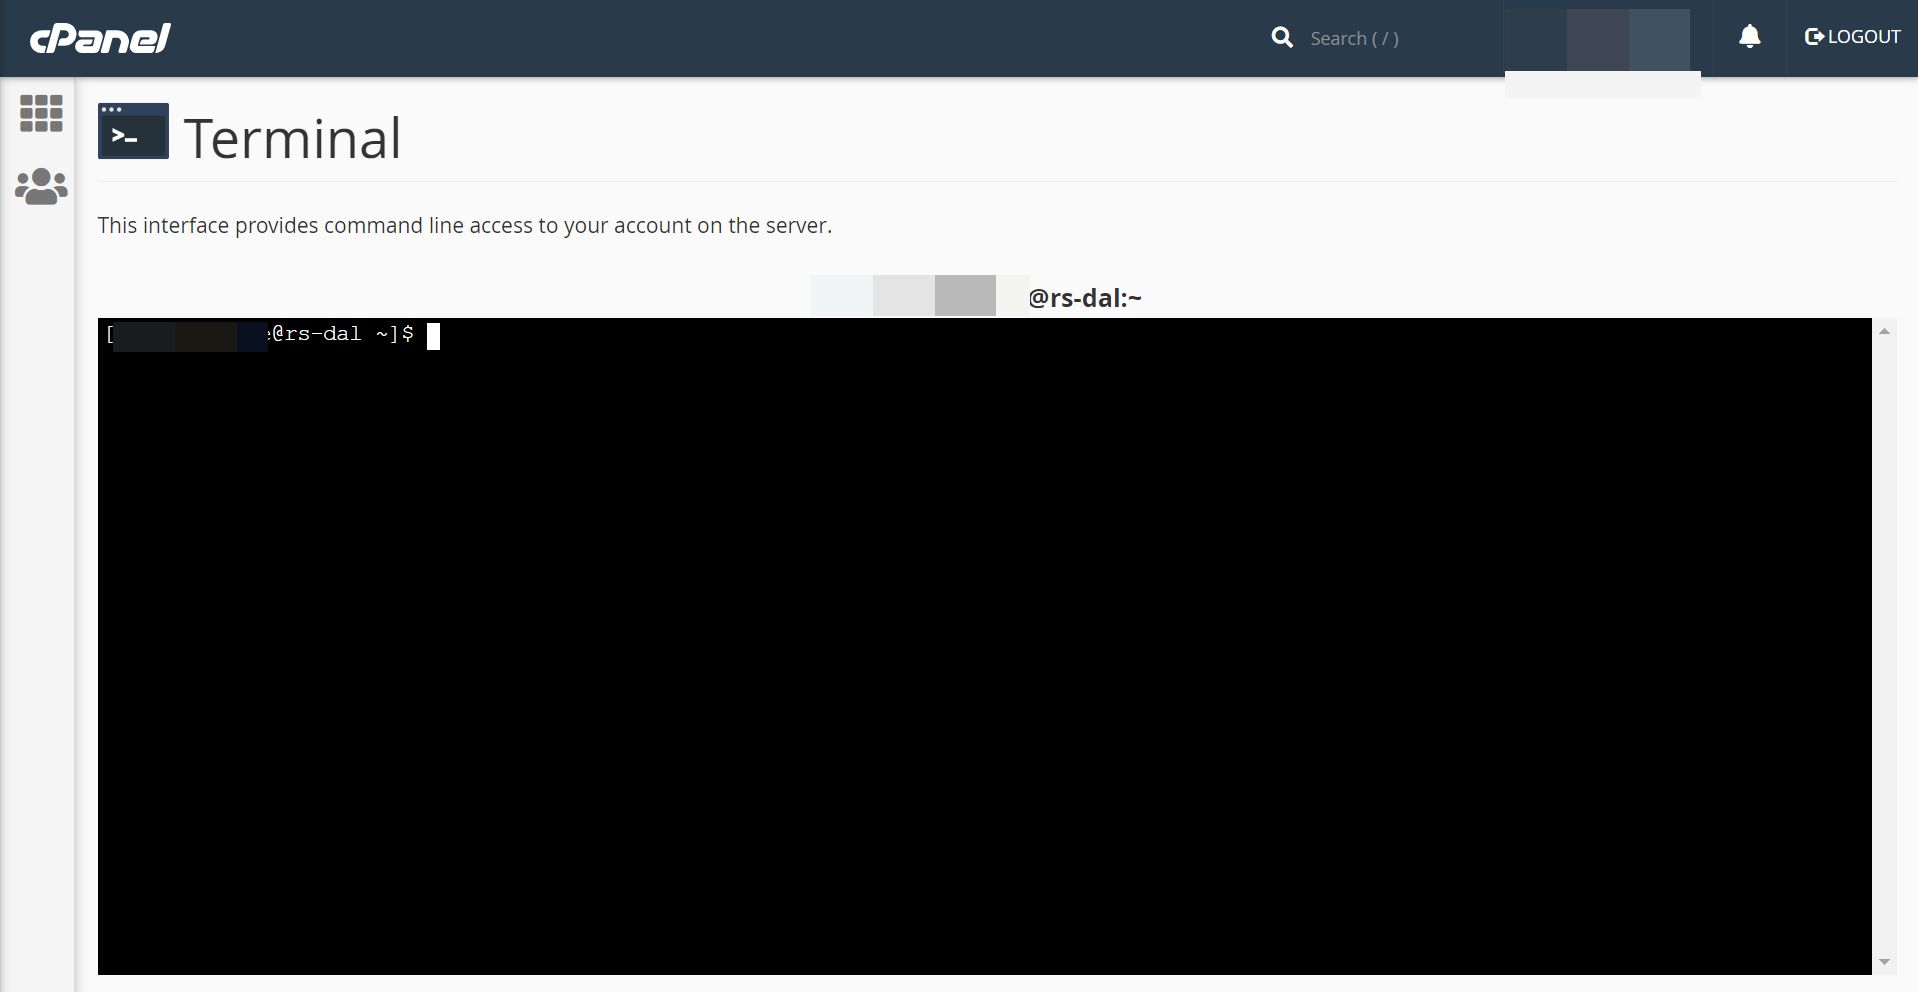
Step 1: Login to your ChemiCloud account by clicking here, then open your cPanel and look for Terminal, which is located in the Advanced Section.

Step 2: Once the Terminal Page opens, you’ll need to click the blue button which says “I understand and want to proceed.”. The Terminal is an advanced feature and you’ll need to follow the directions below precisely.

Step 3: After clicking the blue button, the terminal will load.
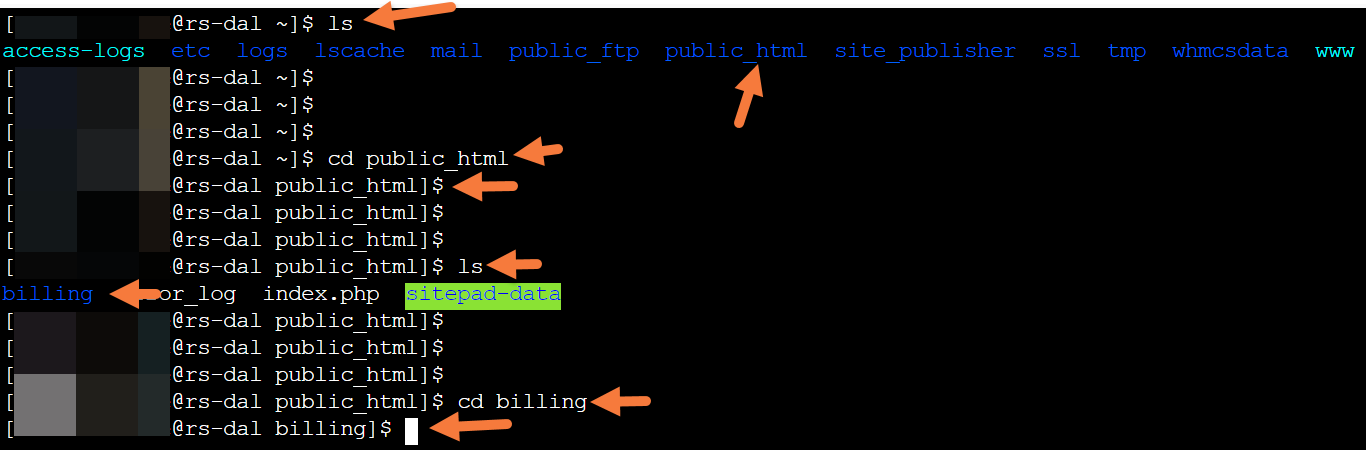
Step 4: Using the cd command, which stands for change directory, change directory into the directory where your WHMCS location is installed. In my case, WHMCS is installed in a folder called billing which is located in the public_html folder, so I will use this command:
cd public_html/billing
to change directories into the WHMCS installation directory.
Step 5: Next you need to run the following command in your Terminal:
chmod 400 configuration.php

After running the command, your Terminal should look like this:
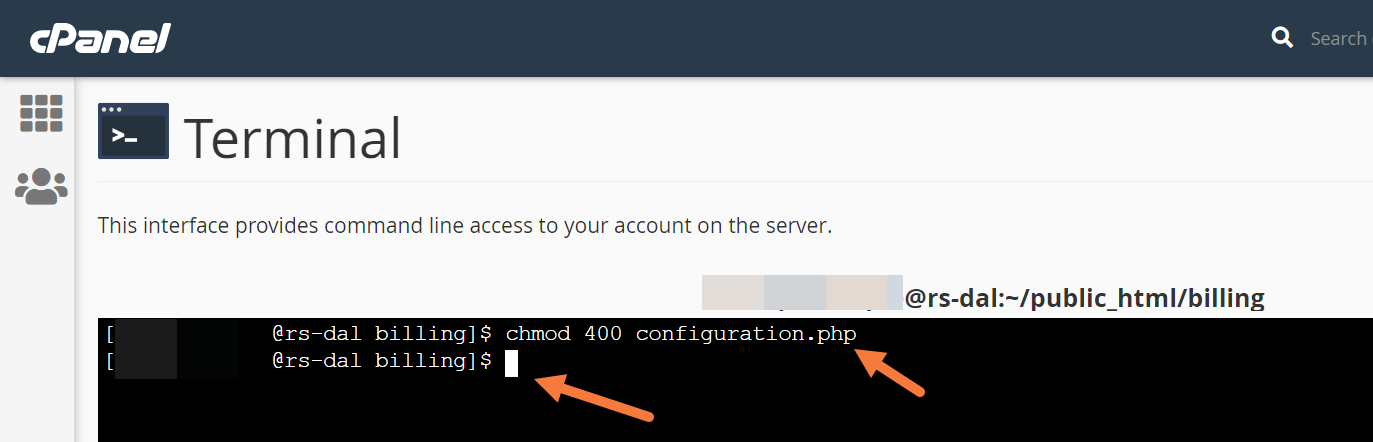
Congrats, you’ve successfully changed the permissions on the WHMCS configuration.php file. Keep in mind, if you need to update your WHMCS License Key, you must set the permissions on this file to 755 to allow the system to edit the file. After updating your license key, you can revert the permissions to 400.
Restrict Access By IP Address
For increased protection, if you and all of your staff use fixed (static) IP addresses, you can restrict access to WHMCS to a specific set of IP addresses. To do this, use the steps below:
Step 1: Log in to your cPanel. There’s a lot of ways to do this, but the sure-fire easiest way is to login to your Client Area, then open your cPanel.
Step 2: Once your cPanel is open, open your File Manager.
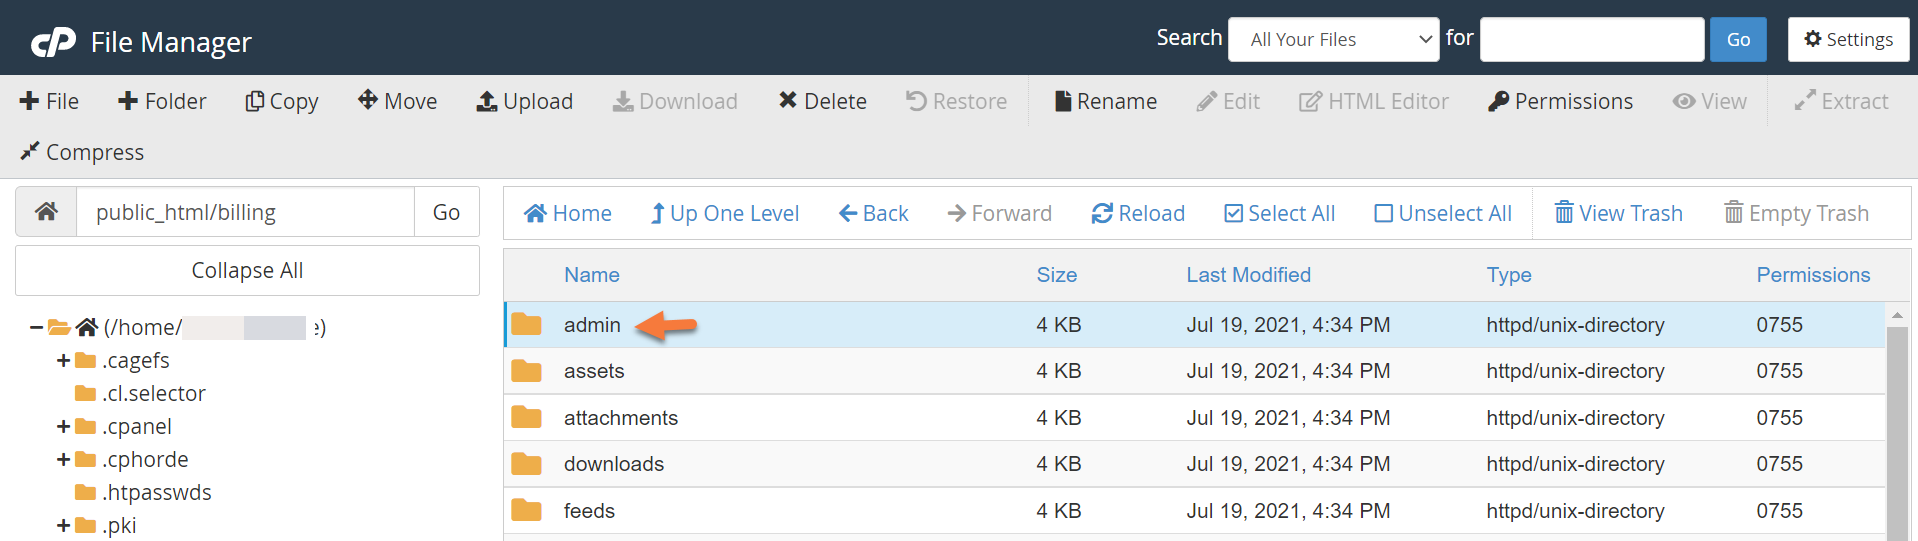
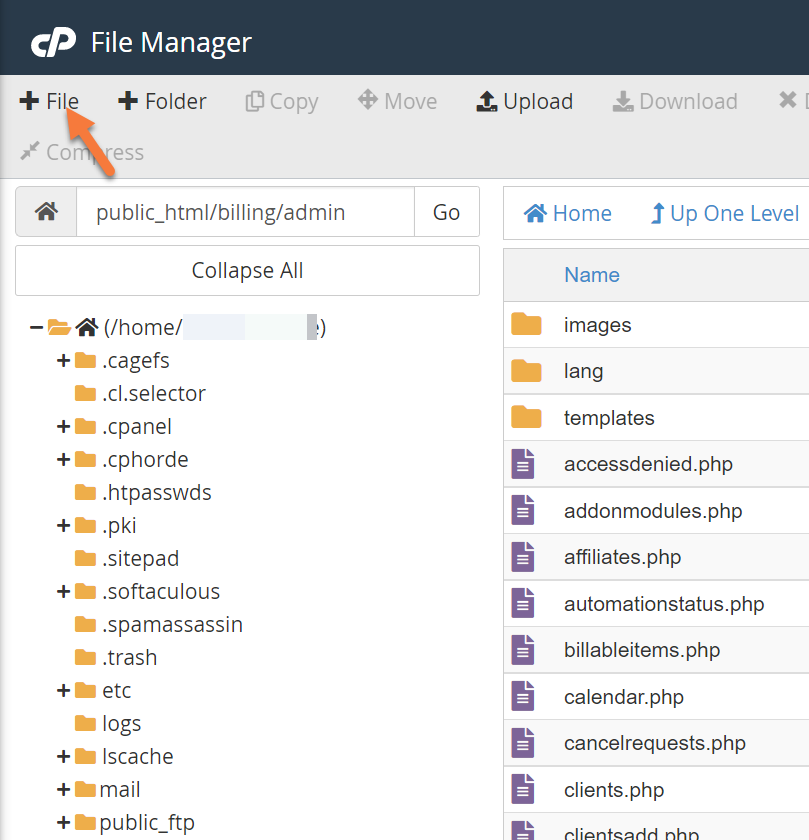
Step 3: In your File Manager, navigate to the directory where your WHMCS installation is located, and open the admin directory.
Step 4: You’ll need to create a new file in the admin directory in order to restrict access to WHMCS by IP address. To do this, click + File in the top left corner of File Manager.
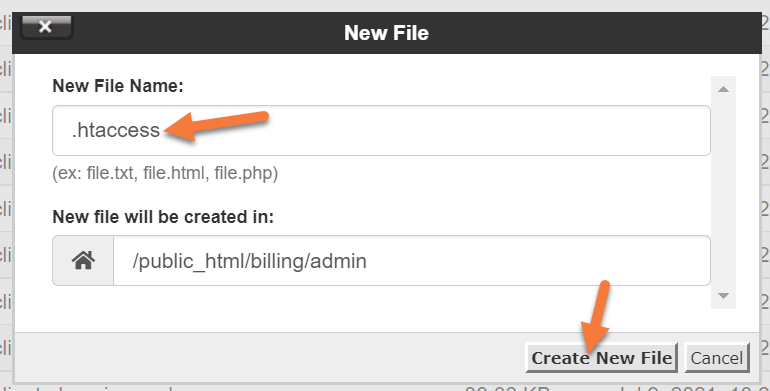
 In the new file modal, the file name will be .htaccess
Click Create New File after entering the filename.
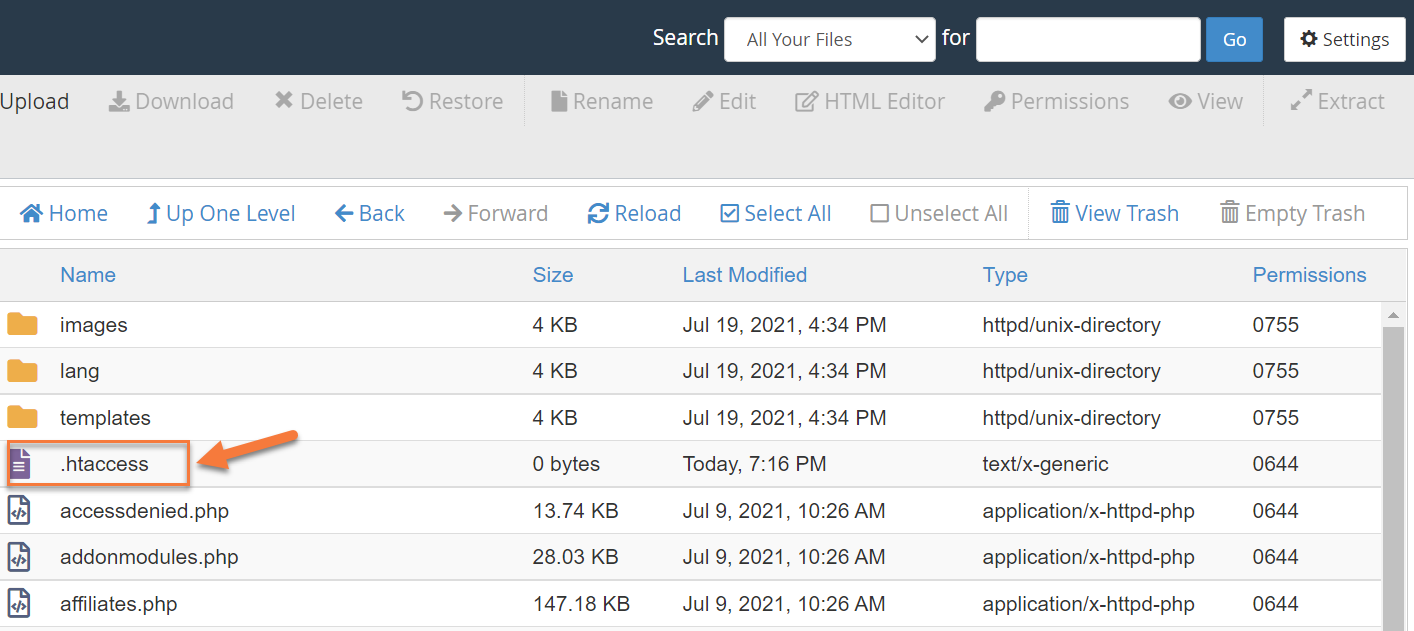
 Once the .htaccess file is created, it will be listed amongst the other files in the /admin directory:
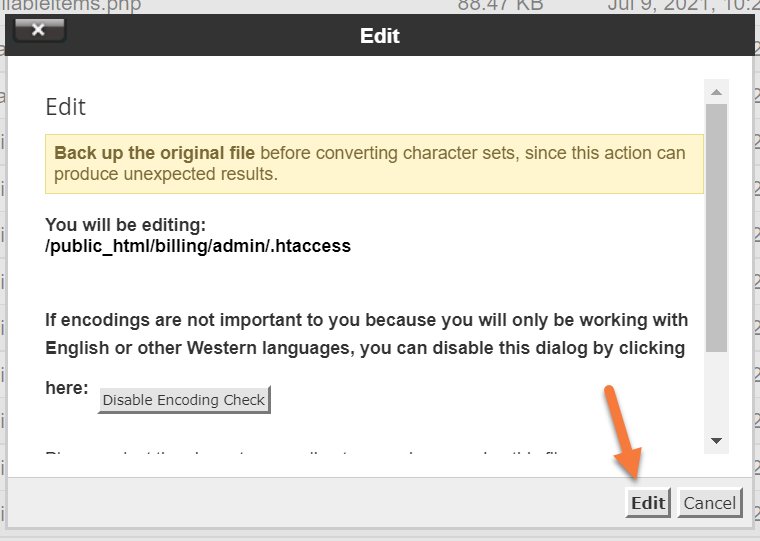
Single-click on the .htaccess file to select it, then click Edit in the top right corner of the row of tools at the top of File Manager.
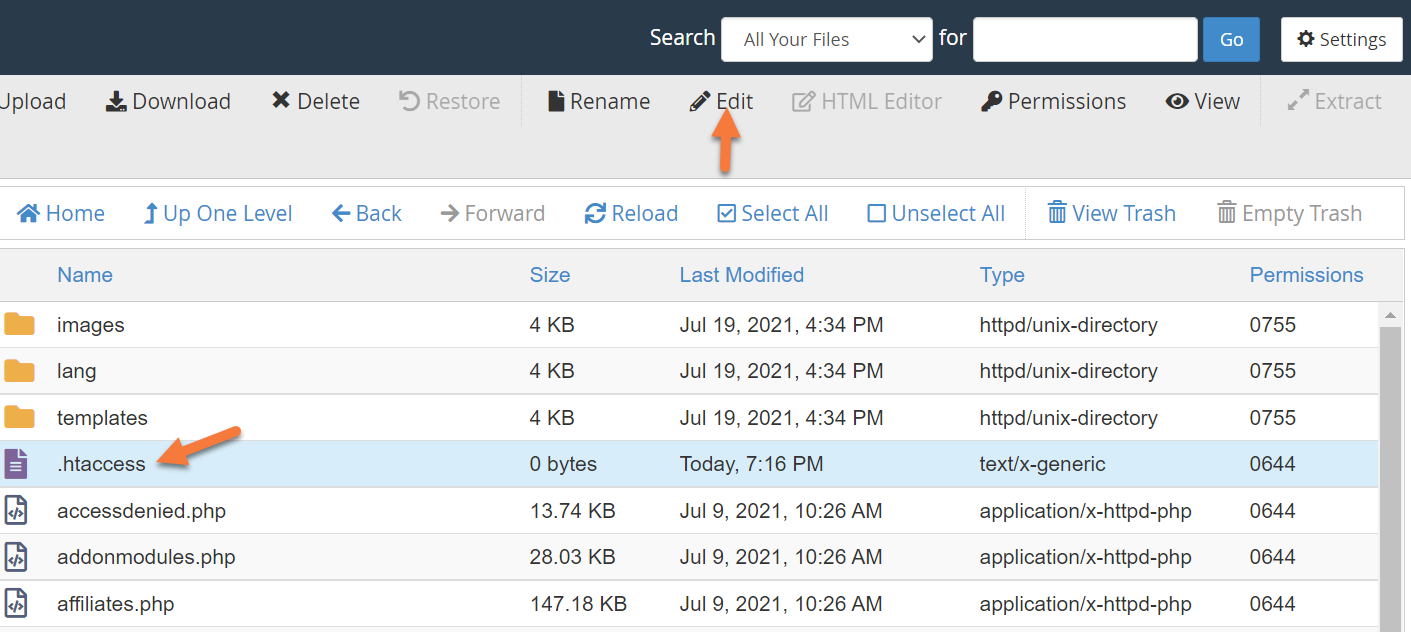
The Edit modal will appear, just click Edit in the bottom right corner to proceed.
 Step 5: A new tab in your browser will open with the HTML editor.
Enter the following text:
order deny,allow
allow from x.x.x.x
allow from x.x.x.x
deny from all
For each IP address, you wish to allow, enter a new line beginning with allow from, following by the IP address.
When you’ve finished, your file could look like this one below (depending on how many IPs you’ve allowed):
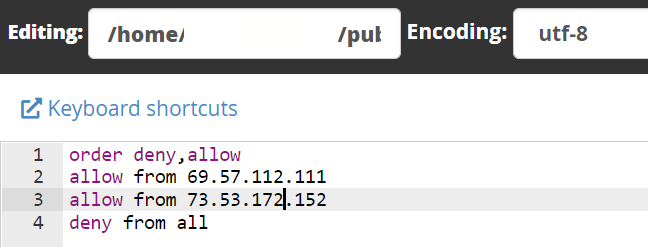
When you’ve finished, click the Save Changes button in the top right corner.
Now, when others try to access your WHMCS Admin area, unless their IP address is on the list, they won’t be able to load the login page or any other elements in the Admin directory.
Renaming Your Admin Directory
You can rename the Admin directory into something else to make it even harder for people to access your Admin area or break into your WHMCS installation.
Follow the steps below to rename your WHMCS admin directory.
Step 1: Login to your cPanel. There’s a lot of ways to do this, but the sure fire easiest way is to login to your Client Area, then open your cPanel.
Step 2: Once your cPanel is open, open your File Manager.
Step 3: In your File Manager, navigate to the Directory where your WHMCS installation is located and locate a file called configuration.php.
Click on the file, then at the top click Edit in the row of tools. In the modal that appears, click Edit.
A new tab will open with your WHMCS configuration listed:
At the bottom of the configuration, add a new line with the following text:
$customadminpath = "mycustomfoldername";
Replace “mycustomfoldername” with the name you wish to use for your Admin directory. This should just be the directory name, not the full path to the directory.
Click Save Changes in the top right corner to save these new changes.
Step 4: Next, return to your File Manager and locate the Admin directory in the directory where WHMCS is installed.
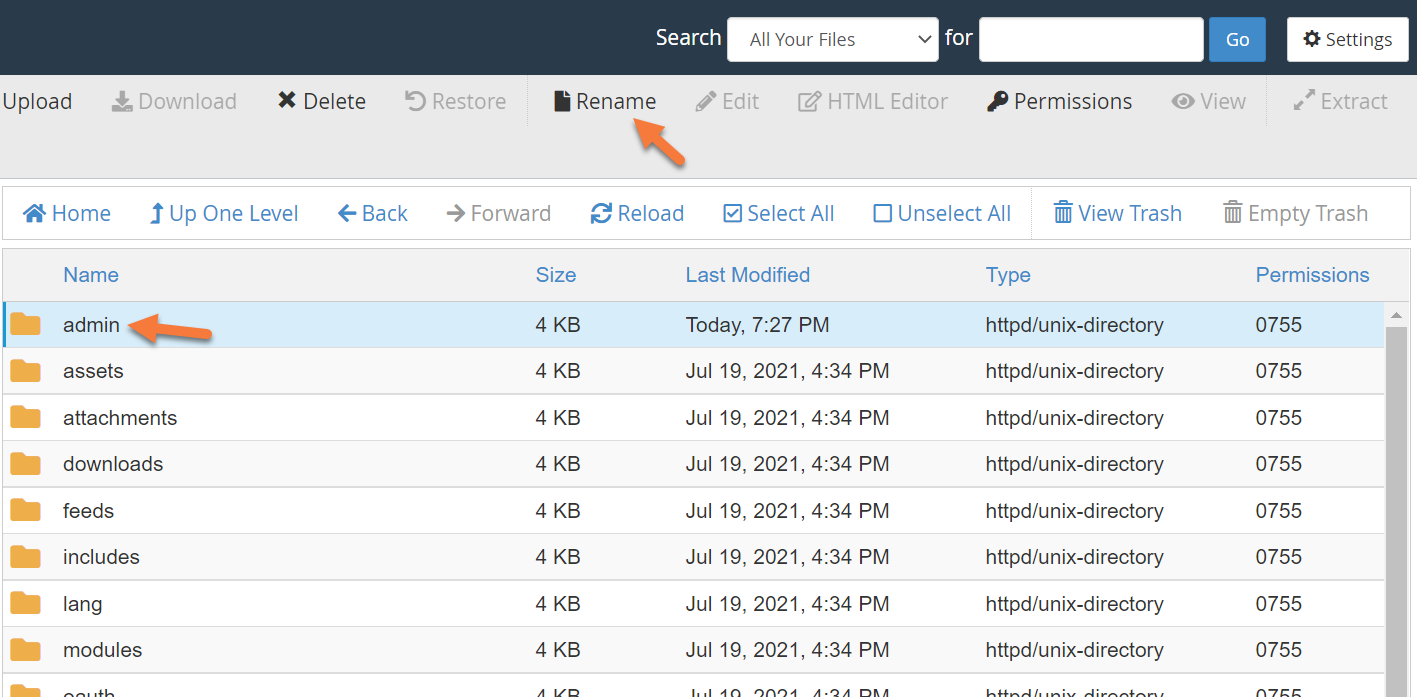
Single-click the folder, then click Rename from the row of tools at the top of the File Manager.
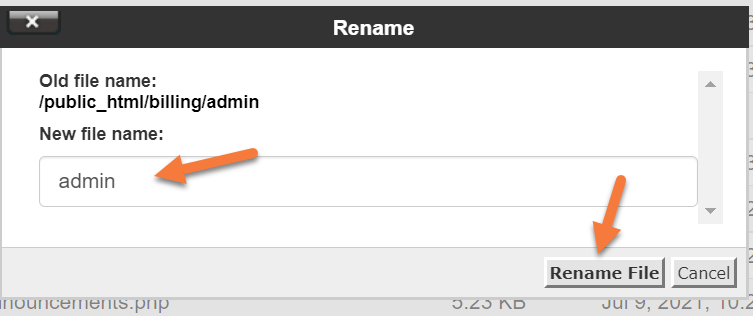
In the rename modal, give the folder the same name you entered in the WHMCS configuration.php file in the earlier step, then click the rename file button to save the file rename.
Now, the folder will be renamed and your WHMCS installation is even more secure!
Restrict Database Privileges
WHMCS only requires a few database permissions to operate day-to-day, including these permissions:
- DELETE
- INSERT
- SELECT
- UPDATE
- LOCK TABLES
However, if you are doing a new installation, upgrade, or activating and deactivating modules, you’ll need these privileges:
- ALTER
- CREATE
- DROP
- INDEX
For enhanced security, you can disable access to ALTER, CREATE, DROP, and INDEX. To do this, use the steps below:
Step 1: Login to your cPanel. There’s a lot of ways to do this, but the sure fire easiest way is to login to your Client Area, then open your cPanel.
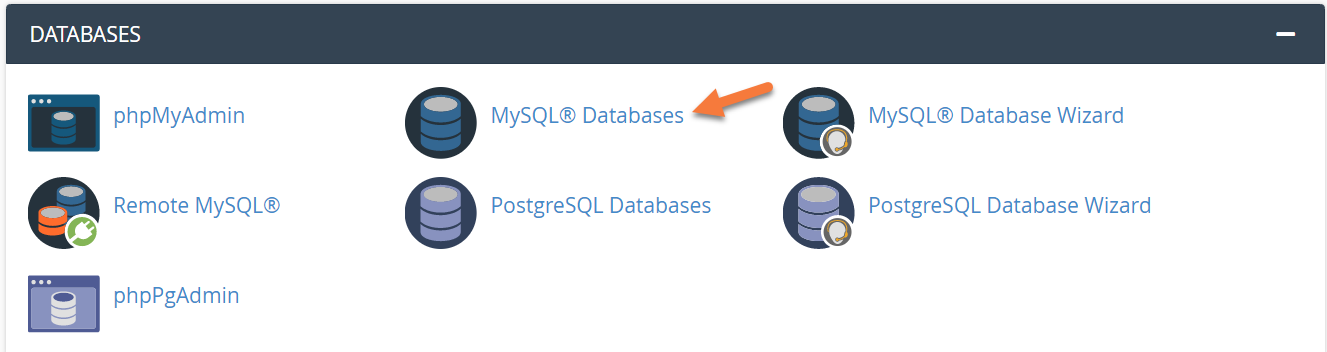
Step 2: Once your cPanel is open, scroll down to the Databases section and open MySQL Databases.
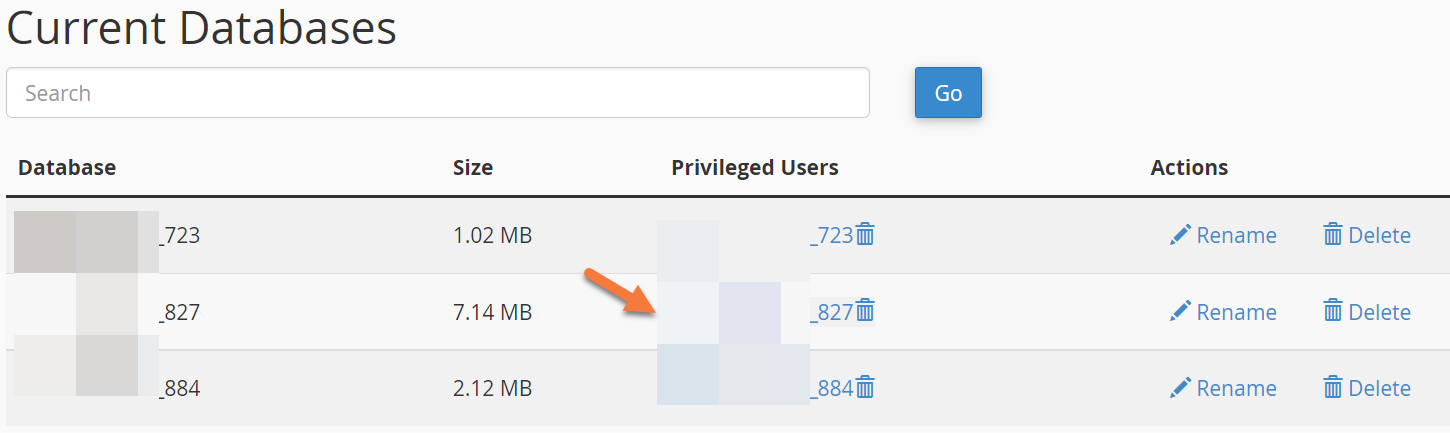
Step 3: Scroll to the Current Databases section and locate the database that’s used for your WHMCS installation.
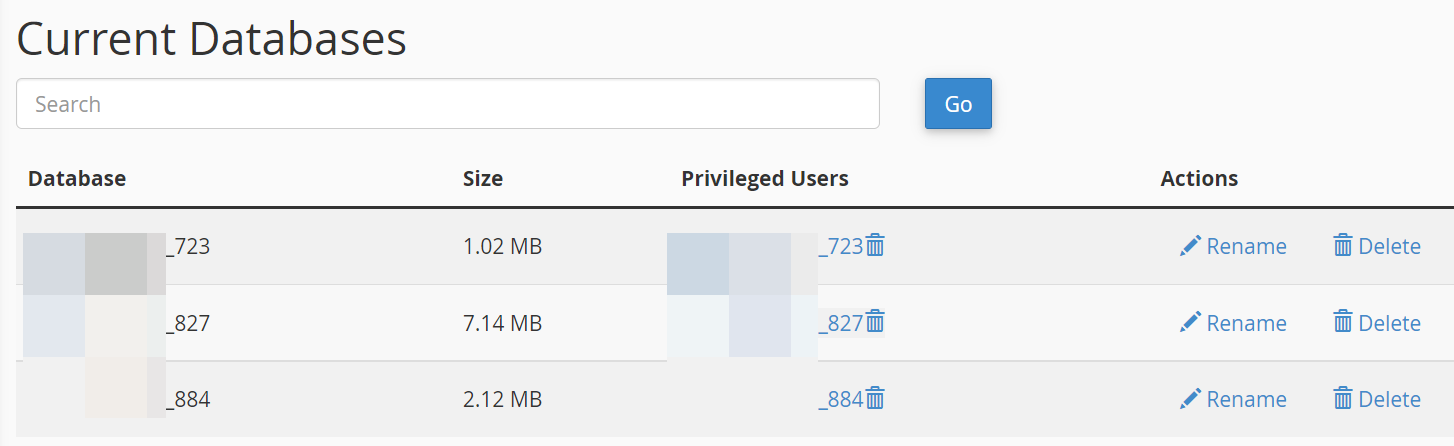
Step 4: Adjacent to the database used for WHMCS, click the Privileged User in the Privileged Users Column. This will load the User Privileges, aka permissions, page.
 Step 5: Uncheck the permissions that are not needed for day-to-day functioning of WHMCS. This includes these:
- ALTER
- CREATE
- DROP
- INDEX
When you’ve finished, click the Make Changes button at the bottom of the page.
And that’s all you need to do! Just keep in mind, next time you go to upgrade your WHMCS, or activate or deactivate a new module, you’ll need to enable those permissions.
]]>
Let’s begin!
How to Create Support Departments in WHMCS
Creating a New Support Department (Without Email Importing)
Step 1: First, log in to your WHMCS Admin. Once logged in, click the wrench in the top right corner, then click System Settings.
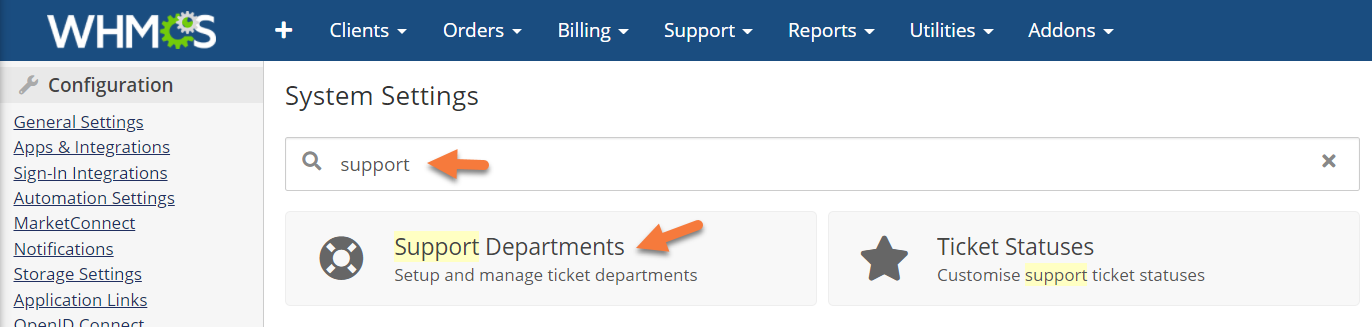
Step 2: Once the System Settings page loads, use the search function at the top to search for ‘support’, and the Support Departments option should load:
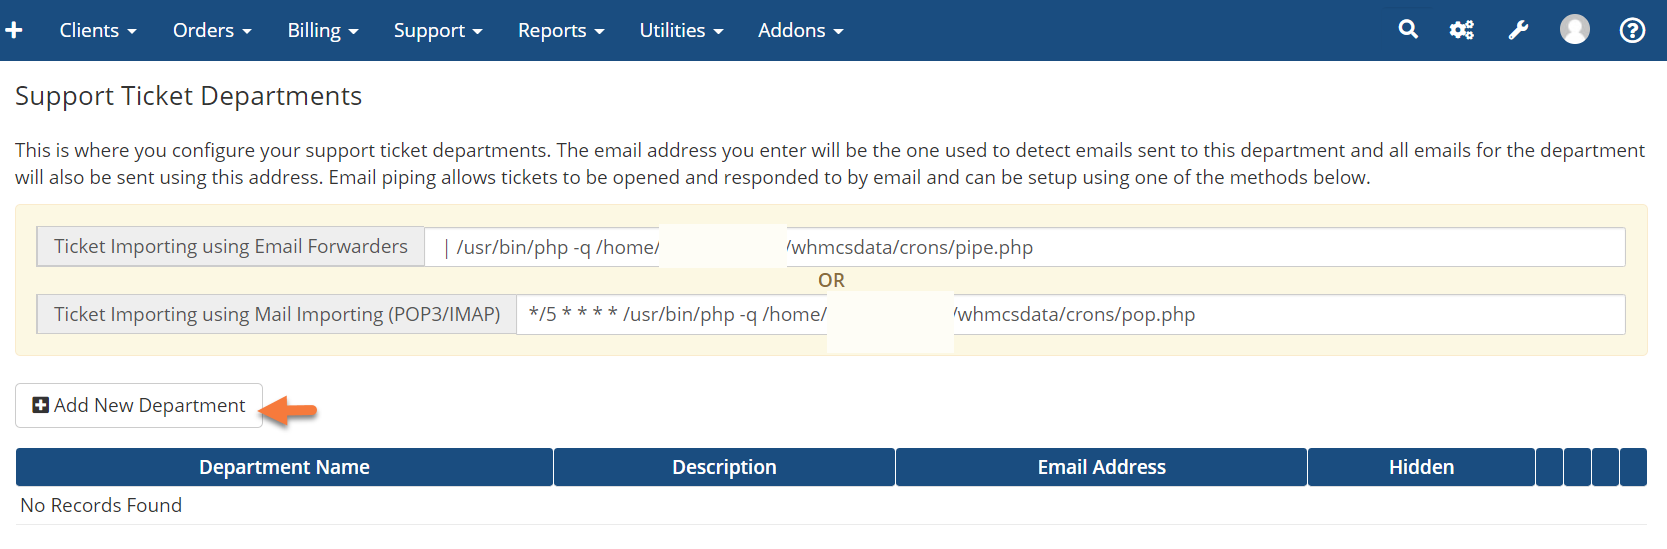
Step 3: Once the Support Ticket Departments area opens, you’ll see a list of your departments, as well as the Email Piping Paths to import tickets sent via email.
Click Add New Department to begin adding your first Support Department.
Step 4: You’ll see a few options when it comes to adding a new Support Department. Let’s review them!
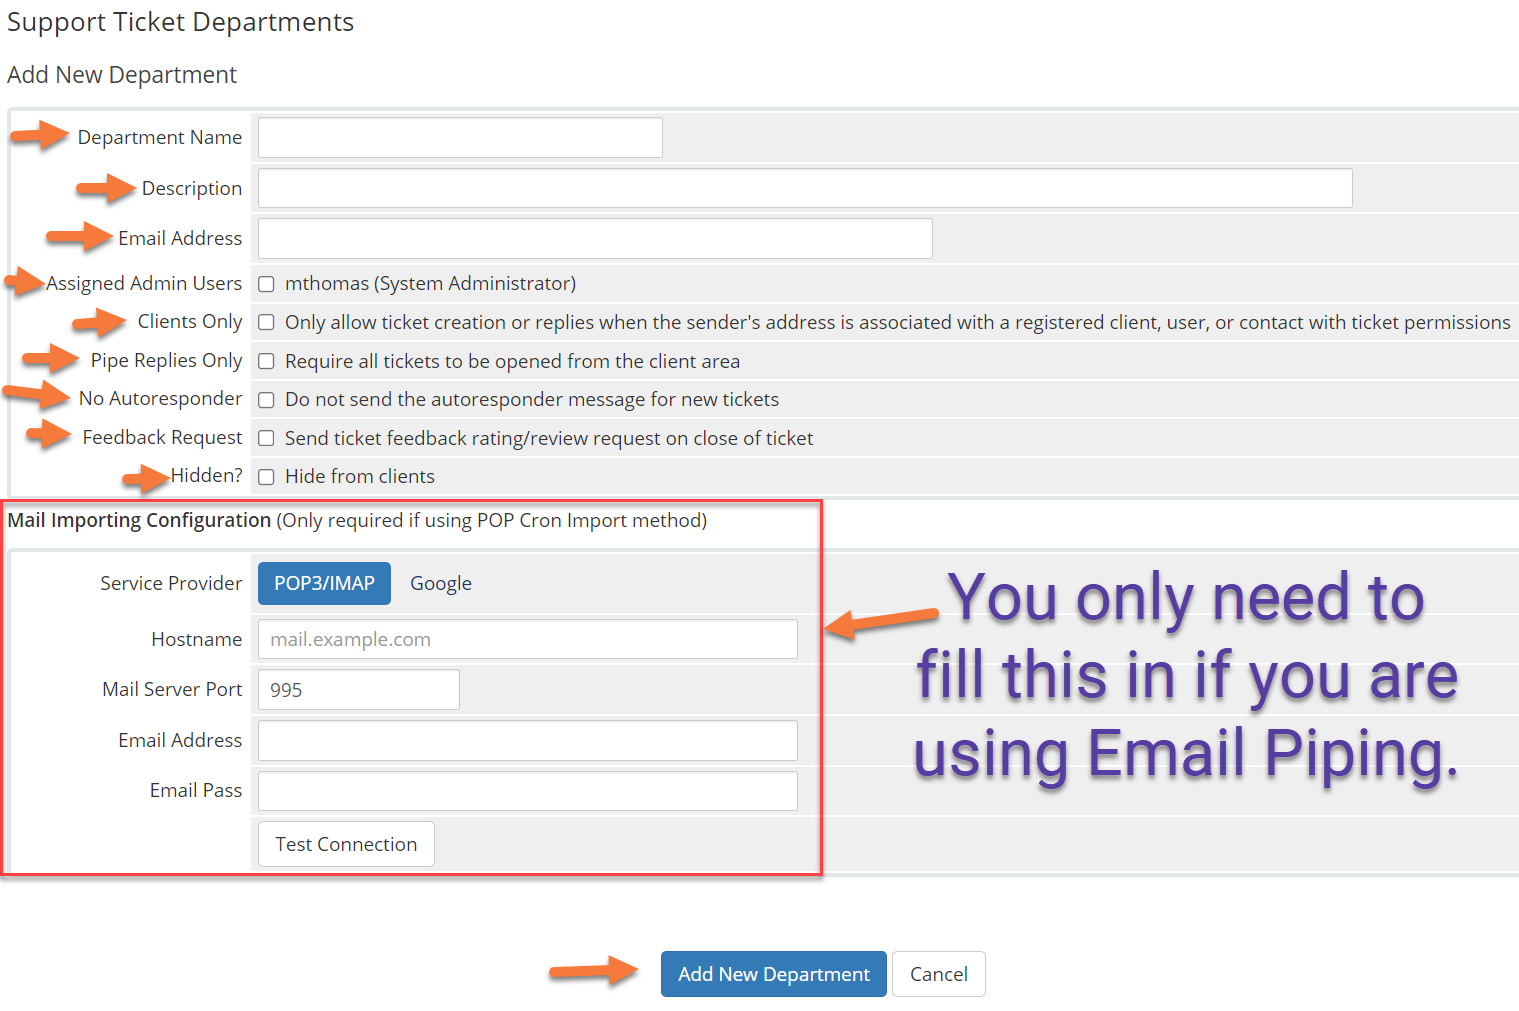
- For Department Name, enter the name of the Department, such as Sales, Support, General, etc…
- The Description of the Department is for your reference so you know which department is which.
- The email address of the department is used within WHMCS and will show as the email address from which the replies are sent to clients, even if you are not using email piping.
- If you are not using email piping, you still need to enter an email address here.
- The address you use doesn’t necessarily have to exist in cPanel unless you are using email piping.
- If you are not using email piping, you still need to enter an email address here.
- Checking the names adjacent to Assigned Admin Users will enable those users to access support tickets in this department and reply to them, close them, or update them, as needed.
- The Clients Only feature will only allow registered customers to open tickets to this department. Non-registered individuals won’t be able to open tickets in this department.
- Be sure not to use this for a pre-sales department.

- Be sure not to use this for a pre-sales department.
- Pipe Replies Only will require users to log in to the Client Area to open new tickets.
- Attempts to open new tickets via email will fail, but users can still respond to tickets via email.
- If you don’t want customers to receive an auto-response stating hey, we got your ticket and we’re on it, or something similar to that when they open a ticket, tick this box.
- The Feedback Request option will enable or disable the sending of an automated feedback request email when a ticket in this department closes.
- If you want this department to be hidden from customers, tick the box next to Hidden. This feature is useful if you have Internal departments, like a Management Department, where tickets can be escalated, but are not available to outsiders directly.
If you aren’t using POP3 Importing or Email Piping, you can click Add New Department to add this new Support Department into WHMCS, and you’re good to go!
If you are using POP3 Importing, or Email Piping, you’ll need to fill in the Mail Importing Configuration fields Continue reading to the next section for assistance.
Creating a New Support Department (With Email Importing)
This section will help you add in email importing for the Support Department you’re creating. Let’s take a closer look at the Mail Importing Configuration fields, below:

- The Hostname will be mail.yourdomain.tld or the server hostname where your account is hosted, such as rs1-cityname.serverhostgroup.com.
- If you host your email with another company, such as Rackspace, you would enter their hostname in this field. Rackspace’s hostname is, secure.emailsrvr.com.
- Next, enter the Mail Server Port. For POP3 this is typically port 995.
- Following this, enter the email address which goes along with the support department. For example, if the department you created is literally called Support, and the email address you used in the email address field is [email protected], ideally the support email account would be set up as [email protected].
- As such, enter the email address which corresponds with the support email account here.
- Enter the password to the email account.
- Finally, test the connection. If the test is successful, you’ll see a message like the one in the image below:

Creating the Email Importing Cron Jobs in cPanel
Next, to have WHMCS automatically poll the email account(s) that goes with the Support Department(s) we’ve created, we need to create a cron job in cPanel to automate that process.
If you aren’t sure what a Cron job is, not to worry! A Cron job is basically a small script that runs at a preset time and automates a task for you.
The steps below will help you with this. Don’t worry if it seems complicated, we’re going to go step by step!
Step 1: In a new browser tab, log in to your cPanel. There’s a lot of ways to do this, but the sure-fire easiest way is to login to your Client Area, then open your cPanel.
Step 2: Once your cPanel is open, use the search function at the top, and search for cron.
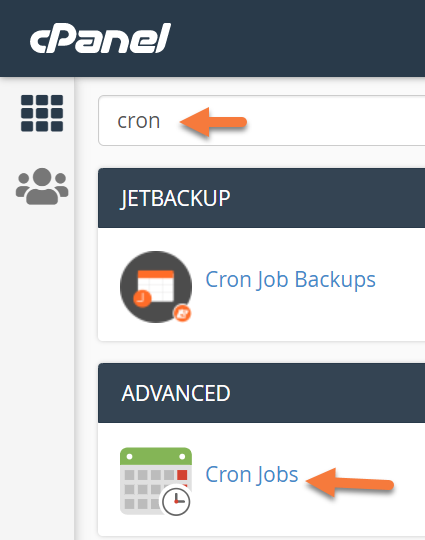
Click Cron Jobs to open the Cron Jobs utility.
Step 3: Scroll down to the Add a New Cron Job section in the Cron Jobs utility. This is where we’ll be adding the to have WHMCS automatically import the emails from the POP3 email accounts associated with our Support Departments.
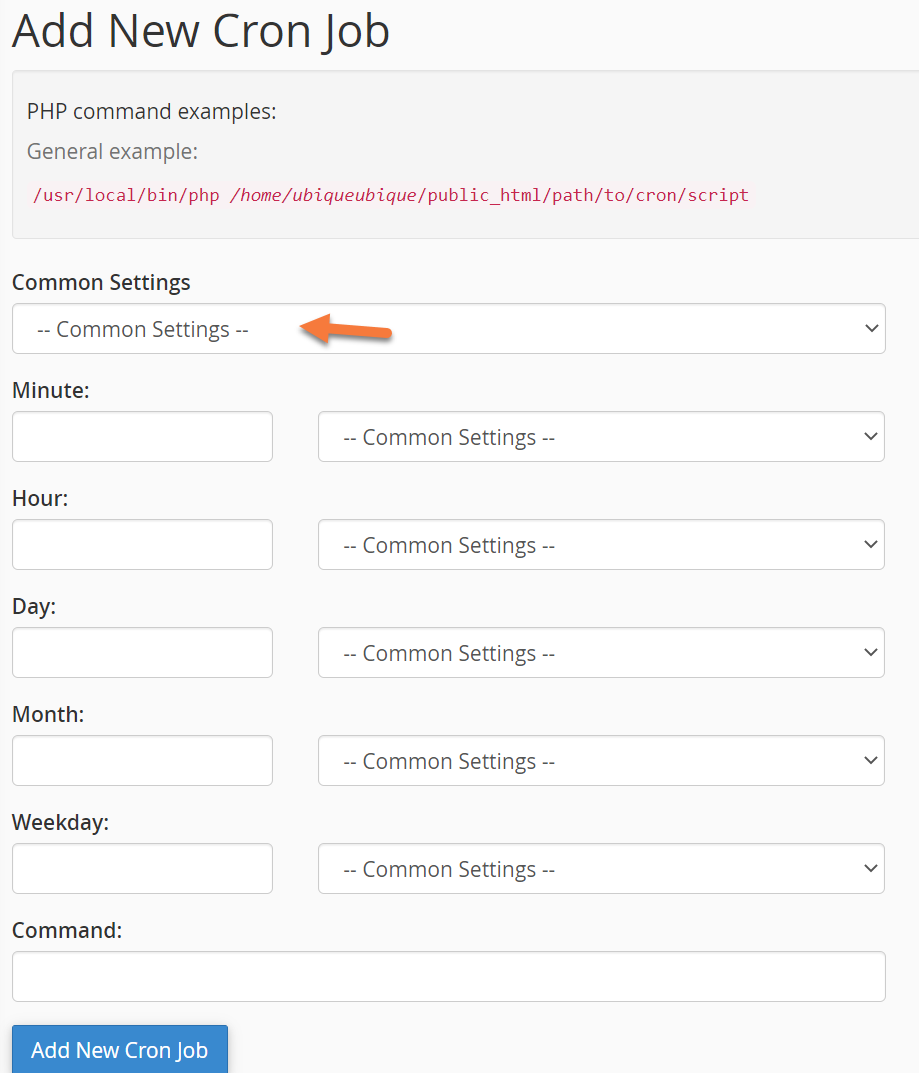
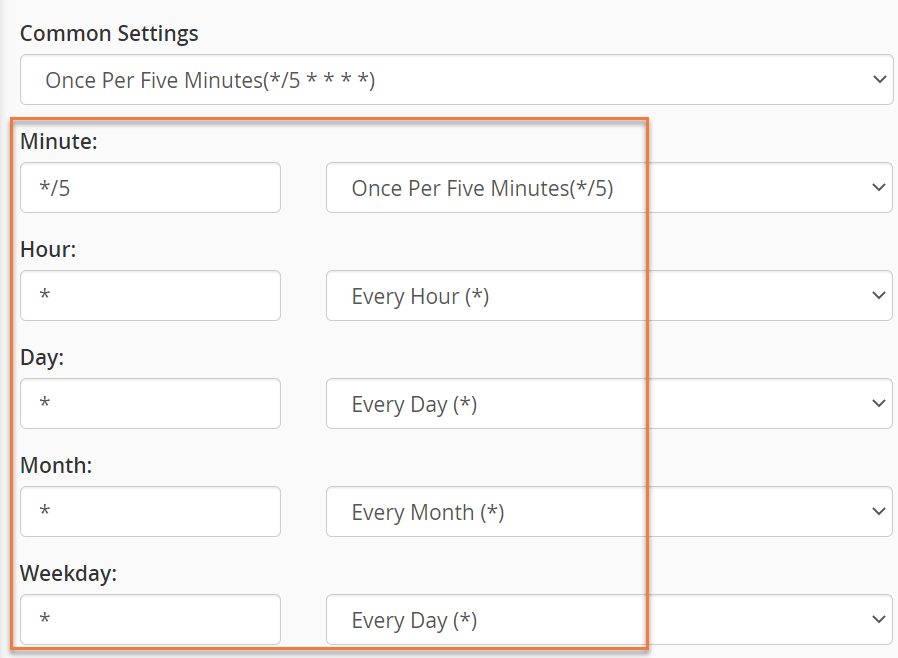
Click the drop-down menu next to Common Settings and choose “Once Per 5 Minutes”.
The forms will prefill with the command structure to have the cron run once per 5 minutes and those fields should look like the ones below:
Step 4: Next, return to the tab in your browser where the WHMCS > Support Tickets area is open.
At the top of that page, you should see 2 Cron job entries, similar to the ones below:


Using your mouse cursor, copy the part of the path beginning at /usr/bin and ending in pop.php. Your selection should look like this:
/usr/bin/php -q /home/YourcPanelUserName/whmcsdata/crons/pop.php
Step 5: Return to the tab in your browser where cPanel > Cron Jobs is open.
In the Command field, paste the Cron path you copied from the previous tab.
When the text is pasted into the command field, it should look similar to this, without the blurred out portion.
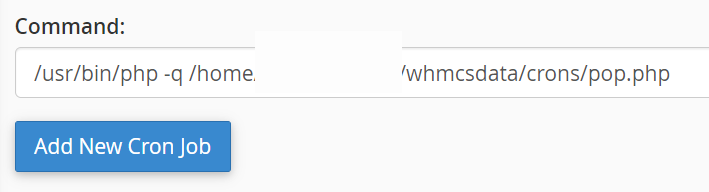
Click the Add New Cron Job button to save this Cron Job.
And that’s all you need to do in order to set up Email Importing via POP3 in WHMCS > Support Departments. Now, your customers can email [email protected] and when that message is received by the email server, WHMCS will automatically import the message into it’s Support System (Help Desk) and you’ll be able to respond just like it were a normal ticket opened directly from the customer’s Client Area!
We hope you found this tutorial helpful! If you have any questions, leave a comment, or have a chat with our friendly support team 24×7!
Please join us in the next tutorial where we will walk you through Getting Started with WHMCS MarketConnect in WHMCS.
Let’s begin!
How to Create a Product in WHMCS
You can follow the steps in this article or watch out our video tutorial.
Step 1: First, log in to your WHMCS Admin. Once logged in, click the wrench in the top right corner, then click System Settings.
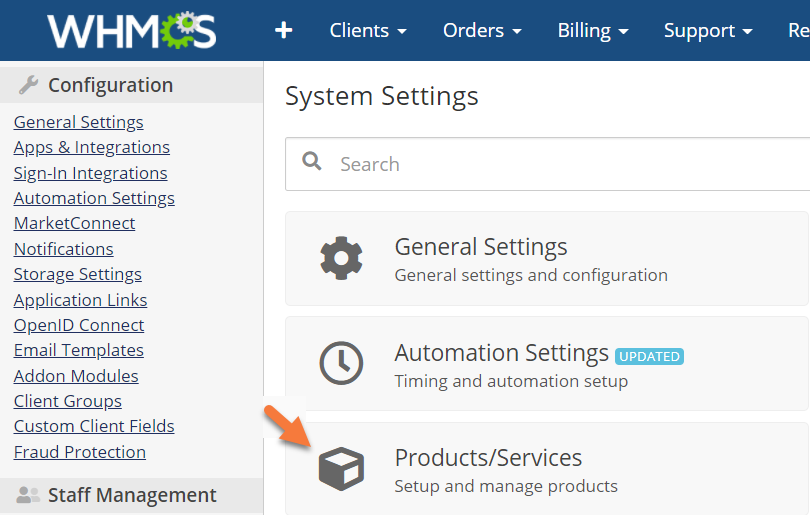
Step 2: When the list of System Settings loads, click Products/Services.
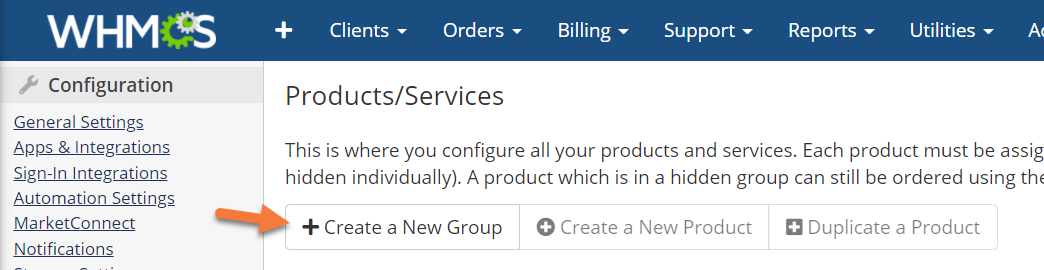
Step 3: Before creating a Product, you need to create a Product Group. To do this, click the Create a New Group button.
Step 4: When the Create Group page loads, you’ll see a screen like the one below. Let’s explore what’s on this page.
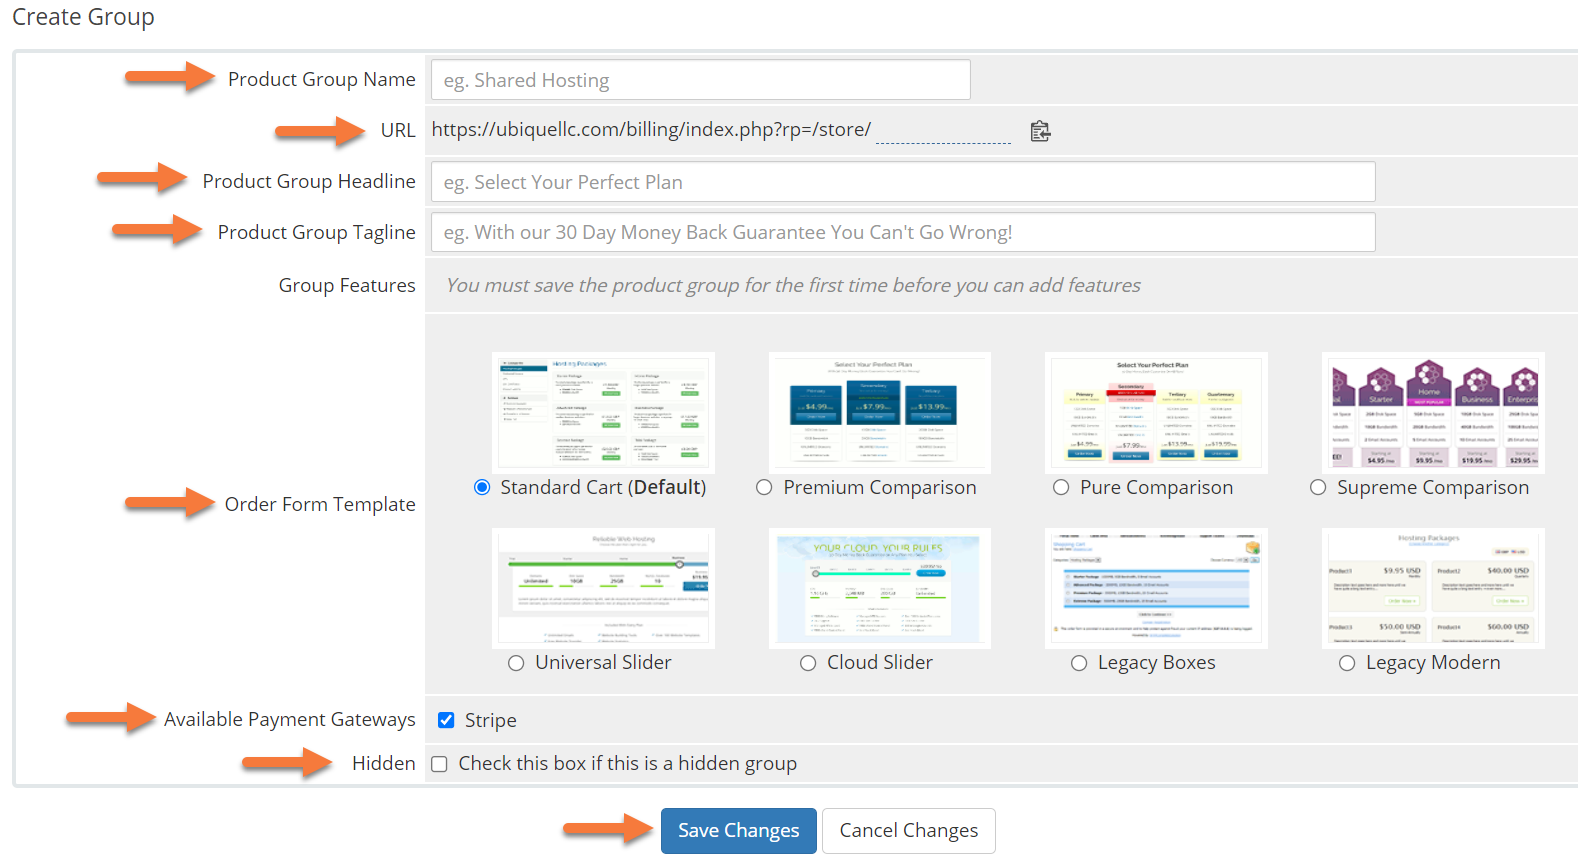
- First you need to enter a Product Group name. Remember, the product group is what will contain all the different products beneath it. For example, if you offer Shared Hosting to your customers and have 3 different plans, the plans will be individual products, while the group will be “Shared Hosting”.
- The URL will give you a friendly URL that you can use to directly link people to this product group. WHMCS will automatically create a human readable version, but if you don’t like what WHMCS creates, click the generated URL (at the end of the URL, where the end of the URL is underlined in dotted lines), and you will be able to edit the URL.
- The Headline should be a catchy call to action title for this product group, such as “The Best Hosting Around!”.
- The Tagline should be something that also grabs the customers attention, you can feel free to use the example provided in WHMCS, “With our 30 day money back guarantee, you can’t go wrong!”
- The Order Form Template changes the way your product groups and the products therein are listed when customers are shopping on your website.
- Available Payment Gateways allows you to select which payment gateways can be used for that product group, and therefore the products within the group.
- Hidden allows you to hide the group until you are ready to make it available to the public. We recommend enabling this until you’ve configured all the products within the group, that way you don’t get people accidentally buying something that isn’t quite ready yet.
When you’ve completed the form and made your choices, click Save Changes to continue.
After you save, you’ll see a notice stating your changes were saved successfully. Click Back to Product List to return to the list of products.

Step 5: Once you have returned to the Products/Services area, click the Create a new Product button.

The Create a New Product page will load. From here, you a few options to configure. Let’s take a look!
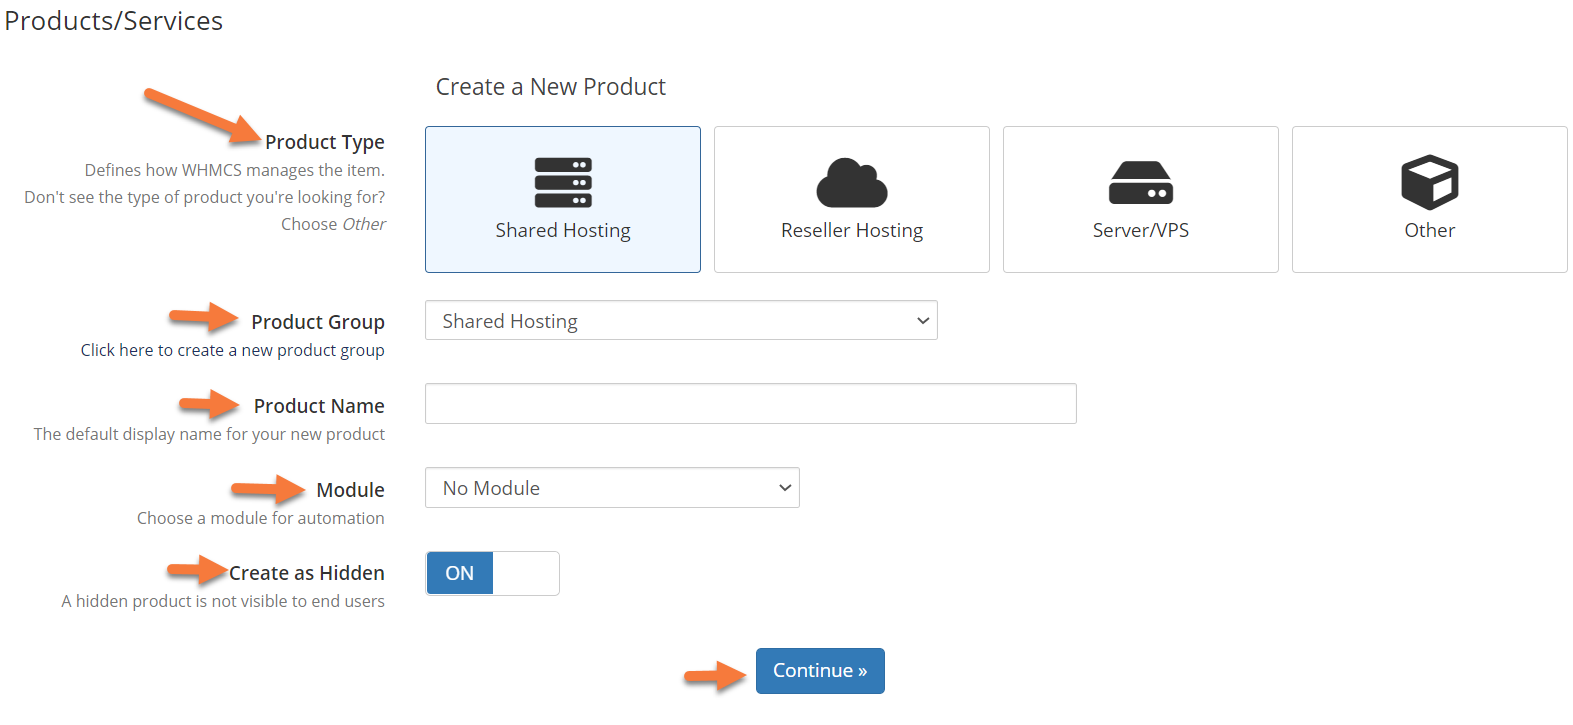
- First, you need to choose a product type. You have 4 options by default:
- Shared Hosting
- Reseller Hosting
- Server/VPS
- Other
- The product group I created originally is for Shared Hosting, so I’m going to leave that selected.
- Second, you need to select the Product Group. Using the dropdown menu, select the Product Group which goes with the Product Type you’re creating.
- Third, you need to give this product a name. Don’t name it Shared Hosting; that will confuse customers. Instead, please give it a catchy name, like Bronze, Gold, or Platinum.
- Third, you need to select a Module for this, if you want to automate the account provisioning on your Reseller Account. Then, using the dropdown menu, choose cPanel.
- Fourth, if you want to hide this product for now, leave the “Create as hidden” toggle to the On position.
Lastly, click Continue to create your Product.
Step 6: You will be taken to the Edit Product page, where there are 9 tabs for the different details that go with this new Product. We won’t cover every detail in these tabs, so don’t feel overwhelmed. We’re just going to talk about the basics.
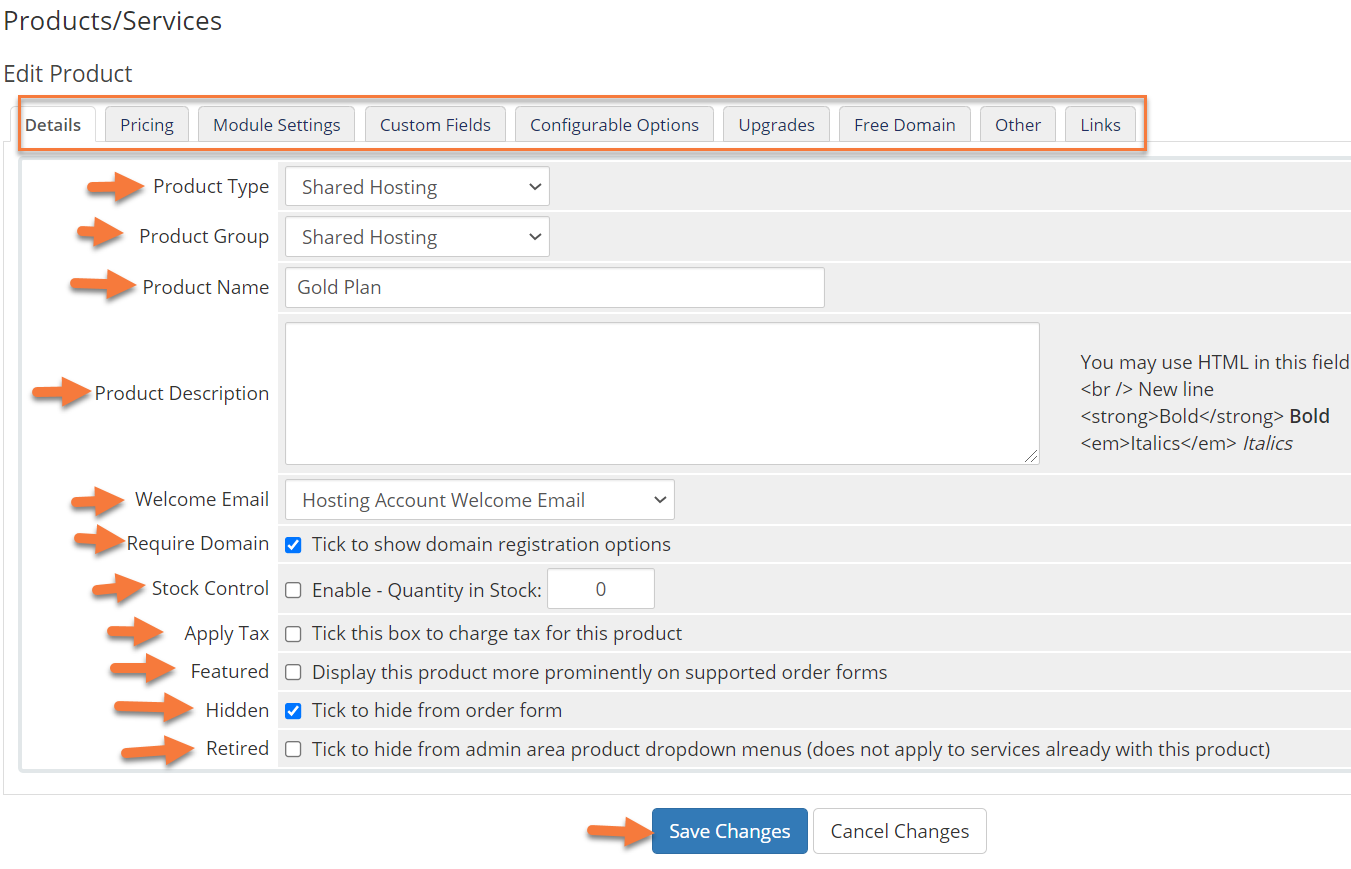
- As you can see from the top 3 fields, Product Type, Product Group, and Product Name, the settings have been carried over from the previous window.
- The Product Description is very important as this is where you will list what comes with the product you are selling as, at least in this case, the “Gold Plan”. In my case, this product comes with some pretty cool features.
- Keep in mind: You can use HTML in the Product Description Field. The contents of this field are what will display beneath the product listing in your Store when customers are viewing your product listings within the Shared Hosting category.
- The Welcome Email setting will dispatch a welcome email to customers who sign up for this product. You can use the built in templates located in WHMCS to easily send customers their new product information, or you can completely customize them to fit in with your branding.
- If checked, the Require Domain feature will not let customers purchase this product unless they have a valid domain name to go along with it. That domain name could be from a third-party registrar, or one you have sold them from another of your Product Groups. Regardless of the registrar in this case, the domain must be valid and real for the customers to be able to proceed with the purchase.
- Stock Control is a very important setting. If you’re hosting with ChemiCloud, you’ve no doubt got a finite limit to your reseller resources from which these Products & Groups you create in WHMCS draw upon. You can only sell so many of these before your Reseller Account is tapped out, so you should do some math to figure out how many of these Plans you can offer by using the Stock Control feature.
- Once stock is depleted, the product will no longer be available and WHMCS will send Administrators an email about stock being low or no longer available for the product.
- The Tax option allows you to enable or disable tax collection for this item. You should check with your Local Tax & Revenue Authority to decide which option is best for your business.
- Featured allows you to “feature” this product in a special fashion that separates it from your others. If you have a product that is selling better or is a fancier product to which you push your customers, you can set that item to be ‘featured’ by enabling this option.
- Hidden allows you to hide this product until you are ready to sell.
- The Retired option allows you to keep this product in the billing system, but no longer offer it for sale. This is helpful if you have customers who are still on a ‘legacy plan’ that they haven’t migrated off, and therefore WHMCS will be able to continue to bill them for said subscription while preventing new sign-ups.
Be sure to click Save Changes to save any changes you made to this Product.
Next, let’s look at the Pricing tab.
Step 7: The Pricing module allows you to control any/all settings related to the new product you’re adding.
There is a very important setting here you should be aware of. Let’s take a look!
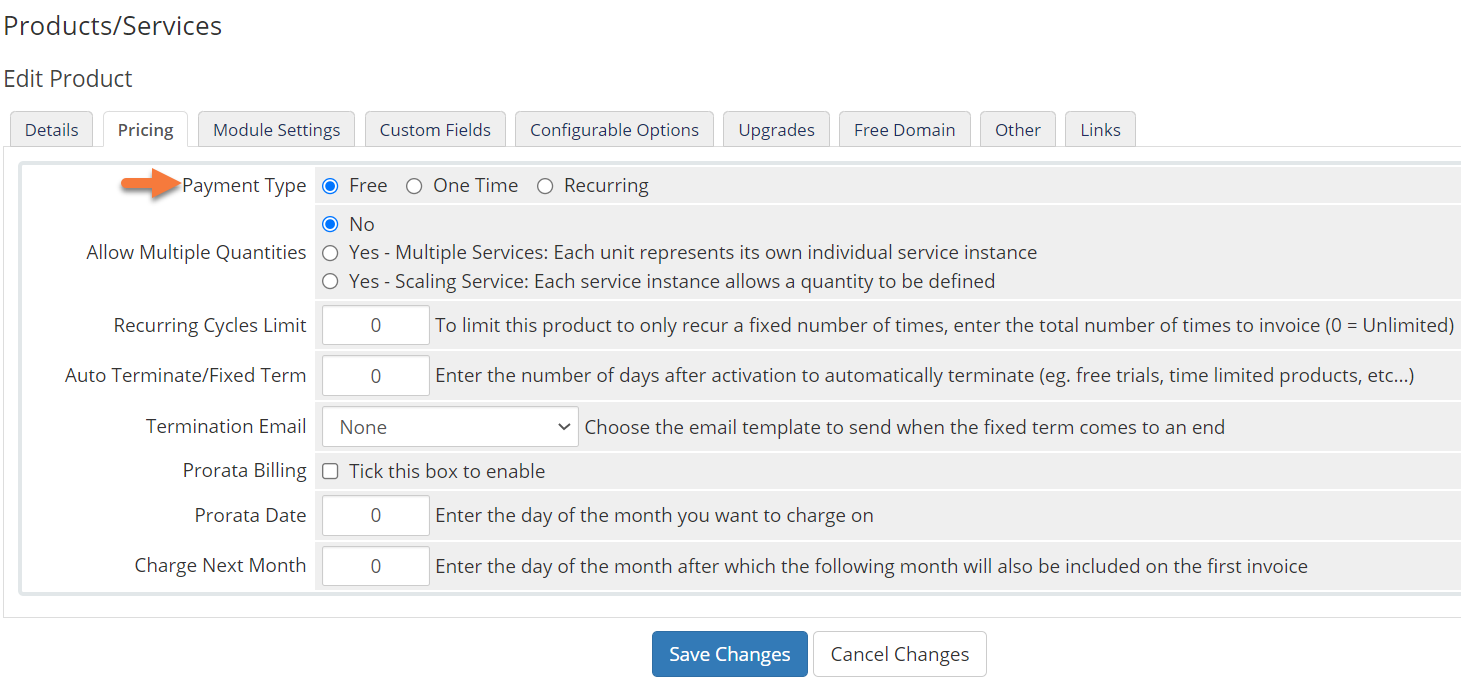
The Payment Type setting allows you to control whether the subscription for this product will be free, a one time fee, or a recurring charge.
If you are offering hosting, you’re likely offering it on a recurring basis, so be sure to choose Recurring here.
Once you do this, the box will expand and you will be able to input pricing for this product:
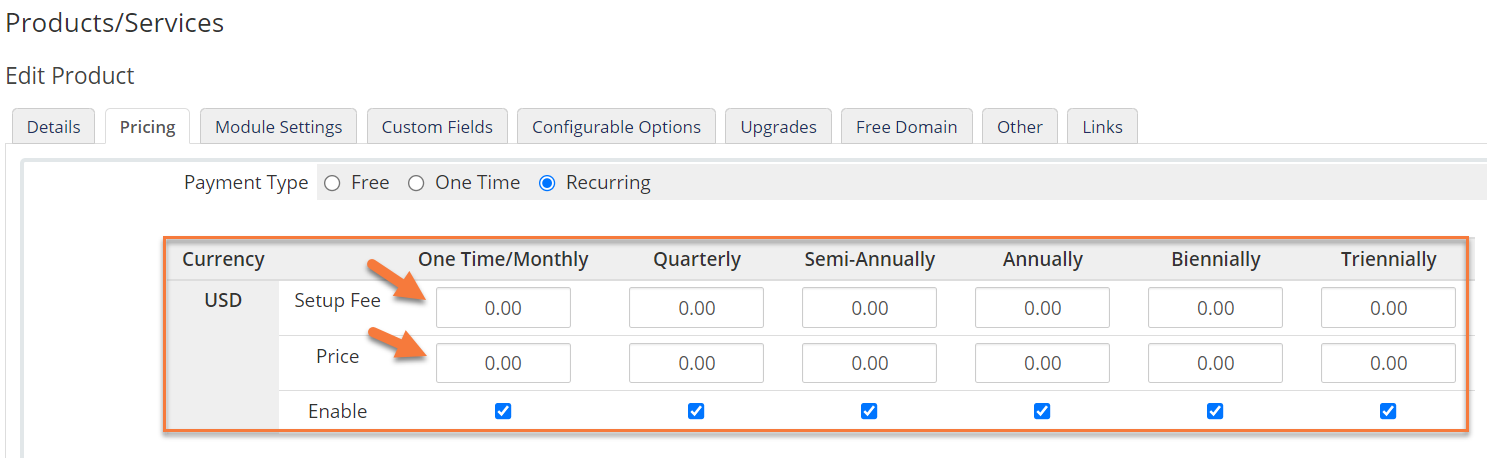
If you have Multiple Currencies installed in WHMCS, be sure to enter the pricing for the product in each Currency.
Click Save Changes when you’ve finished.
Step 8: Next you need to click the Module Settings tab to configure some additional settings.
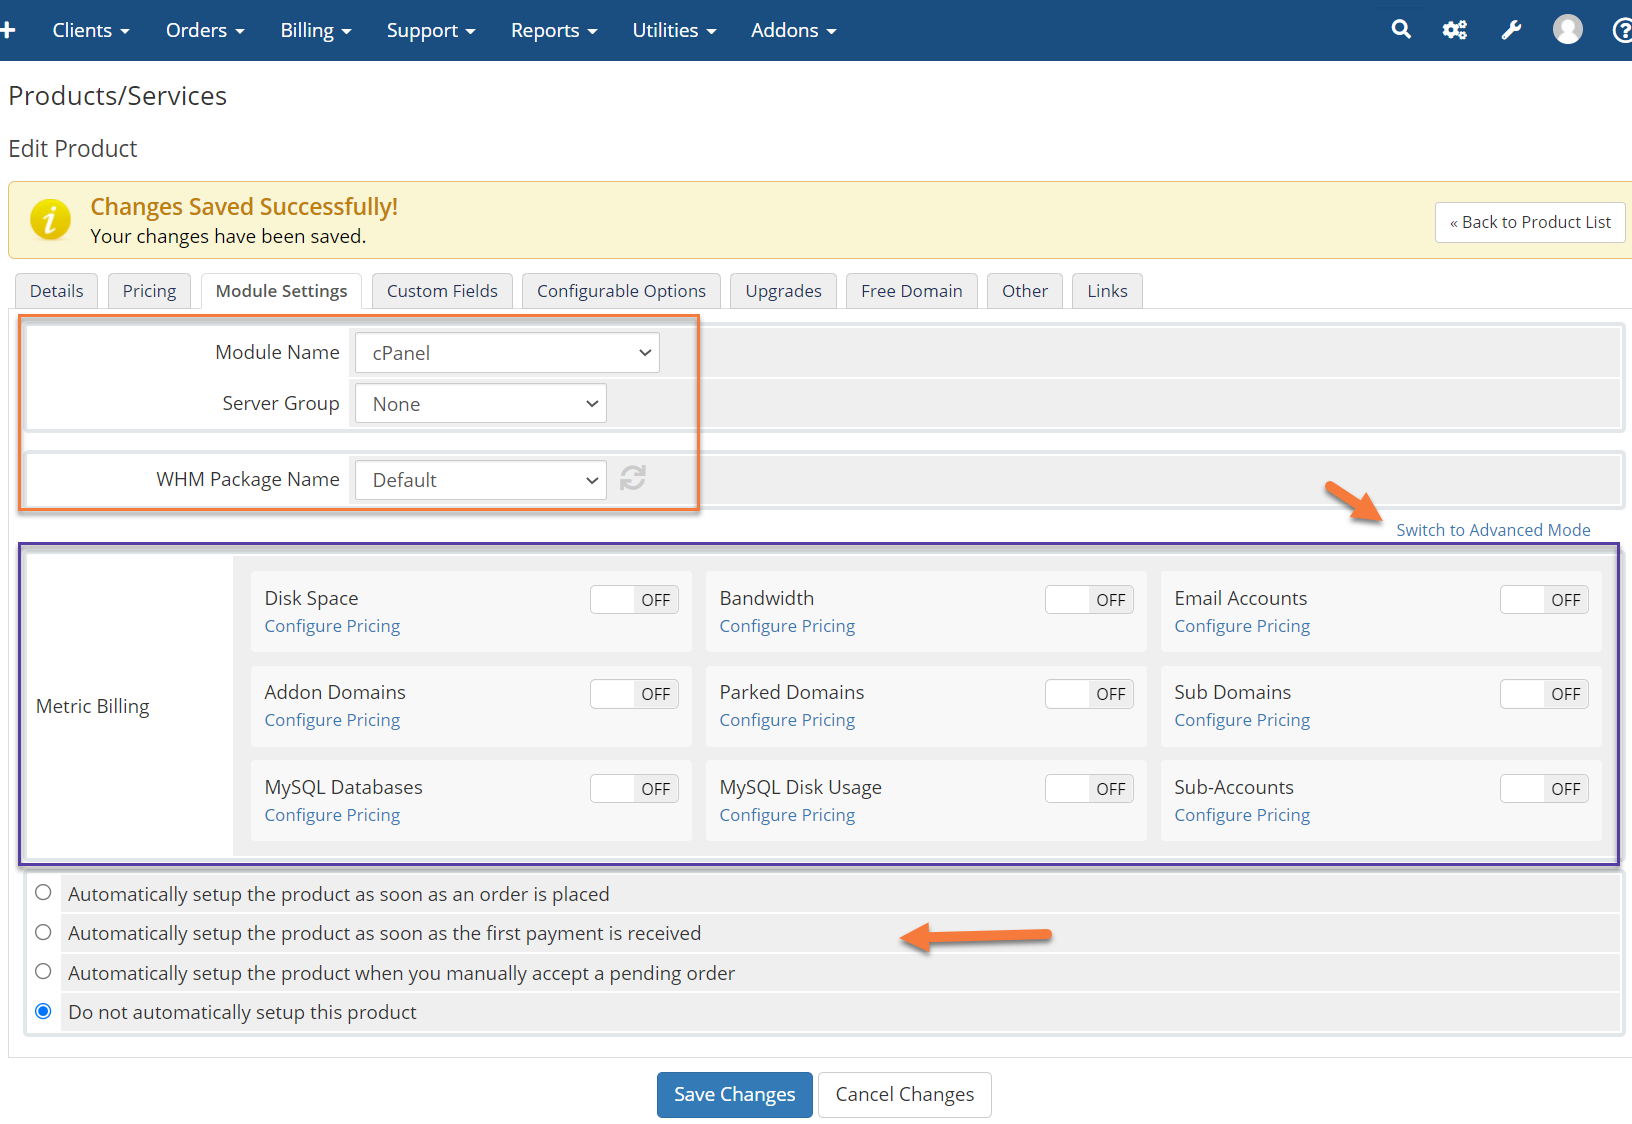
- At the very top, you have the name of the Module that is listed in the “Connect a Server” section, along with the Server Group to provision this plan to.
- Beneath that is the WHM Package Name. This is the name of the package you created in WHM that goes along with the plan in WHMCS.
- If you wish to control the configuration (Disk Space, Domains, FTP, etc) that goes with this plan, click “Switch to Advanced Mode” and you will be able to control these settings.
- The Metric Billing section is for companies who bill their customers by the GB, or by email account. You can also use this to offer additional items or “overage items” at a per-item cost, such as offering additional email accounts.
- The last section involves the automation that WHMCS has with WHM. If you want to automatically set up orders as soon as they are placed, you can enable that. Or alternatively, you can choose from three other options to set up accounts.
Be sure to click Save Changes when you’ve finished.
And that is how you create a new Product Group & Service in WHMCS!
Please join us in the next tutorial where we will walk you through Create Support Departments in WHMCS
Let’s begin!
How to Configure a cPanel Server in WHMCS
You can follow the steps in this article or watch out our video tutorial.
Step 1: First, log in to your WHMCS Admin. Once logged in, click the wrench in the top right corner, then click System Settings.
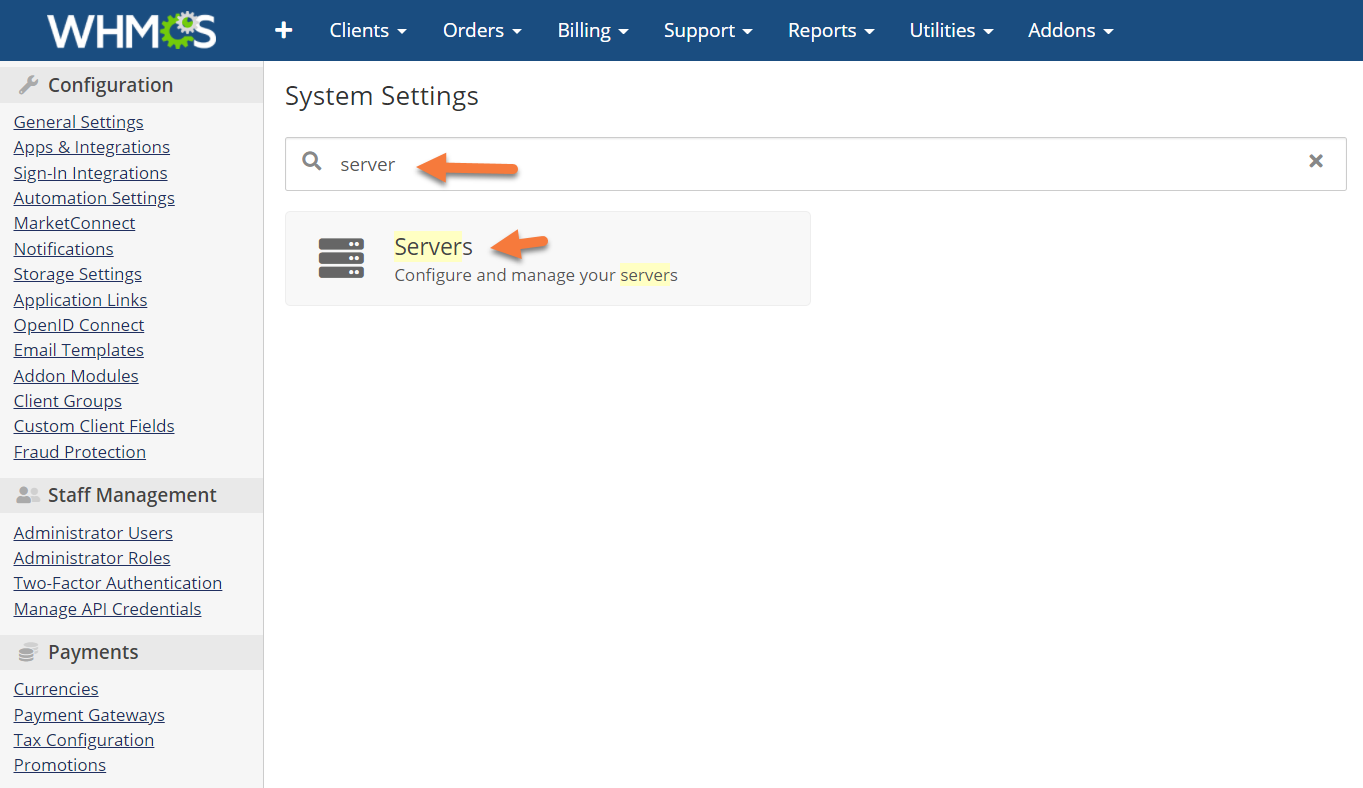
Step 2: When the list of System Settings loads, use the search function at the top of the page to search for ‘servers’.
When the Servers option appears, click it to load the Servers Module.
Step 3: Click the Add New Server button to begin adding a new server.
 Step 4: You will be presented with a list of options to link your server to WHMCS.
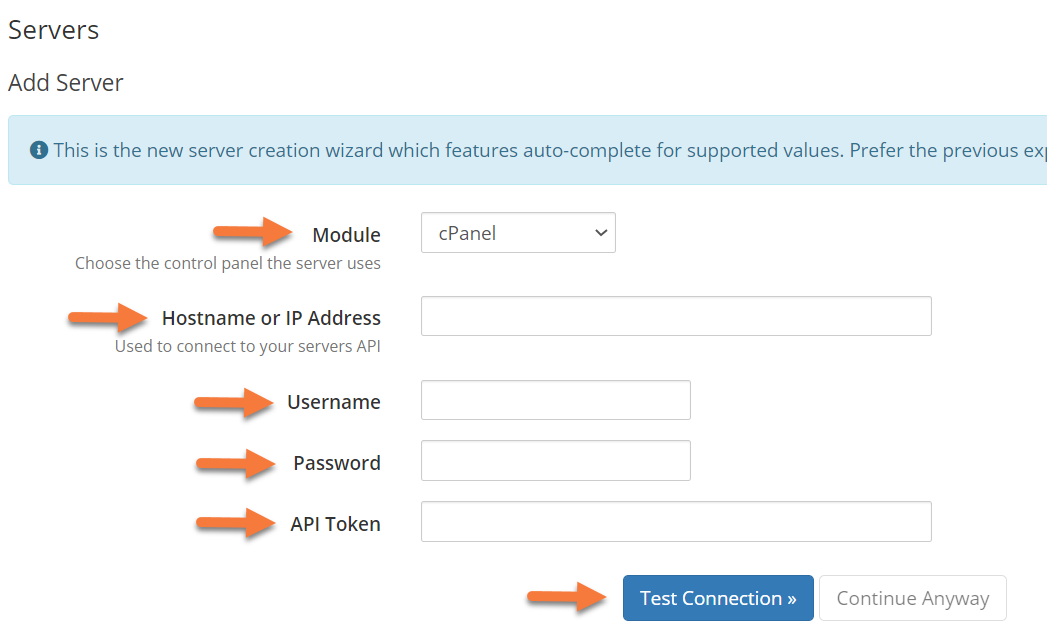
Since we are adding a cPanel server, be sure cPanel is the option selected next to Module.
Next, enter the IP address or Hostname of the server on which your Reseller account is located, followed by the WHM username and either a Password or API token.
Click Test Connection once you’ve finished. If the credentials you entered worked, you’ll be taken to the final Add Server page, which looks like this:
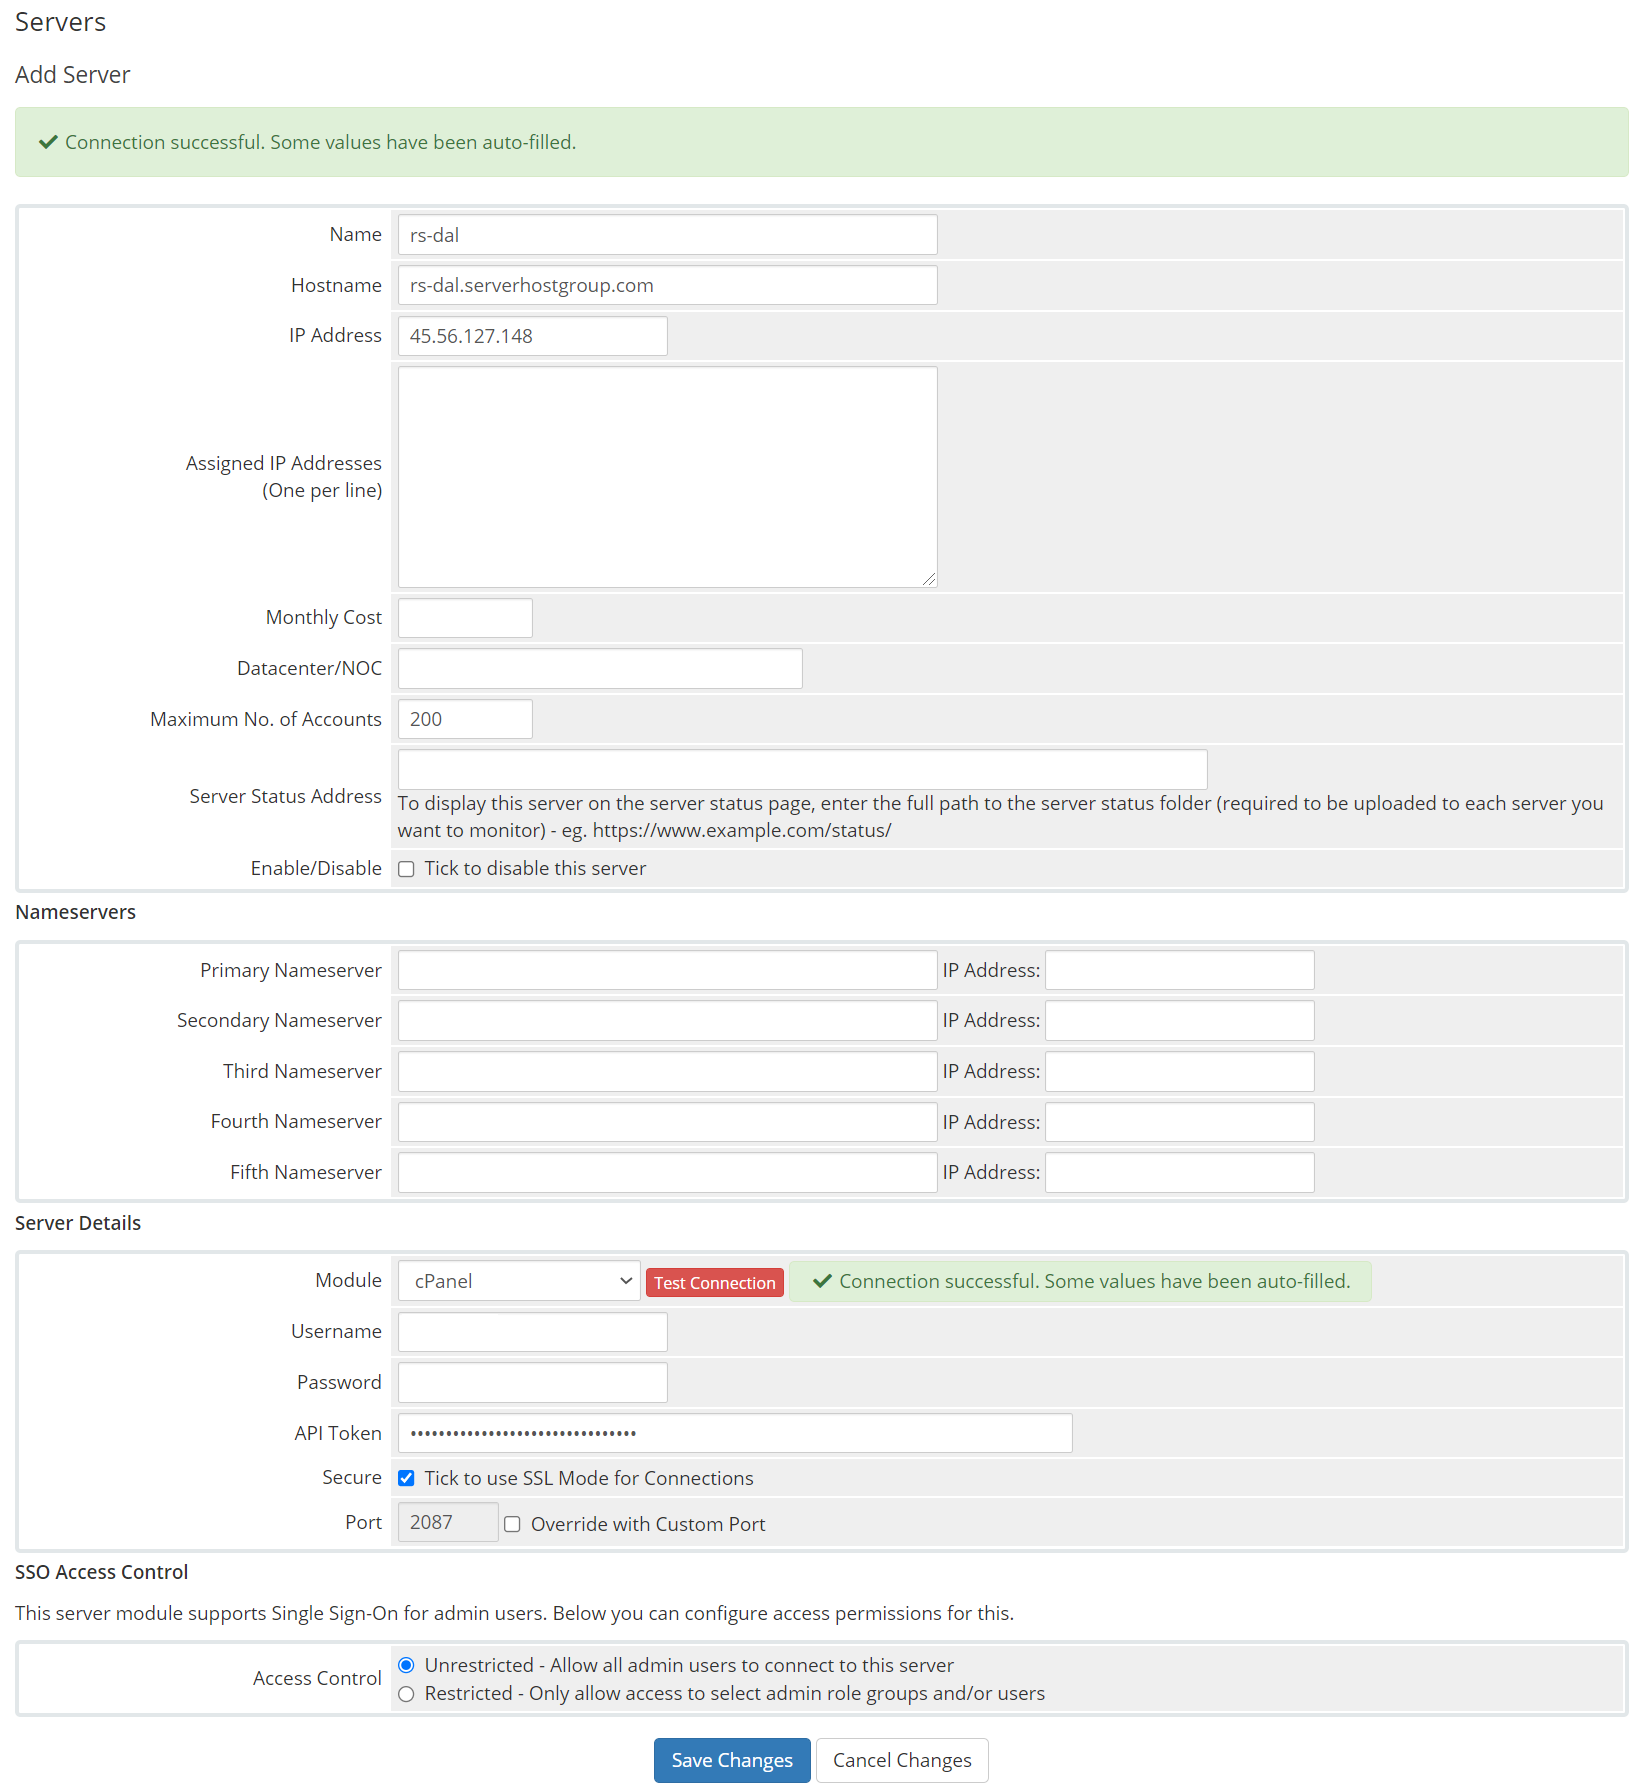
Step 5: On this page, you should fill in as much of this information as possible as that information will be used to auto-populate your client accounts when they are purchased and provisioned via WHMCS.
It is very important you set the nameservers fields as they will be needed for your customer’s domains, otherwise, they will not resolve and you’ll have to intervene and help your clients.
If you are using our Reseller Hosting, you have two options for your nameservers.
- You can create your own custom nameservers. If you aren’t familiar with creating private nameservers, we have a Knowledge Base article on that which you can read by clicking here.
- Use the generic nameservers which were provided by ChemiCloud when your account was created. Please consult your welcome email for these nameservers.
This will allow you to use the Automation Functions in WHMCS to make your life that much easier.
When you’ve finished, click the Save Changes button at the bottom.
And that’s how you add a new cPanel server to WHMCS.
Please join us in the next tutorial where we will walk you through creating a product in WHMCS which is the fifth step you should take after installing WHMCS.
Let’s begin!
How to Change Default Currency in WHMCS
Step 1: First, log in to your WHMCS Admin. Once logged in, click the wrench in the top right corner, then click System Settings.
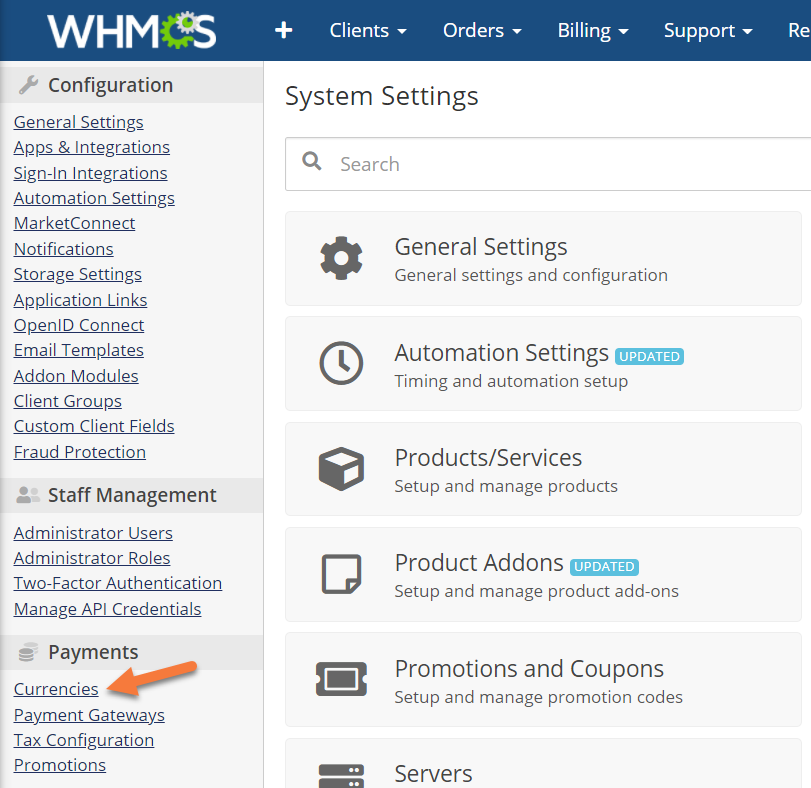
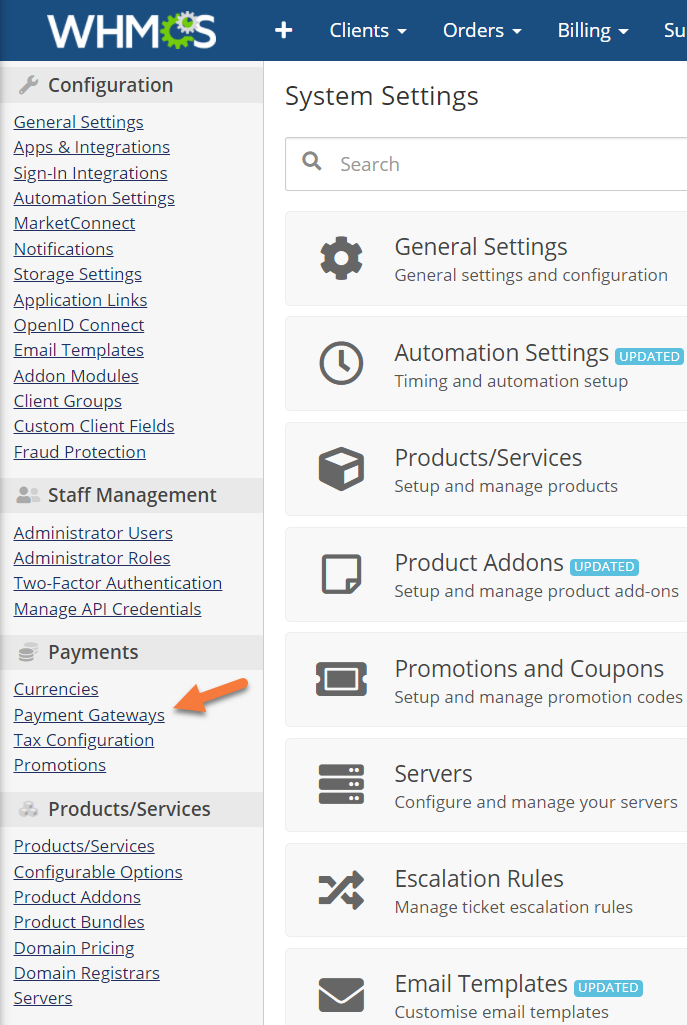
Step 2: When the System Settings page loads, look for the Payments section in the far left menu, then click Currencies.
Step 3: You will be presented with a list of the currencies.
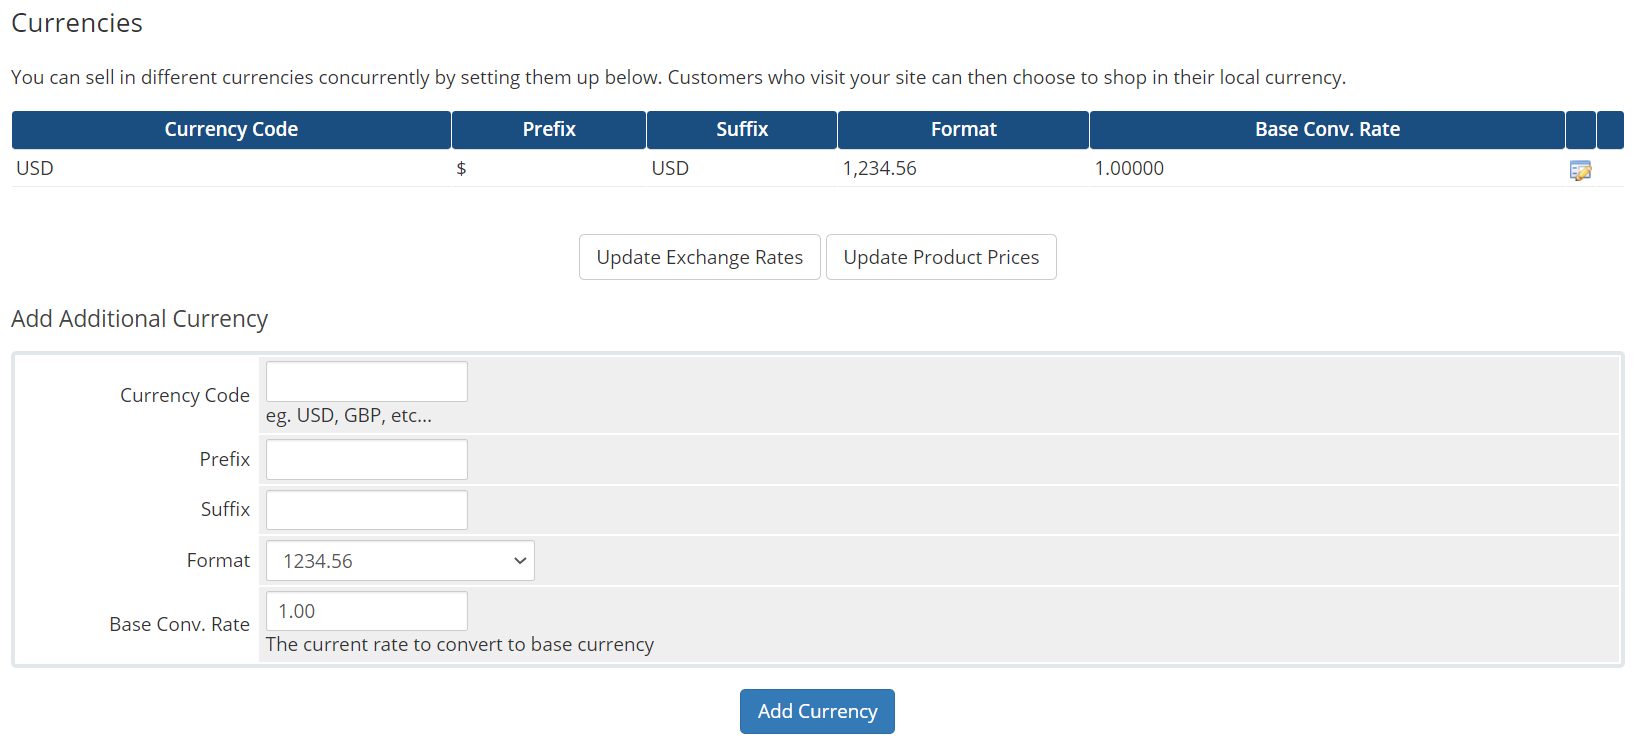
The default currency will be the first in the list. Note, you cannot delete the default currency.
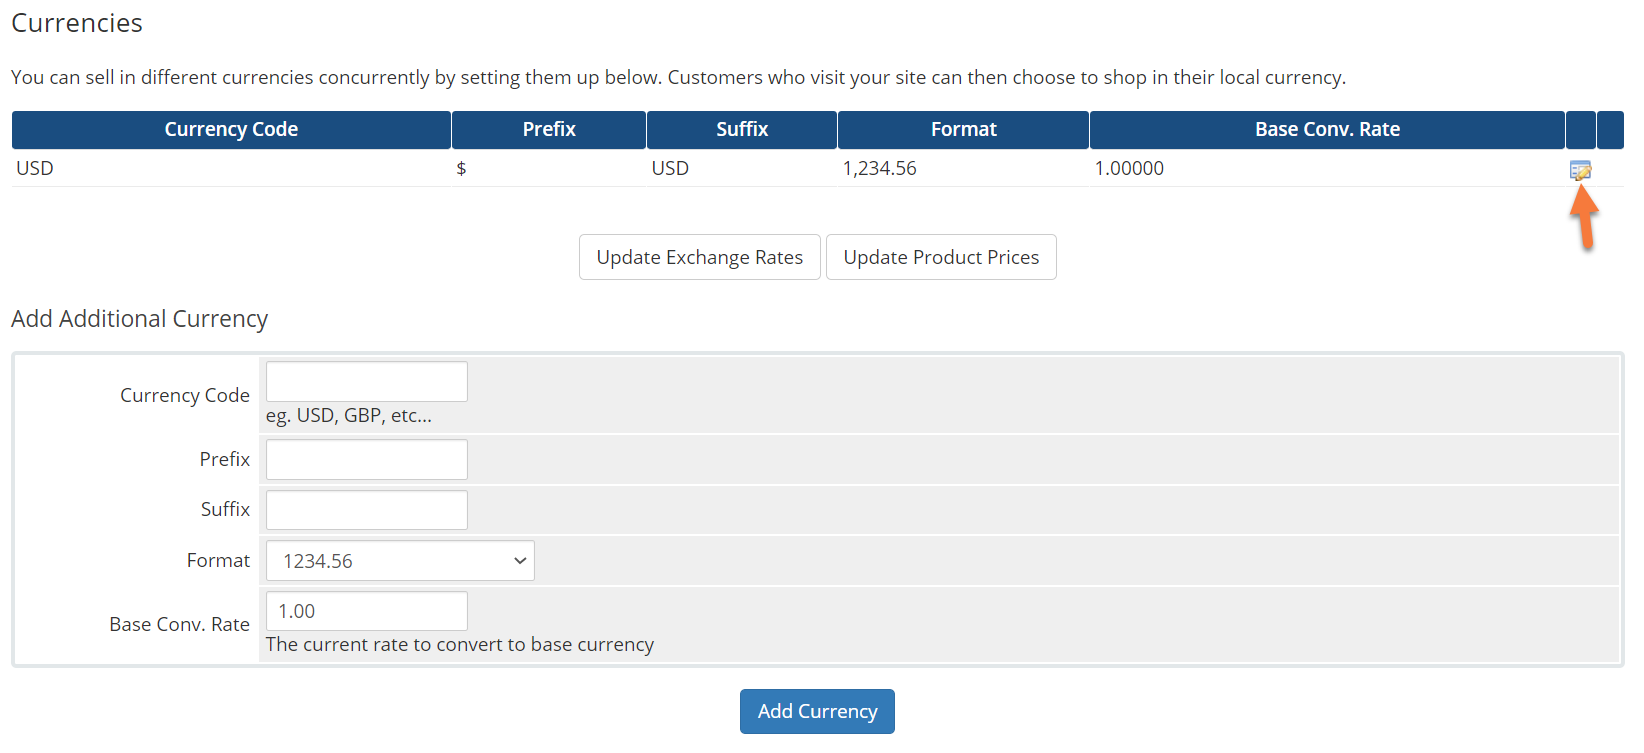
On all WHMCS installations, the default currency is USD. To change the default currency to another currency, click the Edit button.
Step 4: When the Currencies Entry area loads, you will have opportunity to enter a new currency.
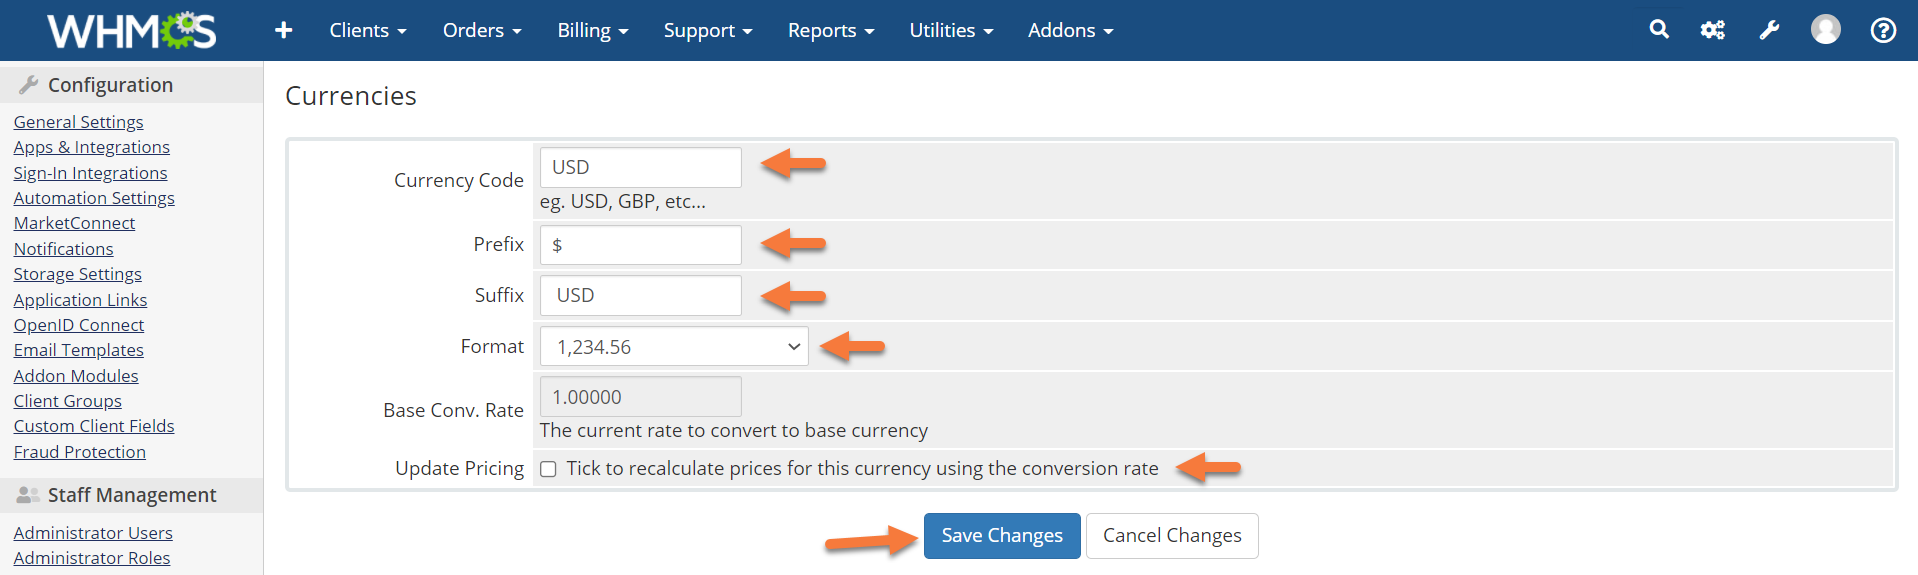
The fields for adding or editing a currency are the same regardless of the currency.
- Currency Code — The standard three-letter ISO-4217 code that payment gateways use. Find a list here.
- Prefix — The text or symbol to display before the amount.
- Suffix — The text or symbol to display after the amount.
- Format — The format style for currencies.
- Base Conv. Rate — The rate by which to divide amounts in this currency to get to the base currency. For example, USD to GBP could be 1.5.
Step 5: if you want to automatically update any existing invoices with your new currency, you can tick the last box to do this. However, we don’t recommend doing this on existing installations because it only updates the currency and not the actual monetary amounts on the invoices.
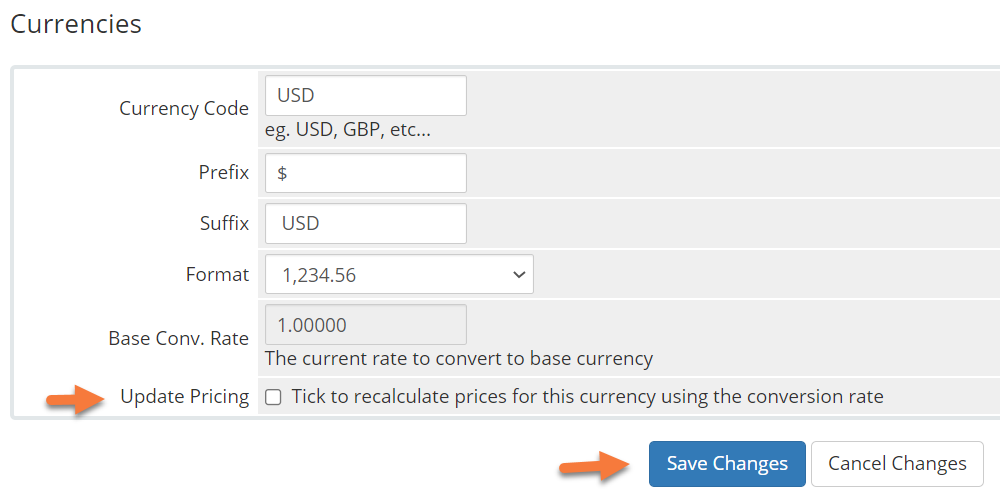
When you’re finished, click Save Changes to save your changes.
And that’s how you update your default currency in WHMCS.
Frequently Asked Questions about Currencies in WHMCS
For which currencies does WHMCS support auto-updating?
WHMCS has the built-in capability to retrieve and update the base conversion rate values daily for the following currencies:
USD, EUR, JPY, BGN, CZK, DKK, EEK, GBP, HUF, LTL, LVL, PLN, RON, SEK, CHF, NOK, HRK, RUB, TRY, AUD, BRL, CAD, CNY, HKD, IDR, INR, KRW, MXN, MYR, NZD, PHP, SGD, THB, and ZAR
What API does WHMCS use for currency auto-updating?
WHMCS uses the ECB API to retrieve exchange rates. Only the currencies listed below are supported for Auto Updating Rates.
Can you specify a different currency in the URL?
Yes, you can link to the order form with a specific currency by adding the required actions to the URL. For example, cart.php?currency=1 or cart.php?currency=2.
And that concludes our tutorial on configuring Default Currency in the WHMCS app.
Please join us in the next tutorial where we will walk you through configuring cPanel Server in WHMCS.
Let’s begin!
How to Configure Payment Gateways in WHMCS
You can follow the steps in this article or watch out our video tutorial.
Step 1: First, log in to your WHMCS Admin. Once logged in, click the wrench in the top right corner, then click System Settings.
Step 2: From the tools on the left, look for the Payments section, and click Payment Gateways.
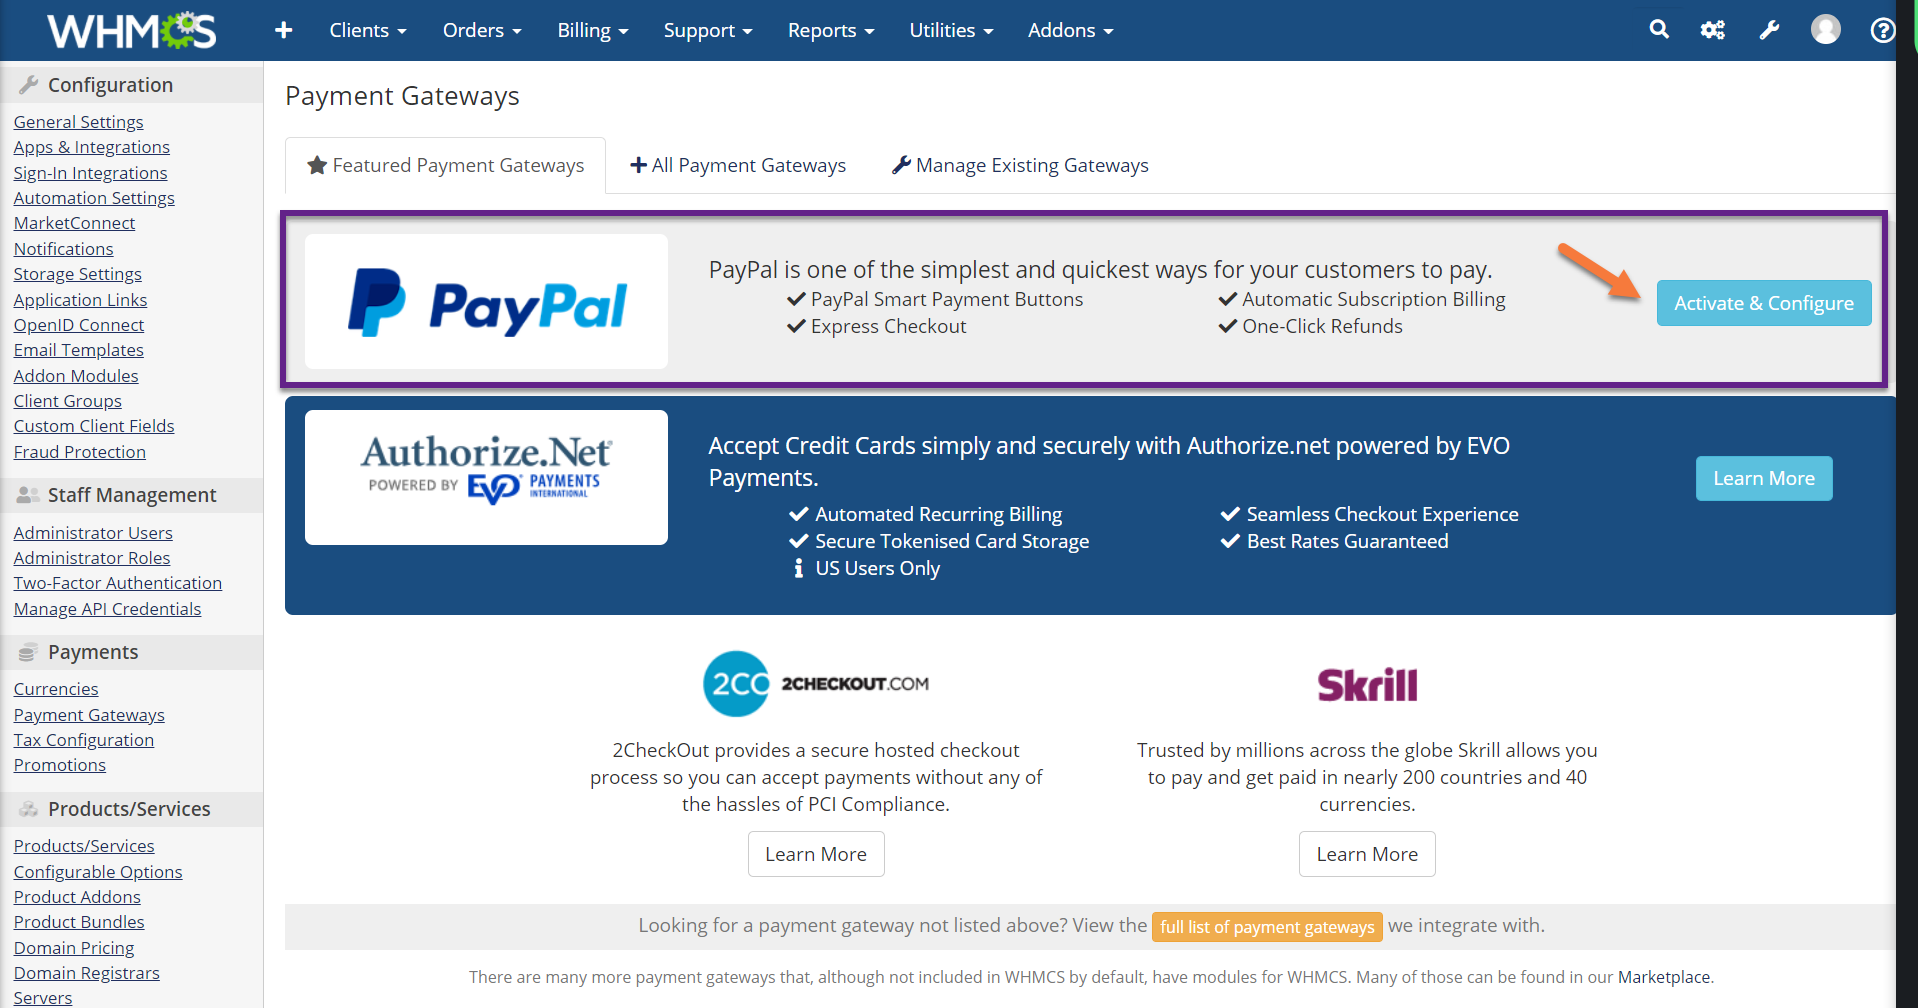
Step 3: The first time you load the Payment Gateways setting, you’ll be presented with this screen:
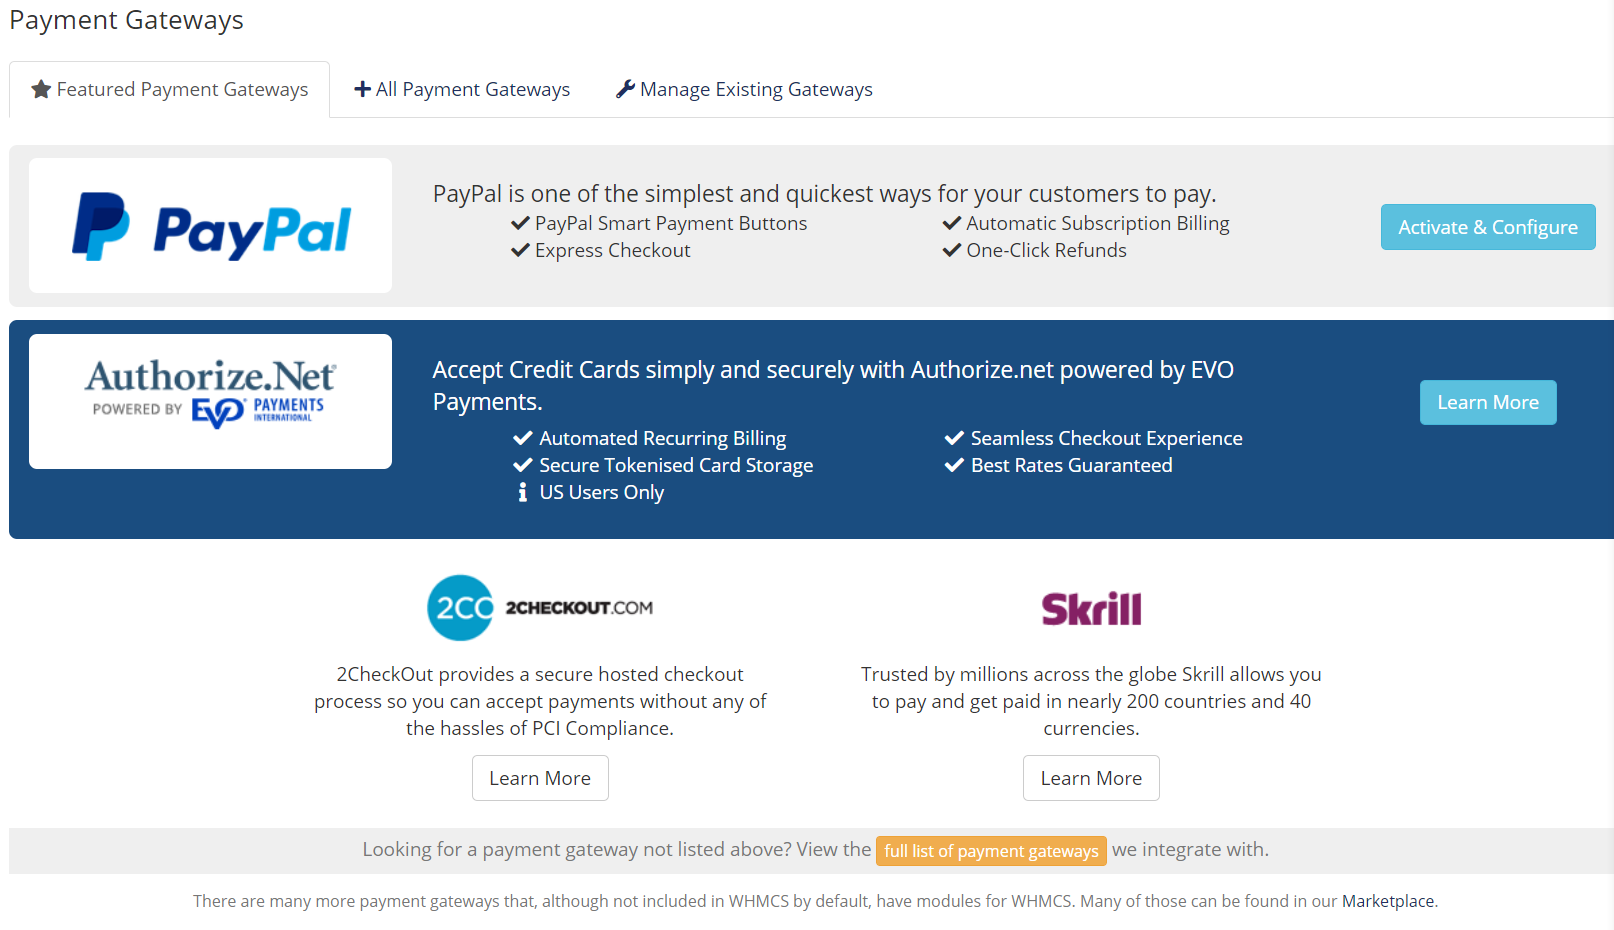
From here, you can decide on the payment processors you want to use.
At ChemiCloud, we recommend users set up PayPal and Stripe. PayPal is a widely accepted payment method in the USA and Canada and Stripe will allow your shop to take credit cards of all types, such as Visa, Mastercard, American Express, Discover, JCB, and others.
How to activate PayPal as a Payment Gateway in WHMCS
Step 1: In the Payment Gateways area, look for the PayPal banner, and click the teal Activate & Configure button.
Step 2: The PayPal sign-in Modal will open, and you will be guided to sign in to your PayPal account.

Enter your PayPal account email, choose your Country, then click Next.
How to activate Stripe as a Payment Gateway in WHMCS
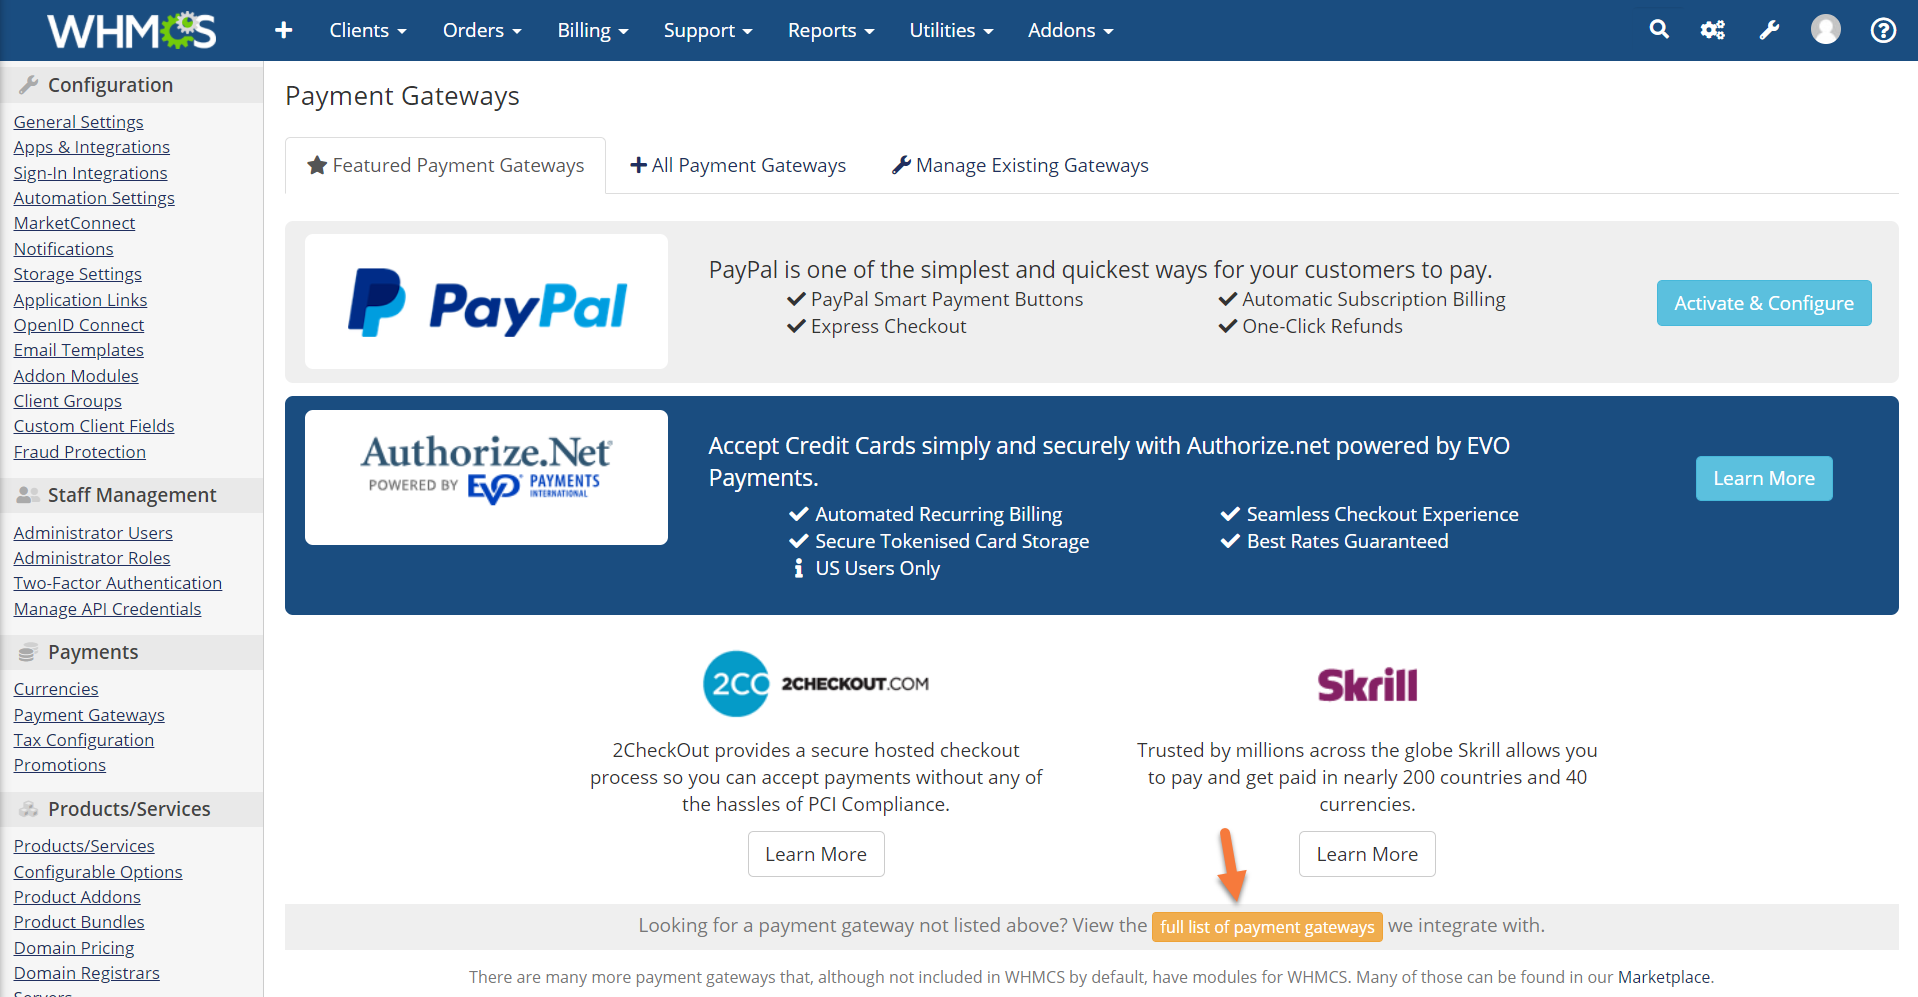
Step 1: In the Payment Gateway area, look at the bottom for a yellow button titled “full list of payment gateways”.
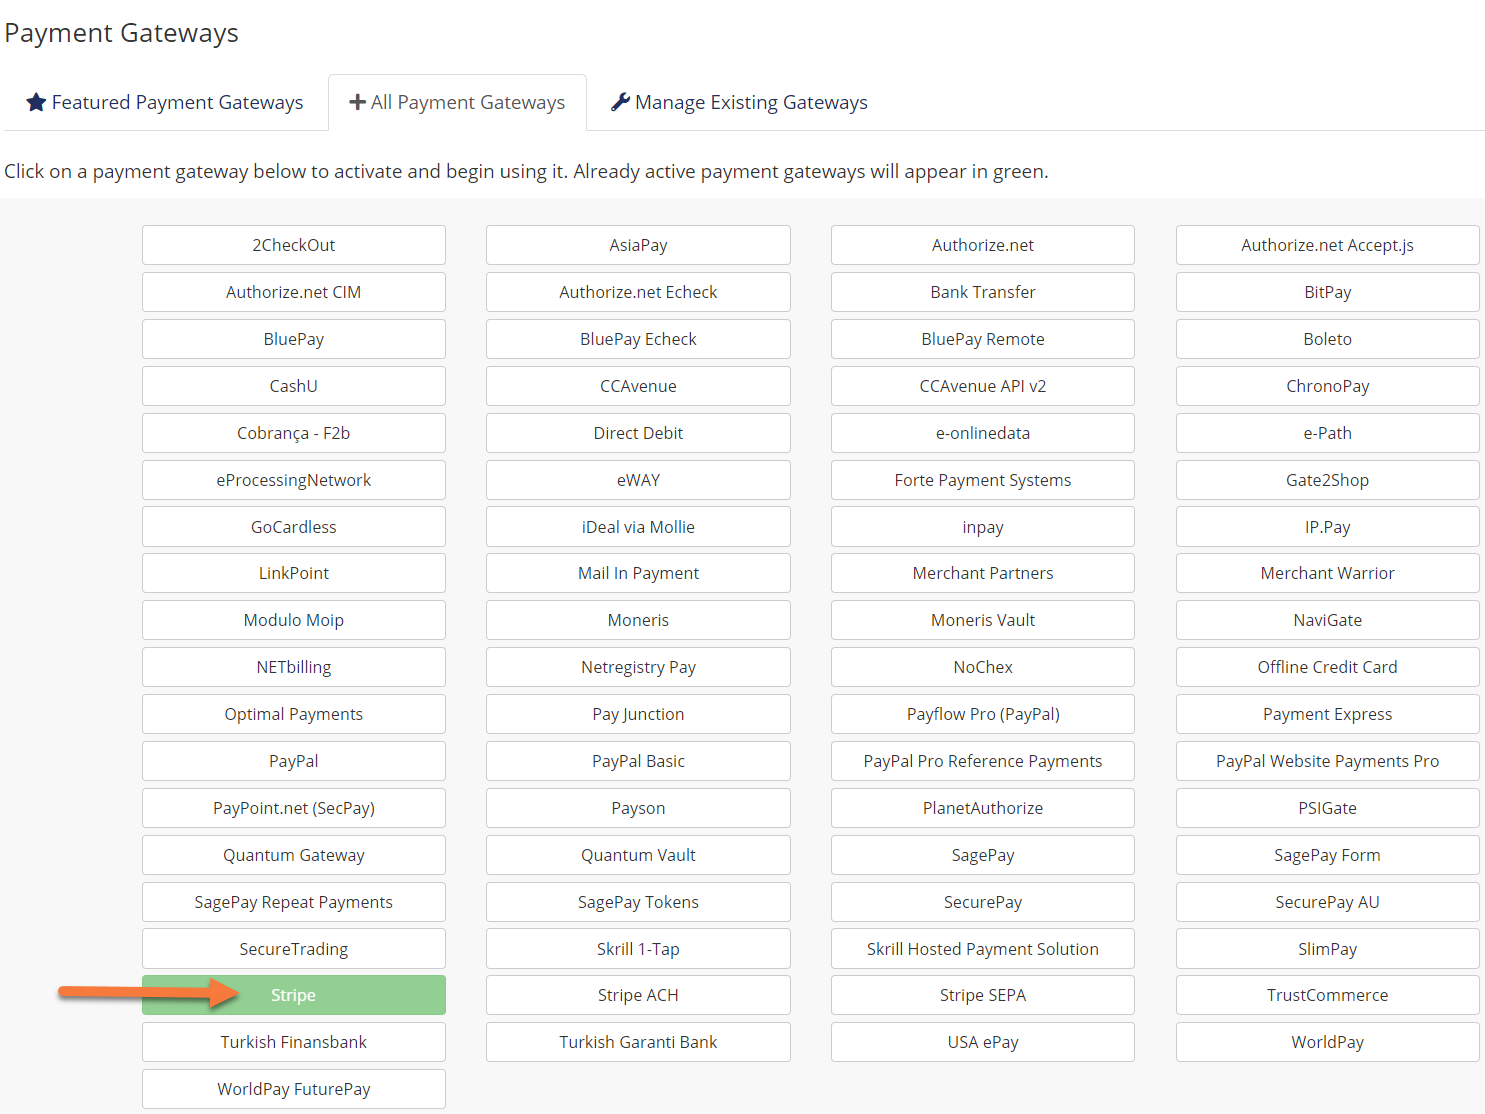
Step 2: Look for and click on Stripe in the list of payment providers:
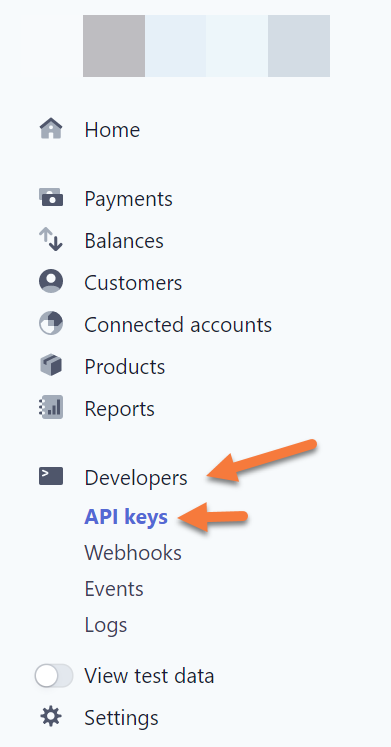
Step 3: You will be taken to the Stripe configuration where you can enter your Stripe API keys.
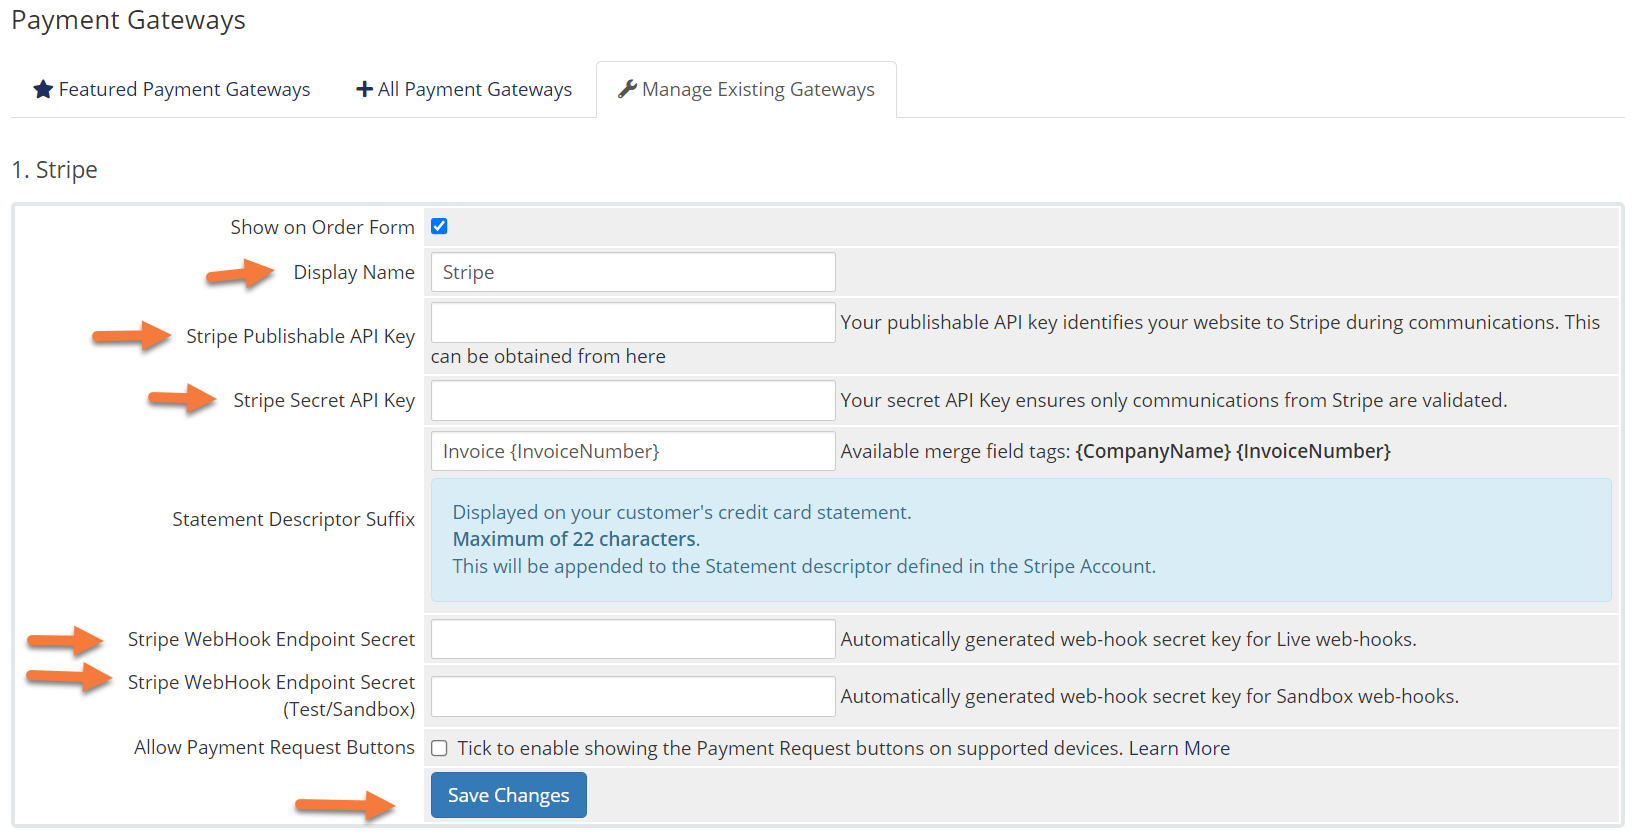
Step 4: To obtain this information, you’ll need to log in to your Stripe account and click Developers from the row of options on the left, then API Keys.
Once you have your Payment Gateways set up and running, you’ll be able to accept money from customers!
And that concludes our tutorial on configuring Payment Gateways in the WHMCS app.
Please join us in the next tutorial where we will walk you through configuring the Default Currency in WHMCS.
Let’s begin!
How to Configure the Automation Settings in WHMCS
You can follow the steps in this article or watch out our video tutorial.
Step 1: First, log in to your WHMCS Admin. Once logged in, click the wrench in the top right corner, then click System Settings.
Step 2: Once the System Settings load, click Automation Settings:
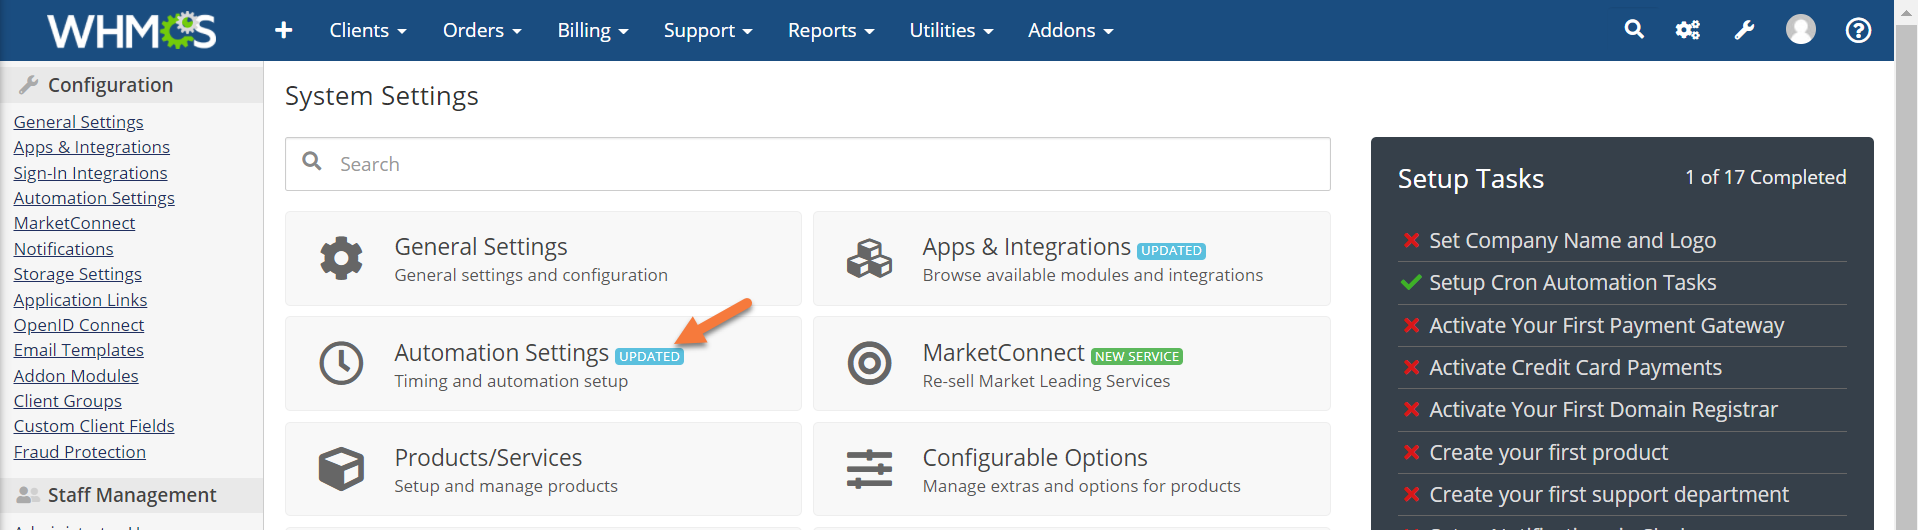
The Automations Settings area in WHMCS is where you can control various settings, such as:
- Suspensions
- Un-suspensions
- Terminations
- How far in advance invoices are generated
- When overdue are sent
and more…
How to repair the Cron in cPanel to eliminate the Automation Settings Error Notice
If you open your Automation Settings area for the first time and you see an Error at the top, like the image below, this section will help you out.

For daily automation in WHMCS to occur, a Cron job must be configured. The Cron is typically configured automatically during WHMCS setup. The default is to run this Cron every 5 minutes.
When you use Softaculous to install WHMCS, it’s possible your Cron for WHMCS was automatically set up incorrectly. This is a feature, not a bug.
Use the steps below to resolve this.
Step 1: Open your cPanel and navigate to the Advanced Section.
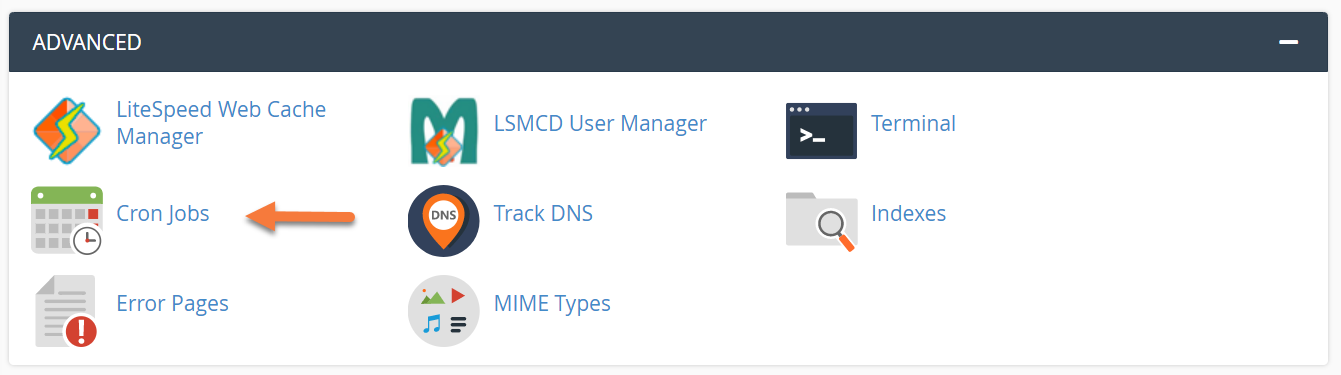
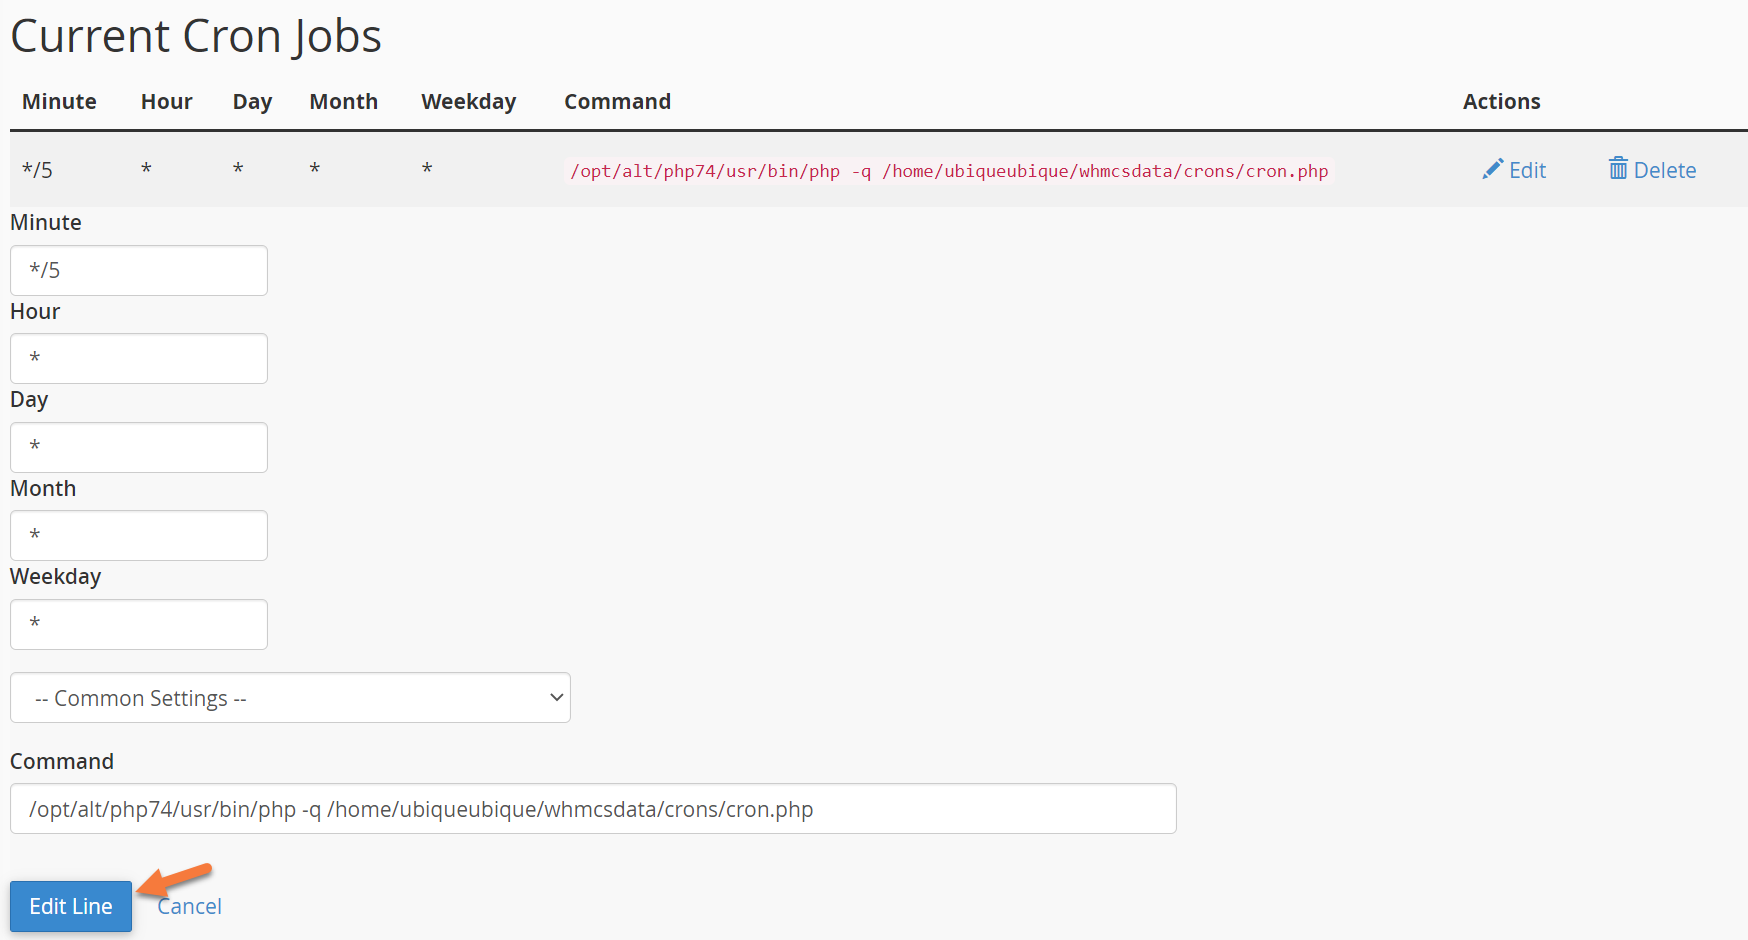
Step 2: When the Cron Jobs page opens, scroll down to the “Current Cron Jobs” section and locate your WHMCS Cron:

Click Edit to open the Cron.
Step 3: When the Cron editor opens, click the drop-down that says –Common Settings–:

Step 4: In the drop-down menu, choose every 5 minutes:
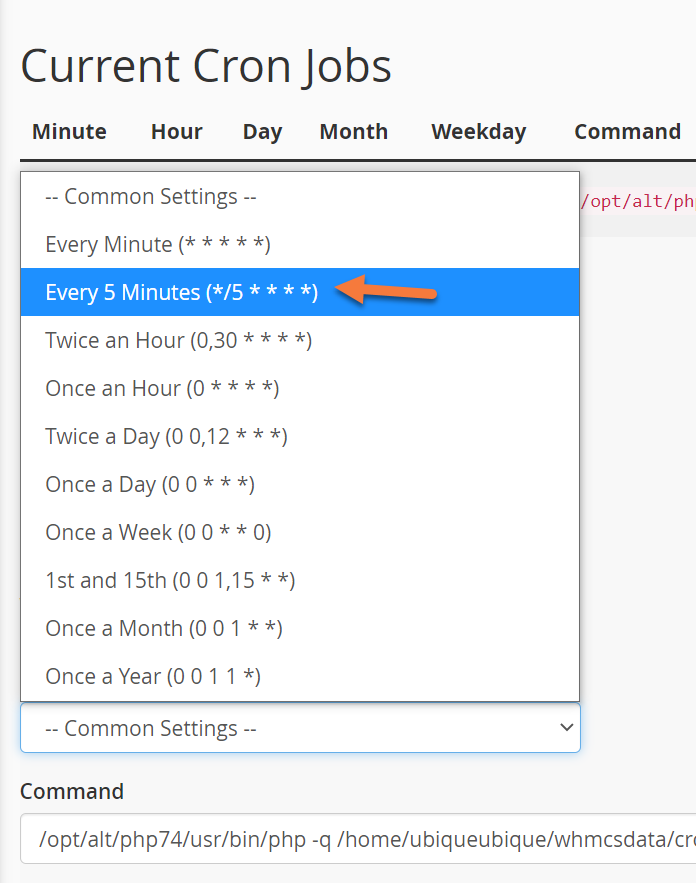
Step 5: Click Edit Line to save your changes.
Step 6: You’ll need to wait 48 hours for all the Daily Crons in WHMCS to run before this error will go away. If after 2 days the error still remains, please contact Support!
Reviewing the Remaining Settings in WHMCS Automation
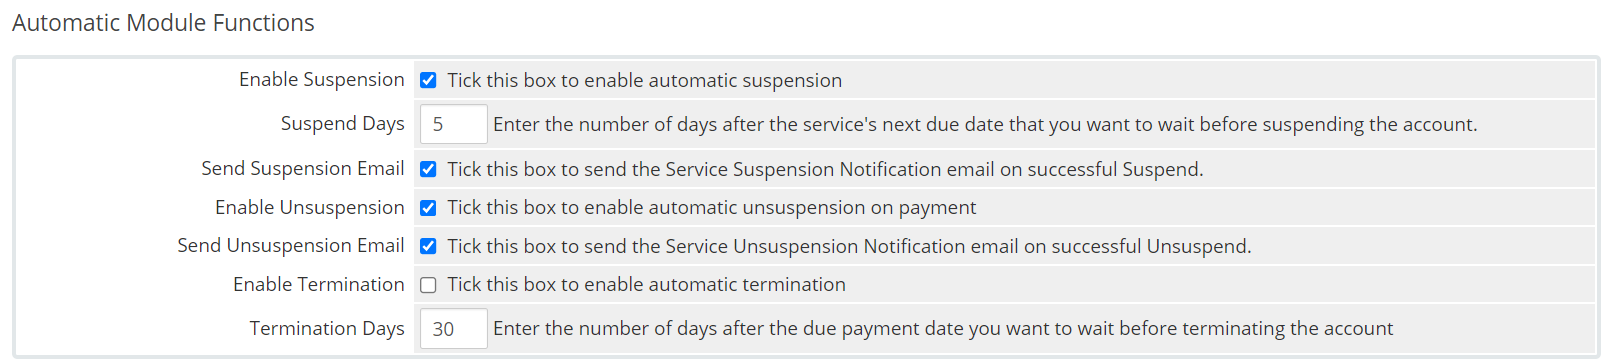
The automatic modules area controls how WHMCS handles suspensions, un-suspension, and terminations. In this section, you can choose whether whmcs performs these functions and the requirements for doing so, such as how overdue a service needs to be before it’s suspended or terminated.
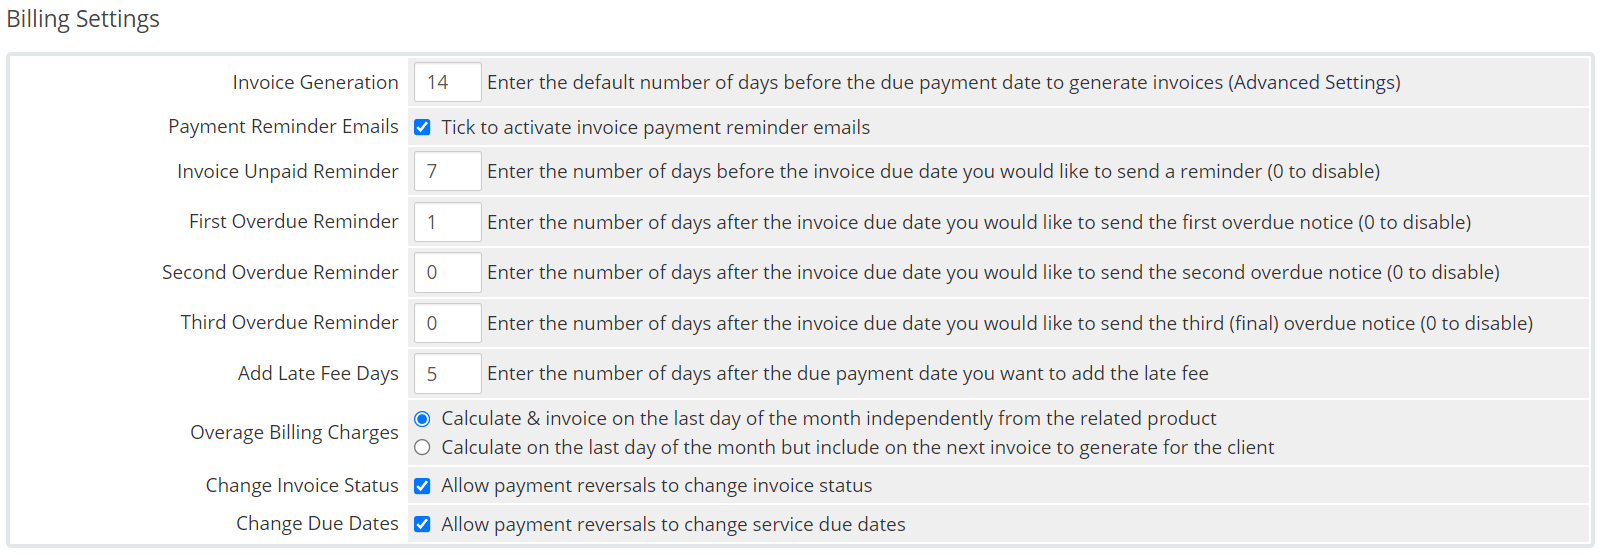
The Billing Settings area lets you choose when invoices, reminders, and overdue notices are sent. You can also adjust when late fees are generated, overage billing calculation, and enable or disable automatic invoice status and due date adjustments if chargebacks occur.

Payment Capture Settings control how automatic payments using stored payment methods are handled.
You can adjust when charges occur, when failed attempts should be retried, and how often to retry, and how to handle expired card information.

In Currency Auto Update Settings, you can choose whether WHMCS should update exchange rates daily, or whether product pricing should update automatically using the current exchange rate daily.
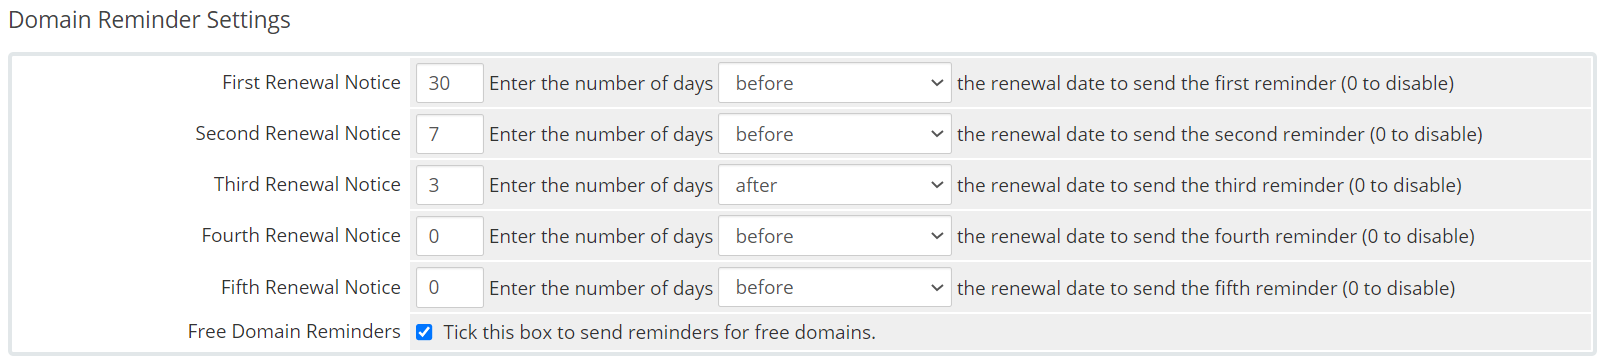
In Domain Reminder settings, you can control when and how many domain reminders are sent.
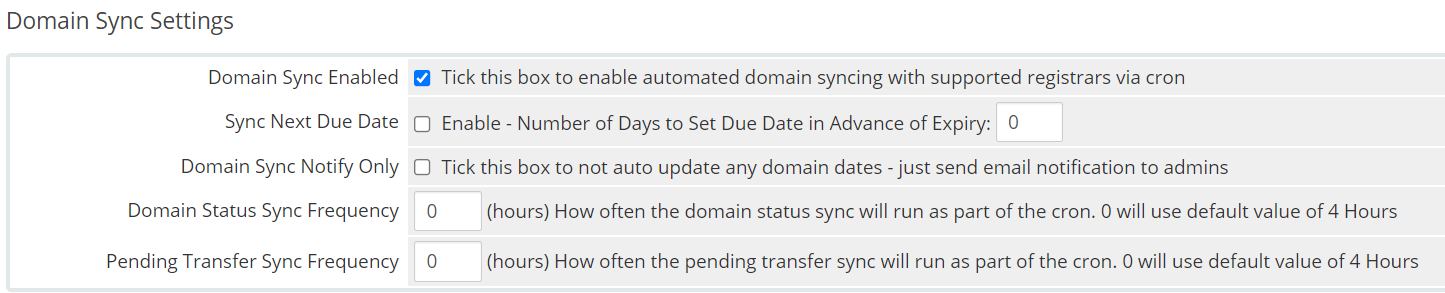
The domain sync settings control whether the domain sync function is used. This ensures the expiration date, next due date, and status of active or pending domains remain accurate. Here you can choose whether you want to enable this function, control how often it syncs, choose whether or not to update the next due date, and whether automatic changes are made and an email is sent to the admin.

In the Support Settings area, you can choose whether you want tickets to automatically close after x amount of time of inactivity.

Data retention settings control how long clients with no active products, services, addons, or domains will be kept in the system before being automatically removed.
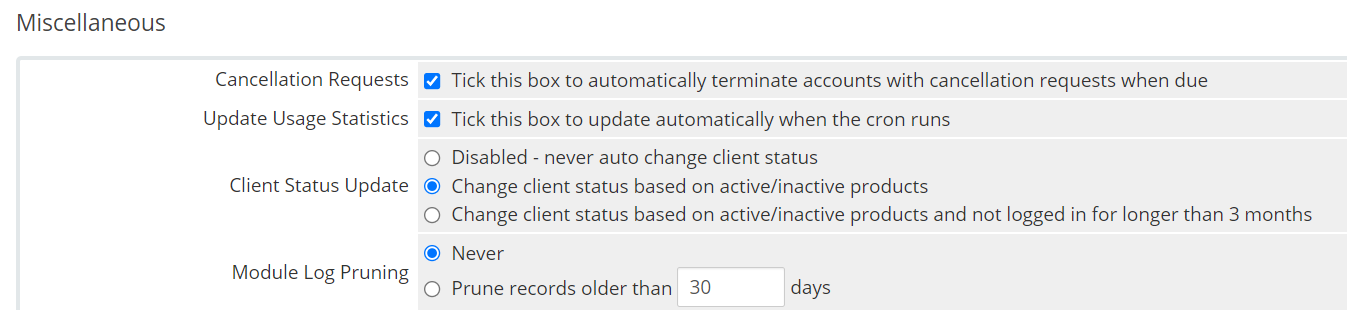
In the Miscellaneous area, you can enable auto-cancellation terminations, automatic usage calculation, and choose how client status updates are handled.
Paired w/ your data retention settings, this area helps you ensure your active client list remains up to date.
Don’t forget to click save changes after making changes to this area. The changes will take effect the next time the Cron runs.
And that concludes our tutorial on configuring the Automation Settings in the WHMCS app.
Please join us in the next tutorial where we will walk you through configuring the Payment Gateways in WHMCS
Let’s begin!
How to Configure the General Settings in WHMCS
You can follow the steps in this article or watch out our video tutorial.
- First, log in to your WHMCS Admin. Once logged in, click the wrench in the top right corner, then click System Settings.
2. Once the System Settings load, you’ll notice there is a row of 12 tabs at the top of the page. Since you need to configure some of these settings to customize your WHMCS installation, let’s review each tab.
General Settings > General
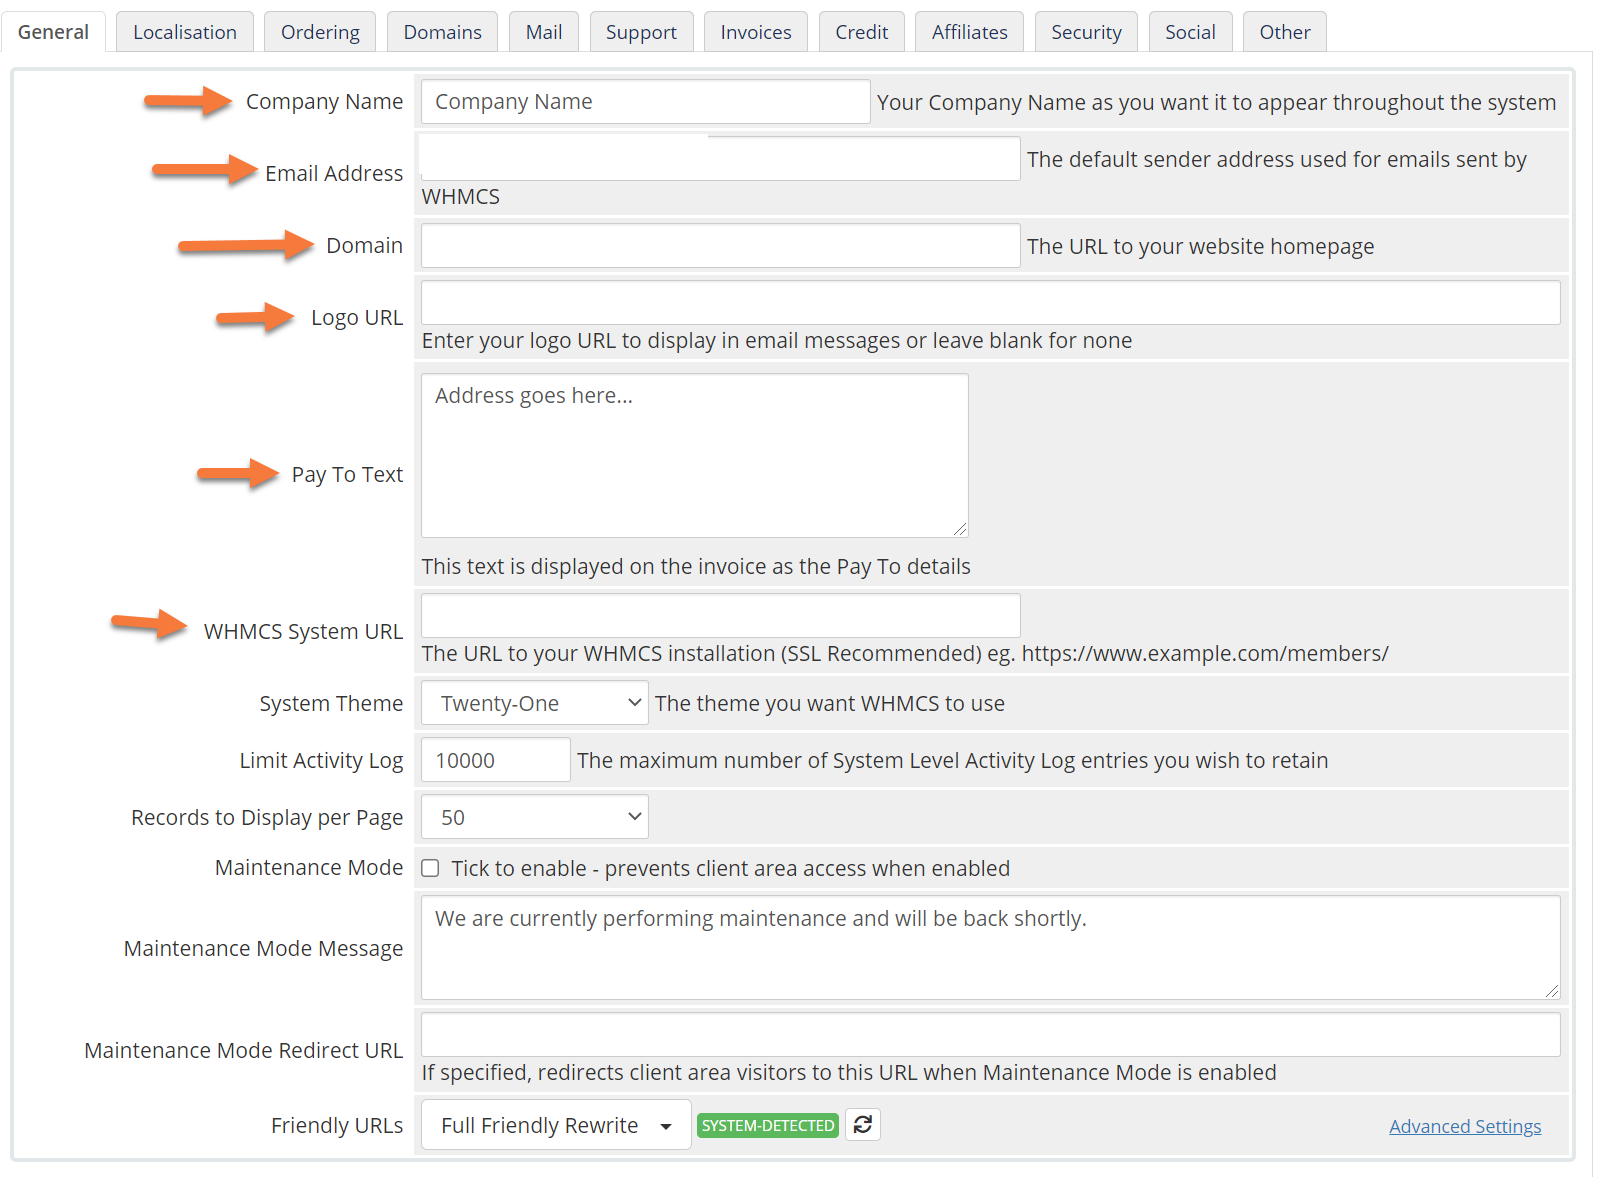
On the General tab, you’ll want to configure the following settings:
- Enter the name of your company in the Company Name field.
- In the “Email Address” field, ensure the address listed there is the one you want to appear when WHMCS sends an email to you or a customer.
- The Domain field is where your business domain name will be listed.
- Your logo URL is the field where you would enter the path to your company logo if you have one. This logo will appear on things like invoices and receipts.
- Your Pay To Text field is where you’ll enter the email address or mailing address where customers will send payments.
Click Save Changes to save any changes you made.
General Settings > Localisation
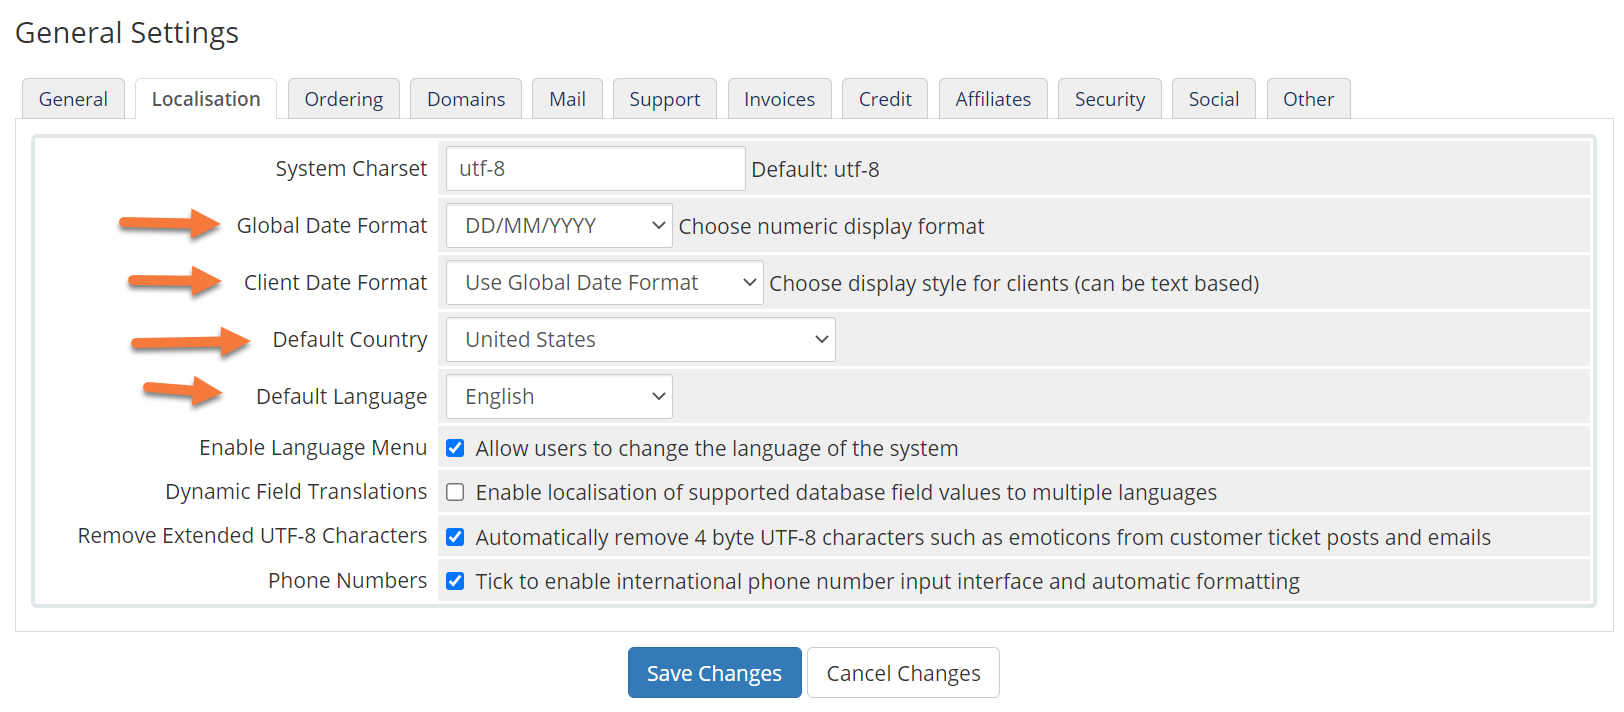
On the Localisation tab, you’ll want to configure the following settings:
- Set the global date format to the date you use in your country.
- Set the client date format to either use the global date, or a custom date.
- Set your default country to the country in which your business is located.
- Set the default language to the language you use.
Click Save Changes to save any changes you made.
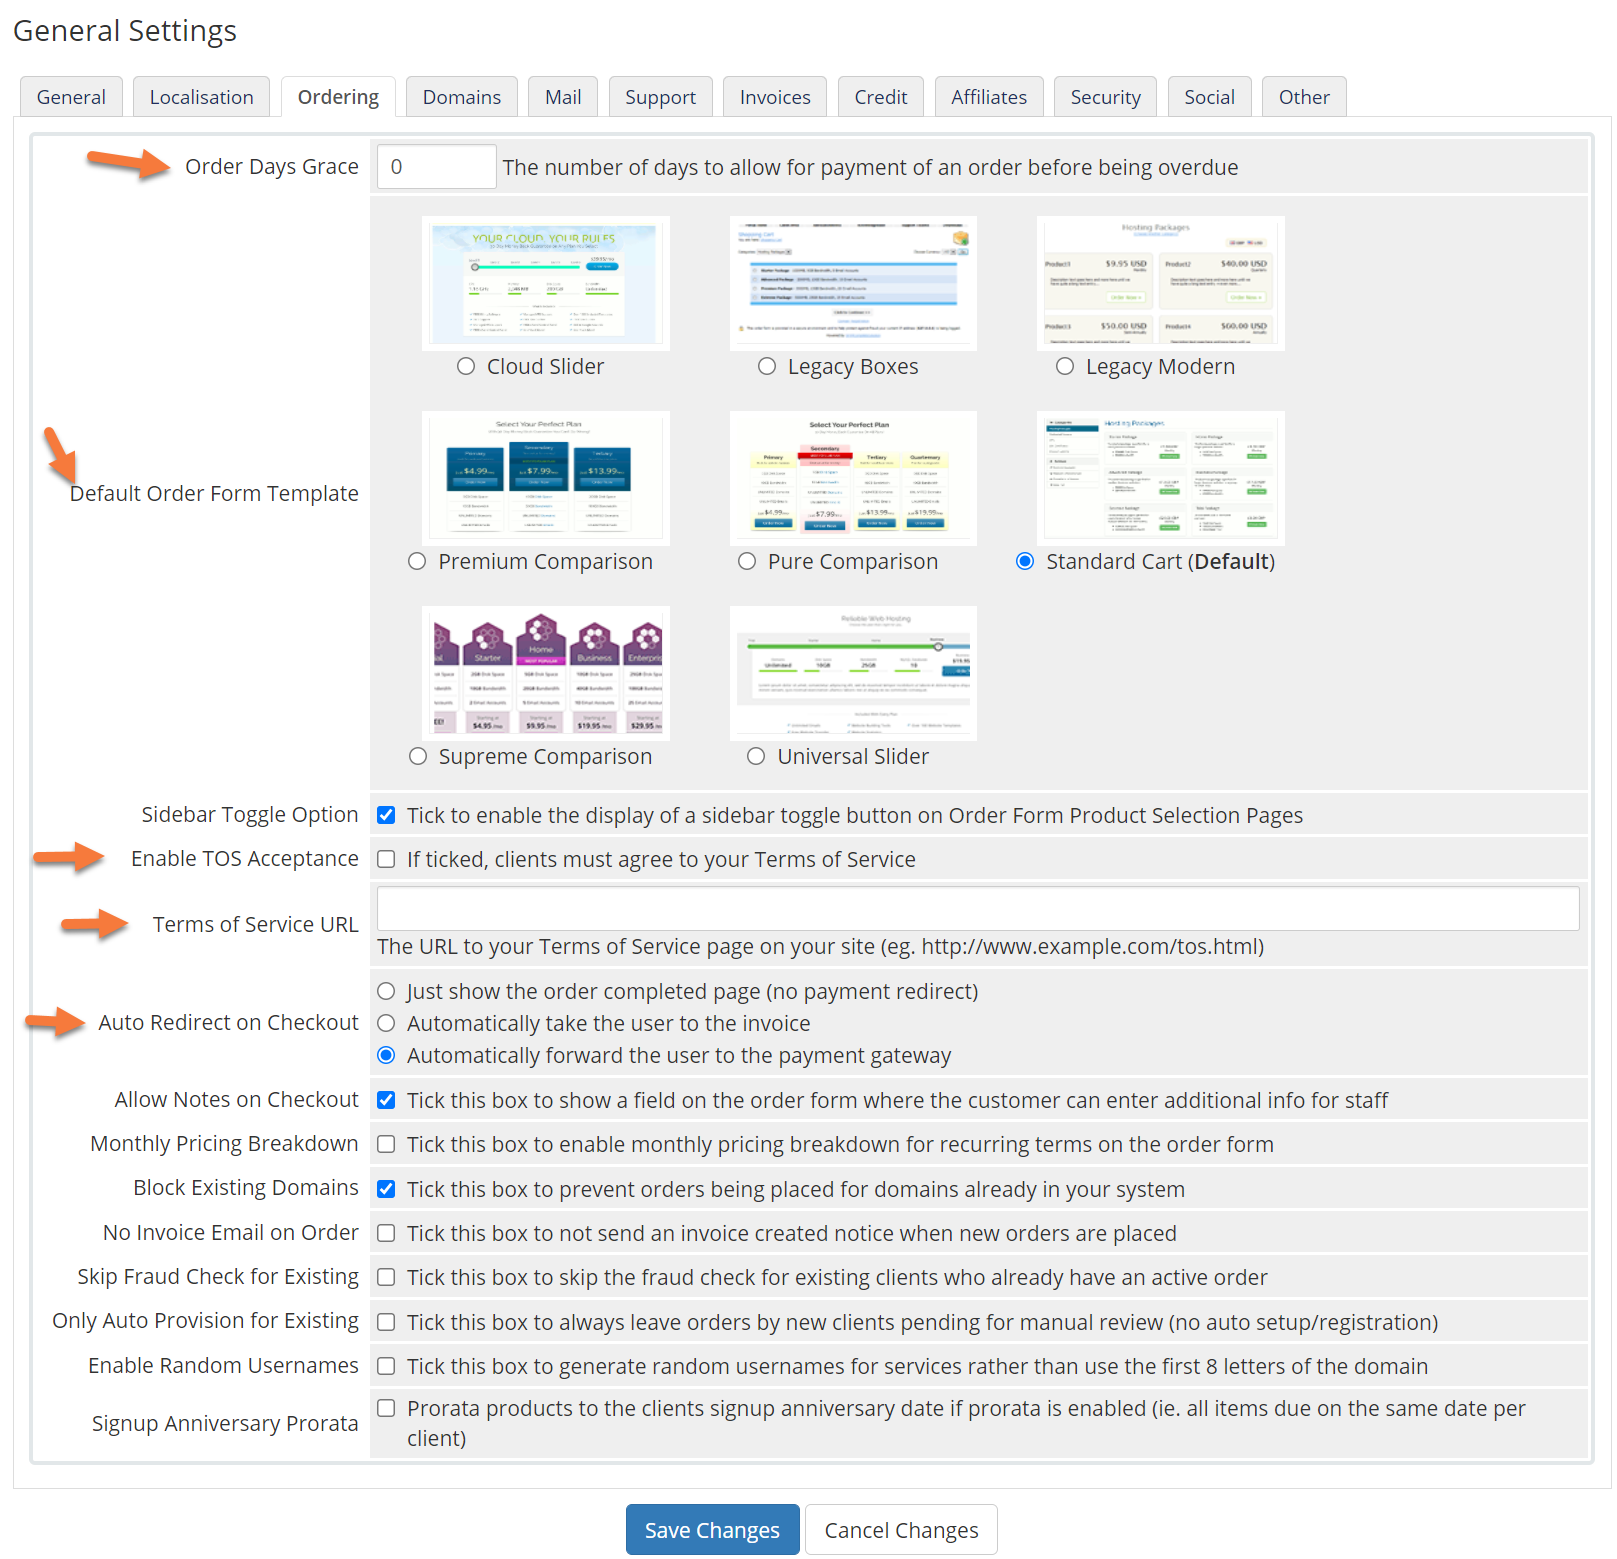
General Settings > Ordering
 On the Ordering Tab, you’ll want to configure the following settings:
- On the Order Days Grace field, enter the number of days to allow for payment before order becomes overdue.
- Choose a “Default Order Form Template” to present to your customers when they are ordering.
- If you have a Terms of Service (TOS) and your customers have to abide by that before completing their purchase, tick the check box next to that option.
- Next enter the URL where the full Terms of Service can be read on your website.
- Finally, if you want your customers to be auto redirected somewhere at checkout, choose the relevant option to the right.
Click Save Changes to save any changes you made.
General Settings > Domains
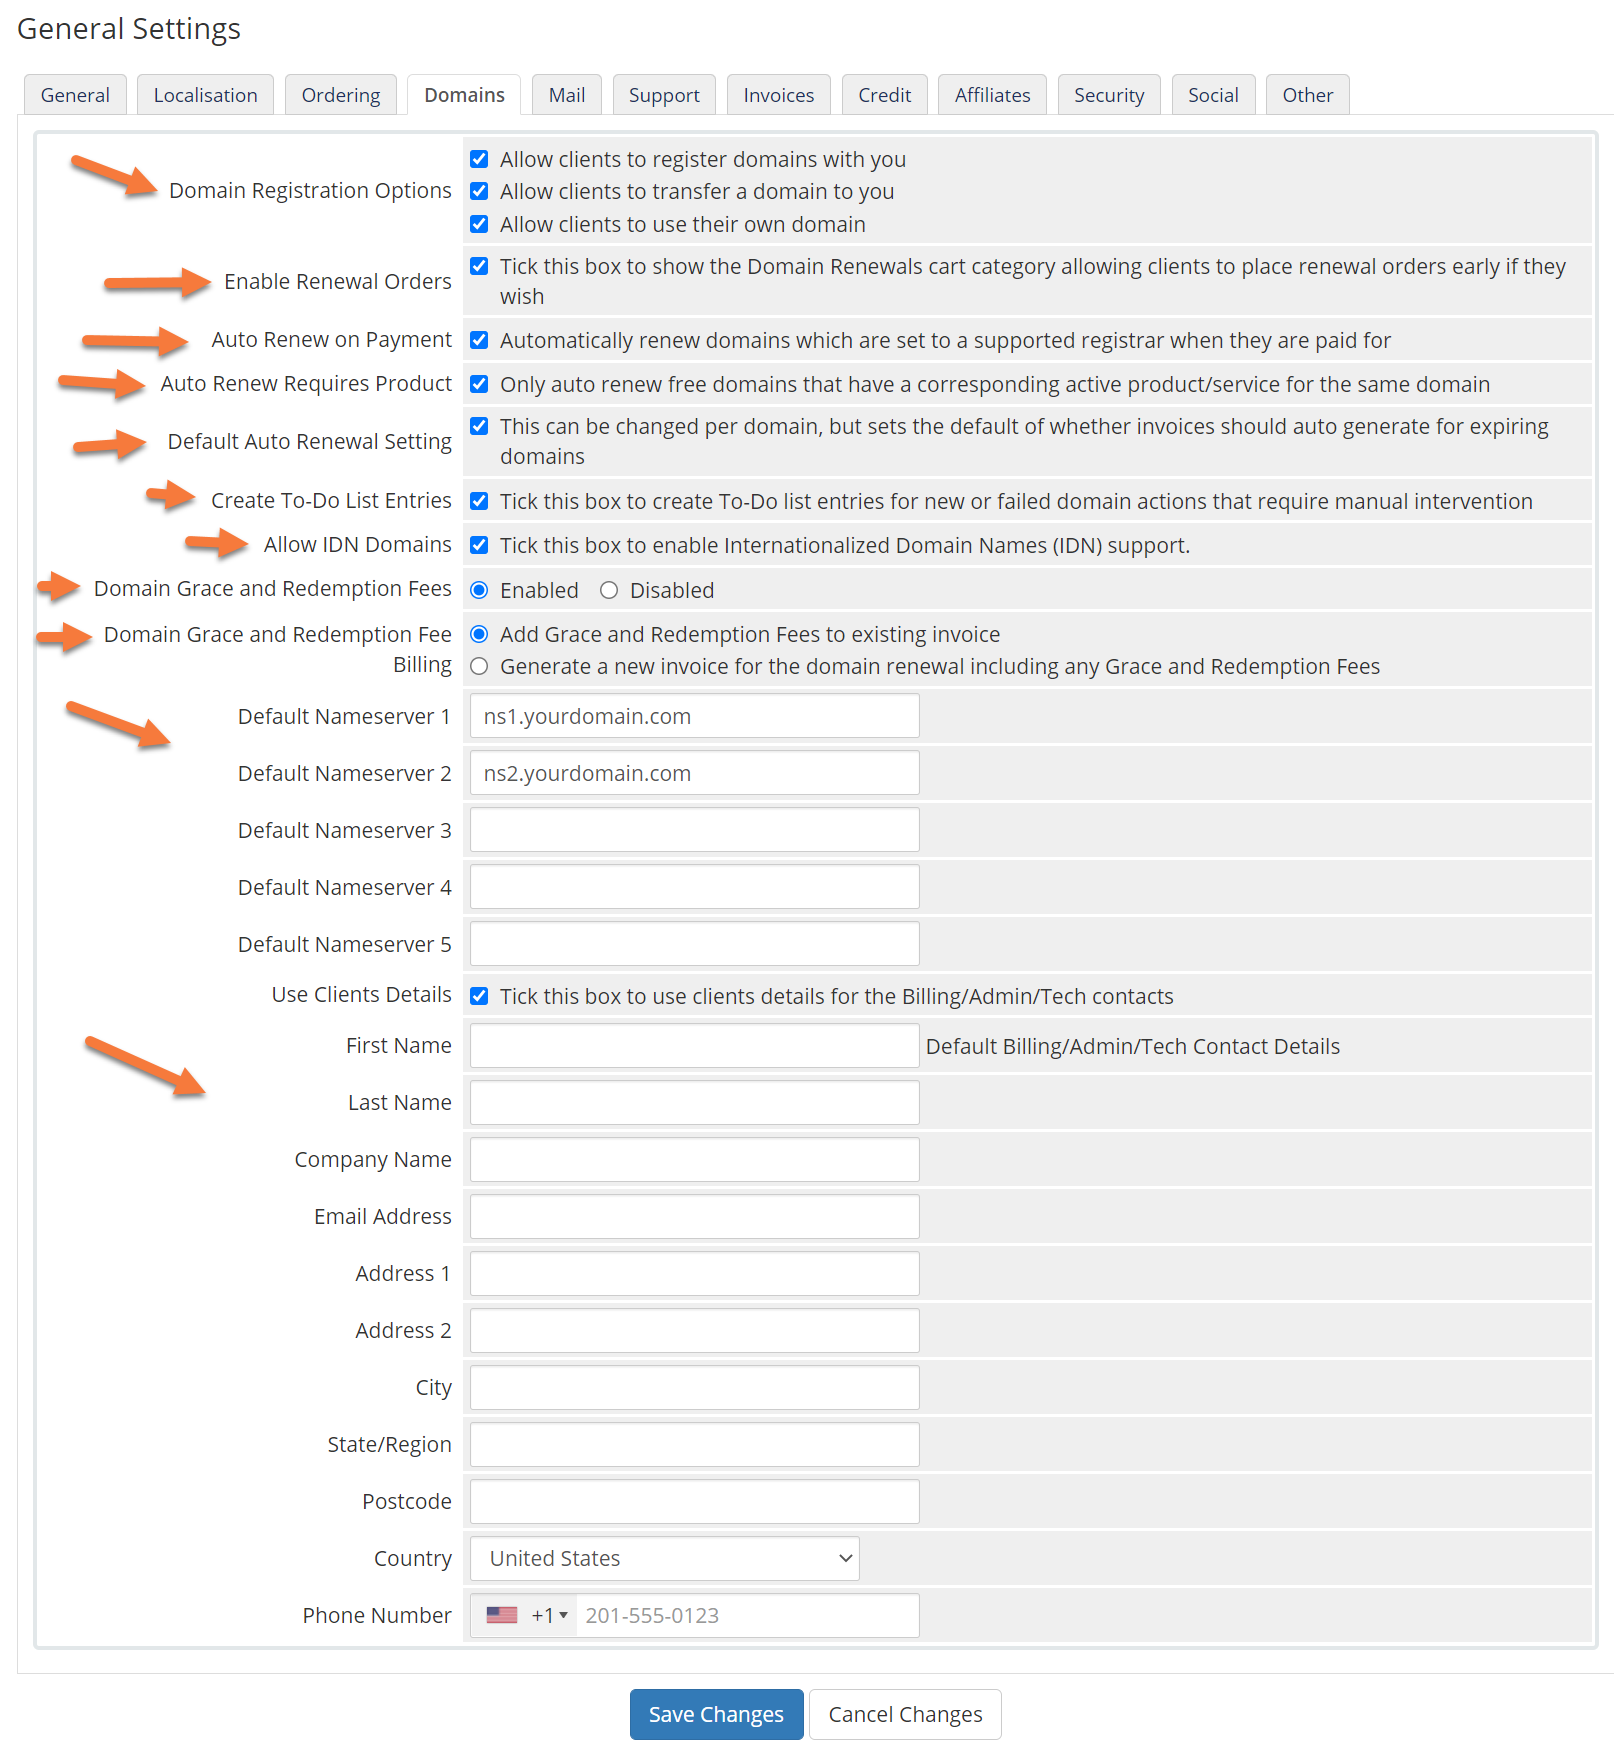
Most of the options on the Domains tab can be left alone, unless you don’t wish to enable certain features, such as IDN domains or Grace and Redemption fees.
However, you definitely want to enter your company’s default nameservers here so they can be auto-populated in the NS field when customers buy domains from you!
Click Save Changes to save any changes you made.
General Settings > Mail
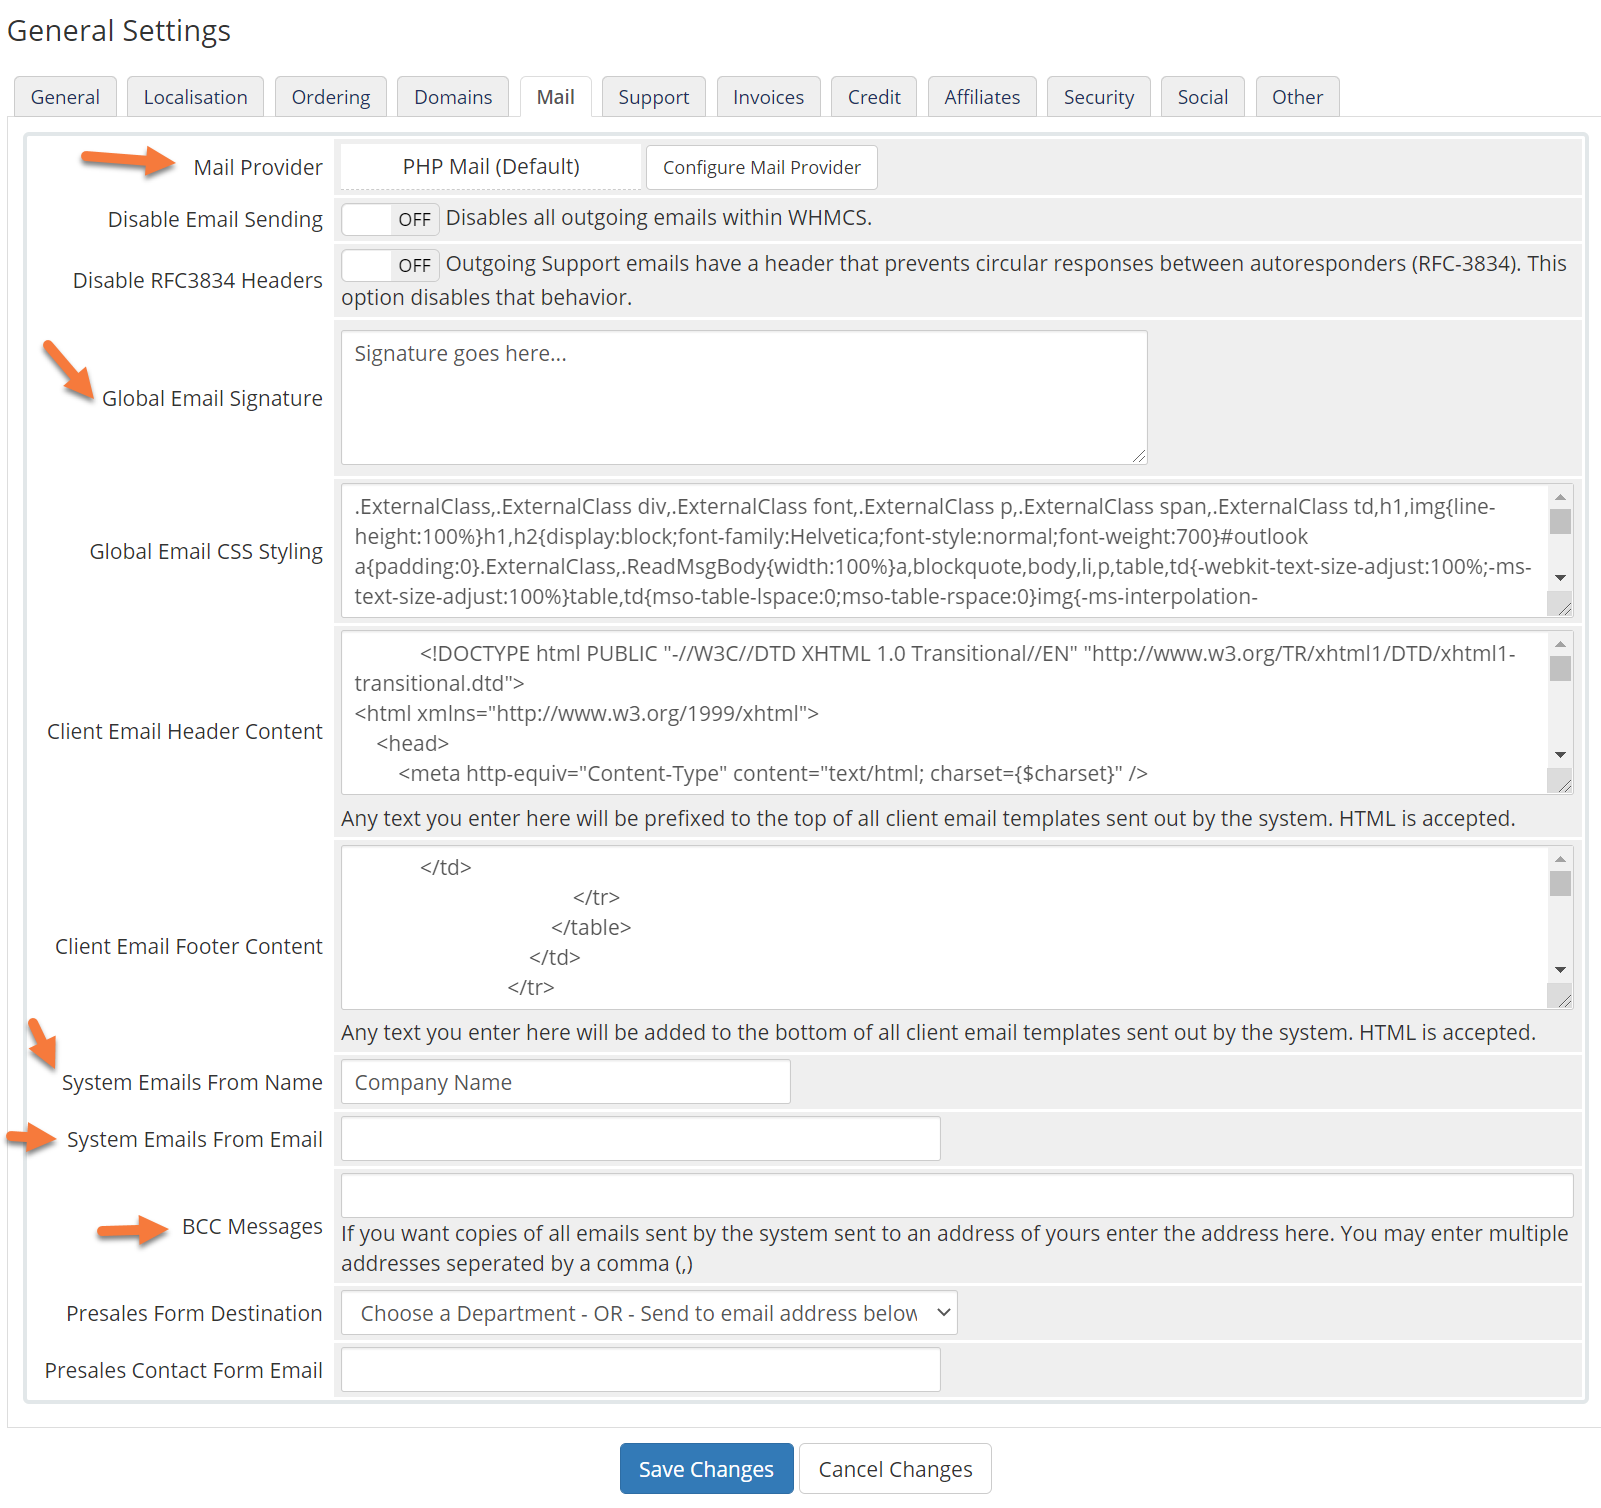
The Mail area contains a very important setting you must modify to use WHMCS successfully at ChemiCloud.
We do not support PHPMail on our servers & this is the default setting for WHMCS. You’ll need to click the “Configure Mail Provider” setting and set up SMTP based email. We have an article on this here.
In addition to changing from PHPMail to SMTP, you need to set a Global Email Signature to say something like:
Thanks for choosing us!
Regards,
Acme XYZ Team
Finally, you’ll need to set the name of the person or department and the email address from which system emails are sent.
Click Save Changes to save any changes you made.
General Settings > Support
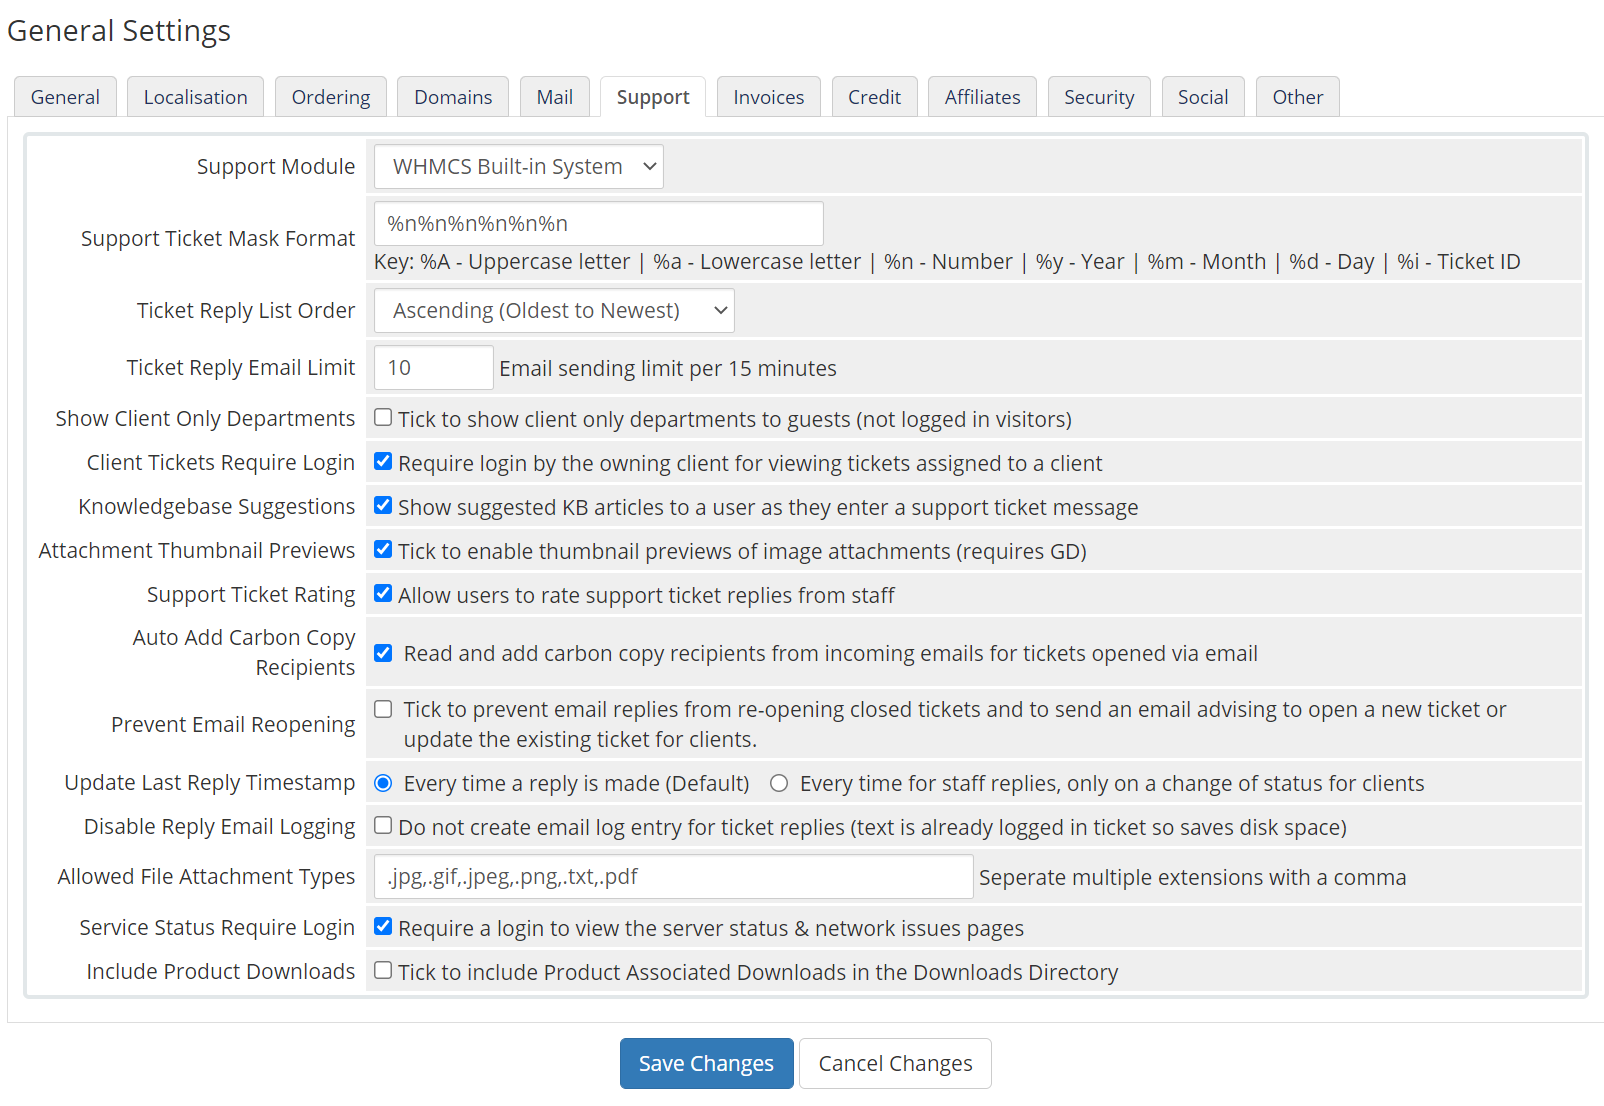
The Support section controls settings related to the built-in Help Desk / Support Desk functionality of WHMCS. Most of the settings here are good to go, however, there’s one setting I’d like to call out:
Service Status Requires Login
This setting will prevent people, whether they are customers or not, from setting if you have any network issues (assuming you plan to use the Network Issues section of WHMCS) unless they are logged in. In the opinion of this author, people shouldn’t need to sign in to see this information.
However, some web hosts have proprietary information on these pages, such as IP Addresses or the names of their Web Servers, which can become targets for Botnets and DDOS Bots, so we do understand if you want to leave this setting checked.
Click Save Changes to save any changes you made.
General Settings > Invoices
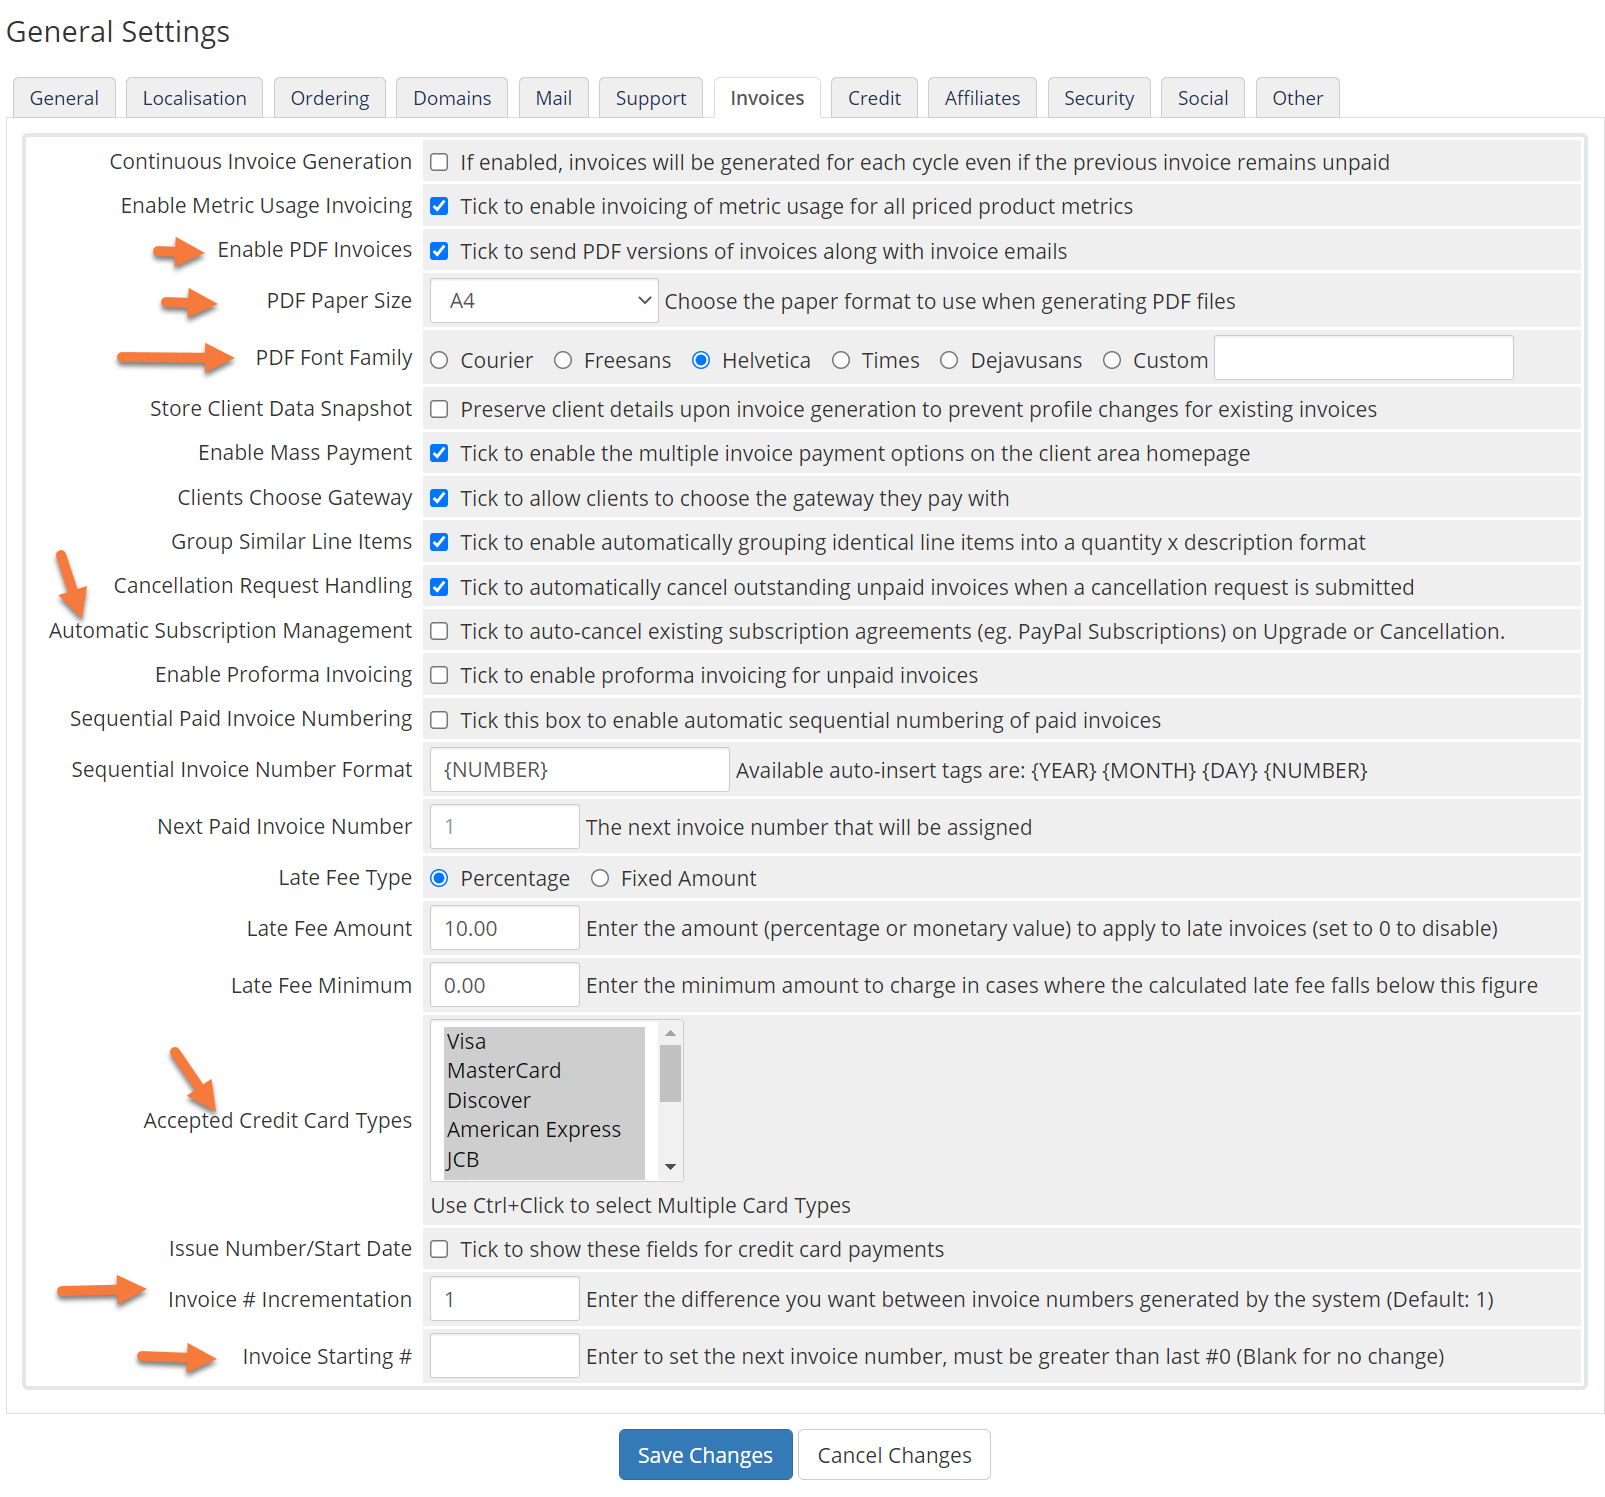
The Invoices tab contains a number of settings you should review, at the very least, including:
- Enable PDF Invoices
- PDF Paper Size
- PDF Font Family
- Automatic Subscription Management – this is a key feature and if enabled, can undoubtedly save you time.
- Accepted Credit Card Types – the system defaults to accepting a lot of credit card varieties, your payment gateway may not accept all of them, so be sure to only select the ones for which you can process payments.
- Invoice # Incrementation
- and Invoice Starting Number
Click Save Changes to save any changes you made.
General Settings > Credit
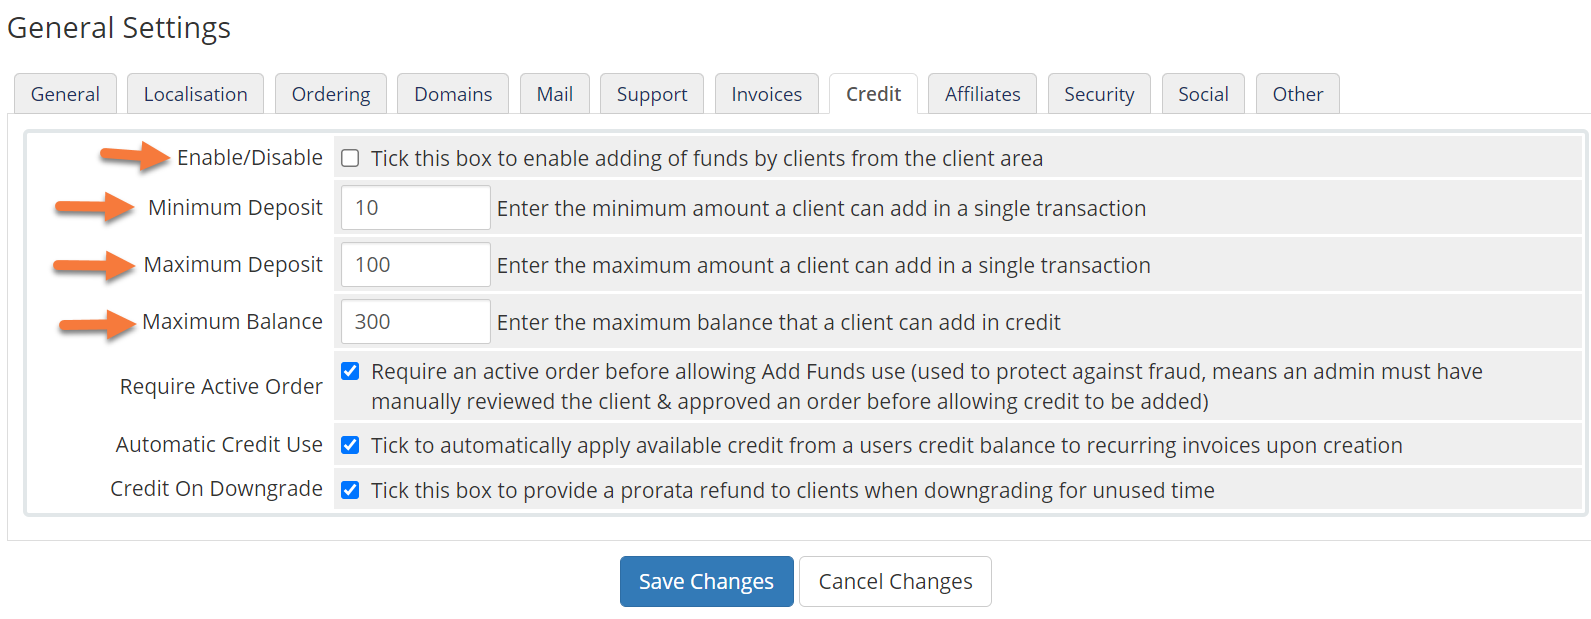
The Credit tab contains the settings related to ‘store credit’ in Customer accounts.
By default, this is disabled, however, if you wish for your customers to be able to pre-load the account with money, you can enable this, then configure the maximum and minimum deposit amounts, plus the overall maximum balance an account can have.
Click Save Changes to save any changes you made.
General Settings > Affiliates
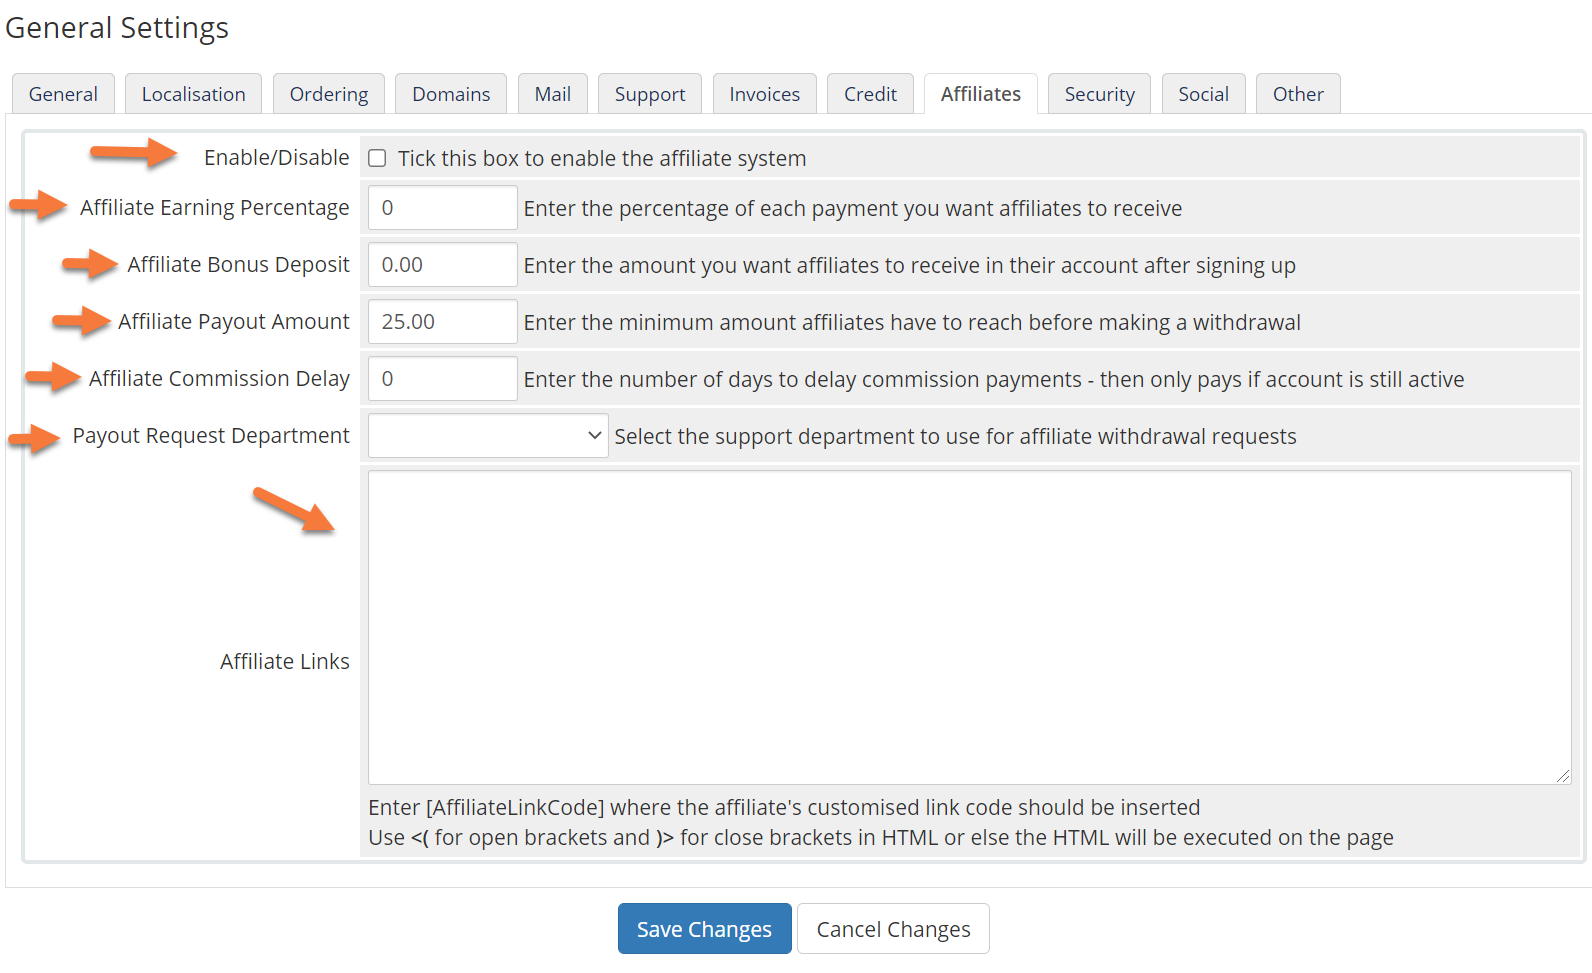
The Affiliates section controls settings related to the built-in Affiliates system in WHMCS.
By default, this setting is renewed and you should carefully review the WHMCS documentation on Affiliates before deciding to turn this on.
If you do decide to enable this feature, then you should set up the following fields:
- Affiliate Earning Percentage
- Affiliate Bonus Deposit
- Affiliate Payout Amount
- Affiliate Commission Delay
- Payout Request Department
Click Save Changes to save any changes you made.
General Settings > Security
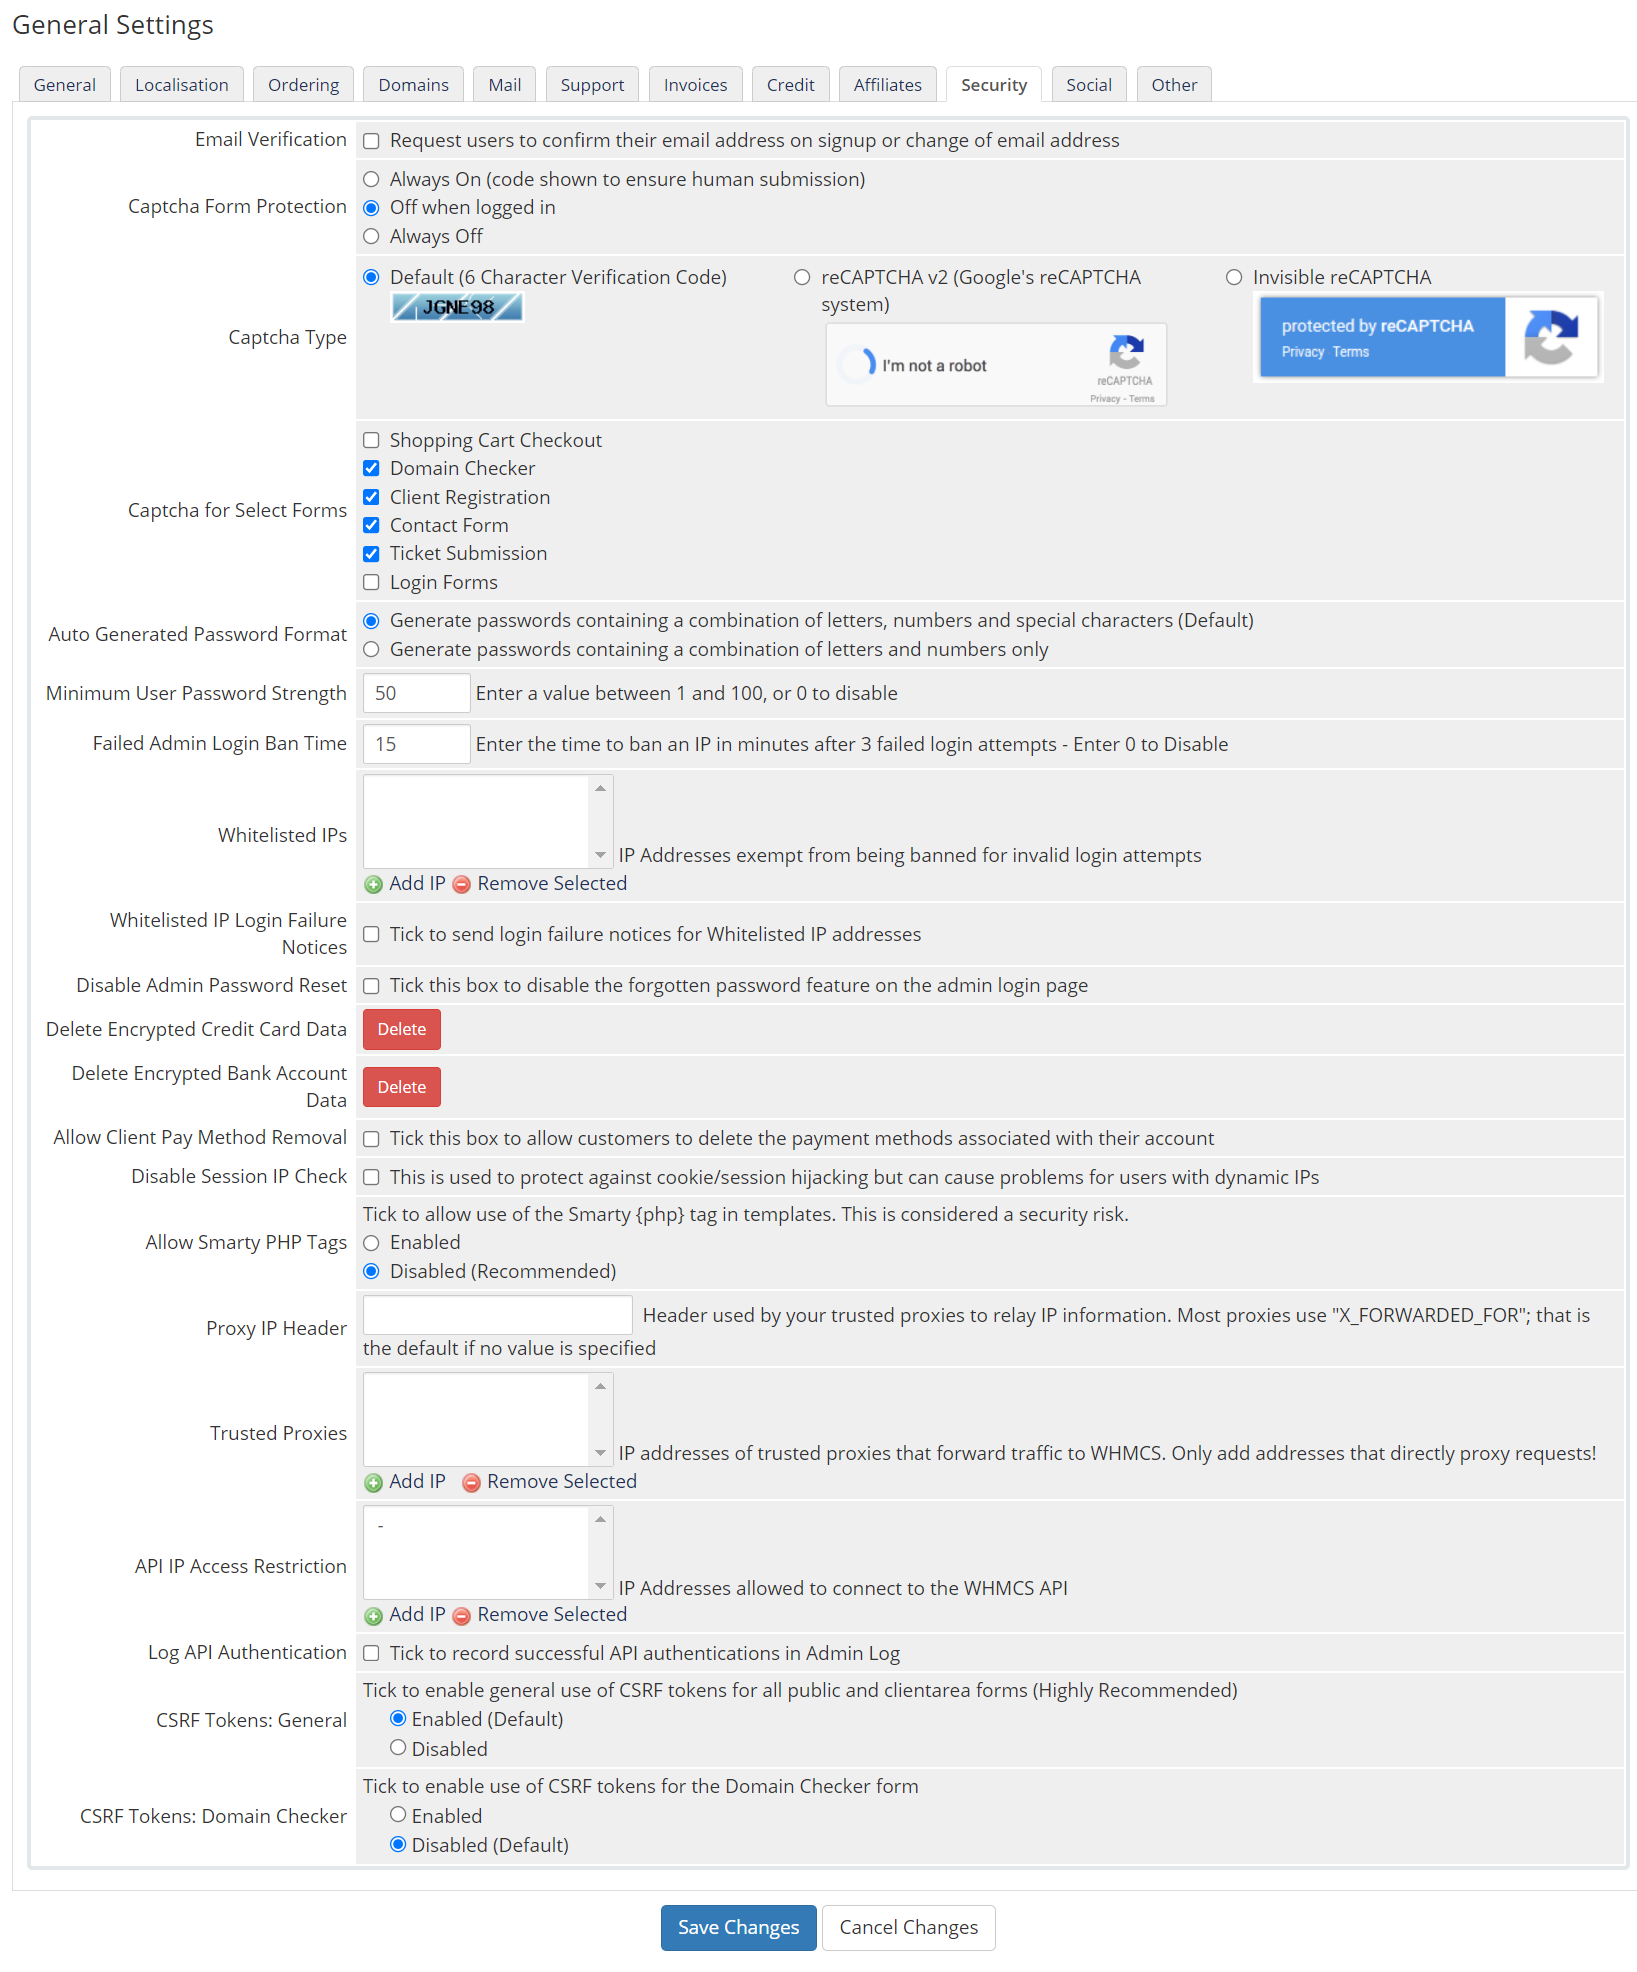
The Security tab contains some very important settings you should review, including:
- Email Verification – request users to confirm their email address on signup or change of email address.
- reCAPTCHA – This setting will protect your forms and should be enabled. You have the option to choose from a CAPTCHA that comes with WHMCS, or you can use Google’s reCAPTCHA.
- Auto-Generated Password Formats
- Minimum User Password Strength
- Whitelisted IPs
- Deletion settings for sensitive data, such as credit cards and bank accounts.
- and API IP Address Restriction.
Click Save Changes to save any changes you made.
General Settings > Social
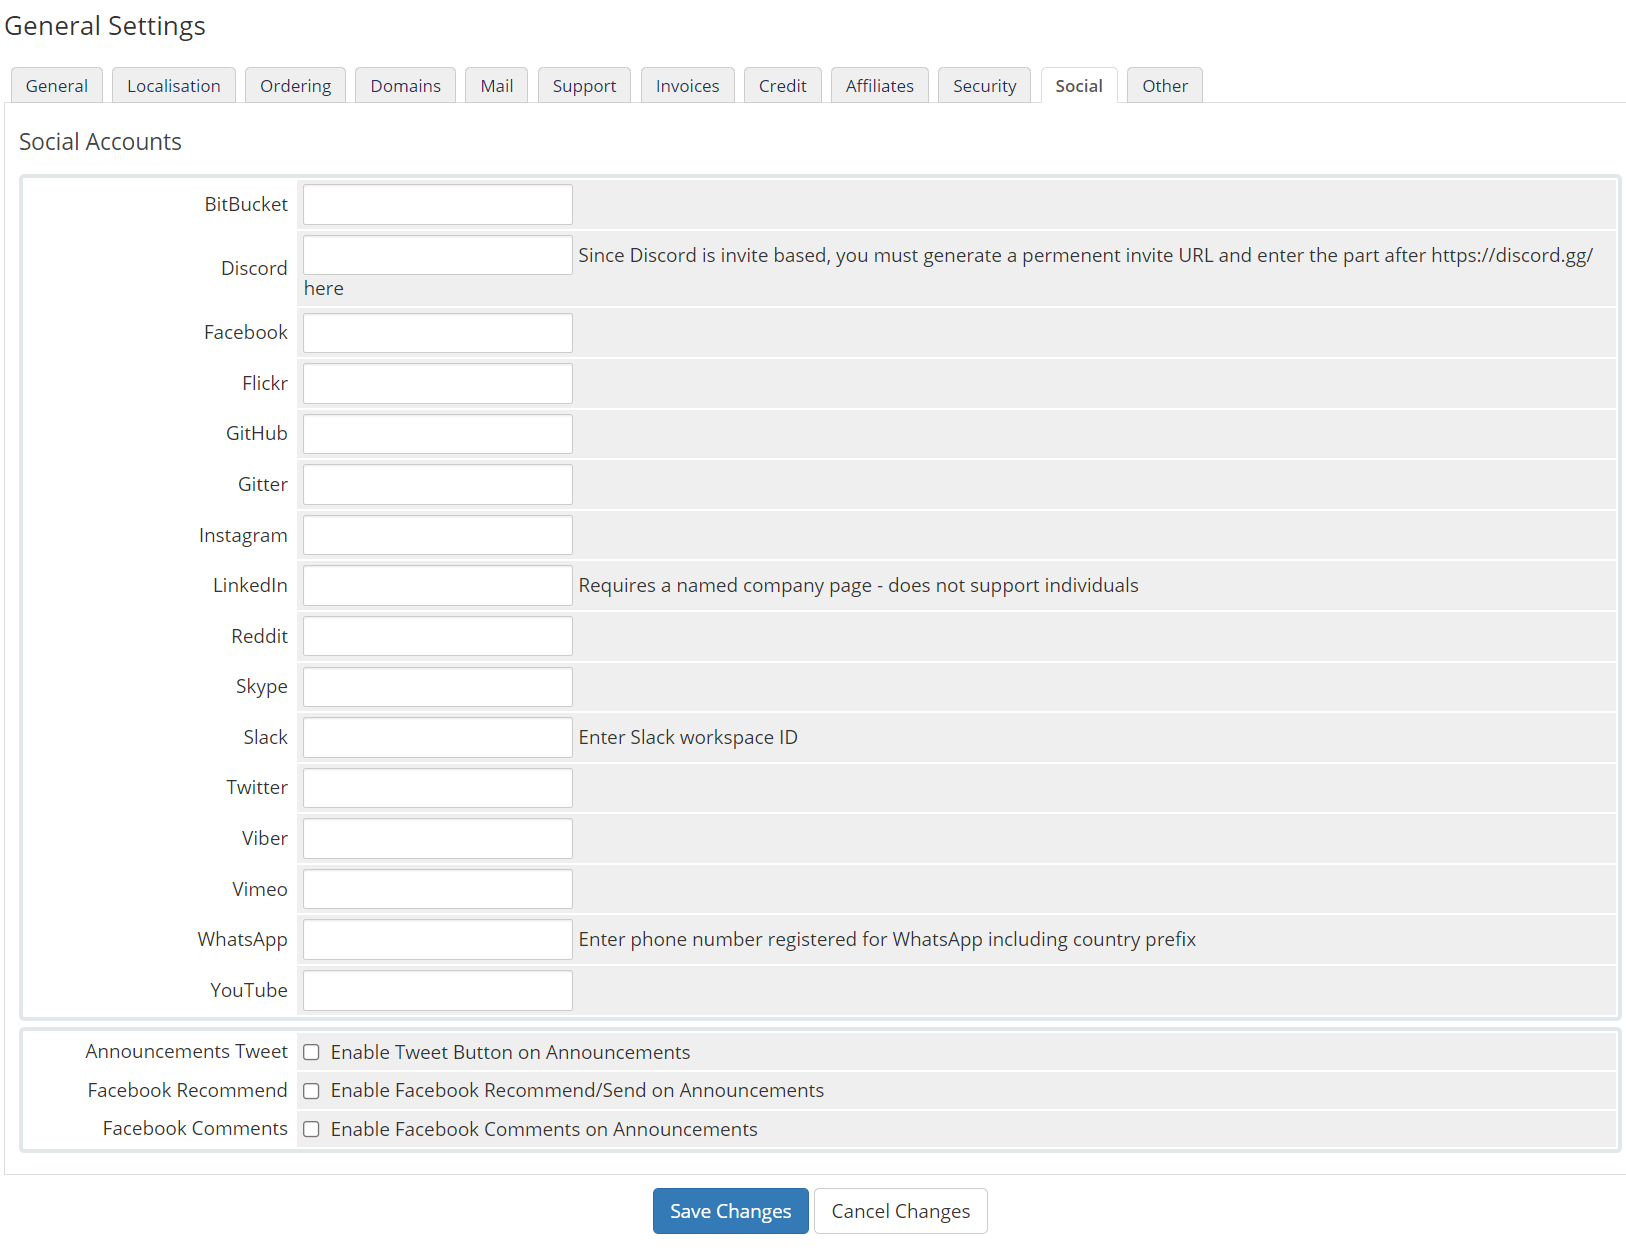
The Social section is where you will enter the information for any Social Media networks you have, like Discord, Twitter, or Facebook.
Click Save Changes to save any changes you made.
General Settings > Other
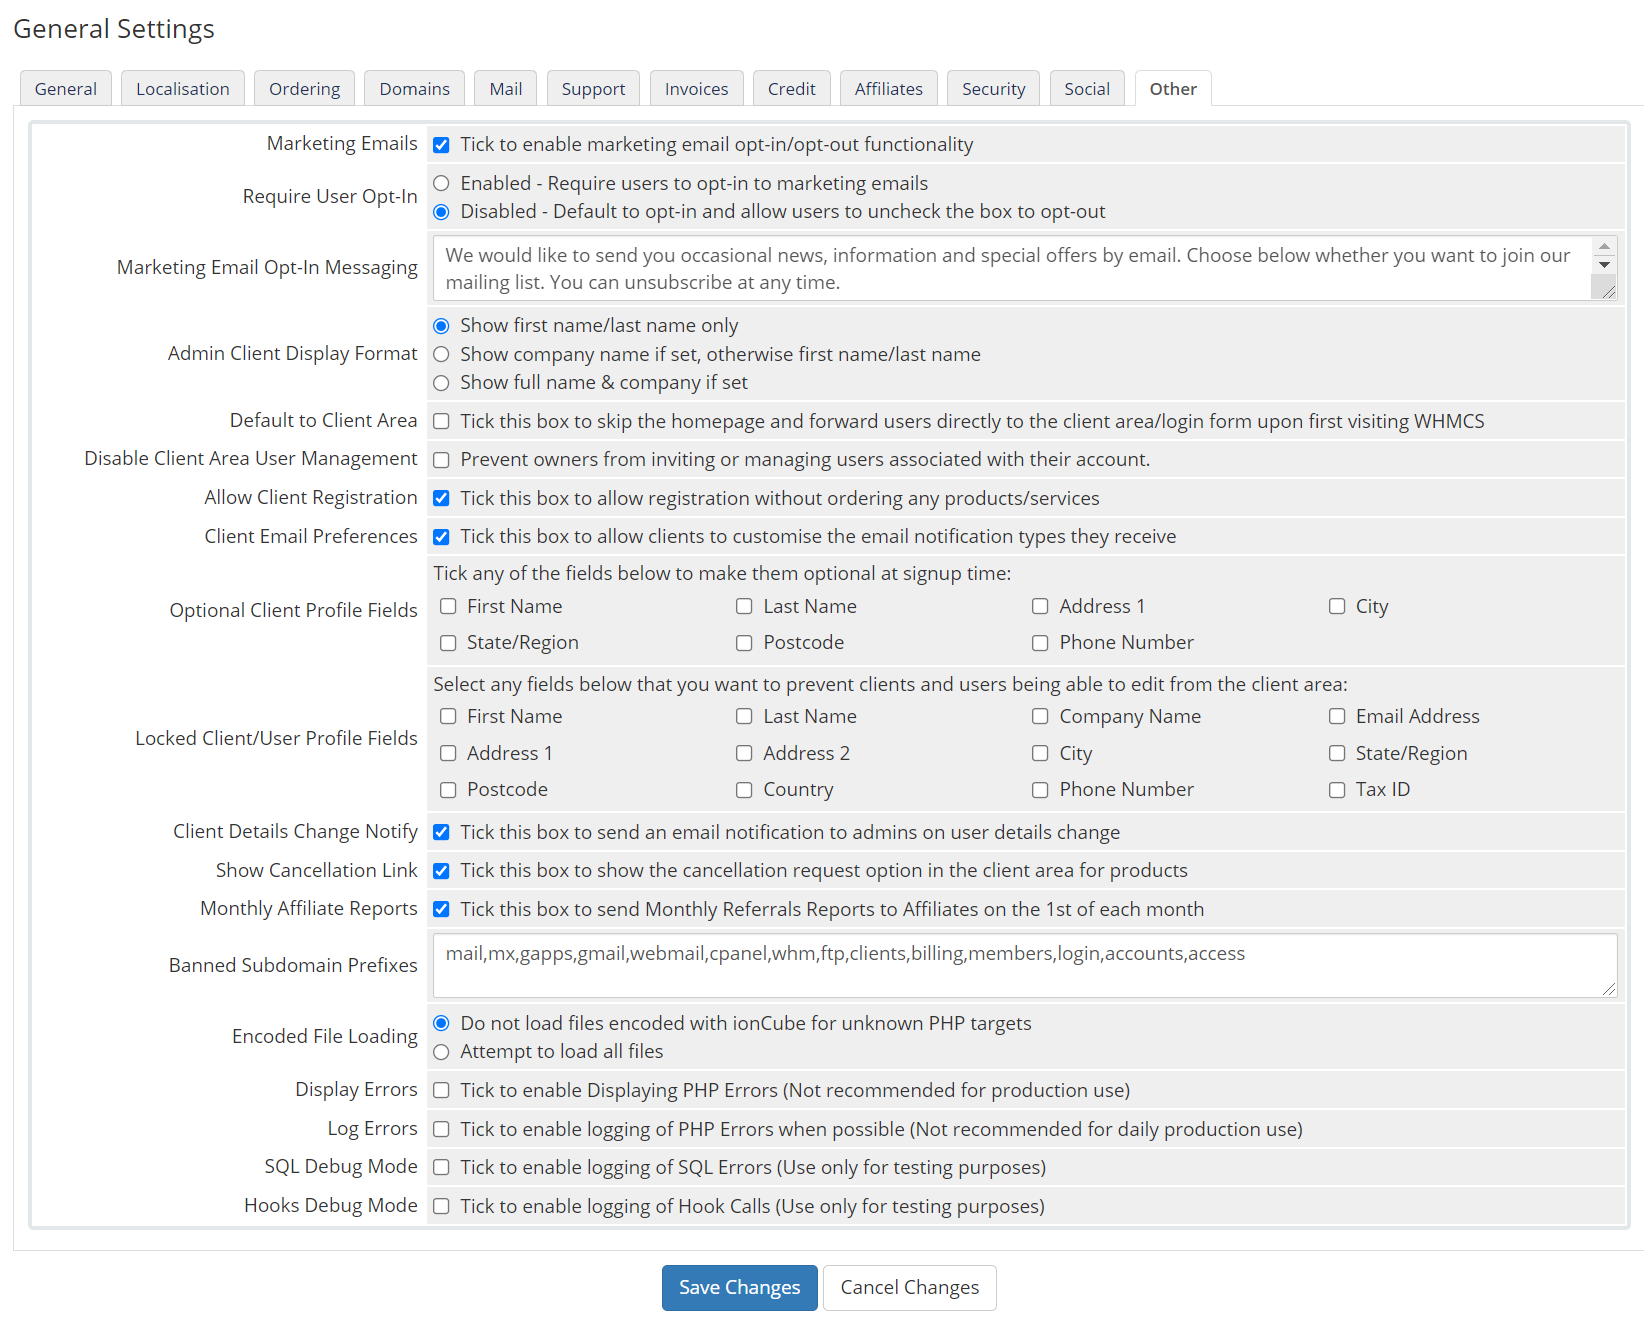
The Other section contains settings that don’t really fit in anywhere else. Review the settings and see if you want to enable or disable anything.
For the most part, the default settings are just fine.
Click Save Changes to save any changes you made.
And that concludes our review of the General Settings in the WHMCS app.
Please join us in the next tutorial where we will walk you through configuring the Automation Settings in WHMCS